1 nginx安装(Windows版本)
1.1 下载安装包
到官网下载Windows版本的nginx安装包
技巧01:下载好的压缩包解压即可,无需安装

1.2 启动nginx
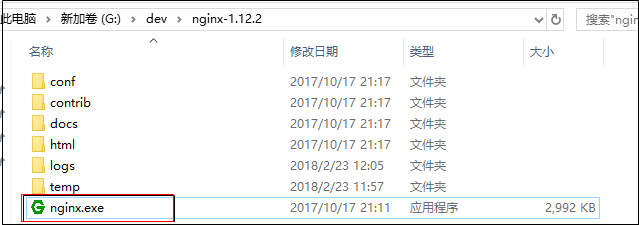
进入到解压目录,点击 nginx.exe 就可以启动nginx啦
1.3 验证
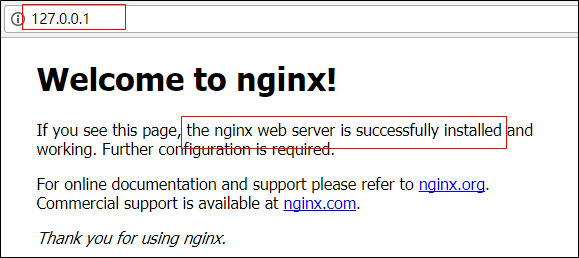
打开浏览器,跳转到 http://127.0.0.1/ 后如果出现下面的页面就说明nginx安装成功啦
1.4 参考文档
2 angular项目部署
2.1 项目打包
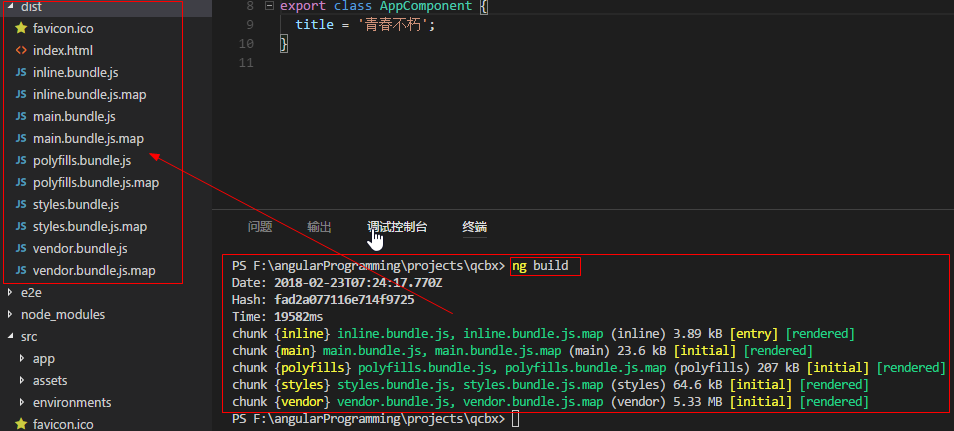
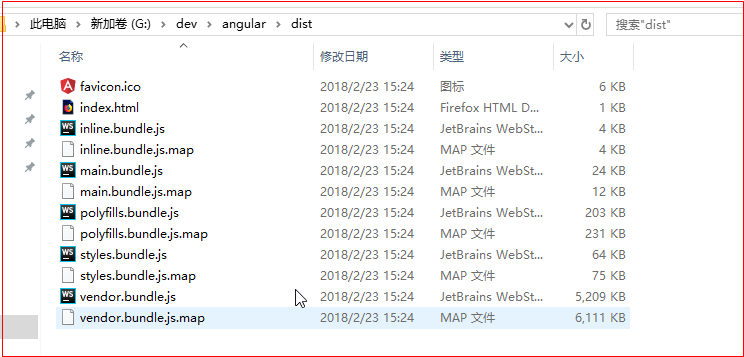
对angular项目进行打包处理,打包好后在angular项目的根目录会出现一个dist文件夹,该文件夹存放的就是打包好的项目文件
技巧01:需要到 package.json 中去修改 ng build 指令
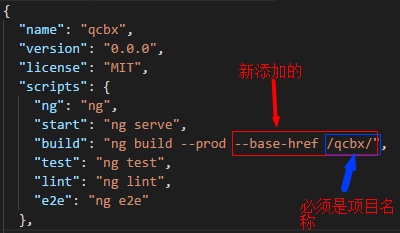


{
  "name": "qcbx",
  "version": "0.0.0",
  "license": "MIT",
  "scripts": {
    "ng": "ng",
    "start": "ng serve",
    "build": "ng build --prod --base-href /qcbx/",
    "test": "ng test",
    "lint": "ng lint",
    "e2e": "ng e2e"
  },
  "private": true,
  "dependencies": {
    "@angular/animations": "^5.2.5",
    "@angular/cdk": "^5.2.2",
    "@angular/common": "^5.2.0",
    "@angular/compiler": "^5.2.0",
    "@angular/core": "^5.2.0",
    "@angular/forms": "^5.2.0",
    "@angular/http": "^5.2.0",
    "@angular/material": "^5.2.2",
    "@angular/platform-browser": "^5.2.0",
    "@angular/platform-browser-dynamic": "^5.2.0",
    "@angular/router": "^5.2.0",
    "core-js": "^2.4.1",
    "hammerjs": "^2.0.8",
    "rxjs": "^5.5.6",
    "zone.js": "^0.8.19"
  },
  "devDependencies": {
    "@angular/cli": "~1.7.0",
    "@angular/compiler-cli": "^5.2.0",
    "@angular/language-service": "^5.2.0",
    "@types/jasmine": "~2.8.3",
    "@types/jasminewd2": "~2.0.2",
    "@types/node": "~6.0.60",
    "codelyzer": "^4.0.1",
    "jasmine-core": "~2.8.0",
    "jasmine-spec-reporter": "~4.2.1",
    "karma": "~2.0.0",
    "karma-chrome-launcher": "~2.2.0",
    "karma-coverage-istanbul-reporter": "^1.2.1",
    "karma-jasmine": "~1.1.0",
    "karma-jasmine-html-reporter": "^0.2.2",
    "protractor": "~5.1.2",
    "ts-node": "~4.1.0",
    "tslint": "~5.9.1",
    "typescript": "~2.5.3"
  }
}
2.2 打包项目移动
将打包好的项目移动到任意位置,例如:
2.3 nginx配置
nginx需要配置的东西也就是在conf文件中,打开安装目录下的 conf/nginx.conf 在http节点下添加server节点

技巧01:天假server节点时一定要加上 try_files $uri $uri/ /index.html; 否则项目配置的子路由无法生效
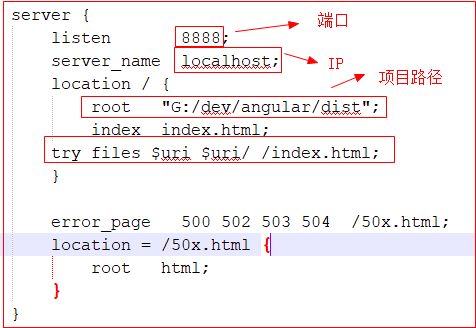
#user  nobody;
worker_processes  1;

#error_log  logs/error.log;
#error_log  logs/error.log  notice;
#error_log  logs/error.log  info;

#pid        logs/nginx.pid;


events {
    worker_connections  1024;
}


http {
    include       mime.types;
    default_type  application/octet-stream;

    #log_format  main  '$remote_addr - $remote_user [$time_local] "$request" '
    #                  '$status $body_bytes_sent "$http_referer" '
    #                  '"$http_user_agent" "$http_x_forwarded_for"';

    #access_log  logs/access.log  main;

    sendfile        on;
    #tcp_nopush     on;

    #keepalive_timeout  0;
    keepalive_timeout  65;

    #gzip  on;

    server {
        listen       80;
        server_name  localhost;

        #charset koi8-r;

        #access_log  logs/host.access.log  main;

        location / {
            root   html;
            index  index.html index.htm;
        }

        #error_page  404              /404.html;

        # redirect server error pages to the static page /50x.html
        #
        error_page   500 502 503 504  /50x.html;
        location = /50x.html {
            root   html;
        }

        # proxy the PHP scripts to Apache listening on 127.0.0.1:80
        #
        #location ~ .php$ {
        #    proxy_pass   http://127.0.0.1;
        #}

        # pass the PHP scripts to FastCGI server listening on 127.0.0.1:9000
        #
        #location ~ .php$ {
        #    root           html;
        #    fastcgi_pass   127.0.0.1:9000;
        #    fastcgi_index  index.php;
        #    fastcgi_param  SCRIPT_FILENAME  /scripts$fastcgi_script_name;
        #    include        fastcgi_params;
        #}

        # deny access to .htaccess files, if Apache's document root
        # concurs with nginx's one
        #
        #location ~ /.ht {
        #    deny  all;
        #}
    }

    server {
        listen       8888;
        server_name  localhost;
        location / {
            root   "G:/dev/angular/dist";
            index  index.html;
        try_files $uri $uri/ /index.html;
        }

        error_page   500 502 503 504  /50x.html;
        location = /50x.html {
            root   html;
        }
    }


    # another virtual host using mix of IP-, name-, and port-based configuration
    #
    #server {
    #    listen       8000;
    #    listen       somename:8080;
    #    server_name  somename  alias  another.alias;

    #    location / {
    #        root   html;
    #        index  index.html index.htm;
    #    }
    #}


    # HTTPS server
    #
    #server {
    #    listen       443 ssl;
    #    server_name  localhost;

    #    ssl_certificate      cert.pem;
    #    ssl_certificate_key  cert.key;

    #    ssl_session_cache    shared:SSL:1m;
    #    ssl_session_timeout  5m;

    #    ssl_ciphers  HIGH:!aNULL:!MD5;
    #    ssl_prefer_server_ciphers  on;

    #    location / {
    #        root   html;
    #        index  index.html index.htm;
    #    }
    #}

}
2.4 重启nginx
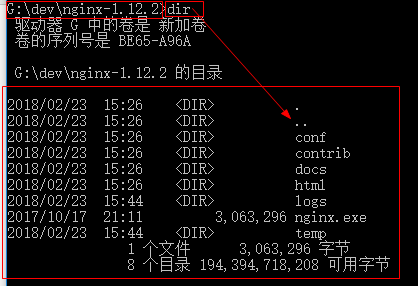
技巧01:利用命令启动或者关闭nginx时必须进入到安装nginx的根目录,例如
Windows下nginx命令操作:点击前往
nginx.exe
nginx.exe -s stop
nginx.exe -s quit
nginx.exe -s reload
坑01:重启nginx后还必须清楚浏览器数据,再访问时才可以看到最新的效果,否则会是重启nginx之前的效果
2.5 效果展示
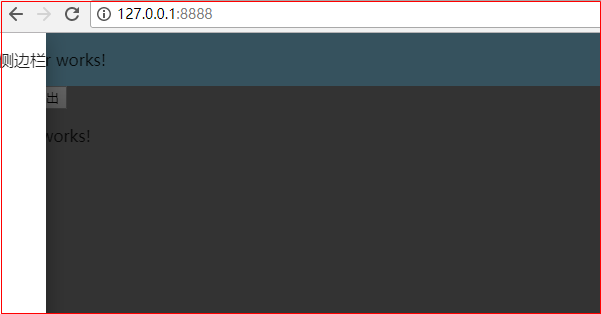
利用浏览器访问 http://127.0.0.1:8888/ 就会弹出angular项目的页面
2.6 参考文档