1 什么是多态
多态按字面的意思就是多种形态。当类之间存在层次结构,并且类之间是通过继承关联时,就会用到多态。
C++ 多态意味着由继承而产生的相关的不同的类,调用重写函数时,会根据实际的对象类型来执行不同的函数。
有了多态,可以有多个不同的类,都带有同一个名称但具有不同实现的函数,函数的参数甚至可以是相同的。多态性是面向对象程序设计的一个重要特征,能增加程序的灵活性。可以减轻系统升级、维护、调试的工作量和复杂度。
1.2 静态链接、动态链接
链接是指一个程序模块、代码之间相互关联的过程。
静态链接 是程序链接在编译阶段实现,也称为早期匹配。
例如:由于程序没有运行,所以不可能知道父类指针指向的具体是父类对象还是子类对象,从程序安全的角度,编译器假设父类指针只指向父类对象,因此编译的结果为调用父类的成员函数。这种特性就是静态链接。
示例代码如下所示:
// test1.cpp,用于验证静态链接

#include <iostream>

using namespace std;

class Parent
{
	public:

		void print()
		{
			cout << "this is ParentClass" << endl;
		}
};

class Child : public Parent
{
	public:

		void print()
		{
			cout << "this is ChildClass" << endl;
		}
};

void printByPoint(Parent *parent)
{
	parent->print();
}

void printByReference(Parent& parent)
{
	parent.print();
}

int main()
{
	Child childTest_4;
	Parent *parentTest_4 = NULL;
	parentTest_4 = &childTest_4;		// 父类指针指向子类对象
	printByPoint(parentTest_4);

	Child childTest_5;
	Parent &parentTest_5 =childTest_5;      // 父类引用引用子类对象
	printByReference(parentTest_5);

	return 0;
}
运行结果:
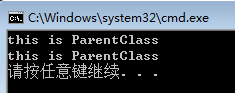
从以上运行结果发现,程序并没有如我们所想实现多态。我们想要的是在程序中任意点可以根据实际所调用的对象类型来选择调用的函数,这种操作被称为 动态链接,或后期绑定。
多态的发生是动态链接,是在程序执行的时候判断具体父类指针应该调用的方法。
C++ 通过 virtual 关键字对多态进行支持。
1.3 虚函数
虚函数 是在基类中使用关键字 virtual 声明的函数。在派生类中重新定义基类中定义的虚函数时,会告诉编译器不要静态链接到该函数。
示例代码如下:
// test2.cpp,用于验证虚函数的动态链接

#include <iostream>

using namespace std;

class Parent
{
	public:

		virtual void print()
		{
			cout << "this is ParentClass" << endl;
		}
};

class Child : public Parent
{
	public:

		virtual void print()
		{
			cout << "this is ChildClass" << endl;
		}
};

void printByPoint(Parent *parent)
{
	parent->print();
}

void printByReference(Parent& parent)
{
	parent.print();
}

int main()
{
	Child childTest_4;
	Parent *parentTest_4 = NULL;
	parentTest_4 = &childTest_4;		// 父类指针指向子类对象
	printByPoint(parentTest_4);

	Child childTest_5;
	Parent &parentTest_5 =childTest_5;      // 父类引用引用子类对象
	printByReference(parentTest_5);

	return 0;
}
运行结果:
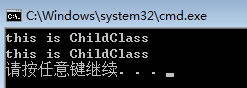
从以上运行结果发现,使用 virtual 声明的函数被重写后即可展现多态特性。
1.4 多态成立的条件
-
要有继承
-
要有虚函数重写
-
要有父类指针(或父类引用)指向子类对象
2 虚析构函数
2.1 为什么需要虚析构函数
当一个类有子类时,该类的析构函数必须是虚函数,原因:可能存在有资源释放不完全的情况。
先举例,资源释放完全的情况:
2.1.1 直接通过子类对象释放资源,不需要在父类写虚析构函数
示例代码如下所示:
// test3.cpp,用于验证为什么需要虚析构函数

#include <iostream>

using namespace std;

class Parent
{
	public:

		Parent()
		{
			str = new char[20];

			strcpy(str,"this is parent");

			cout << "父类构造函数运行" << endl;
		}

		~Parent()
		{
			delete str;

			cout << "父类析构函数运行" << endl;
		}

	private:

		char *str;
};

class Child : public Parent
{
	public:

		Child()
		{
			str = new char[20];

			strcpy(str,"this is Child");

			cout << "子类构造函数运行" << endl;
		}

		~Child()
		{
			delete str;

			cout << "子类析构函数运行" << endl;
		}

	private:

		char *str;
};

// 通过 父类指针 释放子类的资源
void delelteChildByParentPoint(Parent * parent)
{
	delete parent;
}

int main()
{

	Child *childTest = new Child();

	//delete childTest;  // 直接通过子类对象释放资源,不需要在父类写虚析构函数

	return 0;
}
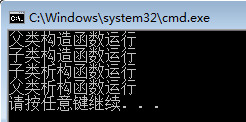
运行结果:
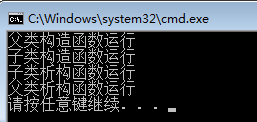
可以看到,子类和父类的对象都析构了。
2.1.2 通过父类的指针调用释放子类的资源,需要在父类写虚析构函数
示例代码如下所示:
// test4.cpp,用于验证为什么需要虚析构函数

#include <iostream>

using namespace std;

class Parent
{
	public:

		Parent()
		{
			str = new char[20];

			strcpy(str,"this is parent");

			cout << "父类构造函数运行" << endl;
		}

		~Parent()
		{
			delete str;

			cout << "父类析构函数运行" << endl;
		}

	private:

		char *str;
};

class Child : public Parent
{
	public:

		Child()
		{
			str = new char[20];

			strcpy(str,"this is Child");

			cout << "子类构造函数运行" << endl;
		}

		~Child()
		{
			delete str;

			cout << "子类析构函数运行" << endl;
		}

	private:

		char *str;
};

// 通过 父类指针 释放子类的资源
void delelteChildByParentPoint(Parent * parent)
{
	delete parent;
}

int main()
{

	Child *childTest = new Child();

	// 通过 父类指针 释放子类的资源
	delelteChildByParentPoint(childTest);

	return 0;
}
运行结果:
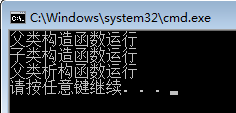
这里可以看到,对象销毁时只调用了父类的析构函数。如果这时子类的析构函数中有关于内存释放的操作,将会造成内存泄露。所以需要给父类的析构函数加上 virtual。
2.2 虚析构函数的实现与例子
给父类的析构函数加上关键字 virtual,即可实现虚析构函数。
示例代码如下:
// test5.cpp,用于验证为什么需要虚析构函数

#include <iostream>

using namespace std;

class Parent
{
	public:

		Parent()
		{
			str = new char[20];

			strcpy(str,"this is parent");

			cout << "父类构造函数运行" << endl;
		}

		virtual ~Parent()
		{
			delete str;

			cout << "父类析构函数运行" << endl;
		}

	private:

		char *str;
};

class Child : public Parent
{
	public:

		Child()
		{
			str = new char[20];

			strcpy(str,"this is Child");

			cout << "子类构造函数运行" << endl;
		}

		~Child()
		{
			delete str;

			cout << "子类析构函数运行" << endl;
		}

	private:

		char *str;
};

// 通过 父类指针 释放子类的资源
void delelteChildByParentPoint(Parent * parent)
{
	delete parent;
}

int main()
{

	Child *childTest = new Child();

	// 通过 父类指针 释放子类的资源
	delelteChildByParentPoint(childTest);

	return 0;
}
运行结果:
可以看到,子类和父类的对象都析构了。
3 重载、重写、重定义
3.1 重载(添加)
重载(添加),特征如下:
-
相同的范围(在同一个类中)
-
函数名字相同
-
参数不同
-
virtual 关键字可有可无
3.2 重写(覆盖)
重写(覆盖),是指派生类覆盖基类函数,特征如下:
-
不同的范围,分别位于基类和派生类中
-
函数的名字相同
-
参数相同
-
基类函数必须有 virtual 关键字
3.3 重定义(隐藏)
重定义(隐藏),是指派生类的函数屏蔽了与其同名的基类函数,规则如下:
-
如果派生类的函数和基类的函数同名,但是参数不同,此时不管基类有没有 virtual 关键字,基类的函数都会被隐藏
-
如果派生类的函数和基类的函数同名,并且参数也相同,但是基类没有 virtual 关键字,基类的函数还是被隐藏。
6 纯虚函数和抽象类
6.1 基本概念
您想要在基类中定义虚函数,以便在派生类中重新定义该函数更好地适用于对象,但是您在基类中又不能对虚函数给出有意义的实现,这个时候就会用到 纯虚函数。
纯虚函数的语法:
virtual 类型 函数名(参数表) = 0;
一个具有纯虚函数的基类称为 抽象类。抽象类不能被实例化,其存在的意义就是被继承,提供子类的公共接口。
6.2 编程实践
代码如下所示:
#include <iostream>
#include <string>

using namespace std;

// 图形类
// 拥有纯虚函数的类, 就叫抽象类
class Shape
{
public:
	// 是一个抽象的接口,说明图形是有一个得到面积方法
	virtual  double getArea() = 0;

	// 定义一个个打印面积的接口
	virtual void print() = 0;
};

// 圆类
// 如果 一个子类继承了抽象类, 那么一定要重写这个纯虚函数。
class Circle :public Shape
{
public:
	Circle(double r)
	{
		this->r = r;
	}

	// 重写父类抽象类的纯虚函数
	virtual double getArea()
	{
		return 3.14 *  r * r;
	}

	virtual void print() {
		cout << "圆的面积是" << endl;
		cout << this->getArea() << endl;
	}

private:
	double r;// 半径
};


// 实现一个正方形
class Rect :public Shape
{
public:
	Rect(double a)
	{
		this->a = a;
	}
	// 是一个抽象的接口,说明图形是有一个得到面积方法
	virtual  double getArea()
	{
		return a*a;
	}

	// 一个打印面积的接口
	virtual void print()  {
		cout << "正方形的面积是" << endl;
		cout << this->getArea() << endl;
	}
private:
	double a;// 边长
};

// 三角形
class Tri :public Shape
{
public:
	Tri(double a, double h)
	{
		this->a = a;
		this->h = h;
	}
	virtual  double getArea()  {
		return 0.5 * h * a;
	}

	virtual void print()  {
		cout << "三角形的面积是" << endl;
		cout << this->getArea() << endl;
	}

private:
	double a;// 底
	double h;// 高
};


// 一个传递抽象类 指针的函数
void printArea(Shape *p)
{
	p->print();
}

int main(void)
{
	//Shape p;// 抽象类不能实例化

	Shape *sp = new Circle(10.0);
	printArea(sp);
	delete sp;

	// 创建一个正方形的对象。用抽象类指针(父类指针)指向子类对象
	sp = new Rect(10.0);
	printArea(sp);
	delete sp;

	Shape *sp2 = new Tri(10, 20);
	sp2->print();
	delete sp2;

	cout << " ------   " << endl;

	return 0;
}
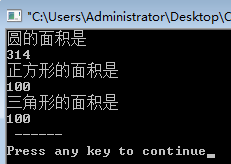
运行结果:
7 面向接口编程
7.1 函数指针
函数指针 用于指向一个函数,函数名是函数体的入口地址。
7.1.1 传统形式 函数指针定义方法
-
直接定义一个函数指针:
函数返回值类型 (*函数指针变量名)(指向函数的参数类型列表);(传统形式) -
通过函数类型定义函数指针:
函数类型 *函数指针变量名;(这种方法与 typedef 联用,请参看 7.1.2 使用 typedef 定义 函数指针)
// 方法一:
// 直接定义一个函数指针
void (*fp)(int,int);
7.1.2 使用 typedef 定义函数指针
-
通过 typedef 定义一个函数类型,定义一个函数指针:
typedef 函数返回值类型 (函数名)(函数的参数类型列表); -
通过 typedef 定义一个函数指针类型,直接定义一个函数指针:
typedef 函数返回值类型 (*函数指针变量名)(指向函数的参数类型列表);
示例如下:
// 方法一:
// 定义一个函数类型
typedef void (myfunctype)(int);
// 定义一个函数指针
myfunctype* fp1= NULL;  // 7.1.1 中的方法二 通过函数类型定义函数指针

// 方法二:
// 定义一个函数指针类型
typedef void (*myfunctype_pointer)(int a,int b)
// 定义一个函数指针
myfunctype_pointer fp2 = NULL;  // 7.1.1 中的方法二 通过函数类型定义函数指针
7.1.3 函数指针调用示例
// functionPointTest1.cpp,函数指针调用示例

#include <iostream>

using namespace std;

int (*fp_add)(int, int);		      // 1. 直接定义一个 函数指针(传统形式)
typedef int (myfunctype)(int, int);	      // 2. 使用 typedef 定义一个 函数类型
typedef int (*myfunctype_pointer)(int, int);  // 3. 使用 typedef 定义一个 函数指针类型

int add(int a, int b)
{
    return a + b;
}

int main()
{
    fp_add = add;
    myfunctype *myfunctype_fp = add;
    myfunctype_pointer myfunctype_pointer_fp = add;

    cout << fp_add(1, 1) << endl;
    cout << myfunctype_fp(1, 1) << endl;
    cout << myfunctype_pointer_fp(1, 1) << endl;

    return 0;
}
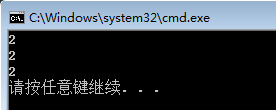
运行结果:
7.2 回调函数
当函数指针作为函数参数时,这就是回调函数。
示例代码如下:
// callbackTest.cpp,回调函数

#include <iostream>

using namespace std;

typedef int (*myfunctype_pointer)(int, int);  // 使用 typedef 定义一个 函数指针类型

int function(int a, int b)
{
	cout << "function 函数被触发" << endl;

	return a + b;
}

// 回调函数
void callback(myfunctype_pointer fp, int param1, int param2)
{
	cout << "callback 回调函数被触发 " << endl;

	int total = -1;

	total = fp(param1, param2);

	cout << "total = " << total << endl;
}

int main()
{
	callback(function, 1, 1);

	return 0;
}
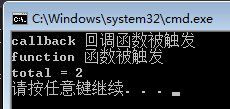
运行结果:
7.2.1 回调函数的本质
回调函数的本质:提前做了一个协议的规定,把函数的参数,函数返回值提前约定好。
如 7.2 的示例代码,我们可以不关心 function函数的实现 是怎样的,只要 function 函数的参数,函数返回值 与 回调函数的函数指针参数 一致就可以。函数 function 的代码做了修改,也可以不用改动 main 函数和回调函数代码,这样便于程序的维护和升级。