FQ收录转自:WebRTC in the real world: STUN, TURN and signaling
WebRTC enables peer to peer communication.
BUT...
WebRTC still needs servers:
-
For clients to exchange metadata to coordinate communication: this is called signaling.
-
To cope with network address translators (NATs) and firewalls.
In this article we show you how to build a signaling service, and how to deal with the quirks of real-world connectivity by using STUN and TURN servers. We also explain how WebRTC apps can handle multi-party calls and interact with services such as VoIP and PSTN (aka telephones).
If you're not familiar with the basics of WebRTC, we strongly recommend you take a look at Getting Started With WebRTC before reading this article.
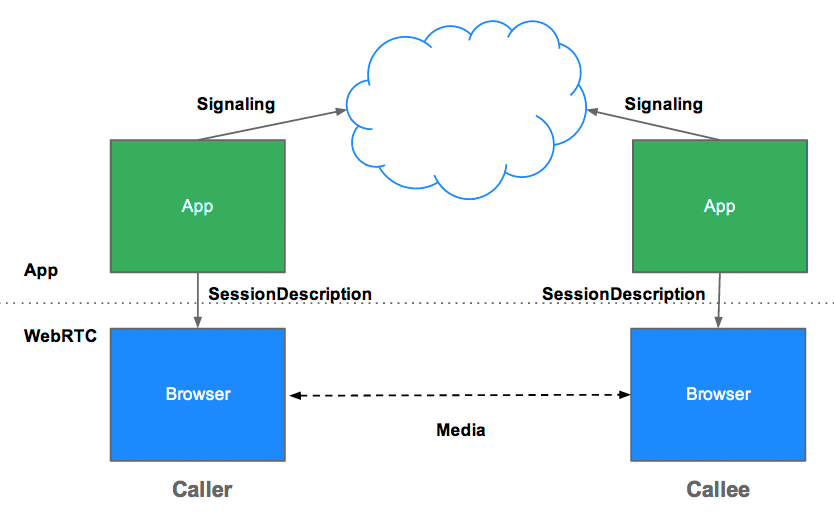
What is signaling?
Signaling is the process of coordinating communication. In order for a WebRTC application to set up a 'call', its clients need to exchange information:
-
Session control messages used to open or close communication.
-
Error messages.
-
Media metadata such as codecs and codec settings, bandwidth and media types.
-
Key data, used to establish secure connections.
-
Network data, such as a host's IP address and port as seen by the outside world.
This signaling process needs a way for clients to pass messages back and forth. That mechanism is not implemented by the WebRTC APIs: you need to build it yourself. We describe below some ways to build a signaling service. First, however, a little context...
Why is signaling not defined by WebRTC?
To avoid redundancy and to maximize compatibility with established technologies, signaling methods and protocols are not specified by WebRTC standards. This approach is outlined by JSEP, the JavaScript Session Establishment Protocol:
The thinking behind WebRTC call setup has been to fully specify and control the media plane, but to leave the signaling plane up to the application as much as possible. The rationale is that different applications may prefer to use different protocols, such as the existing SIP or Jingle call signaling protocols, or something custom to the particular application, perhaps for a novel use case. In this approach, the key information that needs to be exchanged is the multimedia session description, which specifies the necessary transport and media configuration information necessary to establish the media plane.
JSEP's architecture also avoids a browser having to save state: that is, to function as a signaling state machine. This would be problematic if, for example, signaling data was lost each time a page was reloaded. Instead, signaling state can be saved on a server.
 JSEP architecture
 JSEP requires the exchange between peers of offer and answer: the media metadata mentioned above. Offers and answers are communicated in Session Description Protocol format (SDP), which look like this:
v=0

o=- 7614219274584779017 2 IN IP4 127.0.0.1

s=-

t=0 0

a=group:BUNDLE audio video

a=msid-semantic: WMS

m=audio 1 RTP/SAVPF 111 103 104 0 8 107 106 105 13 126

c=IN IP4 0.0.0.0

a=rtcp:1 IN IP4 0.0.0.0

a=ice-ufrag:W2TGCZw2NZHuwlnf

a=ice-pwd:xdQEccP40E+P0L5qTyzDgfmW

a=extmap:1 urn:ietf:params:rtp-hdrext:ssrc-audio-level

a=mid:audio

a=rtcp-mux

a=crypto:1 AES_CM_128_HMAC_SHA1_80 inline:9c1AHz27dZ9xPI91YNfSlI67/EMkjHHIHORiClQe

a=rtpmap:111 opus/48000/2

…
Want to know what all this SDP gobbledygook actually means? Take a look at theIETF examples.
Bear in mind that WebRTC is designed so that the offer or answer can be tweaked before being set as the local or remote description, by editing the values in the SDP text. For example, the preferAudioCodec() function in apprtc.appspot.com can be used to set the default codec and bitrate. SDP is somewhat painful to manipulate with JavaScript, and there is discussion about whether future versions of WebRTC should use JSON instead, but there are some advantages to sticking with SDP.
RTCPeerConnection + signaling: offer, answer and candidate
RTCPeerConnection is the API used by WebRTC applications to create a connection between peers and communicate audio and video.
To initialise this process RTCPeerConnection has two tasks:
-
Ascertain local media conditions, such as resolution and codec capabilities. This is the metadata used for the offer and answer mechanism.
-
Get potential network addresses for the application's host, known ascandidates.
Once this local data has been ascertained, it must be exchanged via a signaling mechanism with the remote peer.
Imagine Alice is trying to call Eve. Here's the full offer/answer mechanism in all its gory detail:
-
Alice creates an RTCPeerConnection object.
-
Alice creates an offer (an SDP session description) with the RTCPeerConnection createOffer() method.
-
Alice calls setLocalDescription() with his offer.
-
Alice stringifies the offer and uses a signaling mechanism to send it to Eve.
-
Eve calls setRemoteDescription() with Alice's offer, so that her RTCPeerConnection knows about Alice's setup.
-
Eve calls createAnswer(), and the success callback for this is passed a local session description: Eve's answer.
-
Eve sets her answer as the local description by calling setLocalDescription().
-
Eve then uses the signaling mechanism to send her stringified answer back to Alice.
-
Alice sets Eve's answer as the remote session description usingsetRemoteDescription().
Alice and Eve also need to exchange network information. The expression 'finding candidates' refers to the process of finding network interfaces and ports using theICE framework.
-
Alice creates an RTCPeerConnection object with an onicecandidate handler.
-
The handler is called when network candidates become available.
-
In the handler, Alice sends stringified candidate data to Eve, via their signaling channel.
-
When Eve gets a candidate message from Alice, she calls addIceCandidate(), to add the candidate to the remote peer description.
JSEP supports ICE Candidate Trickling, which allows the caller to incrementally provide candidates to the callee after the initial offer, and for the callee to begin acting on the call and setting up a connection without waiting for all candidates to arrive.
Coding WebRTC for signaling
Below is a W3C code example that summarises the complete signaling process. The code assumes the existence of some signaling mechanism,SignalingChannel. Signaling is discussed in greater detail below.
var signalingChannel = new SignalingChannel();

var configuration = {

'iceServers': [{

'url': 'stun:stun.example.org'

}]

};

var pc;


// call start() to initiate


function start() {

pc = new RTCPeerConnection(configuration);


// send any ice candidates to the other peer

pc.onicecandidate = function (evt) {

if (evt.candidate)

signalingChannel.send(JSON.stringify({

'candidate': evt.candidate

}));

};


// let the 'negotiationneeded' event trigger offer generation

pc.onnegotiationneeded = function () {

pc.createOffer(localDescCreated, logError);

}


// once remote stream arrives, show it in the remote video element

pc.onaddstream = function (evt) {

remoteView.src = URL.createObjectURL(evt.stream);

};


// get a local stream, show it in a self-view and add it to be sent

navigator.getUserMedia({

'audio': true,

'video': true

}, function (stream) {

selfView.src = URL.createObjectURL(stream);

pc.addStream(stream);

}, logError);

}


function localDescCreated(desc) {

pc.setLocalDescription(desc, function () {

signalingChannel.send(JSON.stringify({

'sdp': pc.localDescription

}));

}, logError);

}


signalingChannel.onmessage = function (evt) {

if (!pc)

start();


var message = JSON.parse(evt.data);

if (message.sdp)

pc.setRemoteDescription(new RTCSessionDescription(message.sdp), function () {

// if we received an offer, we need to answer

if (pc.remoteDescription.type == 'offer')

pc.createAnswer(localDescCreated, logError);

}, logError);

else

pc.addIceCandidate(new RTCIceCandidate(message.candidate));

};


function logError(error) {

log(error.name + ': ' + error.message);

}
To see the offer/answer and candidate exchange processes in action, take a look at the console log for the 'single-page' video chat example at simpl.info/pc. If you want more, download a complete dump of WebRTC signaling and stats from the chrome://webrtc-internals page in Chrome or the opera://webrtc-internals page in Opera.
Peer discovery
This is fancy way of saying — how do I find someone to talk to?
For telephone calls we have telephone numbers and directories. For online video chat and messaging, we need identity and presence management systems, and a means for users to initiate sessions. WebRTC apps need a way for clients to signal to each other that they want to start or join a call.
Peer discovery mechanisms are not defined by WebRTC and we won't go into the options here. The process can be as simple as emailing or messaging a URL: for video chat applications such as talky.io, tawk.com and browsermeeting.com you invite people to a call by sharing a custom link. Developer Chris Ball has built an intriguing serverless-webrtc experiment that enables WebRTC call participants to exchange metadata by any messaging service they like, such as IM, email or homing pigeon.
How can I build a signaling service?
To reiterate: signaling protocols and mechanisms are not defined by WebRTC standards. Whatever you choose, you'll need an intermediary server to exchange signaling messages and application data between clients. Sadly, a web app cannot simply shout into the internet 'Connect me to my friend!'
Thankfully signaling messages are small, and mostly exchanged at the start of a call. In testing with apprtc.appspot.com and samdutton-nodertc.jit.su we found that, for a video chat session, a total of around 30–45 messages were handled by the signaling service, with a total size for all messages of around 10kB.As well as being relatively undemanding in terms of bandwidth, WebRTC signaling services don't consume much processing or memory, since they only need to relay messages and retain a small amount of session state data (such as which clients are connected).
The signaling mechanism used to exchange session metadata can also be used to communicate application data. It's just a messaging service!
Pushing messages from the server to the client
A message service for signaling needs to be bidirectional: client to server and server to client. Bidirectional communication goes against the HTTP client/server request/response model, but various hacks such as long polling have been developed over many years in order to push data from a service running on a web server to a web app running in a browser.
More recently, the EventSource API has been widely implemented. This enables 'server-sent events': data sent from a web server to a browser client via HTTP. There's a simple demo at simpl.info/es. EventSource is designed for one way messaging, but it can be used in combination with XHR to build a service for exchanging signaling messages: a signaling service passes on a message from a caller, delivered by XHR request, by pushing it via EventSource to the callee.
WebSocket is a more natural solution, designed for full duplex client–server communication (messages can flow in both directions at the same time). One advantage of a signaling service built with pure WebSocket or Server-Sent Events (EventSource) is that the back-end for these APIs can be implemented on a variety of web frameworks common to most web hosting packages, for languages such as PHP, Python and Ruby.
About three quarters of browsers support WebSocket and, more importantly, all browsers that support WebRTC also support WebSocket, both on desktop and mobile. TLS should be used for all connections, to ensure messages cannot be intercepted unencrypted, and also to reduce problems with proxy traversal. (For more information about WebSocket and proxy traversal see the WebRTC chapterin Ilya Grigorik's High Performance Browser Networking. Peter Lubber'sWebSocket Cheat Sheet has more information about WebSocket clients and servers.)
Signaling for the canonical apprtc.appspot.com WebRTC video chat application is accomplished via the Google App Engine Channel API, which uses Comettechniques (long polling) to enable signaling with push communication between the App Engine backend and the web client. (There's a long-standing bug for App Engine to support WebSocket. Star the bug to vote it up!) There is a detailed code walkthrough of this app in the HTML5 Rocks WebRTC article.
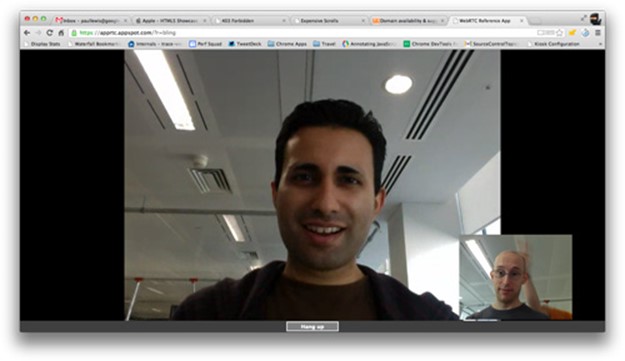 apprtc in action
It is also possible to handle signaling by getting WebRTC clients to poll a messaging server repeatedly via Ajax, but that leads to a lot of redundant network requests, which is especially problematic for mobile devices. Even after a session has been established, peers need to poll for signaling messages in case of changes or session termination by other peers. The WebRTC Book app example takes this option, with some optimizations for polling frequency.
Scaling signaling
Although a signaling service consumes relatively little bandwidth and CPU per client, signaling servers for a popular application may have to handle a lot of messages, from different locations, with high levels of concurrency. WebRTC apps that get a lot of traffic need signaling servers able to handle considerable load.
We won't go into detail here, but there are a number of options for high volume, high performance messaging, including the following:
-
eXtensible Messaging and Presence Protocol (XMPP), originally known as Jabber: a protocol developed for instant messaging that can be used for signaling. Server implementations include ejabberd and Openfire. JavaScript clients such as Strophe.js use BOSH to emulate bidirectional streaming, but for various reasons BOSH may not be as efficient as WebSocket, and for the same reasons may not scale well. (On a tangent: Jingle is an XMPP extension to enable voice and video; the WebRTC project uses network and transport components from the libjingle library, a C++ implementation of Jingle.)
-
Open source libraries such as ZeroMQ (as used by TokBox for their Rumourservice) and OpenMQ. NullMQ applies ZeroMQ concepts to web platforms, using the STOMP protocol over WebSocket.
-
Commercial cloud messaging platforms that use WebSocket (though they may fall back to long polling) such as Pusher, Kaazing and PubNub. (PubNub also has an API for WebRTC.)
-
Commercial WebRTC platforms such as vLine.
(Developer Phil Leggetter's Real-Time Web Technologies Guide provides a comprehensive list of messaging services and libraries.)
Building a signaling service with Socket.io on Node
Below is code for a simple web application that uses a signaling service built withSocket.io on Node. The design of Socket.io makes it simple to build a service to exchange messages, and Socket.io is particularly suited to WebRTC signaling because of its built-in concept of 'rooms'. This example is not designed to scale as a production-grade signaling service, but works well for a relatively small number of users.
Socket.io uses WebSocket with the following fallbacks: Adobe Flash Socket, AJAX long polling, AJAX multipart streaming, Forever Iframe and JSONP polling. It has been ported to various backends, but is perhaps best known for its Node version, which we use in the example below.
There's no WebRTC in this example: it's designed only to show how to build signaling into a web app. View the console log to see what's happening as clients join a room and exchange messages. Our WebRTC codelab gives step-by-step instructions how to integrate this example into a complete WebRTC video chat application. You can download the code from step 5 of the codelab repo or try it out live at samdutton-nodertc.jit.su: open the URL in two browsers for video chat.
Here is the client, index.html:
<!DOCTYPE html>

<html>

<head>

<title>WebRTC client</title>

</head>

<body>

<script src='/socket.io/socket.io.js'></script>

<script src='js/main.js'></script>

</body>

</html>
...and the JavaScript file main.js referenced in the client:
var isInitiator;


room = prompt('Enter room name:');


var socket = io.connect();


if (room !== '') {

console.log('Joining room ' + room);

socket.emit('create or join', room);

}


socket.on('full', function (room){

console.log('Room ' + room + ' is full');

});


socket.on('empty', function (room){

isInitiator = true;

console.log('Room ' + room + ' is empty');

});


socket.on('join', function (room){

console.log('Making request to join room ' + room);

console.log('You are the initiator!');

});


socket.on('log', function (array){

console.log.apply(console, array);

});
The complete server app:
var static = require('node-static');

var http = require('http');

var file = new(static.Server)();

var app = http.createServer(function (req, res) {

file.serve(req, res);

}).listen(2013);


var io = require('socket.io').listen(app);


io.sockets.on('connection', function (socket){


// convenience function to log server messages to the client

function log(){

var array = ['>>> Message from server: '];

for (var i = 0; i < arguments.length; i++) {

array.push(arguments[i]);

}

socket.emit('log', array);

}


socket.on('message', function (message) {

log('Got message:', message);

// for a real app, would be room only (not broadcast)

socket.broadcast.emit('message', message);

});


socket.on('create or join', function (room) {

var numClients = io.sockets.clients(room).length;


log('Room ' + room + ' has ' + numClients + ' client(s)');

log('Request to create or join room ' + room);


if (numClients === 0){

socket.join(room);

socket.emit('created', room);

} else if (numClients === 1) {

io.sockets.in(room).emit('join', room);

socket.join(room);

socket.emit('joined', room);

} else { // max two clients

socket.emit('full', room);

}

socket.emit('emit(): client ' + socket.id + ' joined room ' + room);

socket.broadcast.emit('broadcast(): client ' + socket.id + ' joined room ' + room);


});


});
(You don't need to learn about node-static for this: it just makes the server simpler.)
To run this app on localhost, you need to have Node, socket.io and node-staticinstalled. Node can be downloaded from nodejs.org (installation is straightforward and quick). To install socket.io and node-static, run Node Package Manager from a terminal in your application directory:
npm install socket.io
npm install node-static
To start the server, run the following command from a terminal in your application directory:
node server.js
From your browser, open localhost:2013. Open a new tab page or window in any browser and open localhost:2013 again. To see what's happening, check the console: in Chrome and Opera, you can access this via the DevTools with Command-Option-J or Ctrl-Shift-J.
Whatever approach you choose for signaling, your backend and client app will — at the very least — need to provide services similar to this example.
Using RTCDataChannel for signaling
A signaling service is required to initiate a WebRTC session.
However, once a connection has been established between two peers, RTCDataChannel could, in theory, take over as the signaling channel. This might reduce latency for signaling — since messages fly direct — and help reduce signaling server bandwidth and processing costs. We don't have a demo, but watch this space!
Signaling gotchas
-
RTCPeerConnection won't start gathering candidates untilsetLocalDescription() is called: this is mandated in the JSEP IETF draft.
-
Take advantage of Trickle ICE (see above): call addIceCandidate() as soon as candidates arrive.
Readymade signaling servers
If you don't want to roll your own, there are several WebRTC signaling servers available, which use Socket.io like the example above, and are integrated with WebRTC client JavaScript libraries:
-
webRTC.io: one of the first abstraction libraries for WebRTC.
-
easyRTC: a full-stack WebRTC package.
-
Signalmaster: a signaling server created for use with the SimpleWebRTCJavaScript client library.
...and if you don't want to write any code at all, complete commercial WebRTC platforms are available from companies such as vLine, OpenTok and Asterisk.
For the record, Ericsson built a signaling server using PHP on Apache in the early days of WebRTC. This is now somewhat obsolete, but it's worth looking at the code if you're considering something similar.
Signaling security
Security is the art of making nothing happen.
— Salman Rushdie
Encryption is mandatory for all WebRTC components.
However, signaling mechanisms aren't defined by WebRTC standards, so it's up to you make signaling secure. If an attacker manages to hijack signaling, they can stop sessions, redirect connections and record, alter or inject content.
The most important factor in securing signaling is to use secure protocols, HTTPS and WSS (i.e TLS), which ensure that messages cannot be intercepted unencrypted. Also be careful not to broadcast signaling messages in a way that they can be accessed by other callers using the same signaling server.
To secure a WebRTC app it is absolutely imperative that signaling uses TLS.
After signaling: using ICE to cope with NATs and firewalls
For metadata signaling, WebRTC apps use an intermediary server, but for actual media and data streaming once a session is established, RTCPeerConnection attempts to connect clients directly: peer to peer.
In a simpler world, every WebRTC endpoint would have a unique address that it could exchange with other peers in order to communicate directly.
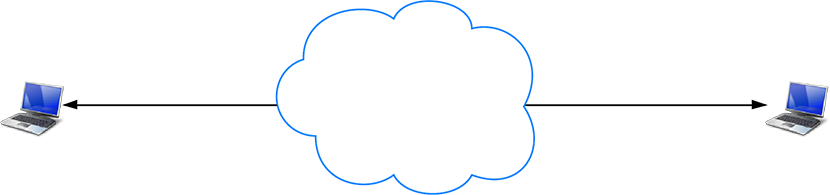 A world without NATs and firewalls
 In reality most devices live behind one or more layers of NAT, some have anti-virus software that blocks certain ports and protocols, and many are behind proxies and corporate firewalls. A firewall and NAT may in fact be implemented by the same device, such as a home wifi router.
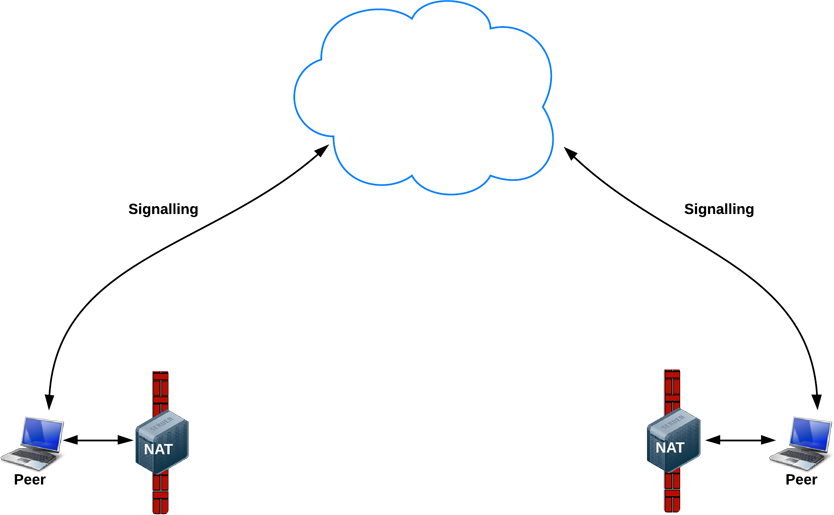 The real world
 WebRTC apps can use the ICE framework to overcome the complexities of real-world networking. To enable this to happen, your application must pass ICE server URLs to RTCPeerConnection, as described below.
ICE tries to find the best path to connect peers. It tries all possibilities in parallel and chooses the most efficient option that works. ICE first tries to make a connection using the host address obtained from a device's operating system and network card; if that fails (which it will for devices behind NATs) ICE obtains an external address using a STUN server, and if that fails, traffic is routed via a TURN relay server.
In other words:
-
A STUN server is used to get an external network address.
-
TURN servers are used to relay traffic if direct (peer to peer) connection fails.
Every TURN server supports STUN: a TURN server is a STUN server with added relaying functionality built in. ICE also copes with the complexities of NAT setups: in reality, NAT 'hole punching' may require more than just a public IP:port address.
URLs for STUN and/or TURN servers are (optionally) specified by a WebRTC app in the iceServers configuration object that is the first argument to the RTCPeerConnection constructor. For apprtc.appspot.com that value looks like this:
{

'iceServers': [

{

'url': 'stun:stun.l.google.com:19302'

},

{

'url': 'turn:192.158.29.39:3478?transport=udp',

'credential': 'JZEOEt2V3Qb0y27GRntt2u2PAYA=',

'username': '28224511:1379330808'

},

{

'url': 'turn:192.158.29.39:3478?transport=tcp',

'credential': 'JZEOEt2V3Qb0y27GRntt2u2PAYA=',

'username': '28224511:1379330808'

}

]

}
Once RTCPeerConnection has that information, the ICE magic happens automatically: RTCPeerConnection uses the ICE framework to work out the best path between peers, working with STUN and TURN servers as necessary.
STUN
NATs provide a device with an IP address for use within a private local network, but this address can't be used externally. Without a public address, there's no way for WebRTC peers to communicate. To get around this problem WebRTC usesSTUN.
STUN servers live on the public internet and have one simple task: check the IP:port address of an incoming request (from an application running behind a NAT) and send that address back as a response. In other words, the application uses a STUN server to discover its IP:port from a public perspective. This process enables a WebRTC peer to get a publicly accessible address for itself, and then pass that on to another peer via a signaling mechanism, in order to set up a direct link. (In practice, different NATs work in different ways, and there may be multiple NAT layers, but the principle is still the same.)
STUN servers don't have to do much or remember much, so relatively low-spec STUN servers can handle a large number of requests.
Most WebRTC calls successfully make a connection using STUN: 86%, according to webrtcstats.com, though this can be less for calls between peers behind firewalls and complex NAT configurations.
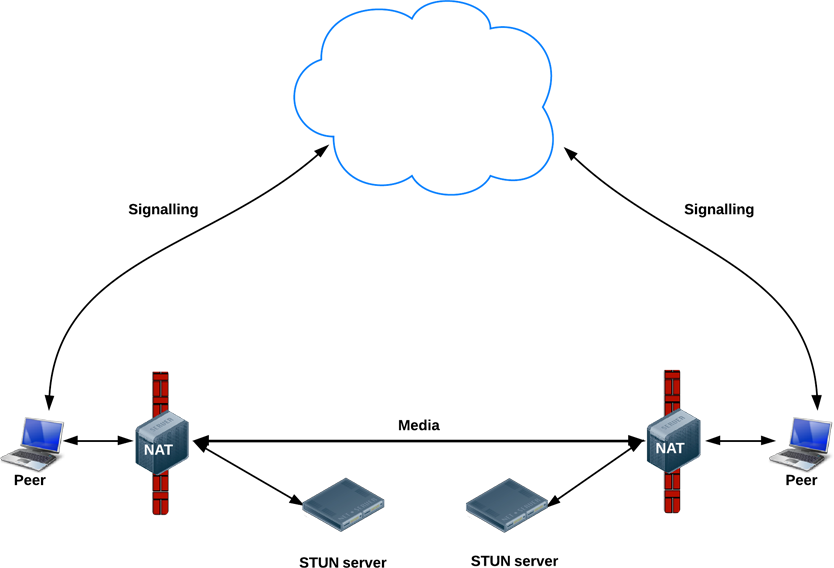 Using STUN servers to get public IP:port addresses
 TURN
RTCPeerConnection tries to set up direct communication between peers over UDP. If that fails, RTCPeerConnection resorts to TCP. If that fails, TURN servers can be used as a fallback, relaying data between endpoints.
Just to reiterate: TURN is used to relay audio/video/data streaming between peers, not signaling data!
TURN servers have public addresses, so they can be contacted by peers even if the peers are behind firewalls or proxies. TURN servers have a conceptually simple task — to relay a stream — but, unlike STUN servers, they inherently consume a lot of bandwidth. In other words, TURN servers need to be beefier.
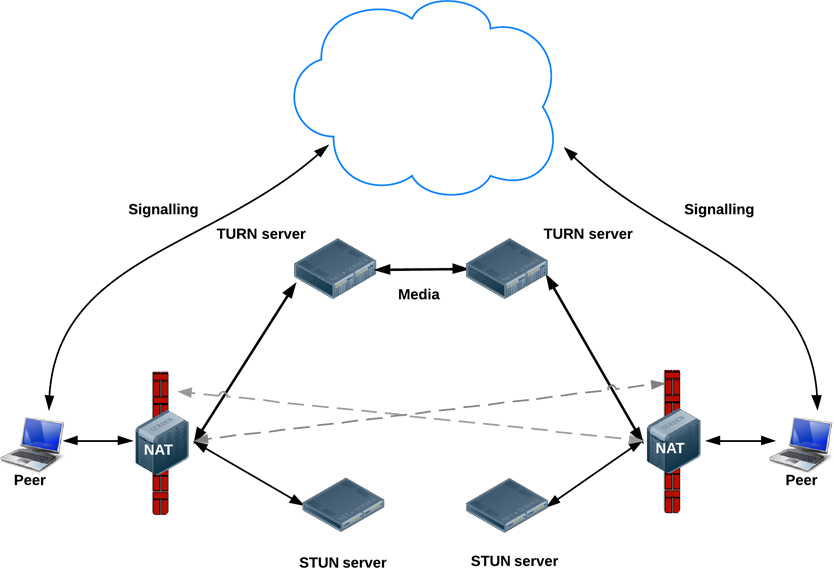 The full Monty: STUN, TURN and signaling
 This diagram shows TURN in action: pure STUN didn't succeed, so each peer resorts to using a TURN server.
Deploying STUN and TURN servers
For testing, Google runs a public STUN server, stun.l.google.com:19302, as used by apprtc.appspot.com. For a production STUN/TURN service, we recommend using the rfc5766-turn-server; source code for STUN and TURN servers is available from code.google.com/p/rfc5766-turn-server, which also provides links to several sources of information about server installation. A VM image for Amazon Web Services is also available.
An alternative TURN server is restund, available as source code and also for AWS. Below are instructions how to set up restund on Google Compute Engine.
-
Open firewall as necessary, for tcp=443, udp/tcp=3478
-
Create four instances, one for each public IP, Standard Ubuntu 12.06 image
-
Set up local firewall config (allow ANY from ANY)
-
Install tools:
sudo apt-get install make
sudo apt-get install gcc -
Install libre from creytiv.com/re.html
-
Fetch restund from creytiv.com/restund.html and unpack
-
wget hancke.name/restund-auth.patch and apply with patch -p1 < restund-auth.patch
-
Run make, sudo make install for libre and restund
-
Adapt restund.conf to your needs (replace IP addresses and make sure it contains the same shared secret) and copy to /etc
-
Copy restund/etc/restund to /etc/init.d/
-
Configure restund:
Set LD_LIBRARY_PATH
Copy restund.conf to /etc/restund.conf
Set restund.conf to use the right 10. IP address -
Run restund
-
Test using stund client from remote machine: ./client IP:port
Beyond one-to-one: multi-party WebRTC
You may also want to take a look at Justin Uberti's proposed IETF standard for aREST API for access to TURN Services.
It's easy to imagine use cases for media streaming that go beyond a simple one-to-one call: for example, video conferencing between a group of colleagues, or a public event with one speaker and hundreds (or millions) of viewers.
A WebRTC app can use multiple RTCPeerConnections so to that every endpoint connects to every other endpoint in a mesh configuration. This is the approach taken by apps such as talky.io, and works remarkably well for a small handful of peers. Beyond that, processing and bandwidth consumption becomes excessive, especially for mobile clients.
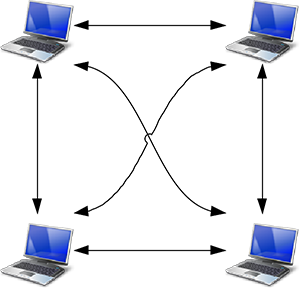 Full mesh topology: everyone connected to everyone
Alternatively, a WebRTC app could choose one endpoint to distribute streams to all others, in a star configuration. It would also be possible to run a WebRTC endpoint on a server and construct your own redistribution mechanism (a sample client application is provided by webrtc.org).
Since Chrome 31 and Opera 18, a MediaStream from one RTCPeerConnection can be used as the input for another: there's a demo at simpl.info/multi. This can enable more flexible architectures, since it enables a web app to handle call routing by choosing which other peer to connect to.
Multipoint Control Unit
A better option for a large number of endpoints is to use a Multipoint Control Unit(MCU). This is a server that works as a bridge to distribute media between a large numbers of participants. MCUs can cope with different resolutions, codecs and frame rates within a video conference, handle transcoding, do selective stream forwarding, and mix or record audio and video. For multi-party calls, there are a number of issues to consider: in particular, how to display multiple video inputs and mix audio from multiple sources. Cloud platforms such as vLine also attempt to optimize traffic routing.
It's possible to buy a complete MCU hardware package, or build your own.
 The back of a Cisco MCU
Several open source MCU software options are available. For example, Licode(previously know as Lynckia) produces an open source MCU for WebRTC; OpenTok has Mantis.
Beyond browsers: VoIP, telephones and messaging
The standardized nature of WebRTC makes it possible to establish communication between a WebRTC app running in a browser and a device or platform running on another communication platform, such as a telephone or a video conferencing systems.
SIP is a signaling protocol used by VoIP and video conferencing systems. To enable communication between a WebRTC web app and a SIP client such as a video conferencing system, WebRTC needs a proxy server to mediate signaling. Signaling must flow via the gateway but, once communication has been established, SRTP traffic (video and audio) can flow directly peer to peer.
PSTN, the Public Switched Telephone Network, is the circuit switched network of all 'plain old' analogue telephones. For calls between WebRTC web apps and telephones, traffic must go through a PSTN gateway. Likewise, WebRTC web apps need an intermediary XMPP server to communicate with Jingle endpoints such as IM clients. Jingle was developed by Google as an extension to XMPP to enable voice and video for messaging services: current WebRTC implementations are based on the C++ libjingle library, an implementation of Jingle initially developed for Google Talk.
A number of apps, libraries and platforms make use of WebRTC's ability to communicate with the outside world:
-
sipML5: an open source JavaScript SIP client
-
jsSIP: JavaScript SIP library
-
Phono: open source JavaScript phone API, built as a plugin
-
Zingaya: an embeddable phone widget
-
Twilio: voice and messaging
-
Uberconference: conferencing
The sipML5 developers have also built the webrtc2sip gateway. Tethr and Tropo have demonstrated a framework for disaster communications 'in a briefcase', using an OpenBTS cell to enable communications between feature phones and computers via WebRTC. Telephone communication without a carrier!
Find out more
WebRTC codelab: step-by-step instructions how to build a video and text chat application, using a Socket.io signaling service running on Node.
2013 Google I/O WebRTC presentation with WebRTC tech lead, Justin Uberti.
Chris Wilson's SFHTML5 presentation: Introduction to WebRTC Apps.
The WebRTC Book gives a lot of detail about data and signaling pathways, and includes a number of detailed network topology diagrams.
WebRTC and Signaling: What Two Years Has Taught Us: TokBox blog post about why leaving signaling out of the spec was a good idea.
Ben Strong's presentation A Practical Guide to Building WebRTC Apps provides a lot of information about WebRTC topologies and infrastructure.
The WebRTC chapter in Ilya Grigorik's High Performance Browser Networkinggoes deep into WebRTC architecture, use cases and performance.