PS:前几篇的内容光是上代码了,也没有细细的讲解..感觉这样写很不好..因此还是多一些讲解吧...
学习内容:
1.了解Service...
2.Service的启动与停止..
3.绑定与取消绑定Service...
4.Service的生命周期...
1.Service...
什么是Service,Service顾名思义就是服务..它的目的:实现服务的后台运行,比如说有些程序的运行时没必要给用户看到的,只需要在后台运行即可,那么这就是Service的一个主要作用..Service的另一个作用就是实现跨进程访问..说白了就是多个应用程序之间实现访问...这章只讲解一个线程自身内部启动和绑定服务...跨线程的将会在下一章进行说明...
i.使用Service首先就要引包...import android.app.Service;
ii.然后就是如何启动Service和停止Service了...
启动和停止Service是很简单的,只需要调用startService()和StopService()函数即可...但是我们需要自己去定义一个服务Service类,来进行一些相应的操作...然后我们通过这两个函数去调用应用程序自身的服务...这样就实现了一个应用的后台程序的运行...
在使用startService()函数启动服务时,调用者与服务者之间没有任何关联,就算是调用者退出了,那么这个服务也仍然会一直在后台去运行,除非使用强行终止,就是使用stopService()函数...否则会在后台一直持续的运行下去,我们手机内部也是有这种时时刻刻在运行的程序的...
//启动服务与停止服务...
Intent intent =new Intent(this,MyService.class);
    startService(intent);
Intent intent =new Intent(this,MyService.class);
    stopService(intent);
iii.绑定服务与解除绑定服务...
绑定服务与解除绑定服务是另一种实现进程内部通信的一种方法,它不同于startService()函数,二者是有一定的区别的,使用bindService()进行绑定服务时,那么调用者和服务之间就形成了一种绑定关系,当服务没有被创建时,系统会直接调用一个onCreate()方法来创建一个服务..当服务被创建的时候,调用onBind()方法,什么是绑定,意思就是当服务者调用时启动服务,当调用者退出的时候,那么也就退出服务..后台也不会继续执行服务...
/*使用绑定服务的时候,一定要定义一个连接,没有这个连接是无法完成绑定服务的...
 *这个连接的功能是:当一个Activity程序与Service建立连接之后,可以通过这个接口来执行Service连接和取消操作...
 *并且要重写其中的两个方法,一个是当服务被连接的时候需要进行什么操作..
 *另一个就是当服务断开连接的时候,我们需要定义一些执行的操作...
 *这里代码给的并不完全,在最后我会给出一个完整的代码,方便大家理解...
 */
private ServiceConnection con=new ServiceConnection() {

        @Override
        public void onServiceDisconnected(ComponentName name) {
            // TODO Auto-generated method stub
            //Toast.makeText(MainActivity.this, "Service UnOnBind()", Toast.LENGTH_LONG).show();
        }

        @Override
        public void onServiceConnected(ComponentName name, IBinder service) {
            // TODO Auto-generated method stub

            binder=(MyService.Binder)service;
        }
    };
bindService(new Intent(this,MyService.class),con,CONTEXT.BIND_AUTO_CREATE);//绑定服务...
unbindService(con);//解除绑定服务...
那么使用服务,首先我们需要定义一个服务类MyService,只有我们先定义一个服务,我们才能够使主线程与服务进行交互..这个类需要继承Service父类...这个父类中有一个方法需要被继承..就是下面这个方法...那么这个方法的调用是在我们将Service与某个应用程序进行绑定时进行调用..正是因为有了这个方法,才导致了Service与应用程序之间形成绑定关系,这层关系是需要IBinder对象实现的..我们可以在其中加入一些实现的代码,那么就完成了后台程序的运行...下面就是我们定义的一个服务类..
package com.example.andorid_radio;
import android.app.Service;
import android.content.Intent;
import android.os.Binder;
import android.os.IBinder;

public class MyService extends Service{
    public MyService(){
    }
    @Override
    public IBinder onBind(Intent intent) {
        // TODO Auto-generated method stub
    }
}
这个服务类内还可以添加很多方法...添加一些我们需要运行的一些代码...
下面我就上一个完整的代码...这个代码实现的功能就是在一个主线程中的EditText输入内容,我们通过启动Service来完成对数据同步的操作...
首先我们先进行布局...添加了5个按钮,一个可编辑的文本控件...
<LinearLayout xmlns:android="http://schemas.android.com/apk/res/android"
    android:layout_width="fill_parent"
    android:layout_height="fill_parent"
    android:orientation="vertical" >
    <EditText
        android:id="@+id/et_show"
        android:layout_width="wrap_content"
        android:layout_height="wrap_content"
        android:text="aa"/>
    <Button
        android:id="@+id/btnStartService"
        android:layout_width="wrap_content"
        android:layout_height="wrap_content"
        android:text="启动服务..." />
    <Button
        android:id="@+id/btnStopService"
        android:layout_width="wrap_content"
        android:layout_height="wrap_content"
        android:text="停止服务..." />
    <Button
        android:id="@+id/btnOnBindService"
        android:layout_width="wrap_content"
        android:layout_height="wrap_content"
        android:text="绑定服务..."/>
    <Button
        android:id="@+id/btnUnOnBindService"
        android:layout_width="wrap_content"
        android:layout_height="wrap_content"
        android:text="取消绑定..."/>
    <Button
        android:id="@+id/btnSyndata"
        android:layout_width="wrap_content"
        android:layout_height="wrap_content"
        android:text="数据同步..."/>
</LinearLayout>
接着我们去定义我们的服务MyService类...
package com.example.andorid_radio;
import android.app.Service;
import android.content.Intent;
import android.os.Binder;
import android.os.IBinder;

public class MyService extends Service{
    private boolean running=false;
    private String data="默认信息...";
    public MyService(){
    }
    //当服务与主线程完成连接后调用...说白了就是当public void onServiceConnected(ComponentName name) {}调用的时候,下面这个函数也被调用...
    @Override
    public IBinder onBind(Intent intent) {
        // TODO Auto-generated method stub
        return new Binder(); //返回一个Binder对象...有了这个Binder也就实现了服务与线程之间的交互...
    }
    //Binder 实例
    public class Binder extends android.os.Binder{
        public void setdata(String data){
            MyService.this.data=data;
        }
    }
    //执行了onstartservice的时候触发...
    @Override
    public int onStartCommand(Intent intent,int flags, int startId){

        data=intent.getStringExtra("data");
        return super.onStartCommand(intent, flags, startId);

    }
   //重写了onCreate方法...
    @Override
    public void onCreate(){
        super.onCreate();
        running=true;
        new Thread(){
            @Override
            public void run(){
                super.run();
                int i=0;
                while(running){
                    i++;
                    System.out.println(i+":"+data);
                    try {
                        sleep(1000);
                    } catch (InterruptedException e) {
                        // TODO Auto-generated catch block
                        e.printStackTrace();
                    }
                }
            }
        }.start();
    }
    //销毁操作...当线程与服务断开连接的时候执行这个操作...
    @Override
    public void onDestroy(){
        super.onDestroy();
        running=false;
        System.out.println("onDestory()");
    }
}
然后是主函数...
package com.example.andorid_radio;
import android.os.Bundle;
import android.os.IBinder;
import android.app.Activity;
import android.content.ComponentName;
import android.content.Context;
import android.content.Intent;
import android.content.ServiceConnection;
import android.view.Menu;
import android.view.View;
import android.widget.EditText;
public class MainActivity extends Activity implements View.OnClickListener{ //不要少写这个View,否则会出现空指针异常...
    EditText et;
    private MyService.Binder binder; //定义一个服务类内的Binder对象...
    //建立连接来监听服务的状态....绑定后会被执行...
    private ServiceConnection con=new ServiceConnection() {

        @Override
        public void onServiceDisconnected(ComponentName name) {
            // TODO Auto-generated method stub
            //Toast.makeText(MainActivity.this, "Service UnOnBind()", Toast.LENGTH_LONG).show();
                        System.out.println("ServiceDisconnected");
        }

        @Override
        public void onServiceConnected(ComponentName name, IBinder service) {
                        //这里的参数也有一个IBinder对象,在服务类内也有一个这样的对象,正是因为这个对象,才使得主线程与服务之间形成连接的桥梁...
            // TODO Auto-generated method stub
            System.out.println("ServiceConnected");
            binder=(MyService.Binder)service;


        }
    };
    @Override
    protected void onCreate(Bundle savedInstanceState) {
        super.onCreate(savedInstanceState);
        setContentView(R.layout.activity_main);
        et=(EditText)findViewById(R.id.et_show);
        findViewById(R.id.btnStartService).setOnClickListener(this);
        findViewById(R.id.btnStopService).setOnClickListener(this);
             findViewById(R.id.btnOnBindService).setOnClickListener(this);
        findViewById(R.id.btnUnOnBindService).setOnClickListener(this);
        findViewById(R.id.btnSyndata).setOnClickListener(this);
    }
    @Override
    public void onClick(View v){
        switch(v.getId()){
        case R.id.btnStartService:{
            //把数据直接放入到intent中
            Intent intent=new Intent(this,MyService.class);
            intent.putExtra("data",et.getText().toString());
            //调用onStartCommand()方法...
            startService(intent);
            break;
        }
        case R.id.btnStopService:{
            stopService(new Intent(this,MyService.class));
            break;
        }
        case R.id.btnOnBindService:{
            //传递服务的连接...
            bindService(new Intent(this,MyService.class), con, Context.BIND_AUTO_CREATE);
            break;
        }
        case R.id.btnUnOnBindService:{
            unbindService(con);
            break;
        }
        case R.id.btnSyndata:{
            //执行Service里的方法使数据能够同步...
            if(binder!=null){
                binder.setdata(et.getText().toString());
            }
            break;
        }
        }
    }
    @Override
    public boolean onCreateOptionsMenu(Menu menu) {
        // Inflate the menu; this adds items to the action bar if it is present.
        getMenuInflater().inflate(R.menu.main, menu);
        return true;
    }

}
这样也就完成了,数据的同步....看着挺抽象的,其实是挺简单的,比较容易理解...简单的说拿我们生活的例子来说,比如说我们自己想要认识另外一个人,那么这个主线程就是我想要认识一个人...那么首先这个人必须得存在(抽象说就是服务),我自己就是(主线程),那么我想认识这个人就必须要有另外一个人作为媒介,那么这个媒介就是(连接二者的函数,连接名,以及一些连接的操作..)...这样才能够完成我认识这个人这一任务...这个例子举得不是很形象,希望不会误导大家....
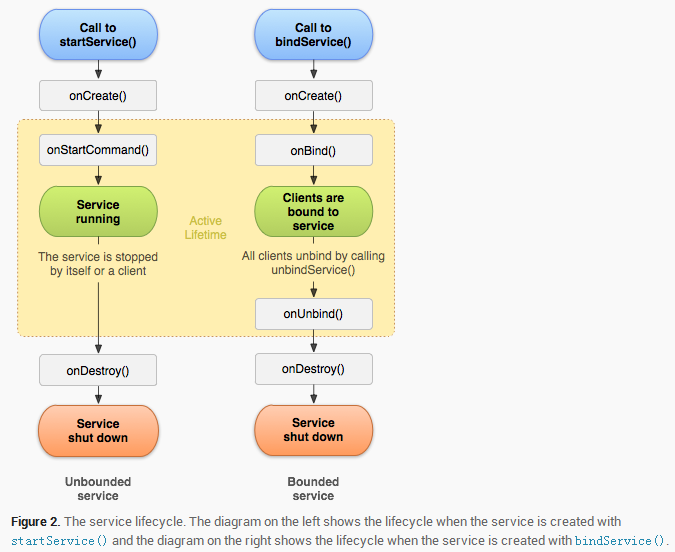
iv.Service生命周期...
Service和Activity一样,也有一个从启动到销毁的过程...但是Service的这个过程相对是很简单的..因为Service只需要经历三个阶段:创建服务,开始服务,销毁服务...
对于使用startService()方法打开的服务,其生命周期:onCreate->onStart->onDestory服务关闭..
对于使用bindService()方法打开的服务。其生命周期:onCreate->onBind->onUnbind->onDestory服务关闭...
来一个图像,方便理解...