1.半透明rgba
在rgba出现之前,半透明可以用opacity来创建,可是这样子导致的结果是不仅元素的背景会变透明,标签元素包含的文字也会变透明。这样子会导致可读性降低,所以都会嵌套一个包装标签来创建半透明,这样子很麻烦,自从可以用rgba来表示颜色之后就方便多了。rgba表示方法为:
.rgba{
        background:rgba(255,0,0,0.5);

}
括号里面有是个数字,第一个表示红色,第二个表示绿色,第三个表示蓝色,最后一个表示不透明度。
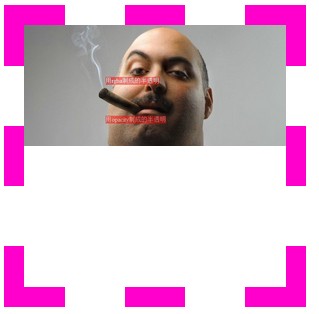
下面分别用rgba创建半透明和opacity创建半透明(不嵌套包装元素),然后对比结果:

可以看的出来,opacity创建的半透明,文字也会变得透明。
2.多背景图background-image
以前backround-image只支持一个图片,现在可以支持多个图片,只要把它们用逗号隔开就行了,格式为:
background: [background-image] [background-position] [background-repeat],
[background-image] [background-position] [background-repeat],
[background-image] [background-position] [background-repeat];
3.背景裁剪background-clip
这个属性包括三个值。
第一种:
.test{
    background-clip:border-box;
    background-color:#0f0;
    background-image:url(path/to/image);
    border:20px dashed #f0c;
    padding:20px;
}
border-box的效果和默认的效果是一样的,都是从border为边界,在内部显示裁剪后的背景。有趣的是,设置border为dashed时,border左上部分的背景颜色为设置的背景颜色。如图:

第二种:
.test{
    background-clip:padding-box;
    background-color:#0f0;
    background-image:url(path/to/image);
    border:20px dashed #f0c;
    padding:20px;
}
padding-box以padding为边界,border将不会有背景颜色。如图:

第三种:
.test{
    background-clip:content-box;
    background-color:#0f0;
    background-image:url(path/to/image);
    border:20px dashed #f0c;
    padding:20px;
}
content-box是在内容区域表现的,如图:

background-clip属性可以和rgba属性结合使用,比如这个边框透明,内容区域不透明的盒子

它完全的代码为:
#test{
    background: green;
    height:222px;
    width:222px;
    text-align:center;
    padding:20px;
    border:20px solid rgba(244,212,0,0.3);
    margin:20px;
    background-clip:padding-box;
    border-radius:15px;
    }
在webkit内核的浏览器上,我们甚至可以实现利用字体裁剪背景图片。如我们想要字体的样子为网格状,可以这样子实现:
#test{
    background:url(test.jpg) no-repeat green;
    height:222px;
    width:222px;
    text-align:center;
    font-size:55px;
    font-weight:bold;
    padding:20px;
    border:20px dashed #f0c;
    margin:20px;
    -webkit-background-clip:text;
    -webkit-text-fill-color:transparent;
}
使用的背景图片为:

效果为:

可以看出,如果我们使用的字体越粗,效果越明显,这可以让我们不使用图片就做出一些效果,减少因为图片而导致的http请求。不过这个特性目前只有webkit内核的浏览器支持。
4.背景大小缩放:background-size
backgound-size有三种赋值。
第一,数字赋值:
#test{
    background-size:200px 300px;
}
第一个值是背景图片宽度,第二个值是背景图片高度。这是设置为背景图宽度为200px,高度为300px。
第二,适应宽度:
#test{
    background-size:contain;
}
缩放背景图片,使其适应宽度,如图:
第三,适应高度:
#test{
    background-size:cover;
}
缩放图片,使其适应高度,如图:

5.渐变:gradient
gradient接受颜色和角度,具体可见代码:
#test{
    height:222px;
    width:222px;
    text-align:center;
    padding:20px;
    border:20px dashed #f0c;
    margin:20px;
    background:-webkit-linear-gradient(180deg,#000 0%,#f00 50%,#ff0 100%);
    background:-moz-linear-gradient(180deg,#000 0%,#f00 50%,#ff0 100%);
    background-clip:padding-box;
}
第一个值为角度,后面的参数为颜色和百分比对应,用空格隔开。该代码的效果为:

gradient默认从上到下渐变,奇怪的是,添加90deg的角度的话,渐变方向不是转90度,而是180度。而角度为180deg时,渐变方向却会转90度。
IE目前不支持gradient。
6.阴影:box-shadow和text-shadow
text-shadow和box-shadow都有3个参数。
第一个为水平偏移量,第二个为垂直偏移量,第三个为模糊的像素宽度,第四个为颜色(可用rgba颜色)。
如:text-shadow:5px 3px 4px rgba(0,0,0,0.7);
意思是说,阴影部分向右偏移5px,向下偏移3px,模糊宽度为4px,颜色为黑色,并且不透明度为0.7 。
#test{
    height:222px;
    width:222px;
    text-align:center;
    padding:20px;
    border:20px dashed #f0c;
    margin:20px;
    background:-webkit-linear-gradient(180deg,#000 0%,#f00 50%,#ff0 100%);
    background:-moz-linear-gradient(180deg,#000 0%,#f00 50%,#ff0 100%);
    background-clip:padding-box;
    box-shadow:5px 5px 4px rgba(0,0,0,0.7);
}
效果为:

#test{
    height:222px;
    width:222px;
    text-align:center;
    padding:20px;
    border:20px dashed #f0c;
    margin:20px;
    background:-webkit-linear-gradient(180deg,#000 0%,#f00 50%,#ff0 100%);
    background:-moz-linear-gradient(180deg,#000 0%,#f00 50%,#ff0 100%);
    background-clip:padding-box;
    text-shadow:5px 5px 4px rgba(21,132,22,1);
}
效果为

7.变换:transform
值得注意的有三个:skew,rotate和scale。
首先是skew,定义沿着X轴和Y轴的2D倾斜转换。如代码:
#test{
    -webkit-transform:skew(20deg,10deg);
    -moz-transform:skew(20deg,10deg);
    transform:skew(20deg,10deg);
}
效果:

接下来是rotate,rotate接受一个旋转的角度,如代码:
#test{
    -webkit-transform:rotate(30deg);
    -moz-transform:rotate(30deg);
    transform:rotate(30deg);
}
效果为:

最后是scale,定义 2D 缩放转换。接受两个值的时候是分别缩放宽度和高度,接受一个值的时候,高度和宽度都根据该值缩放。
如代码:
#test{
    -webkit-transform:scale(1,0.5);
    -moz-transform:scale(1,0.5);
    transform:scale(1,0.5);
}
效果为:

当然,这三个属性,我们也可以一起用,如代码:
#test{
    -webkit-transform:scale(1,0.5) skew(20deg,10deg) rotate(30deg);
    -moz-transform:scale(1,0.5) skew(20deg,10deg) rotate(30deg);
    transform:scale(1,0.5) skew(20deg,10deg) rotate(30deg);
}
效果为:

8.过渡:transition
transition可以实现非常平滑的过渡,最重要的用法就是伪类用法,以前的hover伪类只能实现“瞬间”的变化,有的transition之后,可以实现平滑的过渡了。有设置四个过渡属性:
transition-property:这个属性是设置需要过渡的属性,如color,width等,默认为all,即所有属性都过渡。
transition-duration:过渡所需的时间。
transition-timing-function:过渡方式。ease:匀速,ease-in:加速,ease-out:减速,ease-in-out:先加速再减速。
transition-delay:过渡发生的延迟。
就上例来说,我们可以这样写代码,使其鼠标悬停的时候过渡的变换:
#test:hover{
    -webkit-transform:scale(1,0.5) skew(20deg,10deg) rotate(30deg);
    -moz-transform:scale(1,0.5) skew(20deg,10deg) rotate(30deg);
    transform:scale(1,0.5) skew(20deg,10deg) rotate(30deg);
    }
#test{
    transition-property:all;
    transition-duration:1s;
    transition-timing-function:ease;
    transition-delay:0.1s;
}
我们还以把过渡简写为:
#test{
    transition:all 1s ease 0.1s;
}
9动画:animation
动画的主要属性为:
animation-name:名字,关于后续的关键帧的定义。
animation-duration:动画时间。
animation-iteration-count:动画次数,可为数字和infinite(无限次)。
animation-timing-function:动画方式,和transition一样。
这个是一个颜色变换的动画,如代码:
#test{
    height:222px;
    width:222px;
    -webkit-animation-name:changeColor;
    -webkit-animation-duration:6s;
    -webkit-animation-iteration-count:infinite;
    -webkit-animation-timing-function:ease;
    -moz-animation-name:changeColor;
    -moz-animation-duration:6s;
    -moz-animation-iteration-count:infinite;
    -moz-animation-timing-function:ease;
}
@-webkit-keyframes changeColor{
    0%{
        background:#f00;
    }
    25%{
        background:#0f0;
    }
    50%{
        background:#00f;
    }
    75%{
        background:#f0f;
    }
    100%{
        background:#f00;
    }
}