在qml中, Animation是所有动画类的基类,其中塔有一个属性应该注意,那就是alwaysRunToEnd.它默认为false,如果设置了true,那么无论你是调用了Animation的stop()或者设置running属性为false,动画都会从头到尾的执行完毕。
现在先来说PropertyAnimation。这个类是Animation的派生类,它通过改变对象的属性来实现动画。比如下方的小例子
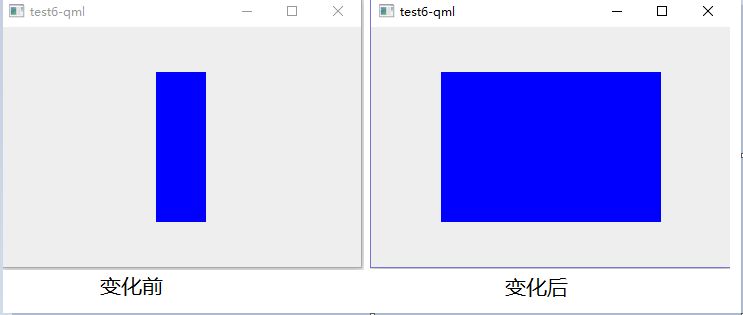
import QtQuick 2.2

Rectangle{
    id: rootItem
     360
    height: 240
    color: "#EEEEEE"

    Rectangle{
        id: rect
         50
        height: 150
        anchors.centerIn: parent
        color: "blue"

        PropertyAnimation{
            id: animation
            target: rect
            property:  "width"
            to: 220
            duration: 2000
        }

        MouseArea{
            anchors.fill: parent
            onClicked: {
                animation.running = true
            }
        }
    }
}
运行程序后,点击蓝色区域的前后变化如下:当点击蓝色区域后,经过2S,填充区域的宽度就会改编成指定宽度
那如果想要改变多个属性呢?
可以用propeties来设置,不过to属性设置的值会将应用你设置的多个属性,因此,用这种方法时,最后设置同一类的属性。比如高度和宽度
propeties: "width, height" //属性名之间用英文逗号个离开
针对单一目标不仅如此,同时可以通过targets设置同时对多个目标的操作:
targets: [rectA, rectB]
现在让我们来改进这个例子。有的同学可能就说,万一我要同时改变多个属性,但是又不是同一类的怎么办?我觉得这么写太low,放到信号中控制多么随心所欲。。。要求有点多哈,但是统统的都可以实现。在Animation中有一条语法,那就是 Animation on <property>将一个PropertyAnimation与一个属性关联起来。就像下面所示:
import QtQuick 2.2

Rectangle{
    id: rootItem
     360
    height: 240
    color: "#EEEEEE"

    Rectangle{
        id: rect
         50
        height: 150
        anchors.centerIn: parent
        color: "blue"

        MouseArea{
            anchors.fill: parent
            id: mouseArea
        }

        PropertyAnimation on width{
            to: 150
            duration: 1000
            running: mouseArea.pressed  //如果不设置此属性,那么在Item加载完后就会立即执行
        }
    }
}
我们通过鼠标的clicked()信号来控制动画,同时又使得变化的属性变得灵活,不那么死板。
除此之外,我们再增加点东西。比如start()和stop()信号
import QtQuick 2.2

Rectangle{
    id: rootItem
     360
    height: 240
    color: "#EEEEEE"

    Rectangle{
        id: rect
         50
        height: 150
        anchors.centerIn: parent
        color: "blue"

        property var animation
        PropertyAnimation{
            id: toSquare
            target: rect
            property: "width"
            to: 150
            duration: 4000
            onStarted: {
                rect.animation = toSquare
                rect.color = "red"
            }

            onStopped: {
                rect.color = "blue"
            }
        }

        PropertyAnimation{
            id: toRect
            target: rect
            properties: "width"
            to: 50
            duration: 4000
            onStarted: {
                rect.animation = toRect
                rect.color = "red"
            }

            onStopped: {
                rect.color = "blue"
            }
        }

        MouseArea{
            anchors.fill: parent
            onClicked: {
                if(rect.animation == toRect ||
                   rect.animation == undefined)
                {
                    toSquare.start()
                }
                else
                    toRect.start()
            }
        }
    }
}
变化如下

大体操作:启动后有一个默认的状态,点击一次鼠标后,width增大,同时填充的背景色为red,同时改变了animation;再次点击后,width往缩小的方向发展,同时改变了animation