Peter Shirley-Ray Tracing The Next Week(2016)
原著:Peter Shirley
英文原著地址 密码: urji
第二本书主要介绍了运动模糊,BVH(层次包围盒),纹理贴图,柏林噪声,纹理映射,光照,instance,volumes,最后会渲染一张封面上的图片。
因为机器计算能力问题,代码渲染的图片分辨率较小,放在The-Next-Week文件夹下,图片使用的是原书的图片。
目录:
- [x] Chapter1:Motion Blur
- [x] Chapter2:Bounding Volume Hierarchies
- [x] Chapter3:Solid Textures
- [x] Chapter4:Perlin Noise
- [x] Chapter5:Image Texture Mapping
- [x] Chapter6:Rectangles and Lights
- [x] Chapter7:Instances
- [x] Chapter8:Volumes
- [x] Chapter9:A Scene Test All New Features
Chapter1:Motion Blur
运动模糊。当你在进行ray tracing的时候,模糊反射和散焦模糊的过程中,每个像素你需要采样多个点,来决定最终像素的颜色,这种效果在现实世界中是另外一种实现方法,现实世界中,相机通过控制快门的开和关,记录下快门开闭时间内,物体运动的轨迹,通过这样的方法实现模糊的效果。
运动模糊的意思是,现实世界中,相机快门开启的时间间隔内,相机活着物体发生了位移,画面最后呈现出来的像素,是移动过程中像素的平均值。我们可以通过随机一条光线持续的时间,最后计算出像素平均的颜色,这也是光线追踪使用了很多随机性的方法,最后的画面接近真实世界的原因。
这种方法的基础是当快门开机的时间段内,随机时间点生成光线,修改之前的ray类,添加一个光线存在时间的变量。
// 增加时间信息
class ray
{
public:
    ray(){}
    ray(const vec3& a, const vec3 & b){ A =a; B = b;}
    vec3 origin() const  { return  A;}
    vec3 direction() const { return  B;}
    vec3 point_at_parameter(float t) const { return A+t*B;}

    float time() const{ return  _time};
    vec3 A;
    vec3 B;
    // 光线的时间戳
    float _time;

};
接下来就是控制camera在时间t1和t2之间,随机时间点生成光线,给camera类添加个float 的时间变量,记录光线产生的时间。
class camera
{
    vec3 origin;
    vec3 u,v,w;
    vec3 horizontal;
    vec3 vertical;
    vec3 lower_left_corner;
    float len_radius;
    // 增加开始时间和结束时间
    float time0,time1;

public :
    // 构造函数增加t0,t1
    camera(vec3 lookfrom, vec3 lookat, vec3 vup, float vfov, float aspect, float aperture, float focus_dist,
    float t0,float t1)
    {
        time0 = t0;
        time1 = t1;
        len_radius = aperture/2;
        float theta = vfov*M_PI/180;
        float half_height = tan(theta/2);
        float half_width = aspect * half_height;
        origin = lookfrom;

        w = unit_vector(lookfrom - lookat);
        u = unit_vector(cross(vup, w));
        v = cross(w,u);

        lower_left_corner = origin - half_width*focus_dist*u - half_height*focus_dist*v - focus_dist*w;
        horizontal = 2*half_width*focus_dist*u;
        vertical = 2*half_height*focus_dist*v;
    }

    ray get_ray(float s,float t)
    {
        vec3 rd = len_radius * random_in_unit_disk();
        vec3 offset = u * rd.x() +v*rd.y();
        // 随机时间戳的光线
        float time = time0 + drand48()*(time1 - time0);
        return ray(origin + offset,lower_left_corner+s*horizontal + t*vertical - origin - offset,time);
    }

};
关于如何移动物体,接下来创建一个移动球体的类,里面存储某个球在时间点t0从位置center0,移动到时间点t1的位置center1.这个时间间隔不用和相机快门的时间长短相同。
class moving_sphere:public  hitable
{
public:
    moving_sphere(){}
    moving_sphere(vec3 cen0,vec3 cen1,float t0,float t1,float r,material *m):
            center0(cen0),center1(cen1),time0(t0),time1(t1),radius(r),mat_ptr(m) {};

    virtual  bool hit(const ray&r,float tmin, float tmax, hit_record& rec) const;

    vec3 center(float time) const;
    vec3 center0,center1;
    float time0,time1;
    float radius;
    material *mat_ptr;
};

// 当前时间点,球心的位置
vec3 moving_sphere::center(float time) const {
    return center0 + ((time-time0)/(time1-time0))*(center1-center0);
}
重写moving_sphere的hit函数,修改之前的center为一个时间相关的位置
bool moving_sphere::hit(const ray& r,float t_min,float t_max,hit_record & rec )const
{
    // 修改之前的center为一个时间相关的位置
    vec3 oc = r.origin() - center(r.time());
    float a = dot(r.direction(), r.direction());
    float b = dot(oc, r.direction());
    float c = dot(oc, oc) - radius*radius;
    float discriminant = b*b - a*c;
    if (discriminant > 0) {
        float temp = (-b - sqrt(discriminant))/a;
        if (temp < t_max && temp > t_min) {
            rec.t = temp;
            rec.p = r.point_at_parameter(rec.t);
            rec.normal = (rec.p - center(r.time())) / radius;
            rec.mat_ptr = mat_ptr;
            return true;
        }
        temp = (-b + sqrt(discriminant)) / a;
        if (temp < t_max && temp > t_min) {
            rec.t = temp;
            rec.p = r.point_at_parameter(rec.t);
            rec.normal = (rec.p - center(r.time())) / radius;
            rec.mat_ptr = mat_ptr;
            return true;
        }
    }
    return false;
}
最后修改上本书最后绘制的场景,小球在time=0的时候,在原来的位置,time=1的时候,移动到center+vec3(0,0.5*drand48(),0)位置,在此pre期间,光圈一直开启。
hitable *random_scene() {
    int n = 500;
    hitable **list = new hitable *[n + 1];
    list[0] = new sphere(vec3(0, -700, 0), 700, new lambertian(vec3(0.5, 0.5, 0.5)));
    int i = 1;
    for (int a = -11; a < 11; a++) {
        for (int b = -11; b < 11; b++) {
            float choose_mat = drand48();
            vec3 center(a + 0.9 * drand48(), 0.2, b + 0.9 * drand48());
            if ((center - vec3(4, 0.2, 0)).length() > 0.9) {
                if (choose_mat < 0.8) {  // diffuse
                    // 运动模糊的小球
                    list[i++] = new moving_sphere(center, center + vec3(0, 0.5 * drand48(), 0), 0.0, 1.0, 0.2,
                                                  new lambertian(vec3(drand48() * drand48(), drand48() * drand48(),
                                                                      drand48() * drand48())));
                } else if (choose_mat < 0.95) { // metal
                    list[i++] = new sphere(center, 0.2,
                                           new metal(vec3(0.5 * (1 + drand48()), 0.5 * (1 + drand48()),
                                                          0.5 * (1 + drand48())), 0.5 * drand48()));
                } else {  // glass
                    list[i++] = new sphere(center, 0.2, new dielectric(1.5));
                }
            }
        }
    }

    list[i++] = new sphere(vec3(0, 1, 0), 1.0, new dielectric(2.5));
    list[i++] = new sphere(vec3(-4, 1, 0), 1.0, new lambertian(vec3(0.4, 0.2, 0.1)));
    list[i++] = new sphere(vec3(4, 1, 0), 1.0, new metal(vec3(1, 1, 1), 0.0));

    return new hitable_list(list, i);
}
camera类的get_ray函数返回了一条随机时间t在t0和t1之间时间点的光线,这个时间t被用在moving_sphere中,决定了center球心的位置。在循环采样ns的位置,不停的get_ray,不停的和随机时间t位置的球求交,这样就形成了动态模糊的效果。
最后渲染出来达到的效果如下:
Chapter2:Bounding Volume Hierarchies
层次包围盒
第二章,是比较重要的一部分,层次包围盒的出现,可以使我们的代码“跑的更快“,主要是通过重构hitable类,添加rectangles和boxes。
之前写的ray tracing的复杂度是线性的,有多少调光线多少个物体,复杂度是线性相关。我们可能同时发出来几百万的光线,但其实这个过程我们可以通过二分查找的思想来进行。这个过程分为2个关键的部分
- 1)划分空间
- 2)划分物体对象
关键的思想是使用bounding volume(包围盒),包围盒就是一个普通的立方体,这个立方体将物体完全包裹着。举个简单的例子,现在有10个物体,你用一个bounding sphere将他们包住,如果光线没有射到这个包围球,那么肯定没有射到这10个物体,如果光线射到了包围球,再进行后面的判断,伪代码如下:
if(ray hit bounding object)
    return whether ray hit bounded objects  // 是否击中包围内部的物体
else
    return false
还有个关键的点是,如何划分物体形成子集。实际上我们不是直接划分屏幕活着volume的,每个物体都有一个bounding volume,而且bounding volume可以重叠。建立一个bounding volume的层级关系。举个例子,我们将物体的总集分为红蓝2个子集,分别用一个bounding volume包围起来,就有了下面的这张图:
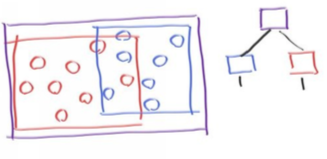
红色和蓝色都在紫色的包围盒内,他们发生了重叠,就有了右边的树型结构,红蓝分别是紫的左右孩子,伪代码如下:
if(hit purple) // 紫色
    hit0 = hits blue enclosed objects
    hit1 = hits red enclosed objects
    if(hit0 or hit1)
        return true and info of closer hit         //返回hit的信息
else
    return false
为了更好的性能,一个好的bounding volume结构是很有必要的,须要方便划分,有要尽可能少的计算量,axis-aligned bounding boxes(AAABB)包围盒就是一种很好的结构,我们只需要知道是否hit到了物体,不需要知道hit到的点,和法线。
很多人用一种叫“slab”的方法,这是一种基于n个纬度的AABB,就是从n个轴上取n个区间表示。3<x<5 , x in (3,5)这样表示更加简洁。
2D的时候,x,y2个区间可以现成一个矩形。
如果判断一条光线是否射中一个区间,须要先判断光线是否击中分界线。在2d平面内,边界是2条线,而这条ray有2个参数t0和t1,就可以在平面内确定一条光线;如果是在3d空间,边界是2个面,假设为x=x0和x=x1(这是x方向上的2个面),对于时刻t,有个关于p(t)的函数
p(t)= A + tB
这个公式是适用与xyz三个坐标系,比如
x(t) = Ax + t*Bx
当t0时刻,射线击中平面的位置 x=x0 ,即
x0 = Ax +t0*Bx
求出来
t0 = (x0 - Ax) / Bx
同理
t1 = (x1 - Ax) / Bx (当x = x1时
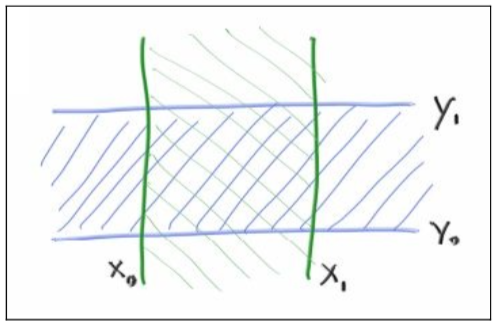
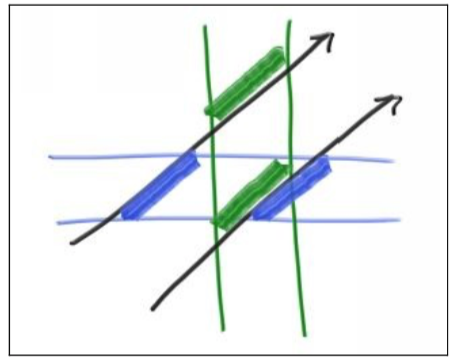
刚才聚的例子是1纬空间的,xy分开计算,但是要知道2纬空间,是否击中物体,就要计算,x空间和y空间击中的物体是否发生重叠,就想下图中蓝色和绿色表示x,y空间击中物体的2个平面,4个平面重叠的部分。
伪代码如下:
    compute(tx0,tx1);
    compute(ty0,ty1);
    return overlap?((tx0,tx1),(ty0,ty1))
三维的时候就再加上z空间的判断。
注意事项:
-
对于求解出来的tx0和tx1,构成的区间可能是(7,3)这样的形式,那么就须要对tx0和tx1做下翻转,转成(3,7)
tx0 = min((x0 - Ax)/Bx,(x1 - Ax)/Bx);
tx1 = max((x0 - Ax)/Bx,(x1 - Ax)/Bx); -
如果除数是0,既Bx=0,或者分子是0,既(x0-Ax)=0或(x1-Ax)=0那么求解出来的答案,求出来可能无意义,分子是0,表示只有一个解,等于光线是擦边,不好界定是射中了还是没有射中。
对于bvh在判断重叠的方法,在一维平面内原理就是比较2个区间,看2个区间是否重叠,比如区间(d,D)和区间(e,E),计算出来的重叠区间为(f,F),如果满足
// 计算是否重叠
bool overlap(d,D,e,E,f,F)
{
    f = max(d,e);
    F = min(D,e);
    return f<F;
}
我自己总结了下就是 左大右小(左区间区max,右区间取min,比较2个值,如果左<右,为真)发生重叠。
// aabb包围盒
class aabb
{
public:
    aabb(){}
    aabb(const vec3 a,const vec3 &b)
    {
        _min = a;_max = b;
    }

    vec3 min()const{ return  _min};
    vec3 max()const{ return  _max};

    bool hit(const ray& r,float tmin,float tmax)const
    {
        for(int a =0;a<3;a++)
        {
            float invD = 1.0f/r.direction()[a];
            float t0 = (min()[a] - r.direction()[a]) * invD;
            float t1 = (max()[a] - r.direction()[a]) * invD;

            if(invD<0.0f)
                std::swap(t0,t1);
            tmin = t0>tmin?t0:tmin;
            tmax = t1<tmax?t1:tmax;
            if(tmax <= tmin)
                return false;
        }
        return true;
    }
    vec3 _min;
    vec3 _max;
};
对于hitable的类,须要加一个bounding_box的虚函数,方便派生类实现
class hitable
{
public:
    virtual bool hit(const ray& r,float t_min,float t_max,hit_record & rec)const =0;
    virtual bool bounding_box(float t0,float t1,aabb & box)const =0;
};
之前写的球类实现bounding_box的函数,球的boundingbox很简单,就是球心加半径。
bool sphere::bounding_box(float t0, float t1, aabb &box) const {
    box = aabb(center - vec3(radius, radius, radius), center + vec3(radius, radius, radius));
    return true;
}
对于动态运动的球,对t0时刻的box和t1时刻的box,取一个更大的boundingbox
aabb moving_sphere::surrounding_box(aabb &box0, aabb &box1) const {
    vec3 small(fmin(box0.min().x(), box1.min().x()),
               fmin(box0.min().y(), box1.min().y()),
               fmin(box0.min().z(), box1.min().z()));
    vec3 big(fmax(box0.max().x(), box1.max().x()),
             fmax(box0.max().y(), box1.max().y()),
             fmax(box0.max().z(), box1.max().z()));
    return aabb(small,big);
}
hitable类也要加点东西,因为BVH涉及左右子树,所以以链表的形式,添加左右子树。
class bvh_node:public hitable
{
public:
    bvh_node(){}
    bvh_node(hitable **l,int n,float time0,float time1);
    virtual bool hit(const ray&r,float tmin,float tmax,hit_record &rec)const;
    virtual bool bounding_box(float t0,float t1,aabb &box) const;

    hitable *left;
    hitable *right;
    aabb box;
};
对于左右子树进行递归操作,直到射到叶子节点,击中重叠的部分,击中的数据用引用rec传出去。
bool bvh_node::hit(const ray &r, float tmin, float tmax, hit_record &rec) const {
    if(box.hit(r,tmin,tmax))
    {
        hit_record left_rec,right_rec;
        bool hit_left = left->hit(r,tmin,tmax,left_rec);
        bool hit_right = right->hit(r,tmin,tmax,right_rec);
        if(hit_left && hit_right)           // 击中重叠部分
        {
            if(left_rec.t<right_rec.t)
                rec = left_rec;             // 击中左子树
            else
                rec = right_rec;            // 击中右子树
            return true;
        } else if(hit_left)
        {
            rec = left_rec;
            return  true;
        } else if(hit_right)
        {
            rec = right_rec;
            return true;
        } else
            return false;
    } else
        return false;                       // 未击中任何物体
}
这种bvh的结构,bvh_node节点记录了击中子类的record信息,而且是一种二分的结构。如果bounding box划分的合理是很高效的,最完美的是满二叉树的情况。
boundingbox的hitrecord的数据,使用qsort函数重写compare函数来进行排序。
int box_x_compare(const void *a,const void *b)
{
    aabb box_left,box_right;
    hitable *ah = *(hitable**)a;
    hitable *bh = *(hitable**)b;
    if(!ah->bounding_box(0,0,box_left) || !bh->bounding_box(0,0,box_right))
        std::cerr <<"No bounding box in bvh_node constructor
";
    if(box_left.min().x() - box_right.min().x()<0.0)
        return  -1;
    else
        return 1;
}
Chapter3:Solid Textures
固体纹理。纹理在图形学中表示为一个面片上有关联的不同的颜色,这里须要完善一个texture的类,表现物体表面的纹理。
class texture {
public:
    virtual vec3 value(float u, float v, const vec3 &p) const = 0;
};

class constant_texture : public texture {
public:
    constant_texture() {}

    constant_texture(vec3 c) : color(c) {}

    virtual vec3 value(float u, float v, const vec3 &p) const {
        return color;
    }

    vec3 color;
};
这样就可以使用texture类,通过uv采样纹理颜色的方法,替换之前写的vec3 的color。比如把之前的lambertain材质重写,使用新的texture来表现颜色。
class lambertian : public material {
public:
    lambertian(texture *a) : albedo(a) {}
    virtual bool scatter(const ray& r_in, const hit_record& rec, vec3& attenuation, ray& scattered) const  {
        vec3 target = rec.p + rec.normal + random_in_unit_sphere();
        scattered = ray(rec.p, target-rec.p);
        attenuation = albedo->value(0,0,rec.p);
        return true;
    }

    texture *albedo;
};
新建一个lambertain材质,同时新建一个checker_texture(棋盘纹理),继承普通的纹理,不过包含2个指针分别指向棋盘的间隔颜色。
// 棋盘纹理
class checker_texture:public texture
{
public:
    checker_texture(){}
    checker_texture(texture *t0,texture *t1):even(t0),odd(t1){}
    virtual vec3 value (float u,float v, const vec3 &p)const {
        float sines = sin(10*p.x())*sin(10*p.y())*sin(10*p.z());
        if(sines<0)
            return odd->value(u,v,p);
        else
            return  even->value(u,v,p);
    }
    // 棋盘纹理的间隔颜色
    texture *odd;
    texture *even;
};
更新main函数中的vec3的color,使用新的texture纹理,注意lambertain材质的构造函数改成 texture的指针了,之前是一个v3的对象。
// 棋盘纹理
texture *checker = new checker_texture(new constant_texture(vec3(0.2, 0.3, 0.1)),
new constant_texture(vec3(0.9, 0.9, 0.9)));
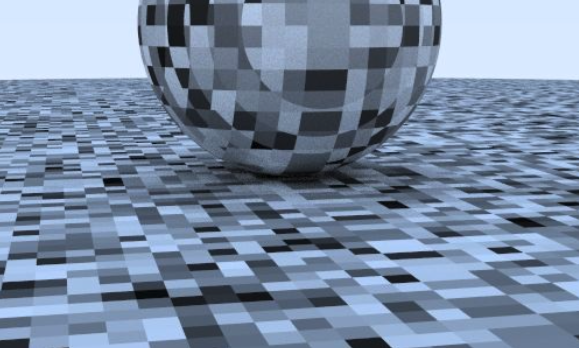
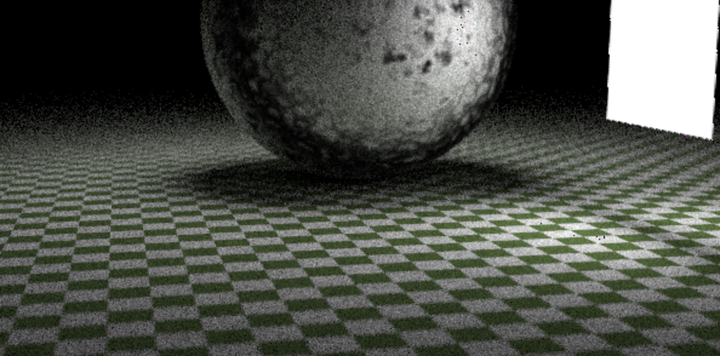
list[0] = new sphere(vec3(0, -700, 0), 700, new lambertian(checker));
最后得到的图案就是把底部大球的纹理,改成了棋盘纹理,效果如下:

Chapter4:Perlin Noise
Perlin噪声 ( Perlin noise )指由Ken Perlin发明的自然噪声生成算法 。
柏林噪声有2个关键的部分,第一是输入相同的3D点,总能返回相同的随机值,第二是使用一些hack的方法,达到快速近似的效果。
noise函数,通过传入一个三维空间的点,返回一个float类型的噪声值。
#include "vec3.h"

class perlin {
public:
    float noise(const vec3 &p) const {
        float u = p.x() - floor(p.x());
        float v = p.y() - floor((p.y()));
        float z = p.z() - floor(p.z());
        int i = int(4 * p.x()) & 255;
        int j = int(4 * p.y()) & 255;
        int k = int(4 * p.z()) & 255;
        return ranfloat[perm_x[i] ^ perm_y[j] ^ perm_z[k]];
    }

    static float *ranfloat;
    static int *perm_x;
    static int *perm_y;
    static int *perm_z;
};

static float *perlin_generate() {
    float *p = new float[256];
    for (int i = 0; i < 256; i++) {
        p[i] = drand48();
    }
    return p;
}

// 改变序列函数
void permute(int *p, int n) {
    for (int i = n - 1; i > 0; i--) {
        int target = int(drand48() * (i + 1));
        int tmp = p[i];
        p[i] = p[target];
        p[target] = tmp;
    }
}

static int *perlin_generate_perm() {
    int *p = new int[256];
    for (int i = 0; i < 256; i++) {
        p[i] = i;
    }
    permute(p, 256);
    return p;
}


float *perlin::ranfloat = perlin_generate();
int *perlin::perm_x = perlin_generate_perm();
int *perlin::perm_y = perlin_generate_perm();
int *perlin::perm_z = perlin_generate_perm();
在texture头文件中,添加生成噪声纹理的代码,通过在0-1之间选取float,创建噪声纹理
// 噪声纹理
class noise_texture:public texture{
public:
    noise_texture(){}
    noise_texture(float sc):scale(sc){}
    virtual vec3 value(float u,float v,const vec3& p)const
    {
        return vec3(1,1,1)*0.5*(1+sin(scale*p.x())+ 5*noise.noise(p));
    }
    perlin noise;
    float scale;
};
在lambertian的球上应用噪声纹理
hitable *two_perlin_spheres()
{
    texture *pertext = new noise_texture();
    hitable **list = new hitable*[2];
    list[0] = new sphere(vec3(0,-1000,0),1000,new lambertian(pertext));
    list[1] = new sphere(vec3(0,2,0),2,new lambertian(pertext));
    return new hitable_list(list,2);
}
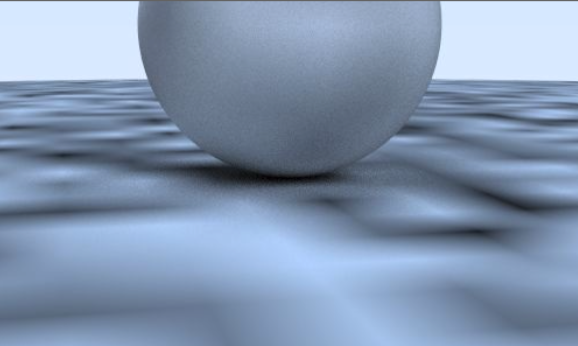
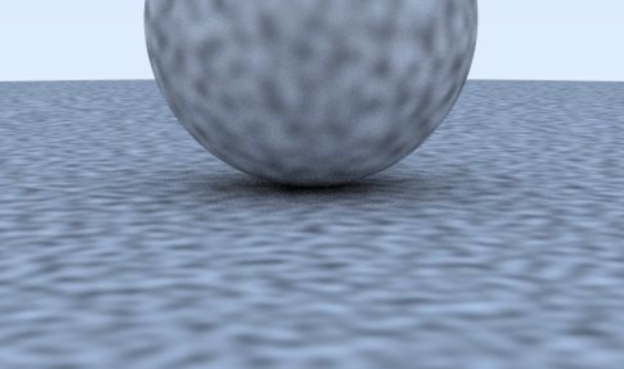
得到的效果如下
再使纹理变得平滑一些,使用线性插值的方法:
inline float trilinear_interp(float cp[2][2][2], float u, float v, float w) {
    float accum = 0;
    for (int i = 0; i < 2; i++) {
        for (int j = 0; j < 2; ++j) {
            for (int k = 0; k < 2; ++k) {
                accum += (i * u + (1 - i) * (1 - u)) * (j * v + (1 - j) * (1 - v)) * (k * w + (1 - k) * (1 - w)) *
                         cp[i][j][k];
            }
        }
    }
    return accum;
}
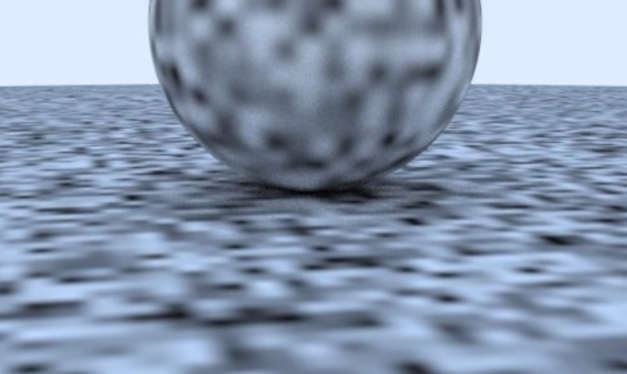
效果如下:
为了达到更好的平滑效果,使用hermite cubic方法去做平滑。
    float noise(const vec3 &p) const {
        float u = p.x() - floor(p.x());
        float v = p.y() - floor((p.y()));
        float w = p.z() - floor(p.z());
        // hermite cubic 方法平滑
        u = u*u*(3-2*u);
        v = v*v*(3-2*v);
        w = w*w*(3-2*w);
        int i = floor(p.x());
        int j = floor(p.y());
        int k = floor(p.z());
效果如下:
同时缩放输入的点p来使噪声变化的更快。
class noise_texture:public texture{
public:
    noise_texture(){}
    noise_texture(float sc):scale(sc){}
    virtual vec3 value(float u,float v,const vec3& p)const
    {
        return vec3(1,1,1)*noise.noise(scale * p);
    }
    perlin noise;
    float scale;
};
得到的效果如下:
现在仍然能看到网格,因为这种模式下,max和min总是收到具体的xyz值影响,然后Ken就用了一个trick,使用随机的vectors替代原来的floats,通过点乘的方法改变格子上的max和min值。
// perlin 插值
inline float perlin_interp(vec3 c[2][2][2],float u,float v, float w)
{
    float uu =u*u*(3-2*u);
    float vv = v*v*(3-2*v);
    float ww = w*w*(3-2*w);
    float accum = 0;
    for (int i = 0; i < 2; ++i) {
        for (int j = 0; j < 2; ++j) {
            for (int k = 0; k < 2; ++k) {
                vec3 weight_v(u-i,v-j,w-k);
                accum += (i*uu + (1-i)*(1-uu))*
                        (j*vv +(1-j)*(1-vv))*
                        (k*ww +(1-k)*(1-ww))*dot(c[i][j][k],weight_v);
            }

        }
    }

    return accum;
}
再添加turb扰动的噪声,达到更加自然的效果
    // 噪声扰动
    float turb(const vec3& p, int depth=7) const {
        float accum = 0;
        vec3 temp_p = p;
        float weight = 1.0;
        for (int i = 0; i < depth; i++) {
            accum += weight*noise(temp_p);
            weight *= 0.5;
            temp_p *= 2;
        }
        return fabs(accum);
    }
并在texture的noise纹理中应用
// 噪声纹理
class noise_texture:public texture{
public:
    noise_texture(){}
    noise_texture(float sc):scale(sc){}
    virtual vec3 value(float u,float v,const vec3& p)const
    {
        // 加缩放和扰动后
        return vec3(1,1,1)*0.5*(1 + sin(scale*p.x() + 5*noise.turb(scale*p))) ;
    }
    perlin noise;
    float scale;
};
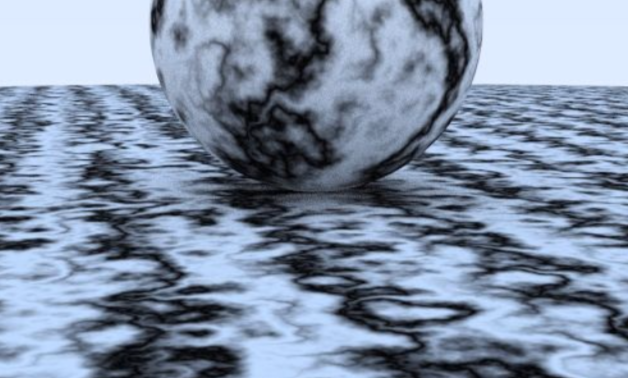
最终达到的效果如下
补充下Perlin Noise的扩展阅读,Building Up Perlin Noise
Chapter5:Image Texture Mapping
纹理映射,通过读取一张图片,使用uv映射的方法,直接将一张图片的纹理绘制在物体表面。
直接的方法是缩放uv,uv是[0,1]之间的float。而像素肯定大于这个区间,所以需要进行缩放,用(i,j)表示当前像素,nx和ny表示纹理的分辨率,所以对于任意像素(i,j)位置,对应的uv坐标就是
u = i / (nx - 1)
v = j / (ny - 1)
这种是对于平面坐标的uv映射,如果是一个球体的话,使用极坐标可以更方便的表示映射关系
u = phi / (2*Pi)
v = theta / Pi
通过hitpoint的xyz,可以计算出theta 和phi,对于单位球体,他们之间的关系如下
x = cos(phi)cos(theta)
y = sin(phi)cos(theta)
z = sin(theta)
然后math.h中提供了atan2()方法,可以计算反三角函数
phi = atan2(y,x)
atan2返回的值是在(-Pi,Pi)之间的
theta = asin(z)
theta值在(-Pi/2,Pi/2)之间。
最终就在hit 文件中写了一个获取球体uv的函数
void get_sphere_uv(const vec3& p, float& u, float& v) {
    float phi = atan2(p.z(), p.x());
    float theta = asin(p.y());
    u = 1-(phi + M_PI) / (2*M_PI);
    v = (theta + M_PI/2) / M_PI;
}
以及使用stb_image从图片读取rgb的头文件
class image_texture : public texture {
public:
    image_texture() {}
    image_texture(unsigned char *pixels, int A, int B) : data(pixels), nx(A), ny(B) {}
    virtual vec3 value(float u, float v, const vec3& p) const;
    unsigned char *data;
    int nx, ny;
};

vec3 image_texture::value(float u, float v, const vec3& p) const {
    int i = (1- u)*nx;
    int j = (1-v)*ny-0.001;
    if (i < 0) i = 0;
    if (j < 0) j = 0;
    if (i > nx-1) i = nx-1;
    if (j > ny-1) j = ny-1;
    float r = int(data[3*i + 3*nx*j]  ) / 255.0;
    float g = int(data[3*i + 3*nx*j+1]) / 255.0;
    float b = int(data[3*i + 3*nx*j+2]) / 255.0;
    return vec3(r, g, b);
}
须要注意main函数中
// 须要先声明宏,不然stb_image 会报错找不到图片格式
#define STB_IMAGE_IMPLEMENTATION
#include "stb_image.h"
Chapter6:Rectangles and Lights
矩形和光照。如何做一个自发光的材质,首先须要在hit_record里面加一个 emitted的方法。比如说背景如果是纯黑的话,就相当于光线来了的时候,他不反射任何光线。
// 自发光材质
class diffuse_light:public material
{
public:
    diffuse_light(texture *a):emit(a){}
    virtual bool scatter(const ray& r_in,const hit_record &rec,vec3 & attenuation,ray& scattered)const {
        return false;
    }
    virtual vec3 emitted(float u,float v,const vec3 &p)const {
        return emit->value(u,v,p);
    }
    texture *emit;
};
材质类须要加个emitted的虚函数,默认return的是黑色。方便子类重写
class material  {
public:
    // 散射虚函数
    // 参数:r_in 入射的光线, rec hit的记录, attenuation v3的衰减,scattered 散射后的光线
    virtual bool scatter(const ray& r_in, const hit_record& rec, vec3& attenuation, ray& scattered) const = 0;
    // 非自发光材质,默认返回黑色
    virtual vec3 emitted(float u,float v,const vec3 &p)const {
        return vec3(0,0,0);
};
接下来写一个rect的类,用来表示空间中的矩形。
以xy平面为例,在z=k的情况下,用2条直线,满足x=x0,x=x1,y=y0,y=y1可以得到一个区域。

当判断ray是否击中这个rectangle的时候,ray的表达式为:
p(t) = a + t*b
在xy平面上,等价于:
z(t) = az + t*bz
解这个关于t的方程,当z=k的时候
t = (k - az) / bz
在知道t之后,
x = ax + t * bx
y = ay + t * by
如果满足 x在区间[x0,x1],y在[y0,y1]上的话,ray就击中了这个rect。
代码如下:
// xy平面的矩形
class xy_rect: public hitable  {
public:
    xy_rect() {}
    xy_rect(float _x0, float _x1, float _y0, float _y1, float _k, material *mat) : x0(_x0), x1(_x1), y0(_y0), y1(_y1), k(_k), mp(mat) {};
    virtual bool hit(const ray& r, float t0, float t1, hit_record& rec) const;
    virtual bool bounding_box(float t0, float t1, aabb& box) const {
        box =  aabb(vec3(x0,y0, k-0.0001), vec3(x1, y1, k+0.0001));
        return true; }
    material  *mp;
    float x0, x1, y0, y1, k;
};
具体实现如下:
// 是否击中,形参传了hit_record的引用。
bool xy_rect::hit(const ray& r, float t0, float t1, hit_record& rec) const {
    float t = (k-r.origin().z()) / r.direction().z();
    if (t < t0 || t > t1)
        return false;
    float x = r.origin().x() + t*r.direction().x();
    float y = r.origin().y() + t*r.direction().y();
    if (x < x0 || x > x1 || y < y0 || y > y1)
        return false;
    rec.u = (x-x0)/(x1-x0);
    rec.v = (y-y0)/(y1-y0);
    rec.t = t;
    rec.mat_ptr = mp;
    rec.p = r.point_at_parameter(t);
    rec.normal = vec3(0, 0, 1);
    return true;
}
在场景中放个rect做为光源
// 带rect和光源的场景
hitable *simple_light()
{
texture *pertext = new noise_texture(4);
texture *checker = new checker_texture(new constant_texture(vec3(0.2, 0.3, 0.1)),
new constant_texture(vec3(0.9, 0.9, 0.9)));
hitable **list = new hitable*[4];
list[0] = new sphere(vec3(0,-700,0),700,new lambertian(checker));
list[1] = new sphere(vec3(0,2,0),2,new lambertian(pertext));
list[2] = new sphere(vec3(0,7,0),2,new diffuse_light(new constant_texture(vec3(4,4,4))));
list[3] = new xy_rect(3,5,1,3,-2,new diffuse_light(new constant_texture(vec3(4,4,4))));
return new hitable_list(list,4);
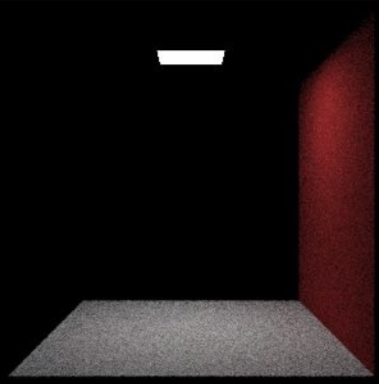
}
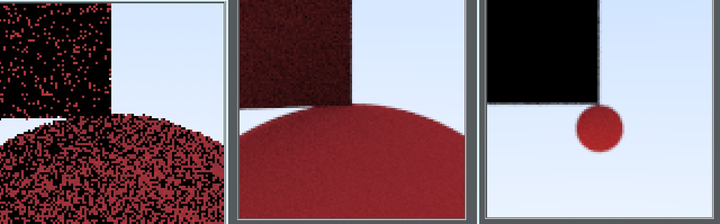
得到如下的图片
接下来补全yz平面和xz平面的代码
class xz_rect: public hitable  {
public:
    xz_rect() {}
    xz_rect(float _x0, float _x1, float _z0, float _z1, float _k, material *mat) : x0(_x0), x1(_x1), z0(_z0), z1(_z1), k(_k), mp(mat) {};
    virtual bool hit(const ray& r, float t0, float t1, hit_record& rec) const;
    virtual bool bounding_box(float t0, float t1, aabb& box) const {
        box =  aabb(vec3(x0,k-0.0001,z0), vec3(x1, k+0.0001, z1));
        return true; }
    material  *mp;
    float x0, x1, z0, z1, k;
};

class yz_rect: public hitable  {
public:
    yz_rect() {}
    yz_rect(float _y0, float _y1, float _z0, float _z1, float _k, material *mat) : y0(_y0), y1(_y1), z0(_z0), z1(_z1), k(_k), mp(mat) {};
    virtual bool hit(const ray& r, float t0, float t1, hit_record& rec) const;
    virtual bool bounding_box(float t0, float t1, aabb& box) const {
        box =  aabb(vec3(k-0.0001, y0, z0), vec3(k+0.0001, y1, z1));
        return true; }
    material  *mp;
    float y0, y1, z0, z1, k;
};
hit方法:
bool xz_rect::hit(const ray& r, float t0, float t1, hit_record& rec) const {
    float t = (k-r.origin().y()) / r.direction().y();
    if (t < t0 || t > t1)
        return false;
    float x = r.origin().x() + t*r.direction().x();
    float z = r.origin().z() + t*r.direction().z();
    if (x < x0 || x > x1 || z < z0 || z > z1)
        return false;
    rec.u = (x-x0)/(x1-x0);
    rec.v = (z-z0)/(z1-z0);
    rec.t = t;
    rec.mat_ptr = mp;
    rec.p = r.point_at_parameter(t);
    rec.normal = vec3(0, 1, 0);
    return true;
}

bool yz_rect::hit(const ray& r, float t0, float t1, hit_record& rec) const {
    float t = (k-r.origin().x()) / r.direction().x();
    if (t < t0 || t > t1)
        return false;
    float y = r.origin().y() + t*r.direction().y();
    float z = r.origin().z() + t*r.direction().z();
    if (y < y0 || y > y1 || z < z0 || z > z1)
        return false;
    rec.u = (y-y0)/(y1-y0);
    rec.v = (z-z0)/(z1-z0);
    rec.t = t;
    rec.mat_ptr = mp;
    rec.p = r.point_at_parameter(t);
    rec.normal = vec3(1, 0, 0);
    return true;
}
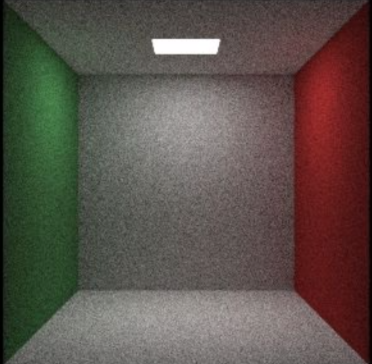
再在场景中放5个墙,一个灯,做个经典的cornell box。
// cornell_box经典场景
hitable *cornell_box() {
    hitable **list = new hitable*[8];
    int i = 0;
    material *red = new lambertian( new constant_texture(vec3(0.65, 0.05, 0.05)) );
    material *white = new lambertian( new constant_texture(vec3(0.73, 0.73, 0.73)) );
    material *green = new lambertian( new constant_texture(vec3(0.12, 0.45, 0.15)) );
    material *light = new diffuse_light( new constant_texture(vec3(15, 15, 15)) );
    list[i++] = new flip_normals(new yz_rect(0, 555, 0, 555, 555, green));
    list[i++] = new yz_rect(0, 555, 0, 555, 0, red);
    list[i++] = new xz_rect(213, 343, 227, 332, 554, light);
    list[i++] = new flip_normals(new xz_rect(0, 555, 0, 555, 555, white));
    list[i++] = new xz_rect(0, 555, 0, 555, 0, white);
    list[i++] = new flip_normals(new xy_rect(0, 555, 0, 555, 555, white));
    return new hitable_list(list,i);
}
camera的参数做一些调整
    vec3 lookfrom(278,278,-800);
    vec3 lookat(278, 278, 0);
    float dist_to_focus = 10.0;
    float aperture = 0.1;
    float vfov = 40.0;
    camera cam(lookfrom, lookat, vec3(0, 1, 0), vfov, float(nx) / float(ny), aperture, dist_to_focus, 0.0, 1.0);
会发现渲染出来的有几个面是黑色的,是因为法向量的问题。
须要翻转法向量
// 翻转法向量
class flip_normals : public hitable {
public:
    flip_normals(hitable *p) : ptr(p) {}
    virtual bool hit(const ray& r, float t_min, float t_max, hit_record& rec) const {
        if (ptr->hit(r, t_min, t_max, rec)) {
            rec.normal = -rec.normal;
            return true;
        }
        else
            return false;
    }
    virtual bool bounding_box(float t0, float t1, aabb& box) const {
        return ptr->bounding_box(t0, t1, box);
    }
    hitable *ptr;
};
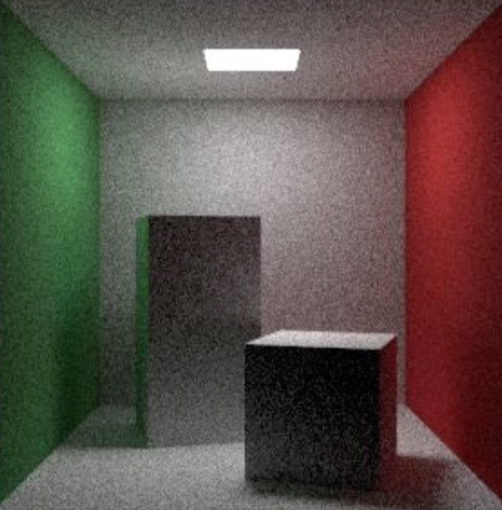
最后渲染出来的图片长这样:
注意
开始的时候渲染出来一片黑,排查了很久,是color里面的tmin设置的问题,原来设置是0,源码中是0.001.
当tmin设0的时候会导致,遍历hitlist时候,ray的t求解出来是0,hit的时候全走了else,导致递归到50层的时候,最后return的是0,* attenuation结果还是0。距离越远,散射用到random_in_unit_sphere生成的ray误差越大,就像上面的图一样。所以cornel 距离5,600的时候,场景中的lambert就全黑了。
    virtual bool scatter(const ray& r_in, const hit_record& rec, vec3& attenuation, ray& scattered) const  {
        vec3 target = rec.p + rec.normal + random_in_unit_sphere();
        scattered = ray(rec.p, target-rec.p, r_in.time());
        attenuation = albedo->value(rec.u, rec.v, rec.p);
        return true;
    }
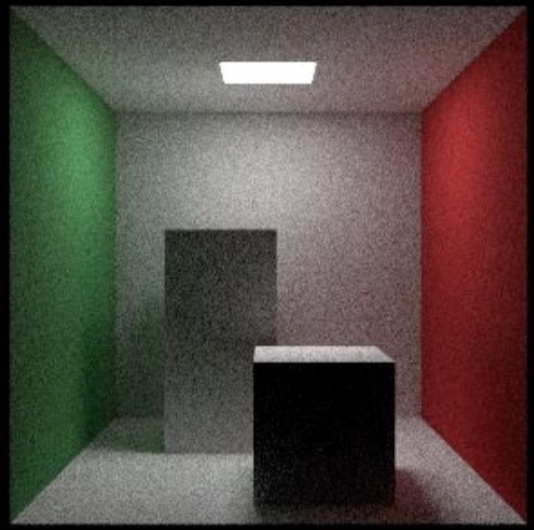
Chapter7:Instances
上一章渲染的结果是cornel box,但其实还不是完整的,完整版的在空间中还会有2个有轻微偏移的立方体。所以首先写一个box的类,用之前的rect来实现一个立方体,box类继承hitable,实现hit和bounding_box的虚方法。
class box: public hitable  {
    public:
        box() {}
        box(const vec3& p0, const vec3& p1, material *ptr);
        virtual bool hit(const ray& r, float t0, float t1, hit_record& rec) const;
        virtual bool bounding_box(float t0, float t1, aabb& box) const {
               box =  aabb(pmin, pmax);
               return true; }
        vec3 pmin, pmax;
        hitable *list_ptr;
};

box::box(const vec3& p0, const vec3& p1, material *ptr) {
    pmin = p0;
    pmax = p1;
    hitable **list = new hitable*[6];
    list[0] = new xy_rect(p0.x(), p1.x(), p0.y(), p1.y(), p1.z(), ptr);
    list[1] = new flip_normals(new xy_rect(p0.x(), p1.x(), p0.y(), p1.y(), p0.z(), ptr));
    list[2] = new xz_rect(p0.x(), p1.x(), p0.z(), p1.z(), p1.y(), ptr);
    list[3] = new flip_normals(new xz_rect(p0.x(), p1.x(), p0.z(), p1.z(), p0.y(), ptr));
    list[4] = new yz_rect(p0.y(), p1.y(), p0.z(), p1.z(), p1.x(), ptr);
    list[5] = new flip_normals(new yz_rect(p0.y(), p1.y(), p0.z(), p1.z(), p0.x(), ptr));
    list_ptr = new hitable_list(list,6);
}

bool box::hit(const ray& r, float t0, float t1, hit_record& rec) const {
    return list_ptr->hit(r, t0, t1, rec);
}
新建2个box的对象
    list[i++] = new box(vec3(130,0,65),vec3(295,165,230),white);
    list[i++] = new box(vec3(265,0,295),vec3(430,330,460),white);
渲染出来的图像如下
当前从侧面看的话,这2个box的关系如下:
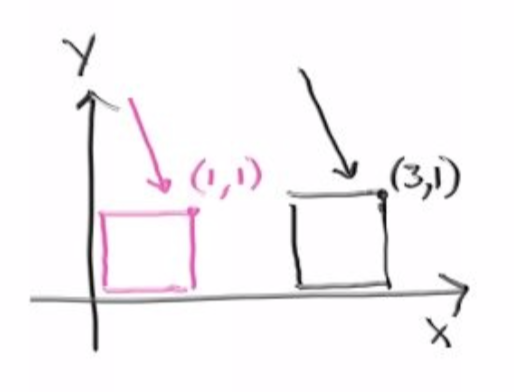
但其实目前的做法和真正cornelbox中是不一样的,我们是在空间中摆放了2个不同位置的box,但其实第二个box是可以通过transform属性,通过第一个box来表示出来的,一般相同形状的模型都可以用instance的方法模拟出来。在hitable.h中实现,translate,继承hitable,同样实现hit和boundingbox的虚函数,这2个虚函数都用到了translate这个类中的一个成员变量vec3 的offset表示偏移量。
// 用于instance的移动
class translate : public hitable {
public:
    translate(hitable *p, const vec3& displacement) : ptr(p), offset(displacement) {}
    virtual bool hit(const ray& r, float t_min, float t_max, hit_record& rec) const;
    virtual bool bounding_box(float t0, float t1, aabb& box) const;
    hitable *ptr;
    vec3 offset;    // vec3的偏移
};

bool translate::hit(const ray& r, float t_min, float t_max, hit_record& rec) const {
    ray moved_r(r.origin() - offset, r.direction(), r.time());
    if (ptr->hit(moved_r, t_min, t_max, rec)) {
        rec.p += offset;
        return true;
    }
    else
        return false;
}

bool translate::bounding_box(float t0, float t1, aabb& box) const {
    if (ptr->bounding_box(t0, t1, box)) {
        box = aabb(box.min() + offset, box.max()+offset);
        return true;
    }
    else
        return false;
}
这样就可以实现平移操作了,对于旋转,坐标点在三维空间中绕z轴旋转的示意图如下,z坐标保持不变,x,y坐标旋转,旋转角度为theta。
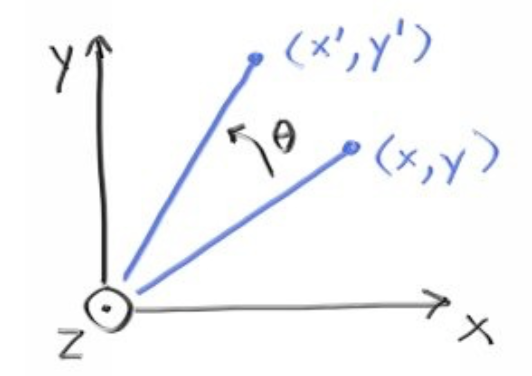
绕z轴旋转时,xy的坐标变化如下
x' = cos(theta) * x - sin(theta) * y
y' = sin(theta) * x + cos(theta) * y
同理绕y轴旋转时,xz如下
x' = cos(theta) * x + sin(theta) * z
z' = -sin(theta) * x + cos(theta) * z
绕x轴旋转,yz如下
y' = cos(theta) * y - sin(theta) * z
z' = sin(theta) * y + cos(theta) * z
相比平移,旋转还需要考虑的一个问题就是,当面发生转动的时候,面的法向量也是会发生转动的,面法向量发生转动,散射的出射光线也会发生改变。实现rotate_y继承hitable,也是实现hit和bounding_box的虚函数,加入2个新的成员变量sin_theta和cos_theta用于角度计算。
class rotate_y : public hitable {
public:
    rotate_y(hitable *p, float angle);
    virtual bool hit(const ray& r, float t_min, float t_max, hit_record& rec) const;
    virtual bool bounding_box(float t0, float t1, aabb& box) const {
        box = bbox; return hasbox;}
    hitable *ptr;
    float sin_theta;
    float cos_theta;
    bool hasbox;
    aabb bbox;
};
实现hit和rotate_y的构造函数
rotate_y::rotate_y(hitable *p, float angle) : ptr(p) {
    float radians = (M_PI / 180.) * angle;
    sin_theta = sin(radians);
    cos_theta = cos(radians);
    hasbox = ptr->bounding_box(0, 1, bbox);
    vec3 min(FLT_MAX, FLT_MAX, FLT_MAX);
    vec3 max(-FLT_MAX, -FLT_MAX, -FLT_MAX);
    for (int i = 0; i < 2; i++) {
        for (int j = 0; j < 2; j++) {
            for (int k = 0; k < 2; k++) {
                float x = i*bbox.max().x() + (1-i)*bbox.min().x();
                float y = j*bbox.max().y() + (1-j)*bbox.min().y();
                float z = k*bbox.max().z() + (1-k)*bbox.min().z();
                float newx = cos_theta*x + sin_theta*z;
                float newz = -sin_theta*x + cos_theta*z;
                vec3 tester(newx, y, newz);
                // 旋转之后重新计算bounding box
                for ( int c = 0; c < 3; c++ )
                {
                    if ( tester[c] > max[c] )
                        max[c] = tester[c];
                    if ( tester[c] < min[c] )
                        min[c] = tester[c];
                }
            }
        }
    }
    bbox = aabb(min, max);
}

bool rotate_y::hit(const ray& r, float t_min, float t_max, hit_record& rec) const {
    vec3 origin = r.origin();
    vec3 direction = r.direction();
    origin[0] = cos_theta*r.origin()[0] - sin_theta*r.origin()[2];
    origin[2] =  sin_theta*r.origin()[0] + cos_theta*r.origin()[2];
    direction[0] = cos_theta*r.direction()[0] - sin_theta*r.direction()[2];
    direction[2] = sin_theta*r.direction()[0] + cos_theta*r.direction()[2];
    ray rotated_r(origin, direction, r.time());
    if (ptr->hit(rotated_r, t_min, t_max, rec)) {
        vec3 p = rec.p;
        vec3 normal = rec.normal;
        // normal 也做相应的旋转,因为是绕y轴,所以改p[0]和p[2]
        p[0] = cos_theta*rec.p[0] + sin_theta*rec.p[2];
        p[2] = -sin_theta*rec.p[0] + cos_theta*rec.p[2];
        normal[0] = cos_theta*rec.normal[0] + sin_theta*rec.normal[2];
        normal[2] = -sin_theta*rec.normal[0] + cos_theta*rec.normal[2];
        rec.p = p;
        rec.normal = normal;
        return true;
    }
    else
        return false;
}
这时候就可以把main中的box引用上translate和roate了,记得先旋转再平移。
        list[i++] = new translate(new rotate_y(new box(vec3(0, 0, 0), vec3(165, 165, 165), white), -18), vec3(130,0,65));
        list[i++] = new translate(new rotate_y(new box(vec3(0, 0, 0), vec3(165, 330, 165), white),  15), vec3(265,0,295));
Chapter8:Volumes
第八章是比较激动人心的一张,Volumes,常见的体渲染包括 烟、雾等。volumes的另一个特性是,可以在内部发生散射,就像光线会在稠密的雾中发生散射一样。体渲染通常的做法是,在体的内部,放很多随机性的面,来实现散射的效果。比如一束烟可以表示为,在这束烟的内部任意point位置,都可以存在一个面,面的集合实现了烟的物理效果(感觉翻译的不好,大概就是这个意思0.0)。
对于一个常量密度的volume,一条ray通过其中的时候,在volume中传播的时候也会发生散射,光线在volume中能传播多远,也是由volume的密度决定的,密度越高,传播的效率越低,光线传播的距离也越短。
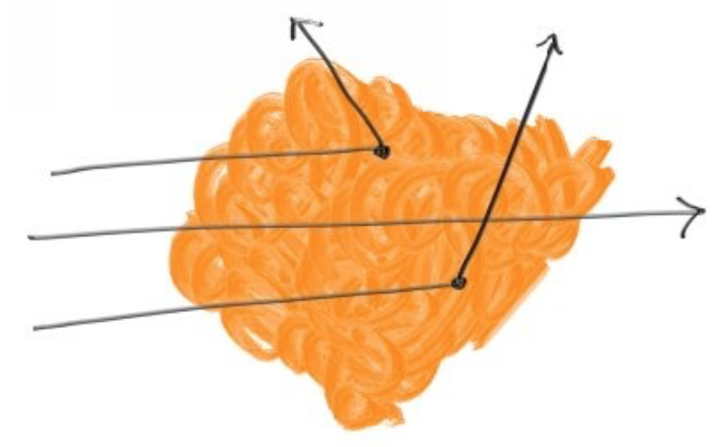
当光线穿过volume的时候,volume中的任意位置都可以发生散射,
probability = C * dL
这里的C是一个volume的系数,表示这个volume视觉上的浓密程度,dL是任意可以发生散射的一小段距离。对于一个Constant volume,我们只需要调节 密度 C和Boundary包围盒。这里再写一个constant_medium继承hitable。
在材质里面添加各向异性的材质
// 各向异性材质
class isotropic : public material {
public:
    isotropic(texture *a) : albedo(a) {}
    virtual bool scatter(const ray& r_in, const hit_record& rec, vec3& attenuation, ray& scattered) const  {
        scattered = ray(rec.p, random_in_unit_sphere());
        attenuation = albedo->value(rec.u, rec.v, rec.p);
        return true;
    }
    texture *albedo;
};
// 体,恒量介质
class constant_medium : public hitable  {
public:
    constant_medium(hitable *b, float d, texture *a) : boundary(b), density(d) { phase_function = new isotropic(a); }
    virtual bool hit(const ray& r, float t_min, float t_max, hit_record& rec) const;
    virtual bool bounding_box(float t0, float t1, aabb& box) const {
        return boundary->bounding_box(t0, t1, box); }
    hitable *boundary;
    float density;
    // 材质为各项异性的材质
    material *phase_function;
};

bool constant_medium::hit(const ray &r, float t_min, float t_max, hit_record &rec) const {
    hit_record rec1, rec2;
    if (boundary->hit(r, -FLT_MAX, FLT_MAX, rec1)) {
        if (boundary->hit(r, rec1.t+0.0001, FLT_MAX, rec2)) {
            if (rec1.t < t_min)
                rec1.t = t_min;
            if (rec2.t > t_max)
                rec2.t = t_max;
            if (rec1.t >= rec2.t)
                return false;
            if (rec1.t < 0)
                rec1.t = 0;
            float distance_inside_boundary = (rec2.t - rec1.t)*r.direction().length();
            float hit_distance = -(1/density)*log(drand48());
            if (hit_distance < distance_inside_boundary) {
                rec.t = rec1.t + hit_distance / r.direction().length();
                rec.p = r.point_at_parameter(rec.t);
                rec.normal = vec3(1,0,0);  // arbitrary
                rec.mat_ptr = phase_function;
                return true;
            }
        }
    }
    return false;
}
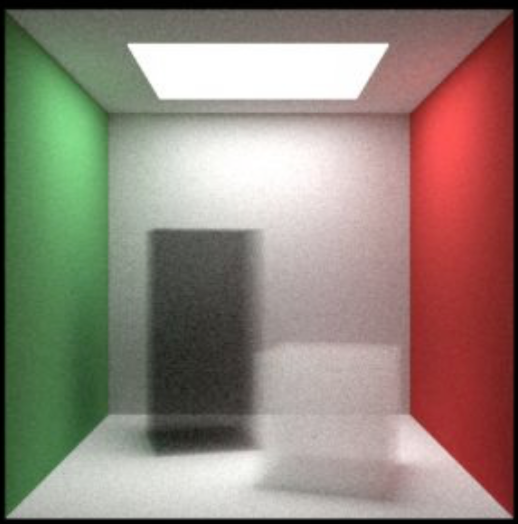
使用main中的cornell_smoke 渲染出来的场景如下:
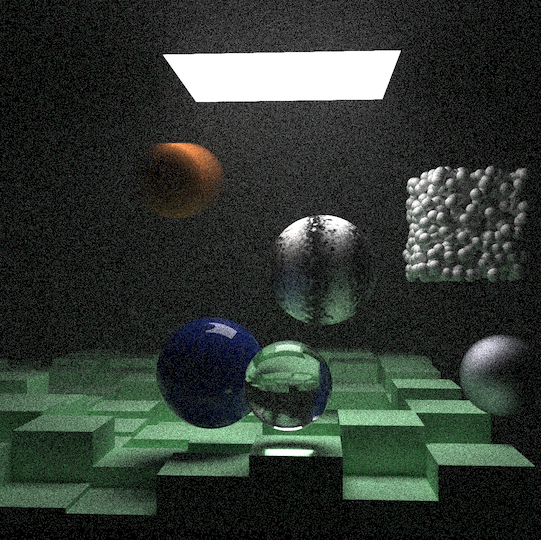
Chapter9:A Scene Testing All New Features
最后一张是渲染运用第二本书上的知识点,渲染出一张和封面一样的图片。
我渲染的场景和原书略有不同,参数如下:
分辨率1000x1000 sample 100
hitable *final() {
    int nb = 10;
    hitable **list = new hitable*[3000];
    material *white = new lambertian( new constant_texture(vec3(0.73, 0.73, 0.73)) );
    material *ground = new lambertian( new constant_texture(vec3(0.48, 0.83, 0.53)) );
    int b = 0;
    int l = 0;
    for (int i = 0; i < nb; i++) {
        for (int j = 0; j < nb; j++) {
            float w = 100;
            float x0 = i*w;
            float z0 = j*w;
            float y0 = 0;
            float x1 = x0 + w;
            float y1 = 100*(drand48()+0.01);
            float z1 = z0 + w;
            cout << "("<<x0<<","<<y0<<","<<z0<<") ("<<x1<<","<<y1<<","<<z1<<")"<<endl;
            list[l++] = new box(vec3(x0, y0, z0), vec3(x1, y1, z1), ground);
        }
    }
    material *light = new diffuse_light( new constant_texture(vec3(7, 7, 7)) );
    list[l++] = new xz_rect(123, 423, 147, 412, 554, light);
    vec3 center(400, 400, 200);
    list[l++] = new moving_sphere(center, center+vec3(30, 0, 0), 0, 1, 50,
                                  new lambertian(new constant_texture(vec3(0.7, 0.3, 0.1))));
    list[l++] = new sphere(vec3(260, 150, 45), 50, new dielectric(1.5));
    list[l++] = new sphere(vec3(0, 150, 145), 50, new metal(vec3(0.8, 0.8, 0.9), 10.0));
    hitable *boundary = new sphere(vec3(360, 150, 145), 70, new dielectric(1.5));
    list[l++] = boundary;
    list[l++] = new constant_medium(boundary, 0.2, new constant_texture(vec3(0.2, 0.4, 0.9)));
    boundary = new sphere(vec3(0, 0, 0), 5000, new dielectric(1.5));
    list[l++] = new constant_medium(boundary, 0.0001, new constant_texture(vec3(1.0, 1.0, 1.0)));
    texture *pertext = new noise_texture(0.1);
    list[l++] =  new sphere(vec3(220,280, 300), 80, new lambertian( pertext ));
    int ns = 1000;
    for (int j = 0; j < ns; j++) {
        list[l++] = new sphere(vec3(165*drand48()-100, 165*drand48()+270, 165*drand48()+395),10 , white);
    }
    cout<< "len(l) = " << l << endl;
    return new hitable_list(list,l);
}