使用rest framerok时,需要写API接口文档,此时就需要用到 apidoc(个人觉得这个用的比较顺手)
需要安装nodejs,,,
windows 下
1 然后验证是否安装成功 node -v
2 安装完nodejs环境后,会自带npm,npm为nodejs包管理工具,安装apidoc :npm install apidoc -g,
安装完成后,使用apidoc -h,查看是否安装成功
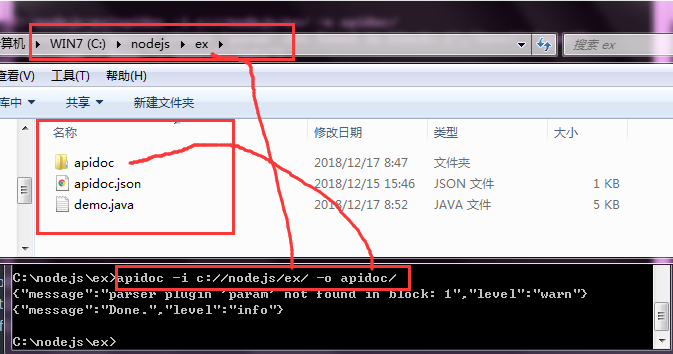
3 C: odejsex>apidoc -i c://nodejs/ex/ -o apidoc/ [使用,apidoc.json一定要放在同级目录]


{
  "name": "apidoc-example",
  "version": "0.3.0",
  "description": "apiDoc example project",
  "title": "Custom apiDoc browser title",
  "url" : "https://api.github.com/v1"
}
/**
* @api {post} ([v1|v2]+)/reply/(d+)$ [post]回复单篇文章
* @apiName post_id_reply
* @apiGroup Get_reply
* @apiSuccessExample Response (example):
* HTTP/1.1 200
回复文章的评论
{
"r_content": "回复内容",
"grop": "如果没有to_u_id的话就需要拿到上一层的grop_id+1",
"m_id": "文章id",
"u_id": "用户id"
}
* @apiSuccessExample Response (example):
* HTTP/1.1 200
回复文章的里面别人的评论
{
"r_content": "回复内容44454",
"grop": 2,
"m_id": 2,
"u_id": 2,
"to_u_id":3
}
*/
/**
* @api {get} ([v1|v2]+)/reply/(d+)$ [get]得到单篇文章的评论
* @apiName get_id_reply
* @apiGroup Get_reply
* @apiSuccessExample Response (example):
* HTTP/1.1 200
{
"id": "评论纪录ID",
"to_u_id": "默认null,即为回复谁的id",
"to_u_id": {
"id": 2,
"u_user": "liu1"
},
"r_content": "回复内容3",
"r_c_time": "回复时间,默认null",
"grop": "评论楼id",
"m_id": "评论文id",
"u_id": "评论人id"
}
*/
/**
* @api {delete} ([v1|v2]+)/get/(d+) [put]删除单篇文章
* @apiName delete_fun
* @apiGroup Show One
*/
/**
* @api {put} ([v1|v2]+)/get/(d+) [put]更新单篇文章
* @apiName update_fun
* @apiGroup Show One
* @apiSuccessExample Response (example):
* HTTP/1.1 200
{
"id": 1,
"t_type": "文章分类的id",
"u_id": "用户名",
"m_head": "标题",
"m_content": "内容"
}
*/
/**
* @api {post} ([v1|v2]+)/get/(d+) [post]推荐单篇文章
* @apiName post_fun
* @apiGroup Show One
* @apiSuccessExample Response (example):
* HTTP/1.1 200
{
"msg": "推荐成功",
"code": 10003
}
*/
/**
* @api {get} ([v1|v2]+)/get/(d+) [get]单篇文章
* @apiName get_fun
* @apiGroup Show One
* @apiSuccess {Int} id 文章 ID.
* @apiSuccess {Int} u_id 作者名.
* @apiSuccess {Int} t_type 文章类型.
* @apiSuccess {String} m_head 文章标题.
* @apiSuccess {String} m_content 文章内容.
* @apiSuccess {Time} m_time 文章发表时间.
* @apiSuccess {String} m_image 附带图片.
* @apiSuccess {Int} y_dl 阅读量.
* @apiSuccess {Int} t_jl 推荐量.
* @apiSuccessExample Response (example):
* HTTP/1.1 200
{
"id": 2,
"t_type": "伤感文",
"u_id": "liu1",
"m_head": "这是标题2",
"m_content": "内容",
"m_time": null,
"m_image": null,
"y_dl": 1,
"t_jl": 1
}
*/
/**
* @api {post} ([v1|v2]+)/get/ [post]提交文章
* @apiName post_fun
* @apiGroup Show
* @apiSuccess {Int} id 文章 ID.
* @apiSuccess {Int} u_id 作者ID.
* @apiSuccess {Int} t_type 文章类型ID.
* @apiSuccess {String} m_head 文章标题.
* @apiSuccess {String} m_content 文章内容.
* @apiSuccessExample Request (example):
* HTTP/1.1 200 Not Authenticated
{
"t_type": "1",
"u_id": "1",
"m_head": "这是标题1147",
"m_content": "内容147",
}
*/
/**
* @api {get} ([v1|v2]+)/get/ [get]获取一页的列表
* @apiName Get_list
* @apiGroup Show
* @apiSuccess {String} id 文章 ID.
* @apiSuccess {String} u_id 作者名.
* @apiSuccess {String} t_type 文章类型.
* @apiSuccess {String} m_head 文章标题.
* @apiSuccess {String} m_content 文章内容.
*/
/**
* @api {post} ([v1|v2]+)/auth/ 登录 and 注册
* @apiName Login&Regist
* @apiGroup User
* @apiParam {Number} username 唯一用户 ID.
* @apiParam {Number} password 用户密码.
* @apiParam {Number} regist 注册用户时使用,有传参数即代表注册用户.
* @apiSuccess {String} code 成功状态码.
* @apiSuccess {String} msg 成功信息.
* @apiSuccess {String} u_id 登录用户.
* @apiSuccess {String} token 登录token_24小时有效.
*
* @apiError code 错误状态码.
* @apiError msg 错误信息.
*
* @apiSuccessExample Request (example):
* HTTP/1.1 200 Not Authenticated
* 登录示例——#协议form-data {username=liu&password=xxx;}
* 注册示例——#协议form-data {username=liu&password=xxx®ist=1;}
*/