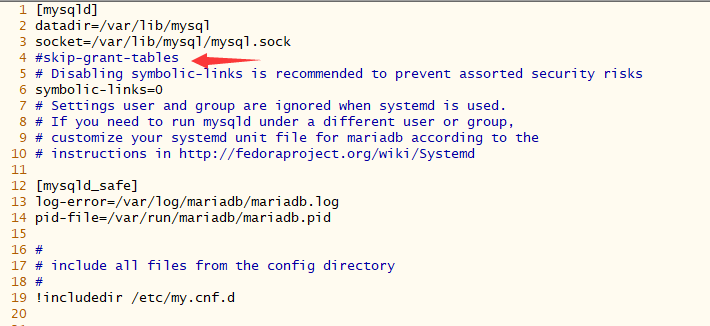
1、修改my.cnf

在这个文件里面加入 skip-grant-tables

修改之后,保存。然后重启数据库
2、由于我的系统是Centos7 ,数据库是mariadb ,所以执行命令如下;

3、重启数据库之后,我们再次进入数据库就不需要密码验证了。
4、进入数据库修改密码;
[root@ub1 ~]$ mysql
Welcome to the MySQL monitor. Commands end with ; or g.
Your MySQL connection id is 3
Server version: 5.7.21-0ubuntu0.16.04.1 (Ubuntu)
... ...
mysql> use mysql;
Reading table information for completion of table and column names
You can turn off this feature to get a quicker startup with -A
Database changed
mysql>
修改更新密码
UPDATE user SET password=PASSWORD('your_new_passwd')WHERE User='root';
值得注意的是mysql和mariadb 是不一样的,在mysql中是没有password这个字段的,要把这个password改成authentication_string;
mysql> UPDATE user SET authentication_string=PASSWORD('root')WHERE User='root';
Query OK, 0 rows affected, 1 warning (0.31 sec)
Rows matched: 1 Changed: 0 Warnings: 1
5、改完密码之后一定记得刷新一下数据库,我之前好多次操作没有成功都是因为没有刷新数据库;
mysql> flush privileges;
6、最后把/etc/my.cnf中的skip-grant-tables注释掉
7、重新启动服务器,密码即可生效。
需要验证密码才能进数据库;


至此,完成。