翻译自官网flume1.8用户指南,原文地址:Flume 1.8.0 User Guide
篇幅限制,分为以下5篇:
【翻译】Flume 1.8.0 User Guide(用户指南)
【翻译】Flume 1.8.0 User Guide(用户指南) source
【翻译】Flume 1.8.0 User Guide(用户指南) Sink
【翻译】Flume 1.8.0 User Guide(用户指南) Channel
【翻译】Flume 1.8.0 User Guide(用户指南) Processors
一、 介绍
1. 概述
Apache Flume 是收集、汇总和移动大数据量的不同数据源到集中的数据仓库的分布式的、可靠的、可用的系统。
使用flume 不仅仅可以做日志收集。自从数据源可自定义,flume可以转移大量的事件数据,包括但不限于网络数据、社交网络数据、邮件数据和处理任何数据源的问题。
Apache Flume是Apache基金会的顶级项目。
现有两个可用的发布版本:0.x 和 1.x。
0.9.x的文档在 flume0.9.x 用户指南。
这篇文档适用于1.4.x版本。
新的和已使用的用户推荐使用1.x版本,这是可以使用最新版本带来的性能提升和更灵活的配置。
2. 系统要求
1. Java运行环境 java1.8 及以上
2. 内存-给source、channel、sink配置足够的内存
3. 磁盘空间-给channel或sink配置足够的磁盘空间
4. 目录权限-给agent目录的读写权限
3. 架构
1.1 数据流模型
一个flume的事件定为为一个byte的数据流和一组可选的字符串属性。flume的 agent(JVm)进程是外部数据源通过(agent)到下一个目的地的组件。
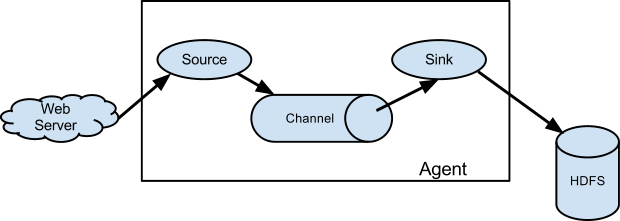
flume的source,消费外部(比如一个web 系统)传递给它的事件。外部source 发送目标flume source可识别的格式的事件到flume。如:一个Avro flume source 可以接收Avro客户端发送的Avro格式的事件,或者接收另一个flume agent 的Avro sink发送的数据。一个相似的流可以使用flume的 Thrift source接收Thrift sink 或者Thrift RPC客户端和Thrift 客户端用任何语言使用flume Thrift 协议生成的事件。文件channel是一个例子,使用本地文件系统支撑,sink从channel里面拿出数据,放到外部的资源库(如HDFS)或者在流中转发到另一个flume的agent的source。source和sink在指定的agent中以异步的方式传递事件。
1.2 复杂流
flume 允许用户创建复杂的数据链路,事件在到达终点前可以经过多个agent,也允许fail-in和fail-out的流,为失败的跳跃点创建上下文路由和备份路由。
1.3 可靠性
流中的事件事件在交付到下一个agent或者最终的仓库(如HDFS),在每个agent的channel中事件是分段的。事件只有在他们存储到下一个agent的channl或最终的仓库中,才会从channel中删除。这就是flume在流支持的“simple-hop”的端到端可靠性交付语义。
flume使用一个交易方法保证数据交付。source和sink分别将事件从一个channel中存储和取出,这样可以确保事件流可靠的从一个点到另一个点。在多链路的流中,为了保证数据安全的存储到下一个链路的channel中,上一个链路的sink和下一个链路的source都会执行交易。
1.4 可恢复性
channel存储事件,并管理数据恢复。flume支持持久化的备份在本地文件系统中的channel。flume也有事件存储在内存队列的channel,更快,但是事件存放在内存中,agent进程死亡不能恢复。
二、配置
2.1 配置一个agent
flume的agent 配置存储在本地配置文件中。这是一个java properties 文件格式。一个配置文件里面可以有一个或多个agent。配置文件里面包括每一个source,sink和channel的配置和他们怎么绑定数据流的连接。
2.1.1 配置单个组件
每个组件(source,sink和channel)在流中名字,类型和配置,都有特定的类型。例如,Avrosource需要接收数据的hostname(或ip 地址) 和端口号。内存channel有最大队列容量, HDFS sink需要知道文件系统的URI, 创建文件的路径,文件滚动的频率等。flume agent的所有配置属性都需要在配置文件中配置。
2.1.2 连接组件
agent需要知道加载的组件和他们的连接方式去构建一个流。这是监听每一个agent的source,sinks和channel名字完成的和每一个sink和source跟channel的连接。例如,一个事件流从avroWeb的Avro source到hdfs集群的HDFS sink ,通过一文件channel连接。配置文件包含组件的名字和avroWeb source和hdfs-cluster sinke的绑定。
2.1.3 启动一个aget
使用flume发布版本bin目录下的shell脚本flume-ng启动一个agent。你需要在命令行下执行agent命名、配置文件路径和配置文件:
$ bin/flume-ng agent -n $agent_name -c conf -f conf/flume-conf.properties.template
现在agent会启动配置文件中的source和sink。
2.1.4 一个简单的案列
我们提供一个配置文件的样例,描述一个简单的flume部署节点。这个配置文件让用户生成事件,并打印在console日志中。
# example.conf: A single-node Flume configuration

# Name the components on this agent
a1.sources = r1
a1.sinks = k1
a1.channels = c1

# Describe/configure the source
a1.sources.r1.type = netcat
a1.sources.r1.bind = localhost
a1.sources.r1.port = 44444

# Describe the sink
a1.sinks.k1.type = logger

# Use a channel which buffers events in memory
a1.channels.c1.type = memory
a1.channels.c1.capacity = 1000
a1.channels.c1.transactionCapacity = 100

# Bind the source and sink to the channel
a1.sources.r1.channels = c1
a1.sinks.k1.channel = c1
这个配置定义了一个单独的agent a1。 a1有个监听端口44444的source,缓存事件数据在内存的channel,记录事件数据在console的sink。配置文件定义了各个组件,描述了他们的types和配置参数。一个配置文件可能定义多个agent,所以当一个flume进程启动时,会传递一个标示,表示启动哪一个agent。
通过这个配置文件,我们可以启动flume用如下命令:
$ bin/flume-ng agent --conf conf --conf-file example.conf --name a1 -Dflume.root.logger=INFO,console
记住在完整的部署环境我们会输入一个或多个选项: --config=<confi-dir>, <conf-dir>目录包括脚本flume-env.sh 和log4j 的配置文件。在这个示例中,我们执行flume没有使用自定义的环境脚本,通过java参数启动flume记录日志到console。
在一个单独的命令窗口,我们可以远程44444端口,发送数据到flume:
$ telnet localhost 44444
Trying 127.0.0.1...
Connected to localhost.localdomain (127.0.0.1).
Escape character is '^]'.
Hello world! <ENTER>
OK
flume的控制台会输出事件的日志消息
12/06/19 15:32:19 INFO source.NetcatSource: Source starting
12/06/19 15:32:19 INFO source.NetcatSource: Created serverSocket:sun.nio.ch.ServerSocketChannelImpl[/127.0.0.1:44444]
12/06/19 15:32:34 INFO sink.LoggerSink: Event: { headers:{} body: 48 65 6C 6C 6F 20 77 6F 72 6C 64 21 0D          Hello world!. }
恭喜你- 你成功的配置和部署了一个flume的agent!接下来的章节包括agent的配置的更多细节。
2.1.5 在配置文件中使用环境
flume有个功能可以替代环境变量,例如:
a1.sources = r1
a1.sources.r1.type = netcat
a1.sources.r1.bind = 0.0.0.0
a1.sources.r1.port = ${NC_PORT}
a1.sources.r1.channels = c1
只在值上有效,在可以上无效(只有在等号的右边有效)
agent通过设置“propertiesImplementation = org.apache.flume.node.EnvVarResolverProperties” 可以调用java的系统属性。
例如:
$ NC_PORT=44444 bin/flume-ng agent –conf conf –conf-file example.conf –name a1 -Dflume.root.logger=INFO,console -DpropertiesImplementation=org.apache.flume.node.EnvVarResolverProperties
以上只是一个例子,环境变量可以通过其他方式设置,包括设置在conf/flume-env.sh中。
2.1.6 记录原始数据
在许多生产环境中,通过获取管道的原始数据流记录流并不是理想的行为,因为这可能导致敏感数据或与安全相关的配置(如密钥)泄漏到Flume日志文件中。默认情况下,Flume不会记录这些信息。另一方面,如果数据管道被破坏,Flume将尝试为调试问题提供线索。
调试事件管道问题的一种方法是设置一个连接到日志记录器接收器的额外内存channel,它将把所有事件数据输出到Flume日志。然而,在某些情况下,这种方法是不够的。
为了启用与事件和配置相关的数据的日志记录,除了log4j属性之外,还必须设置一些Java系统属性。
为了启用与事件和配置相关的数据的日志记录,除了log4j属性之外,还必须设置一些Java系统属性。要启用与配置相关的日志记录,请设置Java系统属性-Dorg.apache.flume.log.printconfig=true。这可以通过命令行传递,也可以通过在flume-env.sh中的JAVA_OPTS变量中设置。
要启用数据日志记录,请设置Java系统属性-Dorg.apache.flume.log。rawdata=true的方式与上面描述的相同。对于大多数组件,还必须将log4j日志级别设置为DEBUG或TRACE,以使特定于事件的日志显示在Flume日志中。
下面是一个启用配置日志记录和原始数据日志记录的示例,同时还将Log4j日志级别设置为调试控制台输出:
$ bin/flume-ng agent --conf conf --conf-file example.conf --name a1 -Dflume.root.logger=DEBUG,console -Dorg.apache.flume.log.printconfig=true -Dorg.apache.flume.log.rawdata=true
2.1.7 zookeeper 基础配置
flume支持通过Zookeeper 配置agent,这是一个实验性的功能。配置文件需要上传到Zookeeper中指定前缀的目录。配置文件存储在Zookeeper节点数据中。下面是代理a1和a2的Zookeeper节点树的样子
- /flume
 |- /a1 [Agent config file]
 |- /a2 [Agent config file]
上传配置文件后,使用如下选项启动agent:
$ bin/flume-ng agent –conf conf -z zkhost:2181,zkhost1:2181 -p /flume –name a1 -Dflume.root.logger=INFO,console
| Argument Name | Default | Description |
|---|---|---|
| z | – | Zookeeper连接字符串. 逗号分割的列表 hostname:port |
| p | /flume | zookeeper存储flume配置的目录 |
2.1.8 安装第三方插件
Flume具有完全基于插件的架构。虽然Flume附带了许多开箱即用的源、通道、接收器、序列化器等,但是存在许多与Flume分离的实现。
尽管通过将自定义Flume组件的jar添加到Flume -env中的FLUME_CLASSPATH变量中,始终可以包含自定义的Flume-env.sh文件,Flume现在支持一个名为plugins的特殊目录。它会自动选择以特定格式打包的插件。这样可以更容易地管理插件打包问题,以及更简单地调试和故障排除几个类的问题,特别是库依赖冲突。
2.1.9 plugins.d
plugins.d的目录存放在$FLUME_HOME/plugins.d, 在启动flume-ng脚本的时候,会查找plugins.d 目录,遵循以下格式,并在启动java时以适当的路径包含它们。
2.1.10 插件的目录结构
每一个在plugins.d 下面的插件,都会有三个子目录
- lib - 插件的jar(s)文件
- libext - 插件的依赖jar
- native - 所有需要的本地库文件,如:.so 文件
plugins.d目录中两个插件的示例:
plugins.d/
plugins.d/custom-source-1/
plugins.d/custom-source-1/lib/my-source.jar
plugins.d/custom-source-1/libext/spring-core-2.5.6.jar
plugins.d/custom-source-2/
plugins.d/custom-source-2/lib/custom.jar
plugins.d/custom-source-2/native/gettext.so
2.2 数据获取
Flume支持许多从外部源获取数据的机制。
2.2.1 RPC
在Flume发行版中包含的Avro客户端可以使用Avro RPC机制将给定的文件发送到Flume Avro源:
$ bin/flume-ng avro-client -H localhost -p 41414 -F /usr/logs/log.10
上面的命令会发送/usr/logs/log.10 的内容的flume监听这个端口的source
2.2.2 执行命令
有一个执行给定命令并使用输出的exec源。输出的一行。文本后面跟着回车(' ')或换行(' ')或两者一起。
2.2.3 网络流
Flume支持以下机制从流行的日志流类型读取数据,例如:
- Avro
- Thrift
- Syslog
- Netcat
2.2.4 设置多链路流

为了跨多个代理或链路传递数据流,前一个agent的接收器和当前链路的源需要是avro类型,接收器指向源的主机名(或IP地址)和端口。
2.2.5 合并
日志收集中非常常见的情况是大量日志生成客户端将数据发送到连接到存储子系统的少数消费者agent。 例如,从数百个Web服务器收集的日志发送给写入HDFS集群的十几个agent。
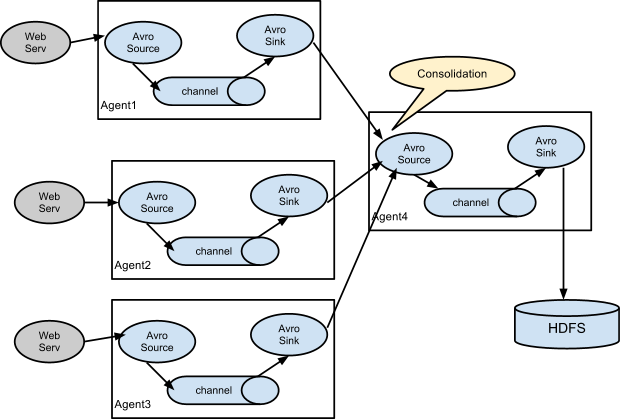
这可以通过使用avro接收器配置多个第一层agent在Flume中实现,所有这些agent都指向单个代理的avro source(同样,您可以在这种情况下使用thrift源/接收器/客户端)。 第二层代理上的此源将接收的事件合并到单个channel中,该channel由sink消费到其最终目的地。
2.2.6 多路复用流程
Flume支持将事件流多路复用到一个或多个目的地。 这是通过定义可以复制或选择性地将事件路由到一个或多个channel的流复用器来实现的。

上面的例子显示了来自agent “foo”的源代码将流程扩展到三个不同的channel。输入流可以复制或多路复用。 在复制流的情况下,每个事件被发送到所有三个channel。 对于多路复用情况,当事件的属性与预配置的值匹配时,事件将被传递到可用通道的子集。 例如,如果一个名为“txnType”的事件属性设置为“customer”,那么它应该转到channel1和channel3,如果它是“vendor”,那么它应该转到channel2,否则转到channel3。 可以在agent的配置文件中设置映射。
三、配置
如前面部分所述,Flume agent程序配置是从类似于具有分层属性设置的Java属性文件格式的文件中读取的。
3.1 定义流
要在单个代理中定义流,您需要通过channel链接源和接收器。 您需要列出给定agent的源,sink和channel,然后将源和sink指向channel。 源实例可以指定多个channel,但sink实例只能指定一个channel。 格式如下:
# list the sources, sinks and channels for the agent
<Agent>.sources = <Source>
<Agent>.sinks = <Sink>
<Agent>.channels = <Channel1> <Channel2>

# set channel for source
<Agent>.sources.<Source>.channels = <Channel1> <Channel2> ...

# set channel for sink
<Agent>.sinks.<Sink>.channel = <Channel1>
示例中,agent 叫 “agent_foo”从给一个额外的avro客户端读取数据,使用内存channel,发送到HDFS。配置文件weblog.confg 就像这样:
# list the sources, sinks and channels for the agent
agent_foo.sources = avro-appserver-src-1
agent_foo.sinks = hdfs-sink-1
agent_foo.channels = mem-channel-1

# set channel for source
agent_foo.sources.avro-appserver-src-1.channels = mem-channel-1

# set channel for sink
agent_foo.sinks.hdfs-sink-1.channel = mem-channel-1
这将使事件从avro-AppSrv-source流向hdfs-Cluster1-sink,通过内存通道mem-channel-1。 当使用weblog.config作为其配置文件启动代理程序时,它将实例化该流程。
3.2 配置单个组件
定义流后,您需要设置每个源,sink和channel的属性。 这是以相同的分层命名空间方式完成的,您可以在其中设置组件类型以及特定于每个组件的属性的其他值:
# properties for sources
<Agent>.sources.<Source>.<someProperty> = <someValue>

# properties for channels
<Agent>.channel.<Channel>.<someProperty> = <someValue>

# properties for sinks
<Agent>.sources.<Sink>.<someProperty> = <someValue>
需要为Flume的每个组件设置属性“type”,以了解它需要什么类型的对象。 每个源,sink和channel类型都有自己的一组属性,使其能够按预期运行。 所有这些都需要根据需要进行设置。 在前面的示例中,我们有一个从avro-AppSrv-source到hdfs-Cluster1-sink的流程通过内存通道mem-channel-1。 这是一个显示每个组件配置的示例:
agent_foo.sources = avro-AppSrv-source
agent_foo.sinks = hdfs-Cluster1-sink
agent_foo.channels = mem-channel-1

# set channel for sources, sinks

# properties of avro-AppSrv-source
agent_foo.sources.avro-AppSrv-source.type = avro
agent_foo.sources.avro-AppSrv-source.bind = localhost
agent_foo.sources.avro-AppSrv-source.port = 10000

# properties of mem-channel-1
agent_foo.channels.mem-channel-1.type = memory
agent_foo.channels.mem-channel-1.capacity = 1000
agent_foo.channels.mem-channel-1.transactionCapacity = 100

# properties of hdfs-Cluster1-sink
agent_foo.sinks.hdfs-Cluster1-sink.type = hdfs
agent_foo.sinks.hdfs-Cluster1-sink.hdfs.path = hdfs://namenode/flume/webdata

#...
3.3 agent中添加多数据流
单个Flume代理可以包含多个独立流。 您可以在配置中列出多个源,sink和channel。 可以链接这些组件以形成多个流:
# list the sources, sinks and channels for the agent
<Agent>.sources = <Source1> <Source2>
<Agent>.sinks = <Sink1> <Sink2>
<Agent>.channels = <Channel1> <Channel2>
然后,你可以将源和sink链接到channel(用于接收器)的相应channel(用于源),以设置两个不同的流。 例如,如果您需要在agent中设置两个流,一个从外部avro客户端到外部HDFS,另一个从尾部输出到avro接收器,那么这是一个配置来执行此操作:
# list the sources, sinks and channels in the agent
agent_foo.sources = avro-AppSrv-source1 exec-tail-source2
agent_foo.sinks = hdfs-Cluster1-sink1 avro-forward-sink2
agent_foo.channels = mem-channel-1 file-channel-2

# flow #1 configuration
agent_foo.sources.avro-AppSrv-source1.channels = mem-channel-1
agent_foo.sinks.hdfs-Cluster1-sink1.channel = mem-channel-1

# flow #2 configuration
agent_foo.sources.exec-tail-source2.channels = file-channel-2
agent_foo.sinks.avro-forward-sink2.channel = file-channel-2
3.4 配置多agent数据流
要设置多层流,您需要有第一跳的avro / thrift接收器指向下一跳的avro / thrift源。 这将导致第一个Flume代理将事件转发到下一个Flume agent。 例如,如果您使用avro客户端定期向本地Flume agent发送文件(每个事件1个文件),则此本地agent可以将其转发到另一个已安装存储的agent。
Weblog agent 配置:
# list sources, sinks and channels in the agent
agent_foo.sources = avro-AppSrv-source
agent_foo.sinks = avro-forward-sink
agent_foo.channels = file-channel

# define the flow
agent_foo.sources.avro-AppSrv-source.channels = file-channel
agent_foo.sinks.avro-forward-sink.channel = file-channel

# avro sink properties
agent_foo.sinks.avro-forward-sink.type = avro
agent_foo.sinks.avro-forward-sink.hostname = 10.1.1.100
agent_foo.sinks.avro-forward-sink.port = 10000

# configure other pieces
#...
HDFS agent 配置:
# list sources, sinks and channels in the agent
agent_foo.sources = avro-collection-source
agent_foo.sinks = hdfs-sink
agent_foo.channels = mem-channel

# define the flow
agent_foo.sources.avro-collection-source.channels = mem-channel
agent_foo.sinks.hdfs-sink.channel = mem-channel

# avro source properties
agent_foo.sources.avro-collection-source.type = avro
agent_foo.sources.avro-collection-source.bind = 10.1.1.100
agent_foo.sources.avro-collection-source.port = 10000

# configure other pieces
#...
在这里,我们将weblog agent的avro-forward-sink链接到hdfs agent的avro-collection-source。 这将导致来自外部应用程序服务器源的事件最终存储在HDFS中。
3.5 输出流
如前一节所述,Flume支持输入一个源到多个通道的流量。 输出,复制和多路复用有两种模式。 在复制流程中,事件将发送到所有已配置的channel。 在多路复用的情况下,事件仅被发送到合格channel的子集。 为了散开流量,需要指定源的channel列表以及输出它的策略。 这是通过添加可以复制或多路复用的channel“选择器”来完成的。 如果它是多路复用器,则进一步指定选择规则。 如果您没有指定选择器,那么默认情况下它会复制:
# List the sources, sinks and channels for the agent
<Agent>.sources = <Source1>
<Agent>.sinks = <Sink1> <Sink2>
<Agent>.channels = <Channel1> <Channel2>

# set list of channels for source (separated by space)
<Agent>.sources.<Source1>.channels = <Channel1> <Channel2>

# set channel for sinks
<Agent>.sinks.<Sink1>.channel = <Channel1>
<Agent>.sinks.<Sink2>.channel = <Channel2>

<Agent>.sources.<Source1>.selector.type = replicating
多路复用选择具有另一组属性以分流流。 这需要指定事件属性到channel集的映射。 选择器检查事件头中的每个已配置属性。 如果它与指定的值匹配,则该事件将发送到映射到该值的所有channel。 如果没有匹配项,则将事件发送到配置为默认值的channel集:
# Mapping for multiplexing selector
<Agent>.sources.<Source1>.selector.type = multiplexing
<Agent>.sources.<Source1>.selector.header = <someHeader>
<Agent>.sources.<Source1>.selector.mapping.<Value1> = <Channel1>
<Agent>.sources.<Source1>.selector.mapping.<Value2> = <Channel1> <Channel2>
<Agent>.sources.<Source1>.selector.mapping.<Value3> = <Channel2>
#...

<Agent>.sources.<Source1>.selector.default = <Channel2>
映射允许为每个值重叠channel。
以下示例具有多路复用到两个路径的单个流。 名为agent_foo的agent具有单个avro源和两个链接到两个接收器的channel:
# list the sources, sinks and channels in the agent
agent_foo.sources = avro-AppSrv-source1
agent_foo.sinks = hdfs-Cluster1-sink1 avro-forward-sink2
agent_foo.channels = mem-channel-1 file-channel-2

# set channels for source
agent_foo.sources.avro-AppSrv-source1.channels = mem-channel-1 file-channel-2

# set channel for sinks
agent_foo.sinks.hdfs-Cluster1-sink1.channel = mem-channel-1
agent_foo.sinks.avro-forward-sink2.channel = file-channel-2

# channel selector configuration
agent_foo.sources.avro-AppSrv-source1.selector.type = multiplexing
agent_foo.sources.avro-AppSrv-source1.selector.header = State
agent_foo.sources.avro-AppSrv-source1.selector.mapping.CA = mem-channel-1
agent_foo.sources.avro-AppSrv-source1.selector.mapping.AZ = file-channel-2
agent_foo.sources.avro-AppSrv-source1.selector.mapping.NY = mem-channel-1 file-channel-2
agent_foo.sources.avro-AppSrv-source1.selector.default = mem-channel-1
选择器检查名为“State”的标头。 如果该值为“CA”,则将其发送到mem-channel-1,如果其为“AZ”,则将其发送到文件channel-2,或者如果其为“NY”则为两者。 如果“状态”标题未设置或与三者中的任何一个都不匹配,则它将转到mem-channel-1,其被指定为“default”。
选择器还支持可选channel。 要为标头指定可选channel,可通过以下方式使用config参数“optional”:
# channel selector configuration
agent_foo.sources.avro-AppSrv-source1.selector.type = multiplexing
agent_foo.sources.avro-AppSrv-source1.selector.header = State
agent_foo.sources.avro-AppSrv-source1.selector.mapping.CA = mem-channel-1
agent_foo.sources.avro-AppSrv-source1.selector.mapping.AZ = file-channel-2
agent_foo.sources.avro-AppSrv-source1.selector.mapping.NY = mem-channel-1 file-channel-2
agent_foo.sources.avro-AppSrv-source1.selector.optional.CA = mem-channel-1 file-channel-2
agent_foo.sources.avro-AppSrv-source1.selector.mapping.AZ = file-channel-2
agent_foo.sources.avro-AppSrv-source1.selector.default = mem-channel-1
选择器将首先尝试写入所需的channel,如果其中一个channel无法使用事件,则会使事务失败。 在所有渠道上重新尝试交易。 一旦所有必需的channel消耗了事件,则选择器将尝试写入可选channel。 任何可选channel使用该事件的失败都会被忽略而不会重试。
如果可选channel与特定报头的所需channel之间存在重叠,则认为该channel是必需的,并且channel中的故障将导致重试所有必需channel集。 例如,在上面的示例中,对于标题“CA”,mem-channel-1被认为是必需的channel,即使它被标记为必需和可选,并且写入此channel的失败将导致该事件 在为选择器配置的所有channel上重试。
请注意,如果标头没有任何所需的channel,则该事件将被写入默认channel,并将尝试写入该标头的可选channel。 如果未指定所需的channel,则指定可选channel仍会将事件写入默认channel。 如果没有将channel指定为默认channel且没有必需channel,则选择器将尝试将事件写入可选channel。 在这种情况下,任何失败都会被忽略。