这是一篇非常简单的关于CUDA的介绍,CUDA是NVIDIA名下一款十分受欢迎的并行计算平台和模型。我在2013年写过一个关于CUDA的简单介绍,那篇文章这些年一直很受欢迎。但是CUDA开始变得简单,同时GPU也变得快了很多。今天是时候更新一篇(甚至更加简单的)介绍了。
CUDA C++只是使用CUDA创建大规模并行应用程序的方法之一。 它允许你使用功能强大的C ++编程语言来开发由GPU上运行的数千个并行线程加速的高性能算法。 许多开发人员以这种方式在应用程序中加速了他们的计算和带宽需求,包括支持正在进行的人工智能革命(称为深度学习)的库和框架。
所以,你已经听说过CUDA,并且您有兴趣学习如何在自己的应用程序中使用它。 如果您是C或C ++程序员,这篇博文应该会给您一个良好的开端。 要继续,你需要一台具有支持CUDA的GPU(Windows,Mac或Linux,任何NVIDIA GPU应该做的)的计算机,或者带有GPU的云实例(AWS,Azure,IBM SoftLayer和其他云服务) 提供者有他们)。 您还需要安装免费的CUDA工具包。
让我们开始吧!
Starting Simple
我们将从一个简单的C ++程序开始,该程序添加两个数组的元素,每个数组包含一百万个元素。
#include <iostream>
#include <math.h>

// function to add the elements of two arrays
void add(int n, float *x, float *y)
{
  for (int i = 0; i < n; i++)
      y[i] = x[i] + y[i];
}

int main(void)
{
  int N = 1<<20; // 1M elements

  float *x = new float[N];
  float *y = new float[N];

  // initialize x and y arrays on the host
  for (int i = 0; i < N; i++) {
    x[i] = 1.0f;
    y[i] = 2.0f;
  }

  // Run kernel on 1M elements on the CPU
  add(N, x, y);

  // Check for errors (all values should be 3.0f)
  float maxError = 0.0f;
  for (int i = 0; i < N; i++)
    maxError = fmax(maxError, fabs(y[i]-3.0f));
  std::cout << "Max error: " << maxError << std::endl;

  // Free memory
  delete [] x;
  delete [] y;

  return 0;
}
首先编译并运行C++程序。将上面的代码放在一个文件中并将其保存为add.cpp,然后使用C ++编译器进行编译。 我在Mac上,所以我使用的是clang ++,但你可以在Linux上使用g ++,在Windows上使用MSVC。
g++ add.cpp -o add
然后运行他:

正如预期的那样,它打印出总和中没有错误然后退出(我的答应貌似是错的)。 现在我想让这个计算在GPU的许多核心上运行(并行)。 实际上,迈出第一步非常容易。
首先,我只需将我们的add函数转换为GPU可以运行的函数,称为CUDA中的内核。 要做到这一点,我所要做的就是在函数中添加说明符__global__,它告诉CUDA C ++编译器这是一个在GPU上运行并可以从CPU代码调用的函数。
// CUDA Kernel function to add the elements of two arrays on the GPU
__global__
void add(int n, float *x, float *y)
{
  for (int i = 0; i < n; i++)
      y[i] = x[i] + y[i];
}
这些__global__函数称为kernels,在GPU上运行的代码通常称为设备代码,而在CPU上运行的代码则是主机代码。
Memory Allocation in CUDA
要在GPU上进行计算,我需要分配GPU可访问的内存。 CUDA中的统一内存(Unified Memory)提供系统中所有GPU和CPU可访问的单个内存空间。我们可以通过 调用cudaMallocManaged()在Unified Memory中分配数据,这个函数会返回一个可以从主机(CPU)代码或设备(GPU)代码访问的指针。 要释放数据,只需将指针传递给cudaFree()即可。
我只需要通过调用cudaMallocManaged()替换上面代码中对new的调用,并将调用delete []替换为调用cudaFree。
// Allocate Unified Memory -- accessible from CPU or GPU
  float *x, *y;
  cudaMallocManaged(&x, N*sizeof(float));
  cudaMallocManaged(&y, N*sizeof(float));

  ...

  // Free memory
  cudaFree(x);
  cudaFree(y);
最后,我需要启动add() kernel,它在GPU上调用它。 使用三角括号语法<<< >>>指定CUDA内核启动。 我只需将它添加到参数列表之前添加的调用中。
add<<<1, 1>>>(N, x, y);
十分简单! 我会尽快了解尖括号内的细节; 现在你需要知道的是,这一行启动了一个GPU线程来运行add()。
还有一件事:我需要CPU等到内核完成才能访问结果(因为CUDA内核启动不会阻塞调用CPU线程)。 为此,我只需在对CPU进行最终的错误检查之前调用cudaDeviceSynchronize()。
这是完整的代码:


#include <iostream>
#include <math.h>
// Kernel function to add the elements of two arrays
__global__
void add(int n, float *x, float *y)
{
  for (int i = 0; i < n; i++)
    y[i] = x[i] + y[i];
}

int main(void)
{
  int N = 1<<20;
  float *x, *y;

  // Allocate Unified Memory – accessible from CPU or GPU
  cudaMallocManaged(&x, N*sizeof(float));
  cudaMallocManaged(&y, N*sizeof(float));

  // initialize x and y arrays on the host
  for (int i = 0; i < N; i++) {
    x[i] = 1.0f;
    y[i] = 2.0f;
  }

  // Run kernel on 1M elements on the GPU
  add<<<1, 1>>>(N, x, y);

  // Wait for GPU to finish before accessing on host
  cudaDeviceSynchronize();

  // Check for errors (all values should be 3.0f)
  float maxError = 0.0f;
  for (int i = 0; i < N; i++)
    maxError = fmax(maxError, fabs(y[i]-3.0f));
  std::cout << "Max error: " << maxError << std::endl;

  // Free memory
  cudaFree(x);
  cudaFree(y);

  return 0;
}

这只是第一步,因为编写时,这个内核只对单个线程是正确的,因为运行它的每个线程都将在整个数组上执行添加。 此外,存在竞争条件,因为多个并行线程将读取和写入相同的位置。
注意:在Windows上,您需要确保在Microsoft Visual Studio中为项目的“ Configuration Properties”中将“Platform”设置为x64。
Profile it!
我认为找出内核运行多长时间的最简单方法是使用nvprof,这是CUDA Toolkit附带的命令行GPU分析器。 只需在命令行上键入nvprof ./add_cuda:
【注:译者这里使用的是1G的element,所以差距比较大】
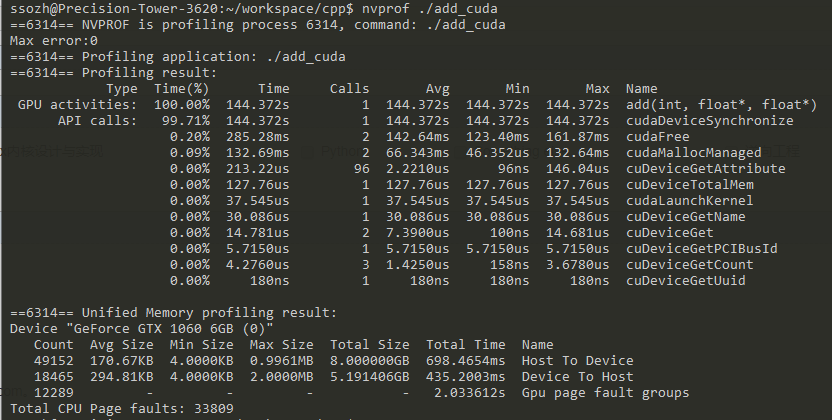
Time(%)      Time     Calls       Avg       Min       Max  Name
100.00%  463.25ms         1  463.25ms  463.25ms  463.25ms  add(int, float*, float*)
以上是nvprof的截断输出,显示了一个要添加的调用。 NVIDIA Tesla K80加速器需要大约半秒钟(译者注:1M elements),而在我3年前的Macbook Pro中,NVIDIA GeForce GT 740M大约需要半秒钟。
下面我们采用并行使他更快吧。
Picking up the Threads
现在您已经在一个kernel中运行一个线程,并进行一些了计算,那么如何使它并行? 关键在于CUDA的<<< 1,1 >>>语法。 这称为执行配置(execution configuration),它告诉CUDA运行时有多少并行线程用在GPU上。 这里有两个参数,但让我们从改变第二个参数开始(,这个参数是):线程块中的线程数(the number of threads in a thread block)。 CUDA GPU使用大小为32的线程块运行内核,因此256个线程是合理的大小【没懂】:
add<<<1, 256>>>(N, x, y);

如果我仅使用此更改运行代码,它将为每个线程执行一次计算,而不是在整个并行线程中传播计算。 要正确地做,我需要修改内核。 CUDA C ++提供的关键字让内核获得正在运行的线程的索引。 具体来说,threadIdx.x包含其块中当前线程的索引,blockDim.x包含块中的线程数。 我只是修改循环以stride through the array with parallel threads。
__global__
void add(int n, float *x, float *y)
{
  int index = threadIdx.x;
  int stride = blockDim.x;
  for (int i = index; i < n; i += stride)
      y[i] = x[i] + y[i];
}
将文件另存为add_block.cu再次编译并在nvprof中运行它。结果如下:

Time(%)      Time     Calls       Avg       Min       Max  Name
100.00%  2.7107ms         1  2.7107ms  2.7107ms  2.7107ms  add(int, float*, float*)
这是一个很大的加速(463ms到2.7ms),但是从我从1个线程到256个线程就不足为奇了。 K80比我的小Macbook Pro GPU(3.2ms)更快。 让我们继续获得更多的表现。
【译者的从144.272s到2.923s,另外这个只是add这个函数的执行时间,而不是整个程序的时间,这次整个程序的运行时间依然有半分钟。】
Out of the Blocks
CUDA GPU有许多并行处理器被分组为流式多处理器( Streaming Multiprocessors)也叫SMs。 每个SM可以运行多个并发线程块。 例如,基于Pascal GPU架构的Tesla P100 GPU具有56个SMs,每个SM能够支持多达2048个活动线程(active threads)。 为了充分利用所有这些线程,我应该使用多个线程块启动内核。
到目前为止,您可能已经猜到执行配置的第一个参数指定了线程块的数量。 并行线程块共同构成了所谓的网格。 由于我要处理N个元素,每个块有256个线程,所以我只需要计算得到至少N个线程的块数。 我只是将N除以块大小(如果N不是blockSize的倍数,则要小心舍入)。
int blockSize = 256;
int numBlocks = (N + blockSize - 1) / blockSize;
add<<<numBlocks, blockSize>>>(N, x, y);
 .
.
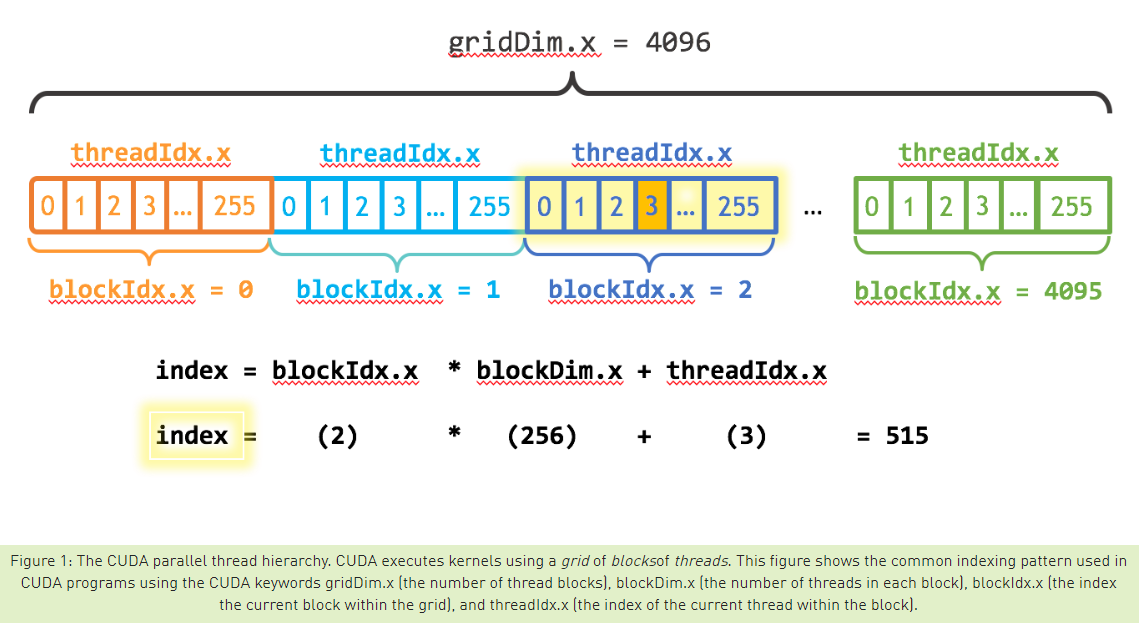
我还需要更新内核代码以考虑整个线程块网格。 CUDA提供gridDim.x,它包含网格中的块数,blockIdx.x包含网格中当前线程块的索引。 图1说明了使用blockDim.x,gridDim.x和threadIdx.x在CUDA中索引到一个数组(一维)的方法。 我们的想法是每个线程通过计算其块开头的偏移量(块索引乘以块大小:blockIdx.x * blockDim.x)并在块(threadIdx.x)中添加线程索引来获取其索引。 代码blockIdx.x * blockDim.x + threadIdx.x在CUDA中经常使用。
__global__
void add(int n, float *x, float *y)
{
  int index = blockIdx.x * blockDim.x + threadIdx.x;
  int stride = blockDim.x * gridDim.x;
  for (int i = index; i < n; i += stride)
    y[i] = x[i] + y[i];
}
更新的内核还设置了网格中线程总数(blockDim.x * gridDim.x)的stride。 CUDA内核中的这种类型的循环通常称为网格跨步循环(grid-stride loop)。
Time(%)      Time     Calls       Avg       Min       Max  Name
100.00%  94.015us         1  94.015us  94.015us  94.015us  add(int, float*, float*)
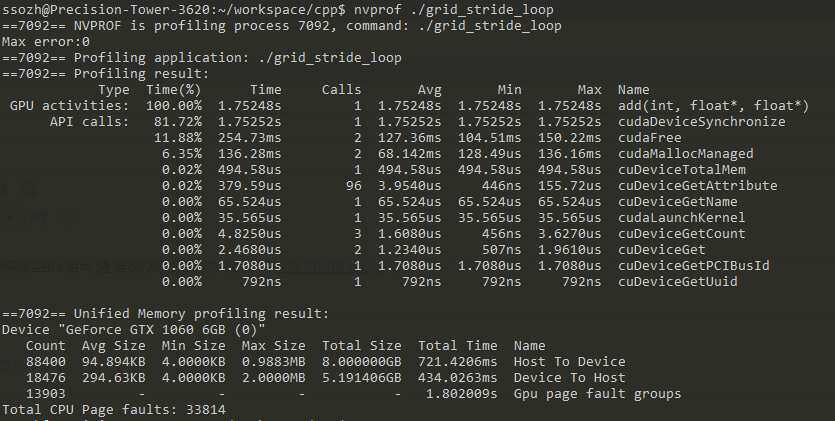
这是另一个28倍的加速,从在K80的所有SM上运行多个块! 我们只使用K80上的2个GPU中的一个,但每个GPU有13个SM。 请注意我的笔记本电脑中的GeForce有2个(较弱的)SM,运行内核需要680us。
Summing Up
以下是Tesla K80和GeForce GT 750M上三个版本的add()内核性能的概述。

Exercises
- Browse the CUDA Toolkit documentation. If you haven’t installed CUDA yet, check out the Quick Start Guide and the installation guides. Then browse the Programming Guideand the Best Practices Guide. There are also tuning guides for various architectures.
- Experiment with
printf()inside the kernel. Try printing out the values ofthreadIdx.xandblockIdx.xfor some or all of the threads. Do they print in sequential order? Why or why not? - Print the value of
threadIdx.yorthreadIdx.z(orblockIdx.y) in the kernel. (Likewise forblockDimandgridDim). Why do these exist? How do you get them to take on values other than 0 (1 for the dims)? - If you have access to a Pascal-based GPU, try running
add_grid.cuon it. Is performance better or worse than the K80 results? Why? (Hint: read about Pascal’s Page Migration Engine and the CUDA 8 Unified Memory API.) For a detailed answer to this question, see the post Unified Memory for CUDA Beginners.
Where To From Here?
我打算用更多CUDA编程材料跟进这篇文章,但为了让你现在忙,有一系列旧的介绍性帖子你可以继续(我计划将来根据需要更新/替换):
- How to Implement Performance Metrics in CUDA C++
- How to Query Device Properties and Handle Errors in CUDA C++
- How to Optimize Data Transfers in CUDA C++
- How to Overlap Data Transfers in CUDA C++
- How to Access Global Memory Efficiently in CUDA C++
- Using Shared Memory in CUDA C++
- An Efficient Matrix Transpose in CUDA C++
- Finite Difference Methods in CUDA C++, Part 1
- Finite Difference Methods in CUDA C++, Part 2
- Accelerated Ray Tracing in One Weekend with CUDA
There is also a series of CUDA Fortran posts mirroring the above, starting with An Easy Introduction to CUDA Fortran.
You might also be interested in signing up for the online course on CUDA programming from Udacity and NVIDIA.
There is a wealth of other content on CUDA C++ and other GPU computing topics here on the NVIDIA Parallel Forall developer blog, so look around!