| 这个作业属于哪个课程 | https://edu.cnblogs.com/campus/fzu/SE2020 |
|---|---|
| 这个作业要求在哪里 | https://edu.cnblogs.com/campus/fzu/SE2020/homework/11224 |
| 这个作业的目标 | 学会使用原型开发工具进行原型设计 |
| 学号 | 031802637杨维涵 031802631吴端己 |
| GitHub URL | https://github.com/SummerD-max/031802637-031802631 |
目录导航
目录
一、PSP表格
| PSP2.1 | Personal Software Process Stages | 预估耗时(分钟) | 实际耗时(分钟) |
|---|---|---|---|
| Planning | 计划 | 20 | 20 |
| Estimate | 估计这个任务需要多少时间 | 660 | 700 |
| Analysis | 需求分析 (包括学习新技术) | 400 | 300 |
| Design Spec | 生成设计文档 | 60 | 30 |
| Design Review | 设计复审 | 30 | 30 |
| Coding Standard | 代码规范 (为目前的开发制定合适的规范) | 20 | 20 |
| Design | 具体设计 | 120 | 400 |
| Reporting | 报告 | 30 | 50 |
| Size Measurement | 计算工作量 | 20 | 0 |
| Postmortem & Process Improvement Plan | 事后总结, 并提出过程改进计划 | 20 | 30 |
| 合计 | 1380 | 1580 |
二、分工:
031802631吴端己:html, js
031802637杨维涵:css
三、解题思路描述与设计实现说明
1.解题思路的描述
刚看到这个题目的时候,我们感觉有点困难,但是经过了几天的学习 (b站,菜鸟教程),我们已经熟悉了HTML、CSS 以及 JavaScript的基本用法,再看这个题目的时候就感觉不是特别困难了。只要用HTML和CSS设计一个用户交互界面,然后通过JS把数据读取后进行处理。
但是,时间有点匆忙,UI界面做的不太好

以下是我们数据解析代码
function getdata() {
            var text = $("#text").val(); //获取文本内容
            var eachblock = text.split("


");//多组数据输入时,调用split函数,以“


"为关键字进行分组
            for (var k = 0; k < eachblock.length; k++) { //eachblock.length用于得到分组的数量
				var smallblock=eachblock[k].split("

");//将大组中(导师、学生信息)与(学生经历)分开
                var arry = smallblock[0].split("
");//对每一组数据,以“
"为关键字进行分组,得到每条导师和学生的信息
				var length=smallblock.length-1;//学生经历的数量
				//处理不同学生的经历
				var messages=[];
				for(var i=1;i<=length;i++){
				var personnal=smallblock[i].split(":");//将不同学生经历以“:”为关键字进行分组,得到名字和经历
				var student={};
				student.name=personnal[0];//将学生名字和经历分别存储在对象student中
				student.experience=personnal[1];
				messages.push(student);
				}
                var teacher = {
                        name: '',
                        children: []
                    }
                for (var p = 0; p < arry.length; p++) {
                    var family = arry[p].split(":");//对(导师、学生信息),以“:”为关键字进行分组,得到身份标签和身份信息
                    var type = [];
                    var type1 = [];
                    var label1 = family[0]; //获取身份标签,保存在label
                    if (p != 0) {
                        type1.name = label1;
                    }
                    var label2 = family[1];//获取身份信息,保存在labe2
                    var label3 = label2.split("、");//针对每组身份信息,以“、”为关键字进行切分,得到每个人的名字信息
                    for (var j = 0; j < label3.length; j++) { //label3.length用于得到每条身份信息里名字的数量
                        var student = [];
                        if (p == 0) {
                            teacher.name = label3[j]; //当p等于0是,处理(导师、学生信息)第一行,即导师信息
                        }
                        if (p != 0) {				  //当p不等于0是,处理(导师、学生信息)中的学生信息
                            student.name = label3[j];
							//遍历messags 寻找是否有相对应的学生经历
							for(var i=0;i<length;i++){
							if(label3[j]==messages[i].name){      //若学生名字等于messages中某一个名字,则将经历变为type的子元素
							student.children=[{name:messages[i].experience}];
							}
							}
                            type.push(student);					  //type存储学生姓名

                        }
                    }
                    if (p != 0) {
                        type1.children = type;                   //type1存储类似2015级硕士生的标签,并将type变为type1的子元素
                        teacher.children.push(type1);
                    }
                }

                treeData[k] = [];
                treeData[k] = teacher;
                maketree(k);
            }
        }
以下是树生成代码
function maketree(k) {
            var margin = {
                    top: 20,
                    right: 120,
                    bottom: 20,
                    left: 120
                },
                width = 960 - margin.right - margin.left,
                height = 500 - margin.top - margin.bottom;

            var i = 0,
                duration = 750, //过渡延迟时间
                root;

            var tree = d3.layout.tree() //创建一个树布局
                .size([height, width]);


            var diagonal = d3.svg.diagonal()
                .projection(function(d) {
                    return [d.y, d.x];
                }); //创建新的斜线生成器

            //声明与定义画布属性
            var svg = d3.select("body").append("svg")
                .attr("width", width + margin.right + margin.left)
                .attr("height", height + margin.top + margin.bottom)
                .append("g")
                .attr("transform", "translate(" + margin.left + "," + margin.top + ")");

            root = treeData[k]; //treeData为上边定义的节点属性
            root.x0 = height / 2;
            root.y0 = 0;


            update(root);


            function update(source) {
                // Compute the new tree layout.计算新树图的布局
                var nodes = tree.nodes(root).reverse(),
                    links = tree.links(nodes);

                // Normalize for fixed-depth.设置y坐标点,每层占180px
                nodes.forEach(function(d) {
                    d.y = d.depth * 180;
                });

                // Update the nodes…每个node对应一个group
                var node = svg.selectAll("g.node")
                    .data(nodes, function(d) {
                        return d.id || (d.id = ++i);
                    }); //data():绑定一个数组到选择集上,数组的各项值分别与选择集的各元素绑定

                // Enter any new nodes at the parent's previous position.新增节点数据集,设置位置
                var nodeEnter = node.enter().append("g") //在 svg 中添加一个g,g是 svg 中的一个属性,是 group 的意思,它表示一组什么东西,如一组 lines , rects ,circles 其实坐标轴就是由这些东西构成的。
                    .attr("class", "node") //attr设置html属性,style设置css属性
                    .attr("transform", function(d) {
                        return "translate(" + source.y0 + "," + source.x0 + ")";
                    })
                    .on("click", click);

                //添加连接点---此处设置的是圆圈过渡时候的效果(颜色)
                // nodeEnter.append("circle")
                //   .attr("r", 1e-6)
                //   .style("fill", function(d) { return d._children ? "lightsteelblue" : "#357CAE"; });//d 代表数据,也就是与某元素绑定的数据。
                nodeEnter.append("rect")
                    .attr("x", -23)
                    .attr("y", -10)
                    .attr("width", 70)
                    .attr("height", 20)
                    .attr("rx", 10)
                    .style("fill", "#000000"); //d 代表数据,也就是与某元素绑定的数据。


                nodeEnter.append("text")
                    .attr("x", function(d) {
                        return d.children || d._children ? 13 : 13;
                    })
                    .attr("dy", "10")
                    .attr("text-anchor", "middle")
                    .text(function(d) {
                        return d.name;
                    })
                    .style("fill", "white")
                    .style("fill-opacity", 1);
                // Transition nodes to their new position.将节点过渡到一个新的位置-----主要是针对节点过渡过程中的过渡效果
                //node就是保留的数据集,为原来数据的图形添加过渡动画。首先是整个组的位置
                var nodeUpdate = node.transition() //开始一个动画过渡
                    .duration(duration) //过渡延迟时间,此处主要设置的是圆圈节点随斜线的过渡延迟
                    .attr("transform", function(d) {
                        return "translate(" + d.y + "," + d.x + ")";
                    });

                nodeUpdate.select("rect")
                    .attr("x", -40)
                    .attr("y", -5)
                    .attr("width", 100)
                    .attr("height", 20)
                    .attr("rx", 10)
                    .style("fill", "#778899");

                nodeUpdate.select("text")
                    .attr("text-anchor", "middle")
                    .style("fill-opacity", 1);

                // Transition exiting nodes to the parent's new position.过渡现有的节点到父母的新位置。
                //最后处理消失的数据,添加消失动画
                var nodeExit = node.exit().transition()
                    .duration(duration)
                    .attr("transform", function(d) {
                        return "translate(" + source.y + "," + source.x + ")";
                    })
                    .remove();

                nodeExit.select("circle")
                    .attr("r", 1e-6);


                nodeExit.select("text")
                    .attr("text-anchor", "middle")
                    .style("fill-opacity", 1e-6);

                // Update the links…线操作相关
                //再处理连线集合
                var link = svg.selectAll("path.link")
                    .data(links, function(d) {
                        return d.target.id;
                    });


                // Enter any new links at the parent's previous position.
                //添加新的连线
                link.enter().insert("path", "g")
                    .attr("class", "link")
                    .attr("d", function(d) {
                        var o = {
                            x: source.x0,
                            y: source.y0
                        };
                        return diagonal({
                            source: o,
                            target: o
                        }); //diagonal - 生成一个二维贝塞尔连接器, 用于节点连接图.
                    })
                    .attr('marker-end', 'url(#arrow)');

                // Transition links to their new position.将斜线过渡到新的位置
                //保留的连线添加过渡动画
                link.transition()
                    .duration(duration)
                    .attr("d", diagonal);

                // Transition exiting nodes to the parent's new position.过渡现有的斜线到父母的新位置。
                //消失的连线添加过渡动画
                link.exit().transition()
                    .duration(duration)
                    .attr("d", function(d) {
                        var o = {
                            x: source.x,
                            y: source.y
                        };
                        return diagonal({
                            source: o,
                            target: o
                        });
                    })
                    .remove();

                // Stash the old positions for transition.将旧的斜线过渡效果隐藏
                nodes.forEach(function(d) {
                    d.x0 = d.x;
                    d.y0 = d.y;
                });
            }

            //定义一个将某节点折叠的函数
            // Toggle children on click.切换子节点事件
            function click(d) {
                if (d.children) {
                    d._children = d.children;
                    d.children = null;
                } else {
                    d.children = d._children;
                    d._children = null;
                }
                update(d);
            }
        }
        //d3.select(self.frameElement).style("height", "500px");
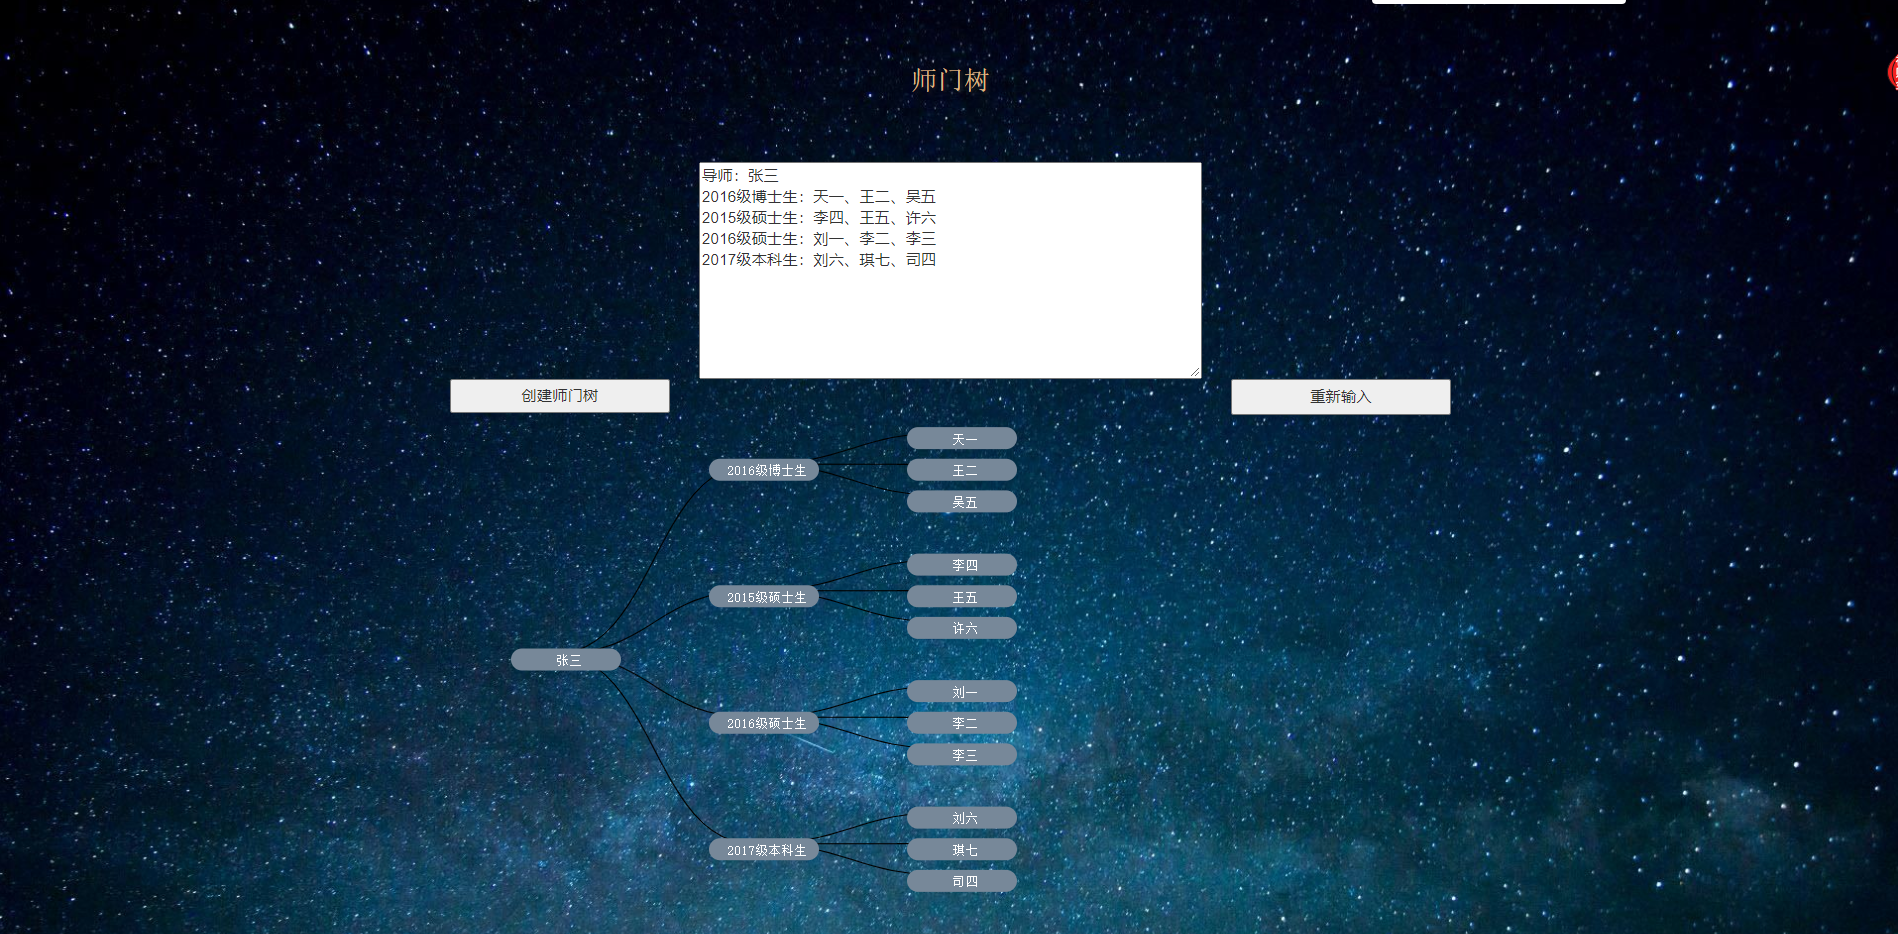
下面是我们设计的UI:

2.设计实现的说明:

代码模块异常或结对困难及解决方法
在创建树的过程中无法生成子节点
通过将对象保存在数组中,数组.children来设置子元素
实现了在节点中加入新的子节点
对js编码有了更深的认识
四、总结
这次结对作业对我们是一次不小的挑战,我们从来没怎么接触过前端,在大佬的指点和之前学长的代码辅助下才整出了这些,所以单元测试也没做,希望下次努力吧

评价你的队友
共同点:学东西比较慢,学习抓不到重点,导致效率低下。对时间安排也不科学。
好处就不说了