一、 后台WebApi配置:
注:Vision为业务名称,以此为例,可随意修改
1. 安装包:Microsoft.AspNetCore.SignalR
2. 注入
Startup.cs ConfigureServices 添加以下代码:
services.AddSignalR();
Startup.cs Configure app.UseEndpoints 添加以下代码:
endpoints.MapHub<VisionHub>("/api/visionHub");
3. 创建通信中心类,继承Hub
using Microsoft.AspNetCore.SignalR;

public class VisionHub : Hub
{
    //重写连接事件,初次建立连接时进入此方法,开展具体业务可使用,例如管理连接池。
    public override async Task OnConnectedAsync()
    {
        await Clients.Caller.SendAsync("connected", Context.ConnectionId);
    }
    //重写断开事件,同理。
    public override async Task OnDisconnectedAsync(Exception exception)
    {
        await base.OnDisconnectedAsync(exception);
    }
    //服务端接收客户端发送方法
    public async Task SendMessage(string message)
    {
        //第一个参数为客户端接收服务端返回方法,名称需要服务端一致。
        await Clients.Caller.SendAsync("ReceiveMessage", Context.ConnectionId + ":  " + message);
    }
    public async Task SendAllMessage(string message)
    {
        //第一个参数为客户端接收服务端返回方法,名称需要服务端一致。
        await Clients.All.SendAsync("ReceiveMessage", Context.ConnectionId + ":  " + message);
    }
}

//Clients.All是全员广播,Clients.Caller是当前连接对象,也可以指定连接推送Clients.Client(id),id为在全局对象中获取:Context.ConnectionId
二、前台React配置
1. 安装包:npm install @microsoft/signalr
2. 连接配置
import React, { useState, useEffect, useRef } from 'react';
import * as signalR from '@microsoft/signalr';

const Vision = () => {
    const connectionRef = useRef(null);
    useEffect(() => {
        let cc;
        const protocol = new signalR.JsonHubProtocol();
        const transport = signalR.HttpTransportType.WebSockets;

        const options = {
            transport,
            skipNegotiation: true,
        };
        cc = new signalR.HubConnectionBuilder()
            .withUrl("http://localhost:8090/api/visionHub", options)  //url需与后台注入一致。
            .withHubProtocol(protocol)
            .withAutomaticReconnect()
            .build();
        cc.serverTimeoutInMilliseconds = 60 * 1000 * 60 * 24;
        cc.on('connected', onConnected)
        cc.on('ReceiveMessage', onReceiveMessage)
        cc.onreconnected(() => {
            if (cc.connectionState != "Connected") {
                onRegister();
            }
        });
        cc.start().then(() => {
            connectionRef.current = cc;
        }).catch(err => {
            console.error('SignalR Connection Error: ', err);
        });
        return () => {
            if (cc) {
                cc.stop();
            }
        }
    }, [])
    const onConnected = (connectionId) => {
        document.getElementById("user").innerHTML = document.getElementById("user").innerHTML + connectionId;
    }
    const onReceiveMessage = (message) => {
        document.getElementById("receiveMsg").innerHTML = document.getElementById("receiveMsg").innerHTML + message + "<br>";
    }
    const SendMessage = (method) => {
        connectionRef.current.invoke(method, document.getElementById("sendMsg").value).catch((err) => {
            console.error('Send', err);
        });
    }
    return (
        <div style={{ margin: 10 }}>
            <div id="user" style={{ margin: 10 }}>张三(ConnectionId):</div>
            <input id="sendMsg" style={{ margin: 10 }} />
            <button type="button" onClick={() => SendMessage("SendMessage")} style={{ margin: 10 }}>Send</button>
            <button type="button" onClick={() => SendMessage("SendAllMessage")} style={{ margin: 10 }}>广播</button>
            <div style={{ margin: 10 }}>服务器:</div>
            <div id="receiveMsg" style={{ margin: 10 }}></div>
        </div>
    )
}
export default Vision
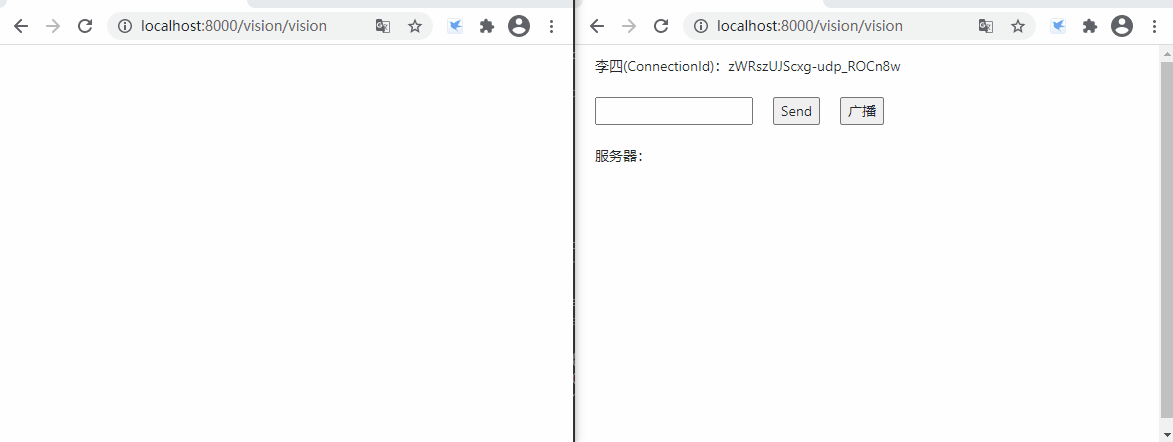
三、效果图
模拟张三上线,生成ConnectionId,单独与广播两种方式与服务器通信
更多强大功能请阅读官方文档:SignalR