前期环境部署:
配置所有主机名称:
master1 主机:
hostname server01
bash
master2 主机:
hostname server02
bash
slave1 主机:
hostname server03
bash
slave2 主机:
hostname server04
bash
manager 主机:
hostname server05
bash
配置所有主机名映射:
vim /etc/hosts //在每台机器上操作
192.168.96.4 server01
192.168.96.5 server02
192.168.96.6 server03
192.168.96.7 server04
192.168.96.9 server05
scp /etc/hosts 192.168.96.4:/etc/
scp /etc/hosts 192.168.96.5:/etc/
scp /etc/hosts 192.168.96.6:/etc/
scp /etc/hosts 192.168.96.9:/etc/
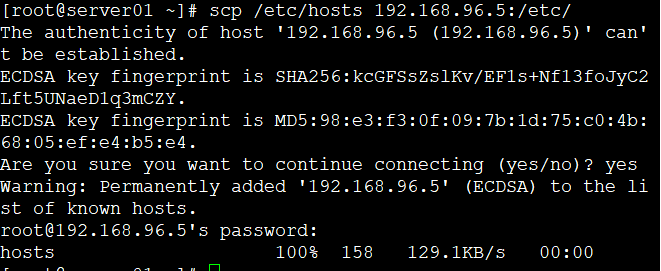 //每台机器都发送
所有主机关闭防火墙和安全机制:(每台机器都操作)
systemctl stop firewalld
iptables -F
setenforce 0
下载mha-manager和mha-noda
网址:http://downloads.mariadb.com/MHA/
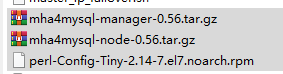
manager三个都需要,其他只需要后两个
安装MHA node
安装epel源
wget -O /etc/yum.repos.d/epel.repo http://mirrors.aliyun.com/repo/epel-7.repo
tar xf mha4mysql-node-0.56.tar.gz
cd mha4mysql-node-0.56/
perl Makefile.PL
make && make install

安装MHA Manger:(安装MHA Manger之前需要安装MHA Node)在master操作,
yum install -y perl perl-Log-Dispatch perl-Parallel-ForkManager perl-DBD-MySQL perl-DBI
perl-Time-HiRes //安装MHA Manger依赖的Perl模块
yum -y install perl-Config-Tiny-2.14-7.el7.noarch.rpm
rpm -q perl perl-Log-Dispatch perl-Parallel-ForkManager perl-DBD-MySQL perl-DBI perl-Time-HiRes perl-Config-Tiny //检查软件是否全安装
安装MHA Manger软件包
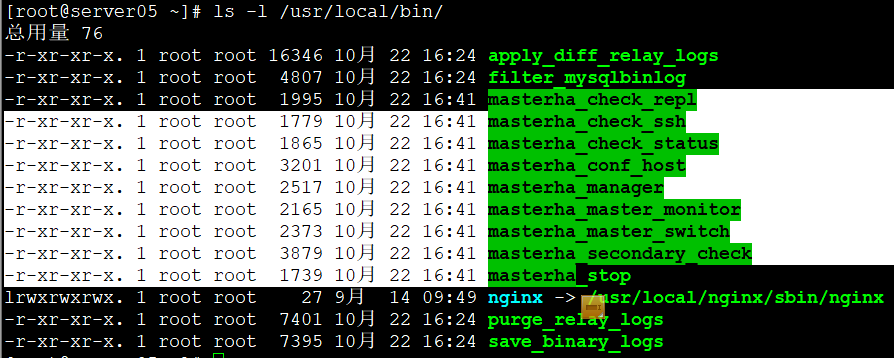
配置SSH 密钥对验证:
Server05(192.168.96.9)上每台机器都发,在主从服务器的密钥对只在服务器之间发
ssh-keygen -t rsa
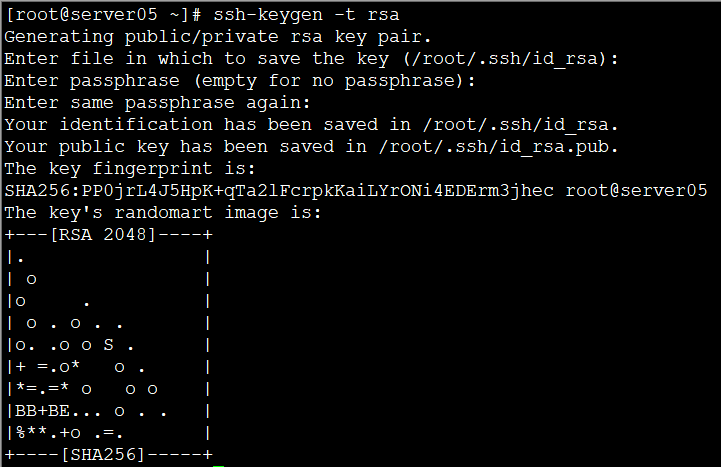
【(双向的,每台机器互相发)】
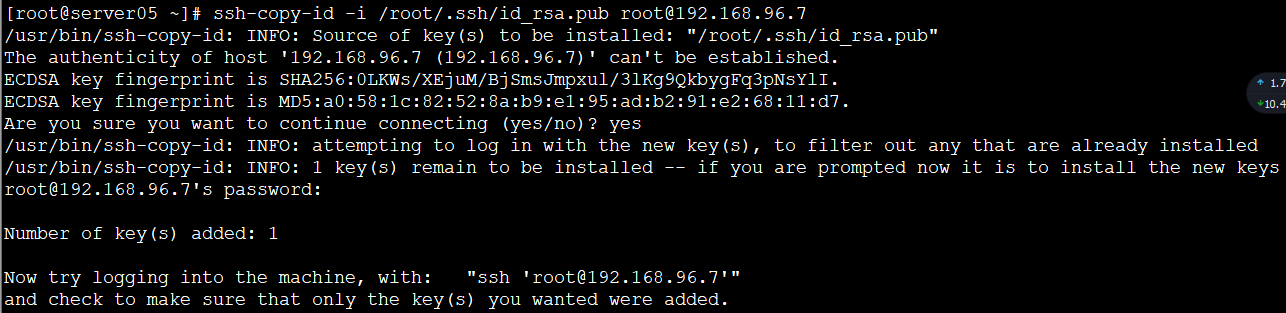
ssh-copy-id -i /root/.ssh/id_rsa.pub root@192.168.96.4
ssh-copy-id -i /root/.ssh/id_rsa.pub root@192.168.96.5
ssh-copy-id -i /root/.ssh/id_rsa.pub root@192.168.96.6
ssh-copy-id -i /root/.ssh/id_rsa.pub root@192.168.96.7
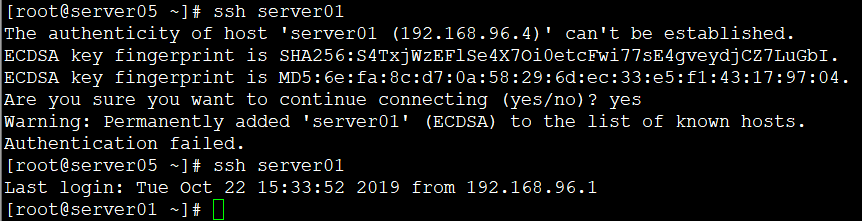
ssh server01(exit退出)
ssh server02
ssh server03
ssh server04
注意:Server05 需要连接每个主机测试,因为第一次连接的时候需要输入 yes,影响后期故
障切换时,对于每个主机的 SSH 控制。(其余机器不用操作)
安装MYSQL
yum -y install mariadb mariadb-server mariadb-devel
systemctl start mariadb
netstat -lnpt | grep :3306
设置数据库初始密码(密码在后面会使用)
mysqladmin -u root password 000000
搭建主从复制环境
修改mysql主机的配置文件:
primary Master(192.168.96.4):
vim /etc/my.cnf
server-id = 1
log-bin=master-bin
log-slave-updates=true
relay_log_purge=0

systemctl restart mariadb
Secondary Master(192.168.96.5)
vim /etc/my.cnf
server-id=2
log-bin=master-bin
log-slave-updates=true
relay_log_purge=0
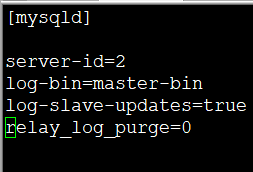
systemctl restart mariadb
slave1(192.168.96.6):
vim /etc/my.cnf
server-id=3
log-bin=mysql-bin
relay-log=slave-relay-bin
log-slave-updates=true
relay_log_purge=0

systemctl restart mariadb
slave2(192.168.96.7):
vim /etc/my.cnf
server-id=4
log-bin=mysql-bin
relay-log=slave-relay-bin
log-slave-updates=true
relay_log_purge=0
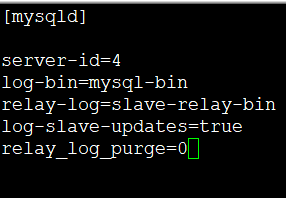
systemctl restart mariadb
mysql服务器创建复制授权用户:(server01——04机器,登录mysql操作)
grant replication slave on *.* to 'repl'@'192.168.96.%' identified by '000000';
flush privileges;
show master status; //查看主库备份时binlog名称和位置

在从服务器操作:(每台从服务器都操作)
stop slave;
CHANGE MASTER TO
MASTER_HOST='192.168.96.4',
MASTER_USER='repl',
MASTER_PASSWORD='000000',
MASTER_LOG_FILE='master-bin.000001',
MASTER_LOG_POS=473;
start slave;
show slave statusG;

三台slave服务器设置read_only状态:
从库对外只提供读服务,只所以没有写进 mysql 配置文件,是因为随时 server02 会提升为
master
[root@server02 ~]# mysql -uroot -p000000 -e 'set global read_only=1'
[root@server03 ~]# mysql -uroot -p000000 -e 'set global read_only=1'
[root@server04 ~]# mysql -uroot -p000000-e 'set global read_only=1'
创建监控用户(server01——04机器操作)
每一台机器为自己的主机名授权:
grant all privileges on *.* to 'root'@'server04' identified by '000000';
flush privileges;
配置MHA环境:
Server05(192.168.96.9):在软件包解压后的目录里面有样例配置文件
mkdir /etc/masterha
cp mha4mysql-manager-0.56/samples/conf/app1.cnf /etc/masterha
vim /etc/masterha/app1.cnf //修改配置文件
【添加内容】
#设置 master 默认保存 binlog 的位置,以便 MHA 可以找到 master 日志
master_binlog_dir=/var/lib/mysql
#设置自动 failover 时候的切换脚本
master_ip_failover_script= /usr/local/bin/master_ip_failover
#设置 mysql 中 root 用户的密码
password=000000
user=root
#ping 包的时间间隔
ping_interval=1
#设置远端 mysql 在发生切换时保存 binlog 的具体位置
remote_workdir=/tmp
#设置复制用户的密码和用户名
repl_password=000000
repl_user=repl
[server1]
hostname=server01
port=3306
[server2]
hostname=server02
candidate_master=1
port=3306
check_repl_delay=0
[server3]
hostname=server03
port=3306
[server4]
hostname=server04
port=3306
配置故障转移脚本:
vim /usr/local/bin/master_ip_failover
【脚本内容】
#!/usr/bin/env perl
use strict;
use warnings FATAL => 'all';
use Getopt::Long;
my (
$command, $ssh_user, $orig_master_host, $orig_master_ip,
$orig_master_port, $new_master_host, $new_master_ip, $new_master_port,
);
my $vip = '192.168.96.100'; # 写入VIP
my $key = "1"; #非keepalived方式切换脚本使用的
my $ssh_start_vip = "/sbin/ifconfig ens32:$key $vip";
my $ssh_stop_vip = "/sbin/ifconfig ens32:$key down"; #那么这里写服务的开关命令
$ssh_user = "root";
GetOptions(
'command=s' => $command,
'ssh_user=s' => $ssh_user,
'orig_master_host=s' => $orig_master_host,
'orig_master_ip=s' => $orig_master_ip,
'orig_master_port=i' => $orig_master_port,
'new_master_host=s' => $new_master_host,
'new_master_ip=s' => $new_master_ip,
'new_master_port=i' => $new_master_port,
);
exit &main();
sub main {
print "
IN SCRIPT TEST====$ssh_stop_vip==$ssh_start_vip===
";
if ( $command eq "stop" || $command eq "stopssh" ) {
# $orig_master_host, $orig_master_ip, $orig_master_port are passed.
# If you manage master ip address at global catalog database,
# invalidate orig_master_ip here.
my $exit_code = 1;
#eval {
# print "Disabling the VIP on old master: $orig_master_host
";
# &stop_vip();
# $exit_code = 0;
#};
eval {
print "Disabling the VIP on old master: $orig_master_host
";
#my $ping=`ping -c 1 10.0.0.13 | grep "packet loss" | awk -F',' '{print $3}' | awk '{print $1}'`;
#if ( $ping le "90.0%"&& $ping gt "0.0%" ){
#$exit_code = 0;
#}
#else {
&stop_vip();
# updating global catalog, etc
$exit_code = 0;
#}
};
if ($@) {
warn "Got Error: $@
";
exit $exit_code;
}
exit $exit_code;
}
elsif ( $command eq "start" ) {
# all arguments are passed.
# If you manage master ip address at global catalog database,
# activate new_master_ip here.
# You can also grant write access (create user, set read_only=0, etc) here.
my $exit_code = 10;
eval {
print "Enabling the VIP - $vip on the new master - $new_master_host
";
&start_vip();
$exit_code = 0;
};
if ($@) {
warn $@;
exit $exit_code;
}
exit $exit_code;
}
elsif ( $command eq "status" ) {
print "Checking the Status of the script.. OK
";
`ssh $ssh_user@$orig_master_ip " $ssh_start_vip "`;
exit 0;
}
else {
&usage();
exit 1;
}
}
# A simple system call that enable the VIP on the new master
sub start_vip() {
`ssh $ssh_user@$new_master_host " $ssh_start_vip "`;
}
# A simple system call that disable the VIP on the old_master
sub stop_vip() {
`ssh $ssh_user@$orig_master_host " $ssh_stop_vip "`;
}
sub usage {
print
"Usage: master_ip_failover --command=start|stop|stopssh|status --orig_master_host=host --orig_master_ip=ip --orig_master_port=port --
new_master_host=host --new_master_ip=ip --new_master_port=port
"; }
chmod +x /usr/local/bin/master_ip_failover //添加可执行权限
设置从库relay log的清除方法(server05-07):
mysql -uroot -p000000 -e 'set global relay_log_purge=0;'

检查MHA ssh 通信状态:
masterha_check_ssh --conf=/etc/masterha/app1.cnf

检查整个集群的状态:
masterha_check_repl --conf=/etc/masterha/app1.cnf

VIP配置管理:
通过命令方式管理VIP地址:
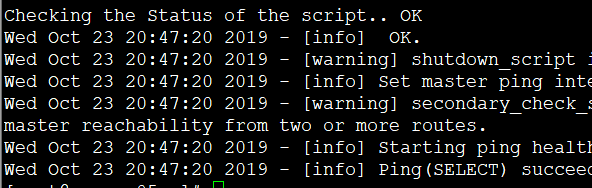
masterha_check_status --conf=/etc/masterha/app1.cnf //在server05检查manger状态

nohup masterha_manager --conf=/etc/masrha/app1.cnf --remove_dead_master_conf --ignore_last_failover< /dev/null >/var/log/masterha/app1/manager.log 2>&1 & // Server05开启manger监控

masterha_check_status --conf=/etc/masterha/app1.cnf //再一次检查srver05状态

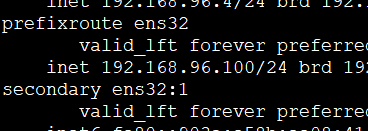
在srver01检查ip,可看到VIP为之前用命令配的192.168.96.100
cat /var/log/masterha/app1/manager.log //查看server05的日志,有四台机器存活,server01为主服务器,02-04为从服务器


模拟主库故障:
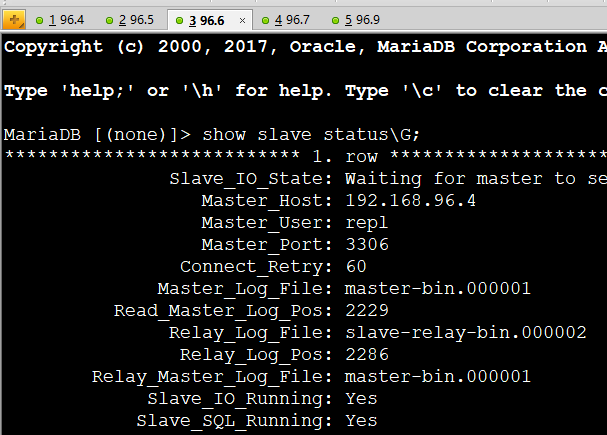
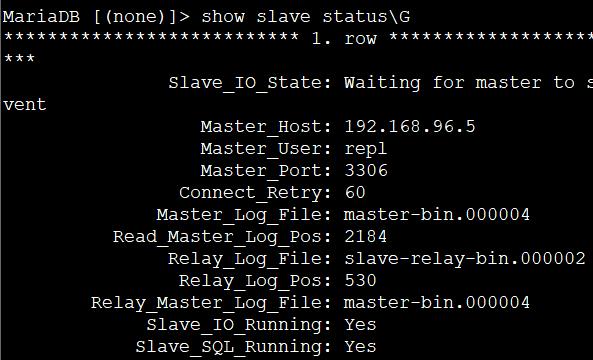
show slave statusG; //查看server03-04的master为server01
systemctl stop mariadb //关闭server01服务
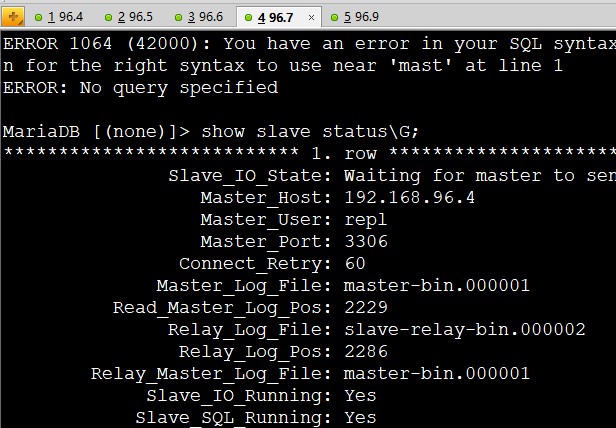
show slave statusG; //查看server03-04的master为server02

VIP配置管理
检查manger状态(master上操作)

开启 manager 监控后台启动manger

masterha_check_status --conf=/etc/masterha/app1.cnf //再次检查状态,显示开启后server01开始有VIP


查看manger日志
模拟主库故障
在05机器直接回车显示进程已经结束

cat /etc/masterha/app1.cnf //查看后会显示节点少01

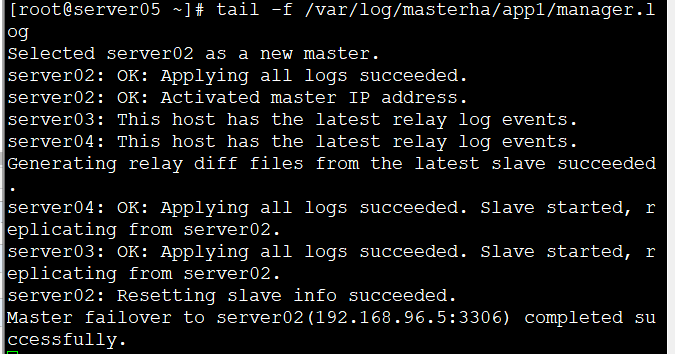
查看日志会显示已经02为新的master
tail -f /var/log/masterha/app1/manager.log
stop slave;
CHANGE MASTER TO
MASTER_HOST='192.168.96.5', //此时主服务器ip
MASTER_USER='repl',
MASTER_PASSWORD='000000';
start slave;
show slave statusG //若命令出错尝试一下重启slave ——reset slave;
停止02服务,关闭后VIP回到01