一、简介
在使用一款App的时候,经常会用到对话框进行信息的友好提示,一般简单要求性不高的时候我们可以使用web提供的alert实现即可。但是,对于需要交互性和美观性的对话框,alert就明显无法满足需求了,首先alert对话框比较丑陋,不符合我们的业务和审美需求,此时如果我们去定制的话,稍微有些浪费。React-Native在这一点上做的很好,给我们提供了一个原生的对话框,那就是AlertIOS,跟iOS中的UIAlertView(deprecated use)样式基本无差。
二、API
AlertIOS组件应用很广,使用也很简单,默认的AlertIOS组件会提供一个“确认”或者“OK”按钮,默认情况下,数组中的最后一个按钮高亮显示。如果数组的个数过多,按钮就会呈现垂直排列。AlertIOS组件一共有两个静态的方法如下所示:
//创建普通对话框,单纯的文案提示
static alert(
    title: ?string,
    message?: ?string,
    callbackOrButtons?: ?(() => void) | ButtonsArray,
    type?: AlertType,
  )

//创建输入对话框,用户可以选择输入内容
static prompt(
    title: ?string,
    message?: ?string,
    callbackOrButtons?: ?((text: string) => void) | ButtonsArray,
    type?: ?AlertType = 'plain-text',
    defaultValue?: string,
    keyboardType?: string
  )

//对话框类型
export type AlertType = $Enum<{
  /**
   * Default alert with no inputs
   */
  'default': string,
  /**
   * Plain text input alert
   */
  'plain-text': string,
  /**
   * Secure text input alert
   */
  'secure-text': string,
  /**
   * Login and password alert
   */
  'login-password': string,
}>;

//按钮数组类型
export type ButtonsArray = Array<{
  /**
   * Button label
   */
  text?: string,
  /**
   * Callback function when button pressed
   */
  onPress?: ?Function,
  /**
   * Button style
   */
  style?: AlertButtonStyle,
}>;

//按钮样式类型
export type AlertButtonStyle = $Enum<{
  /**
   * Default button style
   */
  'default': string,
  /**
   * Cancel button style
   */
  'cancel': string,
  /**
   * Destructive button style
   */
  'destructive': string,
}>;
三、格式
AlertIOS中的传入的按钮数组格式是固定的,如下所示:
//传入的按钮数组
[
      {
            text: '按钮文案1',
            onPress: function(){
                  //点击按钮的触发事件1
            }
      } ,
      {
            text: '按钮文案2',
            onPress: function(){
                  //点击按钮的触发事件2
            }
      } , ...
]
四、使用
1、普通对话框
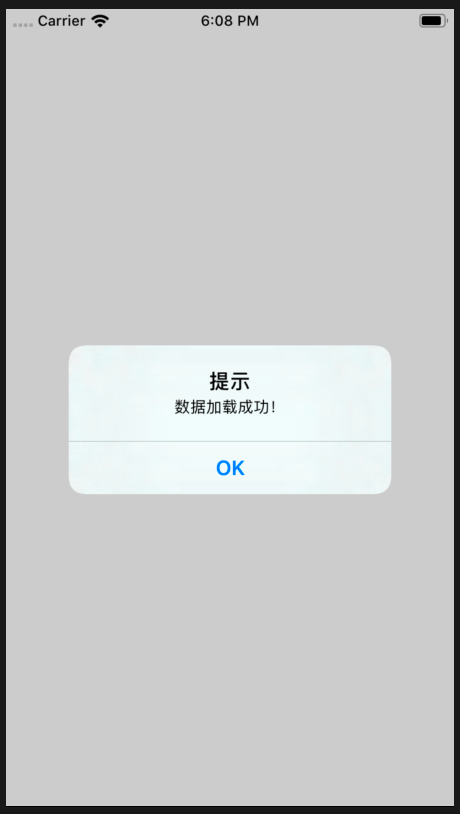
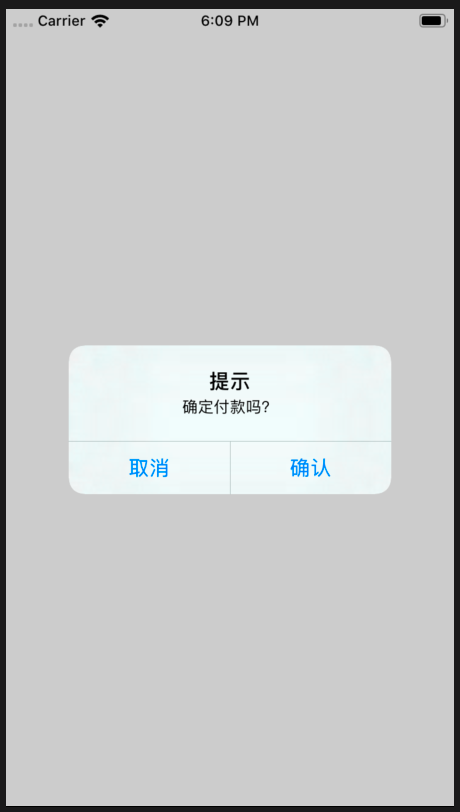
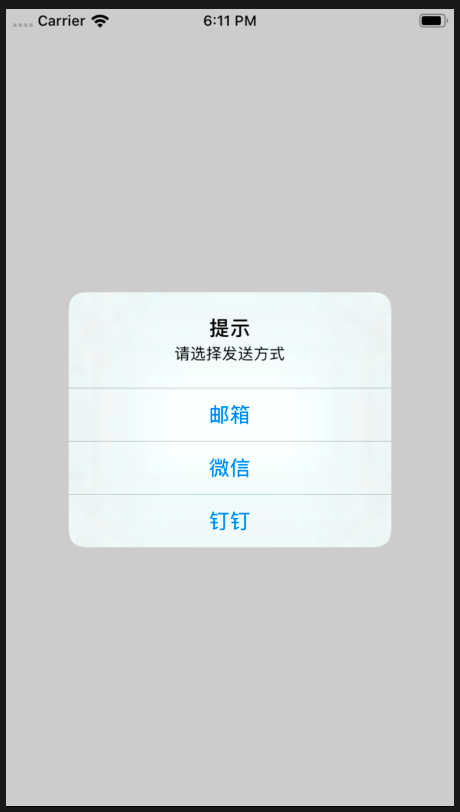
//默认按钮
AlertIOS.alert("提示","数据加载成功!");

//一个按钮
AlertIOS.alert("提示","数据加载成功!",[{text:"知道了",onPress: ()=> {console.log("---onPress---")}}]);

//两个按钮
AlertIOS.alert("提示","确定付款吗?",[{text:"取消",onPress: ()=> {console.log("---取消---")}},{text:"确认",onPress: ()=> {console.log("---确认---")}}]);

//多个按钮
AlertIOS.alert("提示","请选择发送方式",[ {text:"邮箱",onPress: ()=> {console.log("---邮箱---")}},{text:"微信",onPress: ()=> {console.log("---微信---")}},{text:"钉钉",onPress: ()=> {console.log("---钉钉---")}}])

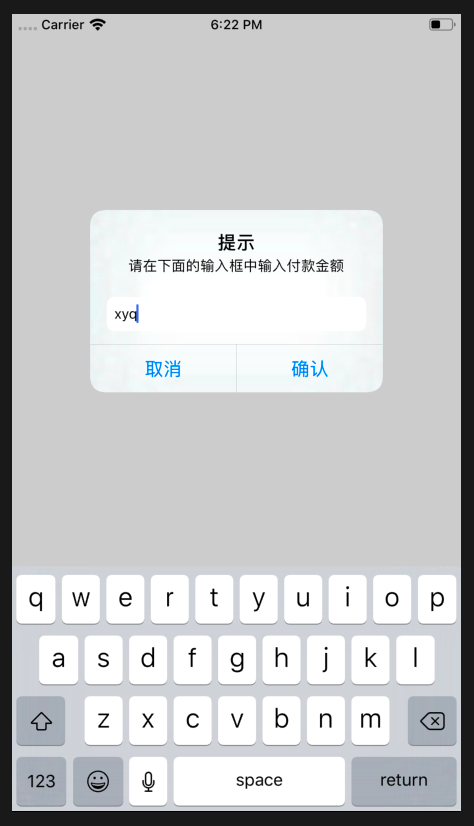
2、输入对话框【按钮排列方式相同,就不一一列举了】
//输入对话框
AlertIOS.prompt("提示","请在下面的输入框中输入付款金额",[{text:"取消",onPress: ()=> {console.log("---取消---")}},{text:"确认",onPress: ()=> {console.log("---确认---")}}]);