spring(二、bean生命周期、用到的设计模式、常用注解)
Spring作为当前Java最流行、最强大的轻量级框架,受到了程序员的热烈欢迎。准确的了解Spring Bean的生命周期是非常必要的。我们通常使用ApplicationContext作为Spring容器。这里,我们讲的也是 ApplicationContext中Bean的生命周期。而实际上BeanFactory也是差不多的,只不过处理器需要手动注册。
转载 http://www.cnblogs.com/zrtqsk/p/3735273.html
一、生命周期流程图:
Spring Bean的完整生命周期从创建Spring容器开始,直到最终Spring容器销毁Bean,这其中包含了一系列关键点。


若容器注册了以上各种接口,程序那么将会按照以上的流程进行。下面将仔细讲解各接口作用。
二、各种接口方法分类
Bean的完整生命周期经历了各种方法调用,这些方法可以划分为以下几类:
1、Bean自身的方法 : 这个包括了Bean本身调用的方法和通过配置文件中<bean>的init-method和destroy-method指定的方法
2、Bean级生命周期接口方法 : 这个包括了BeanNameAware、BeanFactoryAware、InitializingBean和DiposableBean这些接口的方法
3、容器级生命周期接口方法 : 这个包括了InstantiationAwareBeanPostProcessor 和 BeanPostProcessor 这两个接口实现,一般称它们的实现类为“后处理器”。
4、工厂后处理器接口方法 : 这个包括了AspectJWeavingEnabler, ConfigurationClassPostProcessor, CustomAutowireConfigurer等等非常有用的工厂后处理器 接口的方法。工厂后处理器也是容器级的。在应用上下文装配配置文件之后立即调用。
三、演示
我们用一个简单的Spring Bean来演示一下Spring Bean的生命周期。
1、首先是一个简单的Spring Bean,调用Bean自身的方法和Bean级生命周期接口方法,为了方便演示,它实现了BeanNameAware、BeanFactoryAware、InitializingBean和DiposableBean这4个接口,同时有2个方法,对应配置文件中<bean>的init-method和destroy-method。如下:

 1 package springBeanTest;
 2
 3 import org.springframework.beans.BeansException;
 4 import org.springframework.beans.factory.BeanFactory;
 5 import org.springframework.beans.factory.BeanFactoryAware;
 6 import org.springframework.beans.factory.BeanNameAware;
 7 import org.springframework.beans.factory.DisposableBean;
 8 import org.springframework.beans.factory.InitializingBean;
 9
10 /**
11  * @author qsk
12  */
13 public class Person implements BeanFactoryAware, BeanNameAware,
14         InitializingBean, DisposableBean {
15
16     private String name;
17     private String address;
18     private int phone;
19
20     private BeanFactory beanFactory;
21     private String beanName;
22
23     public Person() {
24         System.out.println("【构造器】调用Person的构造器实例化");
25     }
26
27     public String getName() {
28         return name;
29     }
30
31     public void setName(String name) {
32         System.out.println("【注入属性】注入属性name");
33         this.name = name;
34     }
35
36     public String getAddress() {
37         return address;
38     }
39
40     public void setAddress(String address) {
41         System.out.println("【注入属性】注入属性address");
42         this.address = address;
43     }
44
45     public int getPhone() {
46         return phone;
47     }
48
49     public void setPhone(int phone) {
50         System.out.println("【注入属性】注入属性phone");
51         this.phone = phone;
52     }
53
54     @Override
55     public String toString() {
56         return "Person [address=" + address + ", name=" + name + ", phone="
57                 + phone + "]";
58     }
59
60     // 这是BeanFactoryAware接口方法
61     @Override
62     public void setBeanFactory(BeanFactory arg0) throws BeansException {
63         System.out
64                 .println("【BeanFactoryAware接口】调用BeanFactoryAware.setBeanFactory()");
65         this.beanFactory = arg0;
66     }
67
68     // 这是BeanNameAware接口方法
69     @Override
70     public void setBeanName(String arg0) {
71         System.out.println("【BeanNameAware接口】调用BeanNameAware.setBeanName()");
72         this.beanName = arg0;
73     }
74
75     // 这是InitializingBean接口方法
76     @Override
77     public void afterPropertiesSet() throws Exception {
78         System.out
79                 .println("【InitializingBean接口】调用InitializingBean.afterPropertiesSet()");
80     }
81
82     // 这是DiposibleBean接口方法
83     @Override
84     public void destroy() throws Exception {
85         System.out.println("【DiposibleBean接口】调用DiposibleBean.destory()");
86     }
87
88     // 通过<bean>的init-method属性指定的初始化方法
89     public void myInit() {
90         System.out.println("【init-method】调用<bean>的init-method属性指定的初始化方法");
91     }
92
93     // 通过<bean>的destroy-method属性指定的初始化方法
94     public void myDestory() {
95         System.out.println("【destroy-method】调用<bean>的destroy-method属性指定的初始化方法");
96     }
97 }
2、接下来是演示BeanPostProcessor接口的方法,如下:
 1 package springBeanTest;
 2
 3 import org.springframework.beans.BeansException;
 4 import org.springframework.beans.factory.config.BeanPostProcessor;
 5
 6 public class MyBeanPostProcessor implements BeanPostProcessor {
 7
 8     public MyBeanPostProcessor() {
 9         super();
10         System.out.println("这是BeanPostProcessor实现类构造器!!");
11         // TODO Auto-generated constructor stub
12     }
13
14     @Override
15     public Object postProcessAfterInitialization(Object arg0, String arg1)
16             throws BeansException {
17         System.out
18         .println("BeanPostProcessor接口方法postProcessAfterInitialization对属性进行更改!");
19         return arg0;
20     }
21
22     @Override
23     public Object postProcessBeforeInitialization(Object arg0, String arg1)
24             throws BeansException {
25         System.out
26         .println("BeanPostProcessor接口方法postProcessBeforeInitialization对属性进行更改!");
27         return arg0;
28     }
29 }
如上,BeanPostProcessor接口包括2个方法postProcessAfterInitialization和postProcessBeforeInitialization,这两个方法的第一个参数都是要处理的Bean对象,第二个参数都是Bean的name。返回值也都是要处理的Bean对象。这里要注意。
3、InstantiationAwareBeanPostProcessor 接口本质是BeanPostProcessor的子接口,一般我们继承Spring为其提供的适配器类InstantiationAwareBeanPostProcessor Adapter来使用它,如下:
 1 package springBeanTest;
 2
 3 import java.beans.PropertyDescriptor;
 4
 5 import org.springframework.beans.BeansException;
 6 import org.springframework.beans.PropertyValues;
 7 import org.springframework.beans.factory.config.InstantiationAwareBeanPostProcessorAdapter;
 8
 9 public class MyInstantiationAwareBeanPostProcessor extends
10         InstantiationAwareBeanPostProcessorAdapter {
11
12     public MyInstantiationAwareBeanPostProcessor() {
13         super();
14         System.out
15                 .println("这是InstantiationAwareBeanPostProcessorAdapter实现类构造器!!");
16     }
17
18     // 接口方法、实例化Bean之前调用
19     @Override
20     public Object postProcessBeforeInstantiation(Class beanClass,
21             String beanName) throws BeansException {
22         System.out
23                 .println("InstantiationAwareBeanPostProcessor调用postProcessBeforeInstantiation方法");
24         return null;
25     }
26
27     // 接口方法、实例化Bean之后调用
28     @Override
29     public Object postProcessAfterInitialization(Object bean, String beanName)
30             throws BeansException {
31         System.out
32                 .println("InstantiationAwareBeanPostProcessor调用postProcessAfterInitialization方法");
33         return bean;
34     }
35
36     // 接口方法、设置某个属性时调用
37     @Override
38     public PropertyValues postProcessPropertyValues(PropertyValues pvs,
39             PropertyDescriptor[] pds, Object bean, String beanName)
40             throws BeansException {
41         System.out
42                 .println("InstantiationAwareBeanPostProcessor调用postProcessPropertyValues方法");
43         return pvs;
44     }
45 }
这个有3个方法,其中第二个方法postProcessAfterInitialization就是重写了BeanPostProcessor的方法。第三个方法postProcessPropertyValues用来操作属性,返回值也应该是PropertyValues对象。
4、演示工厂后处理器接口方法,如下:
 1 package springBeanTest;
 2
 3 import org.springframework.beans.BeansException;
 4 import org.springframework.beans.factory.config.BeanDefinition;
 5 import org.springframework.beans.factory.config.BeanFactoryPostProcessor;
 6 import org.springframework.beans.factory.config.ConfigurableListableBeanFactory;
 7
 8 public class MyBeanFactoryPostProcessor implements BeanFactoryPostProcessor {
 9
10     public MyBeanFactoryPostProcessor() {
11         super();
12         System.out.println("这是BeanFactoryPostProcessor实现类构造器!!");
13     }
14
15     @Override
16     public void postProcessBeanFactory(ConfigurableListableBeanFactory arg0)
17             throws BeansException {
18         System.out
19                 .println("BeanFactoryPostProcessor调用postProcessBeanFactory方法");
20         BeanDefinition bd = arg0.getBeanDefinition("person");
21         bd.getPropertyValues().addPropertyValue("phone", "110");
22     }
23
24 }
5、配置文件如下beans.xml,很简单,使用ApplicationContext,处理器不用手动注册:
<?xml version="1.0" encoding="UTF-8"?>

<beans xmlns="http://www.springframework.org/schema/beans"
    xmlns:xsi="http://www.w3.org/2001/XMLSchema-instance" xmlns:p="http://www.springframework.org/schema/p"
    xmlns:aop="http://www.springframework.org/schema/aop" xmlns:tx="http://www.springframework.org/schema/tx"
    xsi:schemaLocation="
            http://www.springframework.org/schema/beans
            http://www.springframework.org/schema/beans/spring-beans-3.2.xsd">

    <bean id="beanPostProcessor" class="springBeanTest.MyBeanPostProcessor">
    </bean>

    <bean id="instantiationAwareBeanPostProcessor" class="springBeanTest.MyInstantiationAwareBeanPostProcessor">
    </bean>

    <bean id="beanFactoryPostProcessor" class="springBeanTest.MyBeanFactoryPostProcessor">
    </bean>

    <bean id="person" class="springBeanTest.Person" init-method="myInit"
        destroy-method="myDestory" scope="singleton" p:name="张三" p:address="广州"
        p:phone="15900000000" />

</beans>
6、下面测试一下:
 1 package springBeanTest;
 2
 3 import org.springframework.context.ApplicationContext;
 4 import org.springframework.context.support.ClassPathXmlApplicationContext;
 5
 6 public class BeanLifeCycle {
 7
 8     public static void main(String[] args) {
 9
10         System.out.println("现在开始初始化容器");
11
12         ApplicationContext factory = new ClassPathXmlApplicationContext("springBeanTest/beans.xml");
13         System.out.println("容器初始化成功");
14         //得到Preson,并使用
15         Person person = factory.getBean("person",Person.class);
16         System.out.println(person);
17
18         System.out.println("现在开始关闭容器!");
19         ((ClassPathXmlApplicationContext)factory).registerShutdownHook();
20     }
21 }
关闭容器使用的是实际是AbstractApplicationContext的钩子方法。
我们来看一下结果:
现在开始初始化容器
2014-5-18 15:46:20 org.springframework.context.support.AbstractApplicationContext prepareRefresh
信息: Refreshing org.springframework.context.support.ClassPathXmlApplicationContext@19a0c7c: startup date [Sun May 18 15:46:20 CST 2014]; root of context hierarchy
2014-5-18 15:46:20 org.springframework.beans.factory.xml.XmlBeanDefinitionReader loadBeanDefinitions
信息: Loading XML bean definitions from class path resource [springBeanTest/beans.xml]
这是BeanFactoryPostProcessor实现类构造器!!
BeanFactoryPostProcessor调用postProcessBeanFactory方法
这是BeanPostProcessor实现类构造器!!
这是InstantiationAwareBeanPostProcessorAdapter实现类构造器!!
2014-5-18 15:46:20 org.springframework.beans.factory.support.DefaultListableBeanFactory preInstantiateSingletons
信息: Pre-instantiating singletons in org.springframework.beans.factory.support.DefaultListableBeanFactory@9934d4: defining beans [beanPostProcessor,instantiationAwareBeanPostProcessor,beanFactoryPostProcessor,person]; root of factory hierarchy
InstantiationAwareBeanPostProcessor调用postProcessBeforeInstantiation方法
【构造器】调用Person的构造器实例化
InstantiationAwareBeanPostProcessor调用postProcessPropertyValues方法
【注入属性】注入属性address
【注入属性】注入属性name
【注入属性】注入属性phone
【BeanNameAware接口】调用BeanNameAware.setBeanName()
【BeanFactoryAware接口】调用BeanFactoryAware.setBeanFactory()
BeanPostProcessor接口方法postProcessBeforeInitialization对属性进行更改!
【InitializingBean接口】调用InitializingBean.afterPropertiesSet()
【init-method】调用<bean>的init-method属性指定的初始化方法
BeanPostProcessor接口方法postProcessAfterInitialization对属性进行更改!
InstantiationAwareBeanPostProcessor调用postProcessAfterInitialization方法
容器初始化成功
Person [address=广州, name=张三, phone=110]
现在开始关闭容器!
【DiposibleBean接口】调用DiposibleBean.destory()
【destroy-method】调用<bean>的destroy-method属性指定的初始化方法
spring中常用的设计模式达到九种,我们举例说明:
第一种:简单工厂
又叫做静态工厂方法(StaticFactory Method)模式,但不属于23种GOF设计模式之一。
简单工厂模式的实质是由一个工厂类根据传入的参数,动态决定应该创建哪一个产品类。
spring中的BeanFactory就是简单工厂模式的体现,根据传入一个唯一的标识来获得bean对象,但是否是在传入参数后创建还是传入参数前创建这个要根据具体情况来定。如下配置,就是在 HelloItxxz 类中创建一个 itxxzBean。
第二种:工厂方法(Factory Method)
//调用getBean()时,返回随机数.如果没有指定factory-method,会返回StaticFactoryBean的实例,即返回工厂Bean的实例 XmlBeanFactory factory = new XmlBeanFactory(new ClassPathResource("config.xml")); System.out.println("我是IT学习者创建的实例:"+factory.getBean("random").toString());
第三种:单例模式(Singleton)
保证一个类仅有一个实例,并提供一个访问它的全局访问点。
spring中的单例模式完成了后半句话,即提供了全局的访问点BeanFactory。但没有从构造器级别去控制单例,这是因为spring管理的是是任意的java对象。
核心提示点:Spring下默认的bean均为singleton,可以通过singleton=“true|false” 或者 scope=“?”来指定
第四种:适配器(Adapter)
在Spring的Aop中,使用的Advice(通知)来增强被代理类的功能。Spring实现这一AOP功能的原理就使用代理模式(1、JDK动态代理。2、CGLib字节码生成技术代理。)对类进行方法级别的切面增强,即,生成被代理类的代理类, 并在代理类的方法前,设置拦截器,通过执行拦截器重的内容增强了代理方法的功能,实现的面向切面编程。
第五种:包装器(Decorator)
在我们的项目中遇到这样一个问题:我们的项目需要连接多个数据库,而且不同的客户在每次访问中根据需要会去访问不同的数据库。我们以往在spring和hibernate框架中总是配置一个数据源,因而sessionFactory的dataSource属性总是指向这个数据源并且恒定不变,所有DAO在使用sessionFactory的时候都是通过这个数据源访问数据库。但是现在,由于项目的需要,我们的DAO在访问sessionFactory的时候都不得不在多个数据源中不断切换,问题就出现了:如何让sessionFactory在执行数据持久化的时候,根据客户的需求能够动态切换不同的数据源?我们能不能在spring的框架下通过少量修改得到解决?是否有什么设计模式可以利用呢?
首先想到在spring的applicationContext中配置所有的dataSource。这些dataSource可能是各种不同类型的,比如不同的数据库:Oracle、SQL Server、MySQL等,也可能是不同的数据源:比如apache 提供的org.apache.commons.dbcp.BasicDataSource、spring提供的org.springframework.jndi.JndiObjectFactoryBean等。然后sessionFactory根据客户的每次请求,将dataSource属性设置成不同的数据源,以到达切换数据源的目的。
spring中用到的包装器模式在类名上有两种表现:一种是类名中含有Wrapper,另一种是类名中含有Decorator。基本上都是动态地给一个对象添加一些额外的职责。
第六种:代理(Proxy)
为其他对象提供一种代理以控制对这个对象的访问。 从结构上来看和Decorator模式类似,但Proxy是控制,更像是一种对功能的限制,而Decorator是增加职责。
spring的Proxy模式在aop中有体现,比如JdkDynamicAopProxy和Cglib2AopProxy。
第七种:观察者(Observer)
定义对象间的一种一对多的依赖关系,当一个对象的状态发生改变时,所有依赖于它的对象都得到通知并被自动更新。
spring中Observer模式常用的地方是listener的实现。如ApplicationListener。
第八种:策略(Strategy)
定义一系列的算法,把它们一个个封装起来,并且使它们可相互替换。本模式使得算法可独立于使用它的客户而变化。
spring中在实例化对象的时候用到Strategy模式
在SimpleInstantiationStrategy中有如下代码说明了策略模式的使用情况: 
第九种:模板方法(Template Method)
定义一个操作中的算法的骨架,而将一些步骤延迟到子类中。Template Method使得子类可以不改变一个算法的结构即可重定义该算法的某些特定步骤。
Template Method模式一般是需要继承的。这里想要探讨另一种对Template Method的理解。spring中的JdbcTemplate,在用这个类时并不想去继承这个类,因为这个类的方法太多,但是我们还是想用到JdbcTemplate已有的稳定的、公用的数据库连接,那么我们怎么办呢?我们可以把变化的东西抽出来作为一个参数传入JdbcTemplate的方法中。但是变化的东西是一段代码,而且这段代码会用到JdbcTemplate中的变量。怎么办?那我们就用回调对象吧。在这个回调对象中定义一个操纵JdbcTemplate中变量的方法,我们去实现这个方法,就把变化的东西集中到这里了。然后我们再传入这个回调对象到JdbcTemplate,从而完成了调用。这可能是Template Method不需要继承的另一种实现方式吧。
Spring的一个核心功能是IOC,就是将Bean初始化加载到容器中,Bean是如何加载到容器的,可以使用Spring注解方式或者Spring XML配置方式。
Spring注解方式减少了配置文件内容,更加便于管理,并且使用注解可以大大提高了开发效率!
下面按照分类讲解Spring中常用的一些注解。
一: 组件类注解
思考:Spring怎么知道应该把哪些Java类当成bean注册到容器中呢?
答案:使用配置文件或者注解的方式进行标识需要处理的java类!- 1
- 2
1、注解类介绍
@Component :标准一个普通的spring Bean类。
@Repository:标注一个DAO组件类。
@Service:标注一个业务逻辑组件类。
@Controller:标注一个控制器组件类。
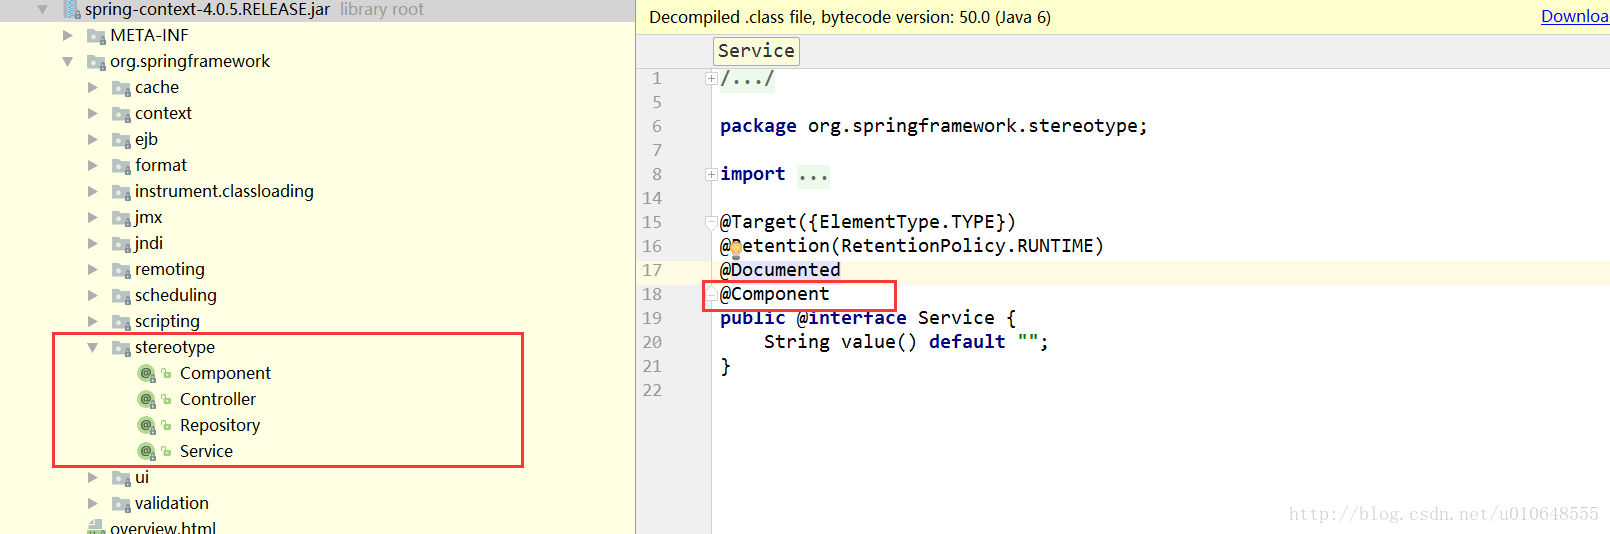
这些都是注解在平时的开发过程中出镜率极高,@Component、@Repository、@Service、@Controller实质上属于同一类注解,用法相同,功能相同,区别在于标识组件的类型。@Component可以代替@Repository、@Service、@Controller,因为这三个注解是被@Component标注的。如下代码
@Target({ElementType.TYPE})
@Retention(RetentionPolicy.RUNTIME)
@Documented
@Component
public @interface Controller {
    String value() default "";
}
- 1
- 2
- 3
- 4
- 5
- 6
- 7
- 8
2、举例详解
(1)当一个组件代表数据访问层(DAO)的时候,我们使用@Repository进行注解,如下
@Repository
public class HappyDaoImpl implements HappyDao{
private final static Logger LOGGER = LoggerFactory.getLogger(HappyDaoImpl .class);
public void  club(){
        //do something ,like drinking and singing
    }
}- 1
- 2
- 3
- 4
- 5
- 6
- 7
(2)当一个组件代表业务层时,我们使用@Service进行注解,如下
@Service(value="goodClubService")
//使用@Service注解不加value ,默认名称是clubService
public class ClubServiceImpl implements ClubService {
    @Autowired
    private ClubDao clubDao;

    public void doHappy(){
        //do some Happy
    }
}- 1
- 2
- 3
- 4
- 5
- 6
- 7
- 8
- 9
- 10
(3)当一个组件作为前端交互的控制层,使用@Controller进行注解,如下
@Controller
public class HappyController {
    @Autowired //下面进行讲解
    private ClubService clubService;

    // Control the people entering the Club
    // do something
}
/*Controller相关的注解下面进行详细讲解,这里简单引入@Controller*/- 1
- 2
- 3
- 4
- 5
- 6
- 7
- 8
- 9
3、总结注意点
1、被注解的java类当做Bean实例,Bean实例的名称默认是Bean类的首字母小写,其他部分不变。@Service也可以自定义Bean名称,但是必须是唯一的!
2、尽量使用对应组件注解的类替换@Component注解,在spring未来的版本中,@Controller,@Service,@Repository会携带更多语义。并且便于开发和维护!
3、指定了某些类可作为Spring Bean类使用后,最好还需要让spring搜索指定路径,在Spring配置文件加入如下配置:
<!-- 自动扫描指定包及其子包下的所有Bean类 -->
<context:component-scan base-package="org.springframework.*"/>- 1
- 2
二:装配bean时常用的注解
1、注解介绍
@Autowired:属于Spring 的org.springframework.beans.factory.annotation包下,可用于为类的属性、构造器、方法进行注值
@Resource:不属于spring的注解,而是来自于JSR-250位于java.annotation包下,使用该annotation为目标bean指定协作者Bean。
@PostConstruct 和 @PreDestroy 方法 实现初始化和销毁bean之前进行的操作
2、举例说明
(1):@Autowired
@Target({ElementType.CONSTRUCTOR, ElementType.FIELD, ElementType.METHOD, ElementType.ANNOTATION_TYPE})
@Retention(RetentionPolicy.RUNTIME)
@Documented
public @interface Autowired {
    boolean required() default true;
}- 1
- 2
- 3
- 4
- 5
- 6
- 7
@Controller
public class HappyController {
    @Autowired //默认依赖的ClubDao 对象(Bean)必须存在
    //@Autowired(required = false) 改变默认方式
    @Qualifier("goodClubService")
    private ClubService clubService;

    // Control the people entering the Club
    // do something
}
- 1
- 2
- 3
- 4
- 5
- 6
- 7
- 8
- 9
- 10
- 11
(2):@Resource
@Target({TYPE, FIELD, METHOD})
@Retention(RUNTIME)
public @interface Resource {
 String name() default "";
 Class type() default java.lang.Object.class;
...- 1
- 2
- 3
- 4
- 5
- 6
public class AnotationExp {

    @Resource(name = "HappyClient")
    private HappyClient happyClient;

    @Resource(type = HappyPlayAno .class)
    private HappyPlayAno happyPlayAno;
}- 1
- 2
- 3
- 4
- 5
- 6
- 7
- 8
3、总结
(1):相同点
@Resource的作用相当于@Autowired,均可标注在字段或属性的setter方法上。
(2):不同点
a:提供方 @Autowired是Spring的注解,@Resource是javax.annotation注解,而是来自于JSR-250,J2EE提供,需要JDK1.6及以上。
b :注入方式 @Autowired只按照Type 注入;@Resource默认按Name自动注入,也提供按照Type 注入;
c:属性
@Autowired注解可用于为类的属性、构造器、方法进行注值。默认情况下,其依赖的对象必须存在(bean可用),如果需要改变这种默认方式,可以设置其required属性为false。
还有一个比较重要的点就是,@Autowired注解默认按照类型装配,如果容器中包含多个同一类型的Bean,那么启动容器时会报找不到指定类型bean的异常,解决办法是结合@Qualified注解进行限定,指定注入的bean名称。
@Resource有两个中重要的属性:name和type。name属性指定byName,如果没有指定name属性,当注解标注在字段上,即默认取字段的名称作为bean名称寻找依赖对象,当注解标注在属性的setter方法上,即默认取属性名作为bean名称寻找依赖对象。
需要注意的是,@Resource如果没有指定name属性,并且按照默认的名称仍然找不到依赖对象时, @Resource注解会回退到按类型装配。但一旦指定了name属性,就只能按名称装配了。
d:@Resource注解的使用性更为灵活,可指定名称,也可以指定类型 ;@Autowired注解进行装配容易抛出异常,特别是装配的bean类型有多个的时候,而解决的办法是需要在增加@Qualitied进行限定。
Spring中 @Autowired注解与@Resource注解的区别
注意点:使用@Resource也要注意添加配置文件到Spring,如果没有配置component-scan
<context:component-scan>
<!--<context:component-scan>的使用,是默认激活<context:annotation-config>功能-->- 1
- 2
则一定要配置 annotation-config
<context:annotation-config/>- 1
三:@Component vs @Configuration and @Bean
1、简单介绍
Spring的官方团队说@Component可以替代 @Configuration注解,事实上我们看源码也可以发现看到,如下
@Target({ElementType.TYPE})
@Retention(RetentionPolicy.RUNTIME)
@Documented
@Component  //看这里!!!
public @interface Configuration {
    String value() default "";
- 1
- 2
- 3
- 4
- 5
- 6
- 7
虽然说可以替代但是两个注解之间还是有区别的!
Bean注解主要用于方法上,有点类似于工厂方法,当使用了@Bean注解,我们可以连续使用多种定义bean时用到的注解,譬如用@Qualifier注解定义工厂方法的名称,用@Scope注解定义该bean的作用域范围,譬如是singleton还是prototype等。
Spring 中新的 Java 配置支持的核心就是@Configuration 注解的类。这些类主要包括 @Bean 注解的方法来为 Spring 的 IoC 容器管理的对象定义实例,配置和初始化逻辑。
使用@Configuration 来注解类表示类可以被 Spring 的 IoC 容器所使用,作为 bean 定义的资源。
@Configuration
public class AppConfig {
    @Bean
    public MyService myService() {
        return new MyServiceImpl();
    }
}- 1
- 2
- 3
- 4
- 5
- 6
- 7
这和 Spring 的 XML 文件中的非常类似
<beans>
    <bean id="myService" class="com.acme.services.MyServiceImpl"/>
</beans>- 1
- 2
- 3
@Bean 注解扮演了和元素相同的角色。
2、举例说明@Component 和 @Configuration
@Configuration
public static class Config {

    @Bean
    public SimpleBean simpleBean() {
        return new SimpleBean();
    }

    @Bean
    public SimpleBeanConsumer simpleBeanConsumer() {
        return new SimpleBeanConsumer(simpleBean());
    }
}- 1
- 2
- 3
- 4
- 5
- 6
- 7
- 8
- 9
- 10
- 11
- 12
- 13
@Component
public static class Config {

    @Bean
    public SimpleBean simpleBean() {
        return new SimpleBean();
    }

    @Bean
    public SimpleBeanConsumer simpleBeanConsumer() {
        return new SimpleBeanConsumer(simpleBean());
    }
}- 1
- 2
- 3
- 4
- 5
- 6
- 7
- 8
- 9
- 10
- 11
- 12
- 13
第一个代码正常工作,正如预期的那样,SimpleBeanConsumer将会得到一个单例SimpleBean的链接。第二个配置是完全错误的,因为Spring会创建一个SimpleBean的单例bean,但是SimpleBeanConsumer将获得另一个SimpleBean实例(也就是相当于直接调用new SimpleBean() ,这个bean是不归Spring管理的),既new SimpleBean() 实例是Spring上下文控件之外的。
3、原因总结
使用@ configuration,所有标记为@ bean的方法将被包装成一个CGLIB包装器,它的工作方式就好像是这个方法的第一个调用,那么原始方法的主体将被执行,最终的对象将在spring上下文中注册。所有进一步的调用只返回从上下文检索的bean。
在上面的第二个代码块中,新的SimpleBeanConsumer(simpleBean())只调用一个纯java方法。为了纠正第二个代码块,我们可以这样做
@Component
public static class Config {
    @Autowired
    SimpleBean simpleBean;

    @Bean
    public SimpleBean simpleBean() {
        return new SimpleBean();
    }

    @Bean
    public SimpleBeanConsumer simpleBeanConsumer() {
        return new SimpleBeanConsumer(simpleBean);
    }
}- 1
- 2
- 3
- 4
- 5
- 6
- 7
- 8
- 9
- 10
- 11
- 12
- 13
- 14
- 15
Spring @Configuration vs @Component
基本概念:@Configuration 和@Bean
四:spring MVC模块注解
1、web模块常用到的注解
- @Controller :表明该类会作为与前端作交互的控制层组件,通过服务接口定义的提供访问应用程序的一种行为,解释用户的输入,将其转换成一个模型然后将试图呈献给用户。
@Controller
public class HappyController {
    //do something
...
}- 1
- 2
- 3
- 4
- 5
Spring MVC 使用 @Controller 定义控制器,它还允许自动检测定义在类路径下的组件(配置文件中配置扫描路径)并自动注册。
- @RequestMapping : 这个注解用于将url映射到整个处理类或者特定的处理请求的方法。可以只用通配符!
@Controller
@RequestMapping("/happy")
public class HappyController  {

  @Autowired
  private HappyService happyService;

  @RequestMapping(/hello/*)
  public void sayHello(){
        //请求为 /happy/hello/* 都会进入这个方法!
        //例如:/happy/hello/123   /happy/hello/adb
        //可以通过get/post 请求
  }
  @RequestMapping(value="/haha",method=RequestMethod.GET)
  public void sayHaHa(){
  //只能通过get请求
  }
...
}- 1
- 2
- 3
- 4
- 5
- 6
- 7
- 8
- 9
- 10
- 11
- 12
- 13
- 14
- 15
- 16
- 17
- 18
- 19
@RequestMapping 既可以作用在类级别,也可以作用在方法级别。当它定义在类级别时,标明该控制器处理所有的请求都被映射到 /favsoft 路径下。@RequestMapping中可以使用 method 属性标记其所接受的方法类型,如果不指定方法类型的话,可以使用 HTTP GET/POST 方法请求数据,但是一旦指定方法类型,就只能使用该类型获取数据。
- @RequestParam :将请求的参数绑定到方法中的参数上,有required参数,默认情况下,required=true,也就是改参数必须要传。如果改参数可以传可不传,可以配置required=false。
 @RequestMapping("/happy")
  public String sayHappy(
  @RequestParam(value = "name", required = false) String name,
  @RequestParam(value = "age", required = true) String age) {
  //age参数必须传 ,name可传可不传
  ...
}- 1
- 2
- 3
- 4
- 5
- 6
- 7
- @PathVariable : 该注解用于方法修饰方法参数,会将修饰的方法参数变为可供使用的uri变量(可用于动态绑定)。
@RequestMapping(value="/happy/{dayid}",method=RequestMethod.GET)
public String findPet(@PathVariable String dayid, Model mode) {
//使用@PathVariable注解绑定 {dayid} 到String dayid
}- 1
- 2
- 3
- 4
@PathVariable中的参数可以是任意的简单类型,如int, long, Date等等。Spring会自动将其转换成合适的类型或者抛出 TypeMismatchException异常。当然,我们也可以注册支持额外的数据类型。
@PathVariable支持使用正则表达式,这就决定了它的超强大属性,它能在路径模板中使用占位符,可以设定特定的前缀匹配,后缀匹配等自定义格式。
- @RequestBody : @RequestBody是指方法参数应该被绑定到HTTP请求Body上。
@RequestMapping(value = "/something", method = RequestMethod.PUT)
public void handle(@RequestBody String body,@RequestBody User user){
   //可以绑定自定义的对象类型
}- 1
- 2
- 3
- 4
- @ResponseBody : @ResponseBody与@RequestBody类似,它的作用是将返回类型直接输入到HTTP response body中。
@ResponseBody在输出JSON格式的数据时,会经常用到。
@RequestMapping(value = "/happy", method =RequestMethod.POST)
@ResponseBody
public String helloWorld() {
return "Hello World";//返回String类型
}- 1
- 2
- 3
- 4
- 5
-
@RestController :控制器实现了REST的API,只为服务于JSON,XML或其它自定义的类型内容,@RestController用来创建REST类型的控制器,与@Controller类型。@RestController就是这样一种类型,它避免了你重复的写@RequestMapping与@ResponseBody。
-
@ModelAttribute :@ModelAttribute可以作用在方法或方法参数上,当它作用在方法上时,标明该方法的目的是添加一个或多个模型属性(model attributes)。
该方法支持与@RequestMapping一样的参数类型,但并不能直接映射成请求。控制器中的@ModelAttribute方法会在@RequestMapping方法调用之前而调用。@ModelAttribute方法有两种风格:一种是添加隐形属性并返回它。另一种是该方法接受一个模型并添加任意数量的模型属性。用户可以根据自己的需要选择对应的风格。
五:Spring事务模块注解
1、常用到的注解
在处理dao层或service层的事务操作时,譬如删除失败时的回滚操作。使用@Transactional 作为注解,但是需要在配置文件激活
<!-- 开启注解方式声明事务 -->
<tx:annotation-driven transaction-manager="transactionManager" />- 1
- 2
2、举例
@Service
public class CompanyServiceImpl implements CompanyService {
  @Autowired
  private CompanyDAO companyDAO;

  @Transactional(propagation = Propagation.REQUIRED, readOnly = false, rollbackFor = Exception.class)
  public int deleteByName(String name) {

    int result = companyDAO.deleteByName(name);
    return result;
  }
  ...
}- 1
- 2
- 3
- 4
- 5
- 6
- 7
- 8
- 9
- 10
- 11
- 12
- 13
3、总结
事务的传播机制和隔离机制比较重要!
| 事务传播行为类型 | 说明 |
|---|---|
| PROPAGATION_REQUIRED | 如果当前没有事务,就新建一个事务,如果已经存在一个事务中,加入到这个事务中。这是最常见的选择。 |
| PROPAGATION_SUPPORTS | 支持当前事务,如果当前没有事务,就以非事务方式执行。 |
| PROPAGATION_MANDATORY | 使用当前的事务,如果当前没有事务,就抛出异常。 |
| PROPAGATION_REQUIRES_NEW | 新建事务,如果当前存在事务,把当前事务挂起。 |
| PROPAGATION_NOT_SUPPORTED | 以非事务方式执行操作,如果当前存在事务,就把当前事务挂起。 |
| PROPAGATION_NEVER | 以非事务方式执行,如果当前存在事务,则抛出异常 |
| PROPAGATION_NESTED | 如果当前存在事务,则在嵌套事务内执行。如果当前没有事务,则执行与PROPAGATION_REQUIRED类 似的操作 |
readOnly : 事务的读写属性,取true或者false,true为只读、默认为false
rollbackFor : 回滚策略,当遇到指定异常时回滚。譬如上例遇到异常就回滚
timeout (补充的) : 设置超时时间,单位为秒
isolation : 设置事务隔离级别,枚举类型,一共五种
| 类型 | 说明 |
|---|---|
| DEFAULT | 采用数据库默认隔离级别 |
| READ_UNCOMMITTED | 读未提交的数据(会出现脏读取) |
| READ_COMMITTED | 读已提交的数据(会出现幻读,即前后两次读的不一样) |
| REPEATABLE_READ | 可重复读,会出现幻读 |
| SERIALIZABLE 串行化 | (对资源消耗较大,一般不使用) |