1.1简介
UINavigationController可以翻译为导航控制器,在iOS里经常用到。
下面的图显示了导航控制器的流程。最左侧是根视图,当用户点击其中的General项时 ,General视图会滑入屏幕;当用户继续点击Auto-Lock项时,Auto-Lock视图将滑入屏幕。相应地,在对象管理上,导航控制器使用了导 航堆栈。根视图控制器在堆栈最底层,接下来入栈的是General视图控制器和Auto-Lock视图控制器。可以调用 pushViewControllerAnimated:方法将视图控制器推入栈顶,也可以调用popViewControllerAnimated:方 法将视图控制器弹出堆栈。

1.2UINavigationController结构组成
看下图,UINavigationController有Navigation bar ,Navigation View ,Navigation toolbar等组成。

2.1
- 新建一个空项目UINavigationControllerDemo
- 新建一个UIViewController,并在UIViewController.xib中添加一个Button设置名字为Goto SecondView
- 打开AppDelegate.h,添加属性
#import <UIKit/UIKit.h>

@interface MLKAppDelegate : UIResponder <UIApplicationDelegate>

@property (strong, nonatomic) UIWindow *window;

@property (strong,nonatomic) UINavigationController *navController;

@end
AppDelegate.mdidFinishLaunchingWithOptions
- (BOOL)application:(UIApplication *)application didFinishLaunchingWithOptions:(NSDictionary *)launchOptions
{
    self.window = [[UIWindow alloc] initWithFrame:[[UIScreen mainScreen] bounds]];
    // Override point for customization after application launch.
    MLKRootViewController *rootController=[[MLKRootViewController alloc]init];
    rootController.title=@"Root View";

    self.navController=[[UINavigationController alloc]init];
    [self.navController pushViewController:rootController animated:YES];
    //
    [self.window addSubview:self.navController.view];
    //
    self.window.backgroundColor = [UIColor whiteColor];
    [self.window makeKeyAndVisible];
    return YES;
}
运行

2.2 添加UIBarButtonItem
bar ButtonItem分左右UIBarButtonItem。我们把左右的都添加上去。
在RootViewController.m中添加代码如下:
- (void)viewDidLoad
{
    [super viewDidLoad];
    // Do any additional setup after loading the view from its nib.
    //添加UIBarButtonItem
    UIBarButtonItem *leftButton=[[UIBarButtonItem alloc]initWithBarButtonSystemItem:UIBarButtonSystemItemAction target:self action:@selector(selectLeftAction:)];
    //
    self.navigationItem.leftBarButtonItem=leftButton;

    UIBarButtonItem *rightButton=[[UIBarButtonItem alloc]initWithBarButtonSystemItem:UIBarButtonSystemItemAction target:self action:@selector(selectRightAction:)];
    //
    self.navigationItem.rightBarButtonItem=rightButton;
}
UIBarButtonSystemItemAction的风格,这是系统自带的按钮风格,系统自带的按钮有下面这些

2.3响应UIBarButtonItem的点击事件
//响应UIBarButtonItem事件的实现
-(void)selectLeftAction:(id)sender{
    UIAlertView *alert=[[UIAlertView alloc] initWithTitle:@"提示" message:@"你点击了导航左按钮" delegate:self cancelButtonTitle:@"确定" otherButtonTitles:nil, nil];

    [alert show];
}

-(void)selectRightAction:(id)sender{

    UIAlertView *alert=[[UIAlertView alloc] initWithTitle:@"提示" message:@"你点击了导航右按钮" delegate:self cancelButtonTitle:@"确定" otherButtonTitles:nil, nil];

    [alert show];

}

3.1创建一个新的UIViewController SecondViewController
3.2为RootViewController的Button设置点击方法
-(void)goToSecondView:(id)sender{
    MLKSecondViewController *secondView=[[MLKSecondViewController alloc]init];
    [self.navigationController pushViewController:secondView animated:YES];
    secondView.title=@"Second View";
}
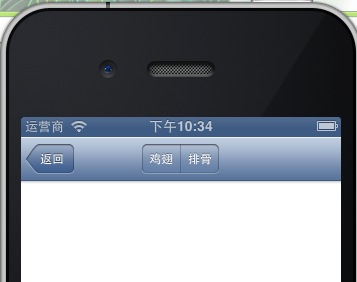
SecondViewController页面

如何在导航栏中实现这种效果呢

这就是SegmentedControl
在SecondViewController.m的viewDidLoad添加如下代码
- (void)viewDidLoad
{
    [super viewDidLoad];
    // Do any additional setup after loading the view from its nib.
    NSArray *array = [NSArray arrayWithObjects:@"鸡翅",@"排骨", nil];
    UISegmentedControl *segmentedController = [[UISegmentedControl alloc] initWithItems:array];

    segmentedController.segmentedControlStyle = UISegmentedControlSegmentCenter;

    [segmentedController addTarget:self action:@selector(segmentAction:) forControlEvents:UIControlEventValueChanged];
    self.navigationItem.titleView = segmentedController;

}
设置点击事件
-(void)segmentAction:(id)sender
{
    switch ([sender selectedSegmentIndex]) {
        case 0:
        {
            UIAlertView *alter = [[UIAlertView alloc] initWithTitle:@"提示" message:@"你点击了鸡翅" delegate:self  cancelButtonTitle:@"确定" otherButtonTitles:nil, nil];
            [alter show];

        }
            break;
        case 1:
        {
            UIAlertView *alter = [[UIAlertView alloc] initWithTitle:@"提示" message:@"你点击了排骨" delegate:self  cancelButtonTitle:@"确定" otherButtonTitles:nil, nil];
            [alter show];
        }
            break;

        default:
            break;
    }
}

左上角的返回上级View的barButtonitem的名字是上级目录的Title,如果title或者适合做button的名字,怎么办呢?我们可以自己定义
在RootViewController viewDidLoad方法
    //自定义backBarButtonItem
    UIBarButtonItem *backButton = [[UIBarButtonItem alloc] initWithTitle:@"返回" style:UIBarButtonItemStyleDone target:nil action:nil];
    self.navigationItem.backBarButtonItem=backButton;

5.1显示ToolBar
在SecondViewController的viewDidLoad方法中添加下面的代码这样ToolBar就显示出来了
[self.navigationController setToolbarHidden:NO animated:YES];
在ToolBar上添加UIBarButtonItem
    UIBarButtonItem *one = [[UIBarButtonItem alloc] initWithBarButtonSystemItem:UIBarButtonSystemItemAdd target:nil action:nil];
    UIBarButtonItem *two = [[UIBarButtonItem alloc] initWithBarButtonSystemItem:UIBarButtonSystemItemBookmarks target:nil action:nil];
    UIBarButtonItem *three = [[UIBarButtonItem alloc] initWithBarButtonSystemItem:UIBarButtonSystemItemAction target:nil action:nil];
    UIBarButtonItem *four = [[UIBarButtonItem alloc] initWithBarButtonSystemItem:UIBarButtonSystemItemEdit target:nil action:nil];
    UIBarButtonItem *flexItem = [[UIBarButtonItem alloc] initWithBarButtonSystemItem:UIBarButtonSystemItemFlexibleSpace target:nil action:nil];
    [self setToolbarItems:[NSArray arrayWithObjects:flexItem, one, flexItem, two, flexItem, three, flexItem, four, flexItem, nil]];

注意:用 [self.navigationController.toolbar setItems:(NSArray *) animated:<#(BOOL)#>]这个方法添加item是不起效果的。下面我动态自己添加Toolbar时,这个才起效果。
5.2动态添加ToolBar
SecondViewController.h文件中添加属性
@property UIToolbar *toolBar;
   //先隐藏ToolBar
    [self.navigationController  setToolbarHidden:YES animated:YES];
    UIBarButtonItem *searchButton = [[UIBarButtonItem alloc] initWithBarButtonSystemItem:UIBarButtonSystemItemSearch target:self action:@selector(goToThirdView:)];
    self.toolBar = [[UIToolbar alloc] initWithFrame:CGRectMake(0.0, self.view.frame.size.height - _toolBar.frame.size.height - 44.0, self.view.frame.size.width, 44.0)];
    [_toolBar setBarStyle:UIBarStyleDefault];
    _toolBar.autoresizingMask = UIViewAutoresizingFlexibleTopMargin;
    [_toolBar setItems:[NSArray arrayWithObject:searchButton]];
    [self.view addSubview:_toolBar];
响应UIBarButtonItem的点击事件,跳转到第三个页面去
-(void)goToThirdView:(id)sender{
    MLKThirdViewController *thirdView=[[MLKThirdViewController alloc]init];
    [self.navigationController pushViewController:thirdView animated:YES];
    thirdView.title=@"Third View";
}
