<?xml version="1.0" encoding="UTF-8"?>
<!-- 引入beans的头 -->
<beans xmlns="http://www.springframework.org/schema/beans"
       xmlns:xsi="http://www.w3.org/2001/XMLSchema-instance"
       xsi:schemaLocation="
http://www.springframework.org/schema/beans http://www.springframework.org/schema/beans/spring-beans.xsd">
    <!-- 配置Spring默认的连接池 -->
    <!-- 这个类由Spring来帮我们创建,它默认情况下只创建一次,因为是单例的. -->
    <bean id="dataSource" class="org.springframework.jdbc.datasource.DriverManagerDataSource">

        <property name="driverClassName" value="com.mysql.jdbc.Driver"></property>
        <property name="url" value="jdbc:mysql:///spring3_day02"></property>
        <property name="username" value="root"></property>
        <property name="password" value=""></property>

    </bean>
    <!-- 配置DBCP连接池 -->
    <bean id="dataSource1" class="org.apache.commons.dbcp.BasicDataSource">
        <property name="driverClassName" value="com.mysql.jdbc.Driver"></property>
        <property name="url" value="jdbc:mysql:///spring3_day02"></property>
        <property name="username" value="root"></property>
        <property name="password" value=""></property>

    </bean>

    <!-- 配置C3P0连接池 -->
    <bean id="dataSource2" class="com.mchange.v2.c3p0.ComboPooledDataSource">
        <property name="driverClass" value="com.mysql.jdbc.Driver"></property>
        <property name="jdbcUrl" value="jdbc:mysql:///spring3_day02"></property>
        <property name="user" value="root"></property>
        <property name="password" value=""></property>

    </bean>
    <!-- 定义jdbctemplate -->
    <bean id="jdbcTemplate" class="org.springframework.jdbc.core.JdbcTemplate">
          <property name="dataSource" ref="dataSource2"></property><!-- 把上面定义好的连接池注入进来了 -->
    </bean>
</beans>
每一次去修改里面的参数都要修改Spring的核心配置文件.


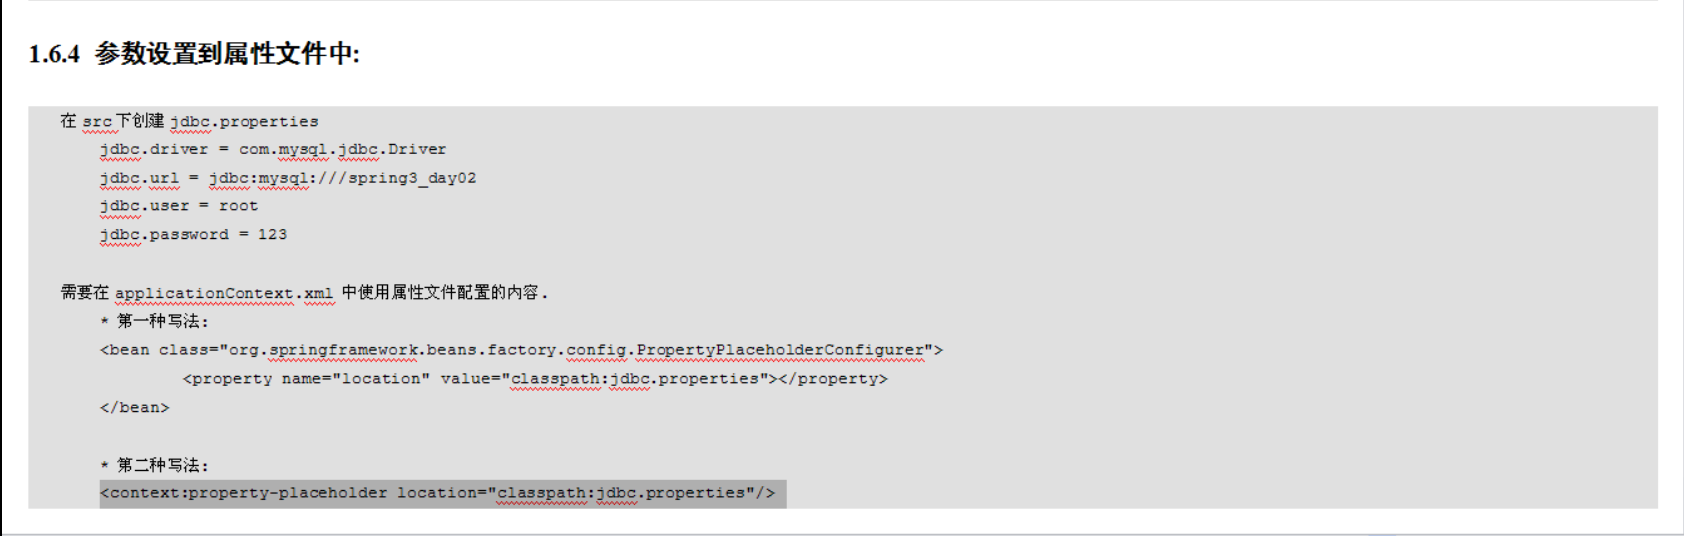
第一种方式要写的东西比较多,所以一般会使用context标签.

要使用context标签就要引入context标签的头.在配置文件xsd-config.html中找到context标签的头.

<context:property-placeholder location="classpath:jdbc.properties"/>
<?xml version="1.0" encoding="UTF-8"?>
<!-- 引入beans的头 -->
<beans xmlns="http://www.springframework.org/schema/beans"
       xmlns:xsi="http://www.w3.org/2001/XMLSchema-instance"
              xmlns:context="http://www.springframework.org/schema/context"
       xsi:schemaLocation="
http://www.springframework.org/schema/beans http://www.springframework.org/schema/beans/spring-beans.xsd
http://www.springframework.org/schema/beans http://www.springframework.org/schema/beans/spring-beans.xsd
http://www.springframework.org/schema/context http://www.springframework.org/schema/context/spring-context.xsd">

    <!-- 配置Spring默认的连接池 -->
    <!-- 这个类由Spring来帮我们创建,它默认情况下只创建一次,因为是单例的. -->
    <bean id="dataSource" class="org.springframework.jdbc.datasource.DriverManagerDataSource">

        <property name="driverClassName" value="com.mysql.jdbc.Driver"></property>
        <property name="url" value="jdbc:mysql:///spring3_day02"></property>
        <property name="username" value="root"></property>
        <property name="password" value=""></property>

    </bean>
    <!-- 配置DBCP连接池 -->
    <bean id="dataSource1" class="org.apache.commons.dbcp.BasicDataSource">
        <property name="driverClassName" value="com.mysql.jdbc.Driver"></property>
        <property name="url" value="jdbc:mysql:///spring3_day02"></property>
        <property name="username" value="root"></property>
        <property name="password" value=""></property>

    </bean>
    <!--
    <bean class="org.springframework.beans.factory.config.PropertyPlaceholderConfigurer">
    <property name="location" value="classpath:jdbc.properties">--><!-- jdbc.properties也是在src下 --><!-- </property>
    </bean>
    -->
    <context:property-placeholder location="classpath:jdbc.properties"/>
    <!-- 配置C3P0连接池 -->
    <bean id="dataSource2" class="com.mchange.v2.c3p0.ComboPooledDataSource">
    <!--
        <property name="driverClass" value="com.mysql.jdbc.Driver"></property>
        -->
        <property name="driverClass" value="${jdbc.driver}"></property>
        <!--
        <property name="jdbcUrl" value="jdbc:mysql:///spring3_day02"></property>
        -->
        <property name="jdbcUrl" value="${jdbc.url}"></property>
        <!--
        <property name="user" value="root"></property>
        -->
        <property name="user" value="${jdbc.user}"></property>
        <!--
        <property name="password" value=""></property>
        -->
        <property name="password" value="${jdbc.password}"></property>

    </bean>
    <!-- 定义jdbctemplate -->
    <bean id="jdbcTemplate" class="org.springframework.jdbc.core.JdbcTemplate">
          <property name="dataSource" ref="dataSource2"></property><!-- 把上面定义好的连接池注入进来了 -->
    </bean>
</beans>
package cn.itcast.spring3.demo1;

import java.sql.DriverManager;

import org.junit.Test;
import org.junit.runner.RunWith;
import org.springframework.beans.factory.annotation.Autowired;
import org.springframework.beans.factory.annotation.Qualifier;
import org.springframework.jdbc.core.JdbcTemplate;
import org.springframework.jdbc.datasource.DriverManagerDataSource;
import org.springframework.test.context.ContextConfiguration;
import org.springframework.test.context.junit4.SpringJUnit4ClassRunner;
import org.springframework.transaction.jta.SpringJtaSynchronizationAdapter;
@RunWith(SpringJUnit4ClassRunner.class)
@ContextConfiguration("classpath:applicationContext.xml")
public class SpringTest1 {

    @Autowired
    @Qualifier("jdbcTemplate")
    private JdbcTemplate jdbcTemplate;//注入Jdbc模板
    @Test
    public void demo2(){
        jdbcTemplate.execute("create table user (id int primary key auto_increment,name varchar(20))");
    }


    @Test
    public void demo1(){
        // 创建连接池:
        DriverManagerDataSource dataSource = new DriverManagerDataSource();//Spring自带的连接池
        // 设置参数:
        dataSource.setDriverClassName("com.mysql.jdbc.Driver");
        dataSource.setUrl("jdbc:mysql:///spring3_day02");
        dataSource.setUsername("root");
        dataSource.setPassword("");

        //使用JDBC的模板:
        //JdbcTemplate jdbcTemplate = new JdbcTemplate();
        //jdbcTemplate.setDataSource(dataSource);
        JdbcTemplate jdbcTemplate = new JdbcTemplate(dataSource);
        jdbcTemplate.execute("create table user (id int primary key auto_increment,name varchar(20))");
    }
}
jdbc.driver = com.mysql.jdbc.Driver
jdbc.url = jdbc:mysql:///spring3_day02
jdbc.user = root
jdbc.password =