事务的介绍已经很多了,这里就不再介绍事务的基本特性了。
事务分两种:
一种式编程式事务,就像那种在jdbc中编写commit或rollback来提交或回滚事务,这中控制事务的方式比较麻烦,一般不建议使用这种方式。
一种是声明式事务,声明式事务,就像字面上说的一样,在一个地方声明一下,然后程序中不需要在由事务控制的代码,非常方便,使用起来简单。
现在使用的式spring,spring是支持声明式事务的,我们只需要在spring的配置文件中,做一些配置,就可以使用了,
我们一般将事务添加到servcie层。下面开始学习spring配置声明式事务
1.利用配置文件配置声明式事务
<?xml version="1.0" encoding="UTF-8"?>
<beans xmlns="http://www.springframework.org/schema/beans"
       xmlns:xsi="http://www.w3.org/2001/XMLSchema-instance"
       xmlns:context="http://www.springframework.org/schema/context" xmlns:tx="http://www.springframework.org/schema/tx"
       xmlns:aop="http://www.springframework.org/schema/aop"
       xsi:schemaLocation="http://www.springframework.org/schema/beans http://www.springframework.org/schema/beans/spring-beans.xsd http://www.springframework.org/schema/context http://www.springframework.org/schema/context/spring-context.xsd http://www.springframework.org/schema/tx http://www.springframework.org/schema/tx/spring-tx.xsd http://www.springframework.org/schema/aop http://www.springframework.org/schema/aop/spring-aop.xsd">

    <!--1.加载数据库连接池的配置信息-->
    <context:property-placeholder location="classpath:jdbc.properties"/>

    <!--2.配置连接池,这里使用dbcp连接池,其他的连接池配置都差不多,需要将class内容修改-->
    <bean id="dataSource" class="org.apache.commons.dbcp.BasicDataSource">
        <property name="driverClassName" value="${jdbc.driver}"/>
        <property name="url" value="${jdbc.url}"/>
        <property name="username" value="${jdbc.username}"/>
        <property name="password" value="${jdbc.password}"/>
        <!--${}读取之前加载的.properties文件,需要注意的是,.properties文件内的属性名必须加上jdbc.
        如,jdbc.url、jdbc.username如果不加jdbc. 会报异常
        还可以继续往下配置最大连接数、初始化连接数、最大等待时间等,配置方式与上面的一样,要先在配置文件中添加,
        也可以在value后直接写值,就不需要.properties文件了-->
    </bean>

    <!--扫描bean包-->
    <context:component-scan base-package="com.zs.dao,com.zs.entity,com.zs.service"/>

    <!--使用spring-jdbc模板时,一般会使用jdbcTemplate对象,在spring工厂创建对象-->
    <bean class="org.springframework.jdbc.core.JdbcTemplate">
        <property name="dataSource" ref="dataSource"/>
    </bean>

    <!--创建spring事务管理器对象-->
    <bean id="transactionManager" class="org.springframework.jdbc.datasource.DataSourceTransactionManager">
        <property name="dataSource" ref="dataSource"/>
    </bean>

    <!--创建spring事务管理的通知类对象-->
    <tx:advice id="txAdvice" transaction-manager="transactionManager">
        <!--此处可以配置事务管理的一些特性-->
        <tx:attributes>
            <!--
            name 中可以使用通配符指定该属性对哪儿些方法起作用
            propagation 配置事务的传播特性,取值如下:
                REQUIRED 判断当前方法是否存在事务,如果不存在就创建一个新的事务,如果存在就使用当前的事务
                REQUIRES_NEW 判断当前方法是否存在事务,如果不存在事务就创建一个新的事务,
                            如果存在事务,就把当前事务挂起,在启动一个新的事务
                NESTED 嵌套事务。判断当前方法是否存在事务,如果不存在就创建一个事务,如果存在事务就把当前事务挂起,
                        再启动一个当前事务的子事务,这样如果父事务产生异常,那么即使子事务没有异常也会回滚。
            read-only 配置事务的只读特性
                true 当前方法是只读事务,在方法之后 不会提交事务;
                false 默认值,当前方法是非只读事务,在方法之后会提交事务,
            配置事务的只读特性,增删改方法一般需要事务,查询方法一般不需要事务,所以以后开发过程中最好把查询方法的read-only设置为true,
            在一定程度上能提高程序的运行效率。-->
            <tx:method name="save*" propagation="NESTED"/>
            <tx:method name="select*" propagation="REQUIRED" read-only="true"/>
        </tx:attributes>
    </tx:advice>

    <!--配置spring的声明式事务-->
    <aop:config>
        <!--生命切入点对象,要对哪儿些类的哪儿些方法使用事务-->
        <aop:pointcut id="p1" expression="execution(* com.zs.service.impl.*.*(..))"/>
        <!--声明事务管理专用的切面-->
        <aop:advisor advice-ref="txAdvice" pointcut-ref="p1"/>
    </aop:config>

</beans>
可以看出上面的这种方法比较复杂,还可以使用
2.注解的方式配置声明式事务

下面编写service方法进行测试:我们以一个方法来测试:
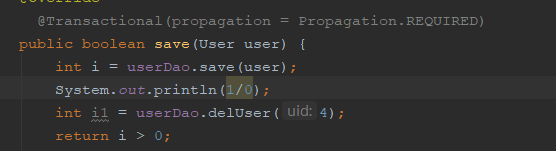
如图所示,当没有开启事务时,那么会执行第一个添加的业务,然后遇到异常,但是添加的业务已经提交了,因此会添加成功,当我们开启事务之后,就会将这两个方法当成一个事务来运行,那么就不会添加成功。