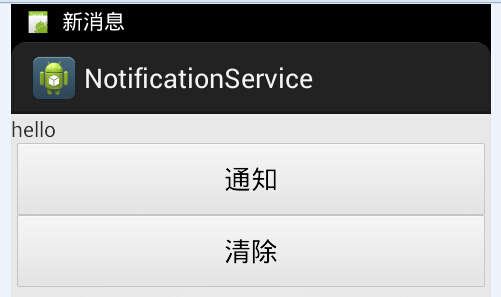
从网上查询资料学习Android消息推送机制,效果图如下:
1.首先是布局文件代码 activity_main.xml
<?xml version="1.0" encoding="utf-8"?>
<LinearLayout xmlns:android="http://schemas.android.com/apk/res/android"
    android:layout_width="fill_parent"
    android:layout_height="fill_parent"
    android:orientation="vertical" >

    <TextView
        android:layout_width="fill_parent"
        android:layout_height="wrap_content"
        android:text="hello" />

    <Button
        android:id="@+id/btnStart"
        android:layout_width="fill_parent"
        android:layout_height="wrap_content"
        android:text="通知" />

    <Button
        android:id="@+id/btnStop"
        android:layout_width="fill_parent"
        android:layout_height="wrap_content"
        android:text="清除" />

</LinearLayout>
2.然后是java主界面代码MainActivity.java
package com.example.notificationservice;

import android.app.Activity;
import android.content.Intent;
import android.os.Bundle;
import android.view.View;
import android.view.View.OnClickListener;
import android.widget.Button;

public class MainActivity extends Activity implements OnClickListener {

    private Button btnStart;
    private Button btnStop;

    @Override
    protected void onCreate(Bundle savedInstanceState) {
        super.onCreate(savedInstanceState);
        setContentView(R.layout.activity_main);
        initView();
    }

    private void initView() {
        btnStart = (Button) findViewById(R.id.btnStart);
        btnStop = (Button) findViewById(R.id.btnStop);
        btnStart.setOnClickListener(this);
        btnStop.setOnClickListener(this);
    }

    @Override
    public void onClick(View v) {
        int id = v.getId();
        if (id == R.id.btnStart) {
            // 启动Service
            Intent intent = new Intent();
            intent.setAction("ymw.MY_SERVICE");
            startService(intent);
        }
        if (id == R.id.btnStop) {
            // 关闭Service
            Intent intent = new Intent();
            intent.setAction("ymw.MY_SERVICE");
            stopService(intent);
        }
    }

    @Override
    public void onBackPressed() {
        System.exit(0);
        super.onBackPressed();
    }

}
3.然后是消息推送服务文件 NotificationService.java
package com.example.notificationservice;

import android.app.Notification;
import android.app.NotificationManager;
import android.app.PendingIntent;
import android.app.Service;
import android.content.Context;
import android.content.Intent;
import android.os.IBinder;

public class NotificationService extends Service {

    // 获取消息线程
    private MessageThread messageThread = null;

    // 点击查看
    private Intent messageIntent = null;
    private PendingIntent messagePendingIntent = null;

    // 通知栏消息
    private int messageNotificationID = 1000;
    private Notification messageNotification = null;
    private NotificationManager messageNotificatioManager = null;

    public IBinder onBind(Intent intent) {
        return null;
    }

    @Override
    public int onStartCommand(Intent intent, int flags, int startId) {
        // 初始化
        messageNotification = new Notification();
        messageNotification.icon = R.drawable.ic_launcher;
        messageNotification.tickerText = "新消息";
        messageNotification.defaults = Notification.DEFAULT_SOUND;
        messageNotificatioManager = (NotificationManager) getSystemService(Context.NOTIFICATION_SERVICE);

        messageIntent = new Intent(this, MainActivity.class);
        messagePendingIntent = PendingIntent.getActivity(this, 0,
                messageIntent, 0);

        // 开启线程
        messageThread = new MessageThread();
        messageThread.isRunning = true;
        messageThread.start();

        return super.onStartCommand(intent, flags, startId);
    }

    /**
     * 从服务器端获取消息
     *
     */
    class MessageThread extends Thread {
        // 设置是否循环推送
        public boolean isRunning = true;

        public void run() {
            // while (isRunning) {
            try {
                // 间隔时间
                Thread.sleep(1000);
                // 获取服务器消息
                String serverMessage = getServerMessage();
                if (serverMessage != null && !"".equals(serverMessage)) {
                    // 更新通知栏
                    messageNotification.setLatestEventInfo(
                            getApplicationContext(), "新消息", "您有新消息。"
                                    + serverMessage, messagePendingIntent);
                    messageNotificatioManager.notify(messageNotificationID,
                            messageNotification);
                    // 每次通知完,通知ID递增一下,避免消息覆盖掉
                    messageNotificationID++;
                }
            } catch (InterruptedException e) {
                e.printStackTrace();
            }
            // }
        }
    }

    @Override
    public void onDestroy() {
        // System.exit(0);
        messageThread.isRunning = false;
        super.onDestroy();
    }

    /**
     * 模拟发送消息
     *
     * @return 返回服务器要推送的消息,否则如果为空的话,不推送
     */
    public String getServerMessage() {
        return "NEWS!";
    }
}
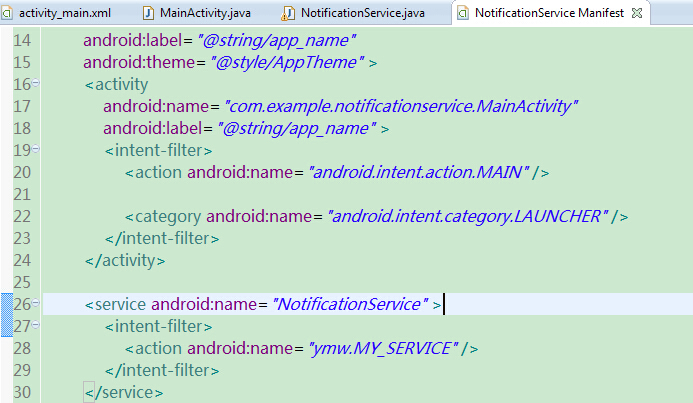
4.最后别忘了在mainfeast.xml文件中配置Service
项目代码如下链接:
http://files.cnblogs.com/_ymw/NotificationService_%E5%8D%9A%E5%AE%A2%E9%99%84%E4%BB%B6.rar