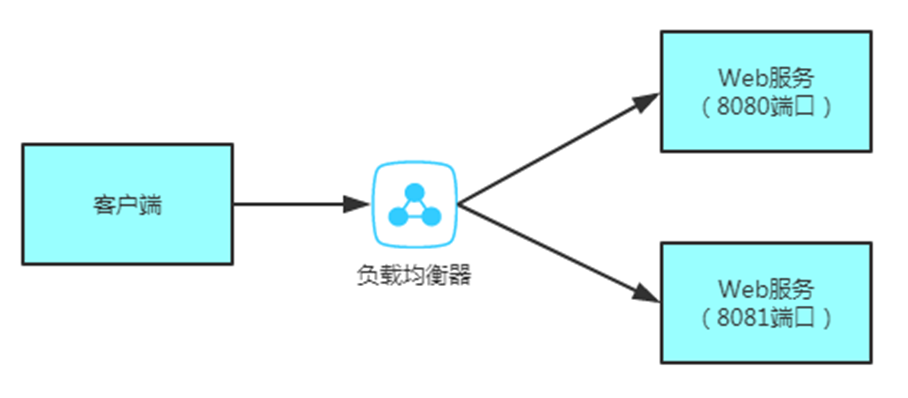
本例将以一个简单的HelloWorld程序来展示Ribbon API的使用,本例的结构图如下
1.编写服务
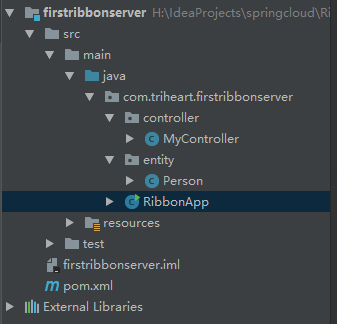
为了能查看负载均衡的效果,我们先编写一个简单的REST服务,通过指定不同的端口,让服务启动多个实例。新建一个名为first-ribbon-server的maven项目,项目的目录结构如下
此处的服务器就是一个基于Springboot的简单Web应用,其代码清单如下
pom.xml


 1 <?xml version="1.0" encoding="UTF-8"?>
 2 <project xmlns="http://maven.apache.org/POM/4.0.0"
 3          xmlns:xsi="http://www.w3.org/2001/XMLSchema-instance"
 4          xsi:schemaLocation="http://maven.apache.org/POM/4.0.0 http://maven.apache.org/xsd/maven-4.0.0.xsd">
 5     <modelVersion>4.0.0</modelVersion>
 6
 7     <groupId>com.triheart</groupId>
 8     <artifactId>first-ribbon-server</artifactId>
 9     <version>1.0-SNAPSHOT</version>
10
11     <dependencies>
12         <dependency>
13             <groupId>org.springframework.boot</groupId>
14             <artifactId>spring-boot-starter-web</artifactId>
15             <version>1.5.3.RELEASE</version>
16         </dependency>
17     </dependencies>
18
19 </project>
Person.java
 1 package com.triheart.firstribbonserver.entity;
 2
 3 /**
 4  * @author 阿遠
 5  * Date: 2018/8/27
 6  * Time: 9:13
 7  */
 8 public class Person {
 9     private Integer id;
10
11     private String name;
12
13     private Integer age;
14
15     private String message;
16
17     public Integer getId() {
18         return id;
19     }
20
21     public void setId(Integer id) {
22         this.id = id;
23     }
24
25     public String getName() {
26         return name;
27     }
28
29     public void setName(String name) {
30         this.name = name;
31     }
32
33     public Integer getAge() {
34         return age;
35     }
36
37     public void setAge(Integer age) {
38         this.age = age;
39     }
40
41     public String getMessage() {
42         return message;
43     }
44
45     public void setMessage(String message) {
46         this.message = message;
47     }
48
49 }
MyController.java
package com.triheart.firstribbonserver.controller;

import javax.servlet.http.HttpServletRequest;
import com.triheart.firstribbonserver.entity.Person;
import org.springframework.http.MediaType;
import org.springframework.web.bind.annotation.PathVariable;
import org.springframework.web.bind.annotation.RequestMapping;
import org.springframework.web.bind.annotation.RequestMethod;
import org.springframework.web.bind.annotation.RestController;

/**
 * @author 阿遠
 * Date: 2018/8/27
 * Time: 9:09
 */

/**
 * 在这个控制器中发布了两个REST服务
 */
@RestController
public class MyController {
    @RequestMapping(value = "/person/{personId}", method = RequestMethod.GET,produces = MediaType.APPLICATION_JSON_VALUE)
    public Person findPerson(@PathVariable("personId") Integer personId, HttpServletRequest request) {
        Person person = new Person();
        person.setAge(30);
        person.setName("crazy");
        person.setId(personId);
        person.setMessage(request.getRequestURL().toString());
        return person;
    }

    @RequestMapping(value = "/", method = RequestMethod.GET)
    public String hello() {
        return "hello";
    }
}
RibbonApp.java
package com.triheart.firstribbonserver;

import org.springframework.boot.autoconfigure.SpringBootApplication;
import org.springframework.boot.builder.SpringApplicationBuilder;

import java.util.Scanner;

/**
 * @author 阿遠
 * Date: 2018/8/27
 * Time: 9:01
 */
@SpringBootApplication
public class RibbonApp {

    public static void main(String[] args) {
        //读取控制台输入的参数作为端口的参数
        Scanner scanner = new Scanner(System.in);
        String port = scanner.nextLine();
        //设置启动的服务端口并启动服务
        new SpringApplicationBuilder(RibbonApp.class).properties("server.port=" + port).run(args);
    }
}
2.编写客户端
编写客户端,使用ribbon的客户端发送请求,相关代码如下
package org.crazyit.cloud;

import com.netflix.client.ClientFactory;
import com.netflix.client.http.HttpRequest;
import com.netflix.client.http.HttpResponse;
import com.netflix.config.ConfigurationManager;
import com.netflix.loadbalancer.BaseLoadBalancer;
import com.netflix.niws.client.http.RestClient;

public class TestRestClient {

    public static void main(String[] args) throws Exception {
        // 设置请求的服务器
        ConfigurationManager.getConfigInstance().setProperty(
                "my-client.ribbon.listOfServers",
                "localhost:8080,localhost:8081");
        // 获取REST请求客户端
        RestClient client = (RestClient) ClientFactory
                .getNamedClient("my-client");
        // 创建请求实例
        HttpRequest request = HttpRequest.newBuilder().uri("/person/1").build();
        // 发送6次请求到服务器中
        for (int i = 0; i < 6; i++) {
            HttpResponse response = client.executeWithLoadBalancer(request);
            String result = response.getEntity(String.class);
            System.out.println(result);
        }
    }
}
启动两次服务器,分别在控制台输入8080、8081端口,启动服务器,运行客户端,可以在控制台上看到如下输出结果
