LNMP快速部署
Nginx (nginx 的解压缩包所在目录不能和nginx编译指定的prefix在同一目录)
yum install pcre pcre-devel  openssl openssl-devel -y
wget http://nginx.org/download/nginx-1.16.0.tar.gz
useradd nginx -u 1111 -s /sbin/nologin -M
tar -zxf nginx-1.16.0.tar.gz
cd nginx-1.16.0/
./configure --user=nginx --group=nginx --prefix=/opt/nginx-1.16.0 --with-http_stub_status_module --with-http_ssl_module
make && make install

# 启动
[root@memcached01 nginx-1.16.0]# /opt/nginx-1.16.0/sbin/nginx
mysql
1.创建mysql用户
[root@web01 ~]# useradd -s /sbin/nologin mysql
[root@web01 ~]# id mysql
uid=1000(mysql) gid=1000(mysql) 组=1000(mysql)

2.下载mysql二进制软件包,提前配置好yum源,下载wget命令
[root@web01 ~]# yum install wget -y
wget -O /etc/yum.repos.d/epel.repo http://mirrors.aliyun.com/repo/epel-7.re
wget -O /etc/yum.repos.d/CentOS-Base.repo http://mirrors.aliyun.com/repo/Centos-7.repo

[root@web01 ~]# mkdir -p /home/mysql/tools
[root@web01 ~]# cd /home/mysql/tools/
# 该mysql文件600M左右,下载时间看网速
[root@web01 tools]# wget  http://mirrors.163.com/mysql/Downloads/MySQL-5.7/mysql-5.7.28-linux-glibc2.12-x86_64.tar.gz


## 二进制方式安装mysql


1.解压并且移动mysql二进制软件包路径
[root@web01 tools]# tar -zvxf mysql-5.7.26-linux-glibc2.12-x86_64.tar.gz
[root@web01 tools]# mv mysql-5.7.26-linux-glibc2.12-x86_64 /opt/mysql-5.7.26

2.生成软连接
[root@web01 opt]# ln -s /opt/mysql-5.7.26/ /opt/mysql
[root@web01 opt]# ls -l /opt/
总用量 0
lrwxrwxrwx 1 root root  18 3月  18 10:15 mysql -> /opt/mysql-5.7.26/
drwxr-xr-x 9 root root 129 3月  18 10:13 mysql-5.7.26

3.卸载centos7自带的mariadb库,防止冲突
[root@web01 mysql]# rpm -e --nodeps mariadb-libs


4.手动创建mysql配置文件 vim /etc/my.cnf
[root@web01 mysql]# cat /etc/my.cnf
[mysqld]
basedir=/opt/mysql/
datadir=/opt/mysql/data
socket=/tmp/mysql.sock
server_id=1
port=3306
log_error=/opt/mysql/data/mysql_err.log

[mysql]
socket=/tmp/mysql.sock


## 初始化mysql
1.卸载系统自带的centos7 mariadb-libs,且安装mysql的依赖环境
rpm -qa mariadb-libs #检查是否存在
[root@web01 mysql]# yum install libaio-devel -y

2.创建mysql数据文件夹且授权
[root@web01 mysql]# mkdir -p /opt/mysql/data
[root@web01 mysql]# chown -R mysql.mysql /opt/mysql/

3.初始化数据库
[root@web01 mysql]# /opt/mysql/bin/mysqld --initialize-insecure --user=mysql --basedir=/opt/mysql/ --datadir=/opt/mysql/data/

# 参数解释
--user=mysql 指定用户
--basedir 指定mysql安装目录
--datadir=/opt/mysql/data 指定数据文件夹
--initialize-insecure 关闭mysql安全策略
--initialize 开启mysql安全模式

## 配置mysql客户端
1.配置mysql启动脚本,定义mysqld.service,脚本如下
[root@web01 mysql]# cat /etc/systemd/system/mysqld.service
[Unit]
Description=MySQL server by chaoge
Documentation=man:mysqld(8)
Documentation=http://dev.mysql.com/doc/refman/en/using-systemd.html
After=network.target
After=syslog.target
[Install]
WantedBy=multi-user.target
[Service]
User=mysql
Group=mysql
ExecStart=/opt/mysql/bin/mysqld --defaults-file=/etc/my.cnf
LimitNOFILE=5000

## 启动mysql
[root@web01 mysql]# systemctl start mysqld
[root@web01 mysql]# systemctl enable mysqld
Created symlink from /etc/systemd/system/multi-user.target.wants/mysqld.service to /etc/systemd/system/mysqld.service.
[root@web01 mysql]# systemctl status mysqld
● mysqld.service - MySQL server by chaoge
   Loaded: loaded (/etc/systemd/system/mysqld.service; disabled; vendor preset: disabled)
   Active: active (running) since 三 2020-03-18 11:30:01 EDT; 6s ago
     Docs: man:mysqld(8)
           http://dev.mysql.com/doc/refman/en/using-systemd.html
 Main PID: 5315 (mysqld)
   CGroup: /system.slice/mysqld.service
           └─5315 /opt/mysql/bin/mysqld --defaults-file=/etc/my.cnf

3月 18 11:30:01 web01 systemd[1]: Started MySQL server by chaoge.
3月 18 11:30:01 web01 systemd[1]: Starting MySQL server by chaoge...

## 修改mysql密码
[root@web01 ~]# mysqladmin -uroot password 'chaoge666'
mysqladmin: [Warning] Using a password on the command line interface can be insecure.
Warning: Since password will be sent to server in plain text, use ssl connection to ensure password safety.

# 再次登录,输入密码
[root@web01 ~]# mysql -uroot -p
Enter password:
Welcome to the MySQL monitor.  Commands end with ; or g.
Your MySQL connection id is 6
Server version: 5.7.26 MySQL Community Server (GPL)

Copyright (c) 2000, 2019, Oracle and/or its affiliates. All rights reserved.

Oracle is a registered trademark of Oracle Corporation and/or its
affiliates. Other names may be trademarks of their respective
owners.

Type 'help;' or 'h' for help. Type 'c' to clear the current input statement.

mysql>
php
yum install  gcc gcc-c++ make zlib-devel libxml2-devel libjpeg-devel libjpeg-turbo-devel libiconv-devel
freetype-devel libpng-devel gd-devel libcurl-devel libxslt-devel libxslt-devel -y

[root@memcached01 nginx-1.16.0]# cd /opt/lnmp/
[root@memcached01 lnmp]# ls
nginx-1.16.0  nginx-1.16.0.tar.gz
[root@memcached01 lnmp]#
[root@memcached01 lnmp]# wget http://mirrors.sohu.com/php/php-7.3.5.tar.gz
tar -zxvf php-7.3.5.tar.gz
cd php-7.3.5

./configure --prefix=/opt/php7.3.5
--enable-mysqlnd
--with-mysqli=mysqlnd
--with-pdo-mysql=mysqlnd
--with-freetype-dir
--with-jpeg-dir
--with-png-dir
--with-zlib
--with-libxml-dir=/usr
--enable-xml
--disable-rpath
--enable-bcmath
--enable-shmop
--enable-sysvsem
--enable-inline-optimization
--with-curl
--enable-mbregex
--enable-fpm
--enable-mbstring
--with-gd
--with-openssl
--with-mhash
--enable-pcntl
--enable-sockets
--with-xmlrpc
--enable-soap
--enable-short-tags
--enable-static
--with-xsl
--with-fpm-user=nginx
--with-fpm-group=nginx
--enable-ftp
--enable-opcache=no

make && make install


# 配置文件
[root@memcached01 php-7.3.5]# pwd
/opt/lnmp/php-7.3.5
[root@memcached01 php-7.3.5]# cp php.ini-development /opt/php7.3.5/lib/php.ini


[root@memcached01 php-7.3.5]# cd /opt/php7.3.5/etc/
[root@memcached01 etc]# ls
pear.conf  php-fpm.conf.default  php-fpm.d
[root@memcached01 etc]# cp php-fpm.conf.default php-fpm.conf
[root@memcached01 etc]#
[root@memcached01 etc]#
[root@memcached01 etc]#  cp php-fpm.d/www.conf.default php-fpm.d/www.conf

# 启动
[root@memcached01 etc]# /opt/php7.3.5/sbin/php-fpm
[root@memcached01 etc]# ps -ef|grep php
root      14782      1  0 04:48 ?        00:00:00 php-fpm: master process (/opt/php7.3.5/etc/php-fpm.conf)
nginx     14783  14782  0 04:48 ?        00:00:00 php-fpm: pool www
nginx     14784  14782  0 04:48 ?        00:00:00 php-fpm: pool www
nginx结合php
[root@memcached01 etc]# cat /opt/nginx-1.16.0/conf/nginx.conf

#user  nobody;
worker_processes  1;

#error_log  logs/error.log;
#error_log  logs/error.log  notice;
#error_log  logs/error.log  info;

#pid        logs/nginx.pid;


events {
    worker_connections  1024;
}


http {
    include       mime.types;
    default_type  application/octet-stream;
    sendfile        on;
    keepalive_timeout  65;
    gzip  on;
include extra/03_blog.conf;
}

[root@memcached01 etc]# mkdir /opt/nginx-1.16.0/conf/extra
[root@memcached01 etc]# cat /opt/nginx-1.16.0/conf/extra/03_blog.conf

server {
listen 80;
server_name _;
location / {
    root html/blog;
    index index.html;
}

#添加有关php程序的解析
location ~ .*.(php|php5)?$ {
    root html/blog;
    fastcgi_pass 127.0.0.1:9000;
    fastcgi_index index.php;
    include fastcgi.conf;
}


}

# 重启
[root@memcached01 etc]# /opt/nginx-1.16.0/sbin/nginx -s reload
测试lnmp
[root@memcached01 extra]# mkdir /opt/nginx-1.16.0/html/blog
[root@memcached01 etc]# echo "<?php phpinfo(); ?>"  > /opt/nginx-1.16.0/html/blog/index.php
部署memcached支持php插件
memcached是分为服务端和客户端的。服务端我们已经启动,这里为lnmp连接memcached属于客户端的插件配置。
这里要注意的是,新版php7对于memcached的支持还需要手动装插件,这里是一个坑,遇见坑不怕,咱可以看报错,上google。。
安装依赖环境
# 安装依赖环境
cd /opt &&
wget https://launchpad.net/libmemcached/1.0/1.0.18/+download/libmemcached-1.0.18.tar.gz
[root@memcached01 opt]# tar -zxf libmemcached-1.0.18.tar.gz
[root@memcached01 opt]# cd libmemcached-1.0.18/
[root@memcached01 libmemcached-1.0.18]# ./configure --prefix=/opt/libmemcached
[root@memcached01 libmemcached-1.0.18]# make && make install
【安装memcached扩展】
# 然后
cd /opt &&
git clone https://github.com/php-memcached-dev/php-memcached.git
[root@memcached01 opt]# cd php-memcached/
[root@memcached01 php-memcached]# /opt/php7.3.5/bin/phpize
Configuring for:
PHP Api Version:         20180731
Zend Module Api No:      20180731
Zend Extension Api No:   320180731

[root@memcached01 php-memcached]# ./configure --with-libmemcached-dir=/opt/libmemcached/   --with-php-config=/opt/php7.3.5/bin/php-config
[root@memcached01 php-memcached]# make && make install

# 最后检查php的插件目录,是否出现了mencached
[root@memcached01 opt]# ls /opt/php7.3.5/lib/php/extensions/no-debug-non-zts-20180731/
memcached.so  # 看到该模块才是正确
【安装memcache扩展】
1.下载
cd /opt &&
git clone https://github.com/websupport-sk/pecl-memcache

2.安装
[root@memcached01 opt]# cd pecl-memcache/
[root@memcached01 pecl-memcache]# /opt/php7.3.5/bin/phpize
Configuring for:
PHP Api Version:         20180731
Zend Module Api No:      20180731
Zend Extension Api No:   320180731

[root@memcached01 pecl-memcache]# ./configure  --with-php-config=/opt/php7.3.5/bin/php-config
[root@memcached01 pecl-memcache]# make && make install

# 检查扩展文件,看到这俩才是正确
[root@memcached01 pecl-memcache]# ls /opt/php7.3.5/lib/php/extensions/no-debug-non-zts-20180731/
memcached.so  memcache.so
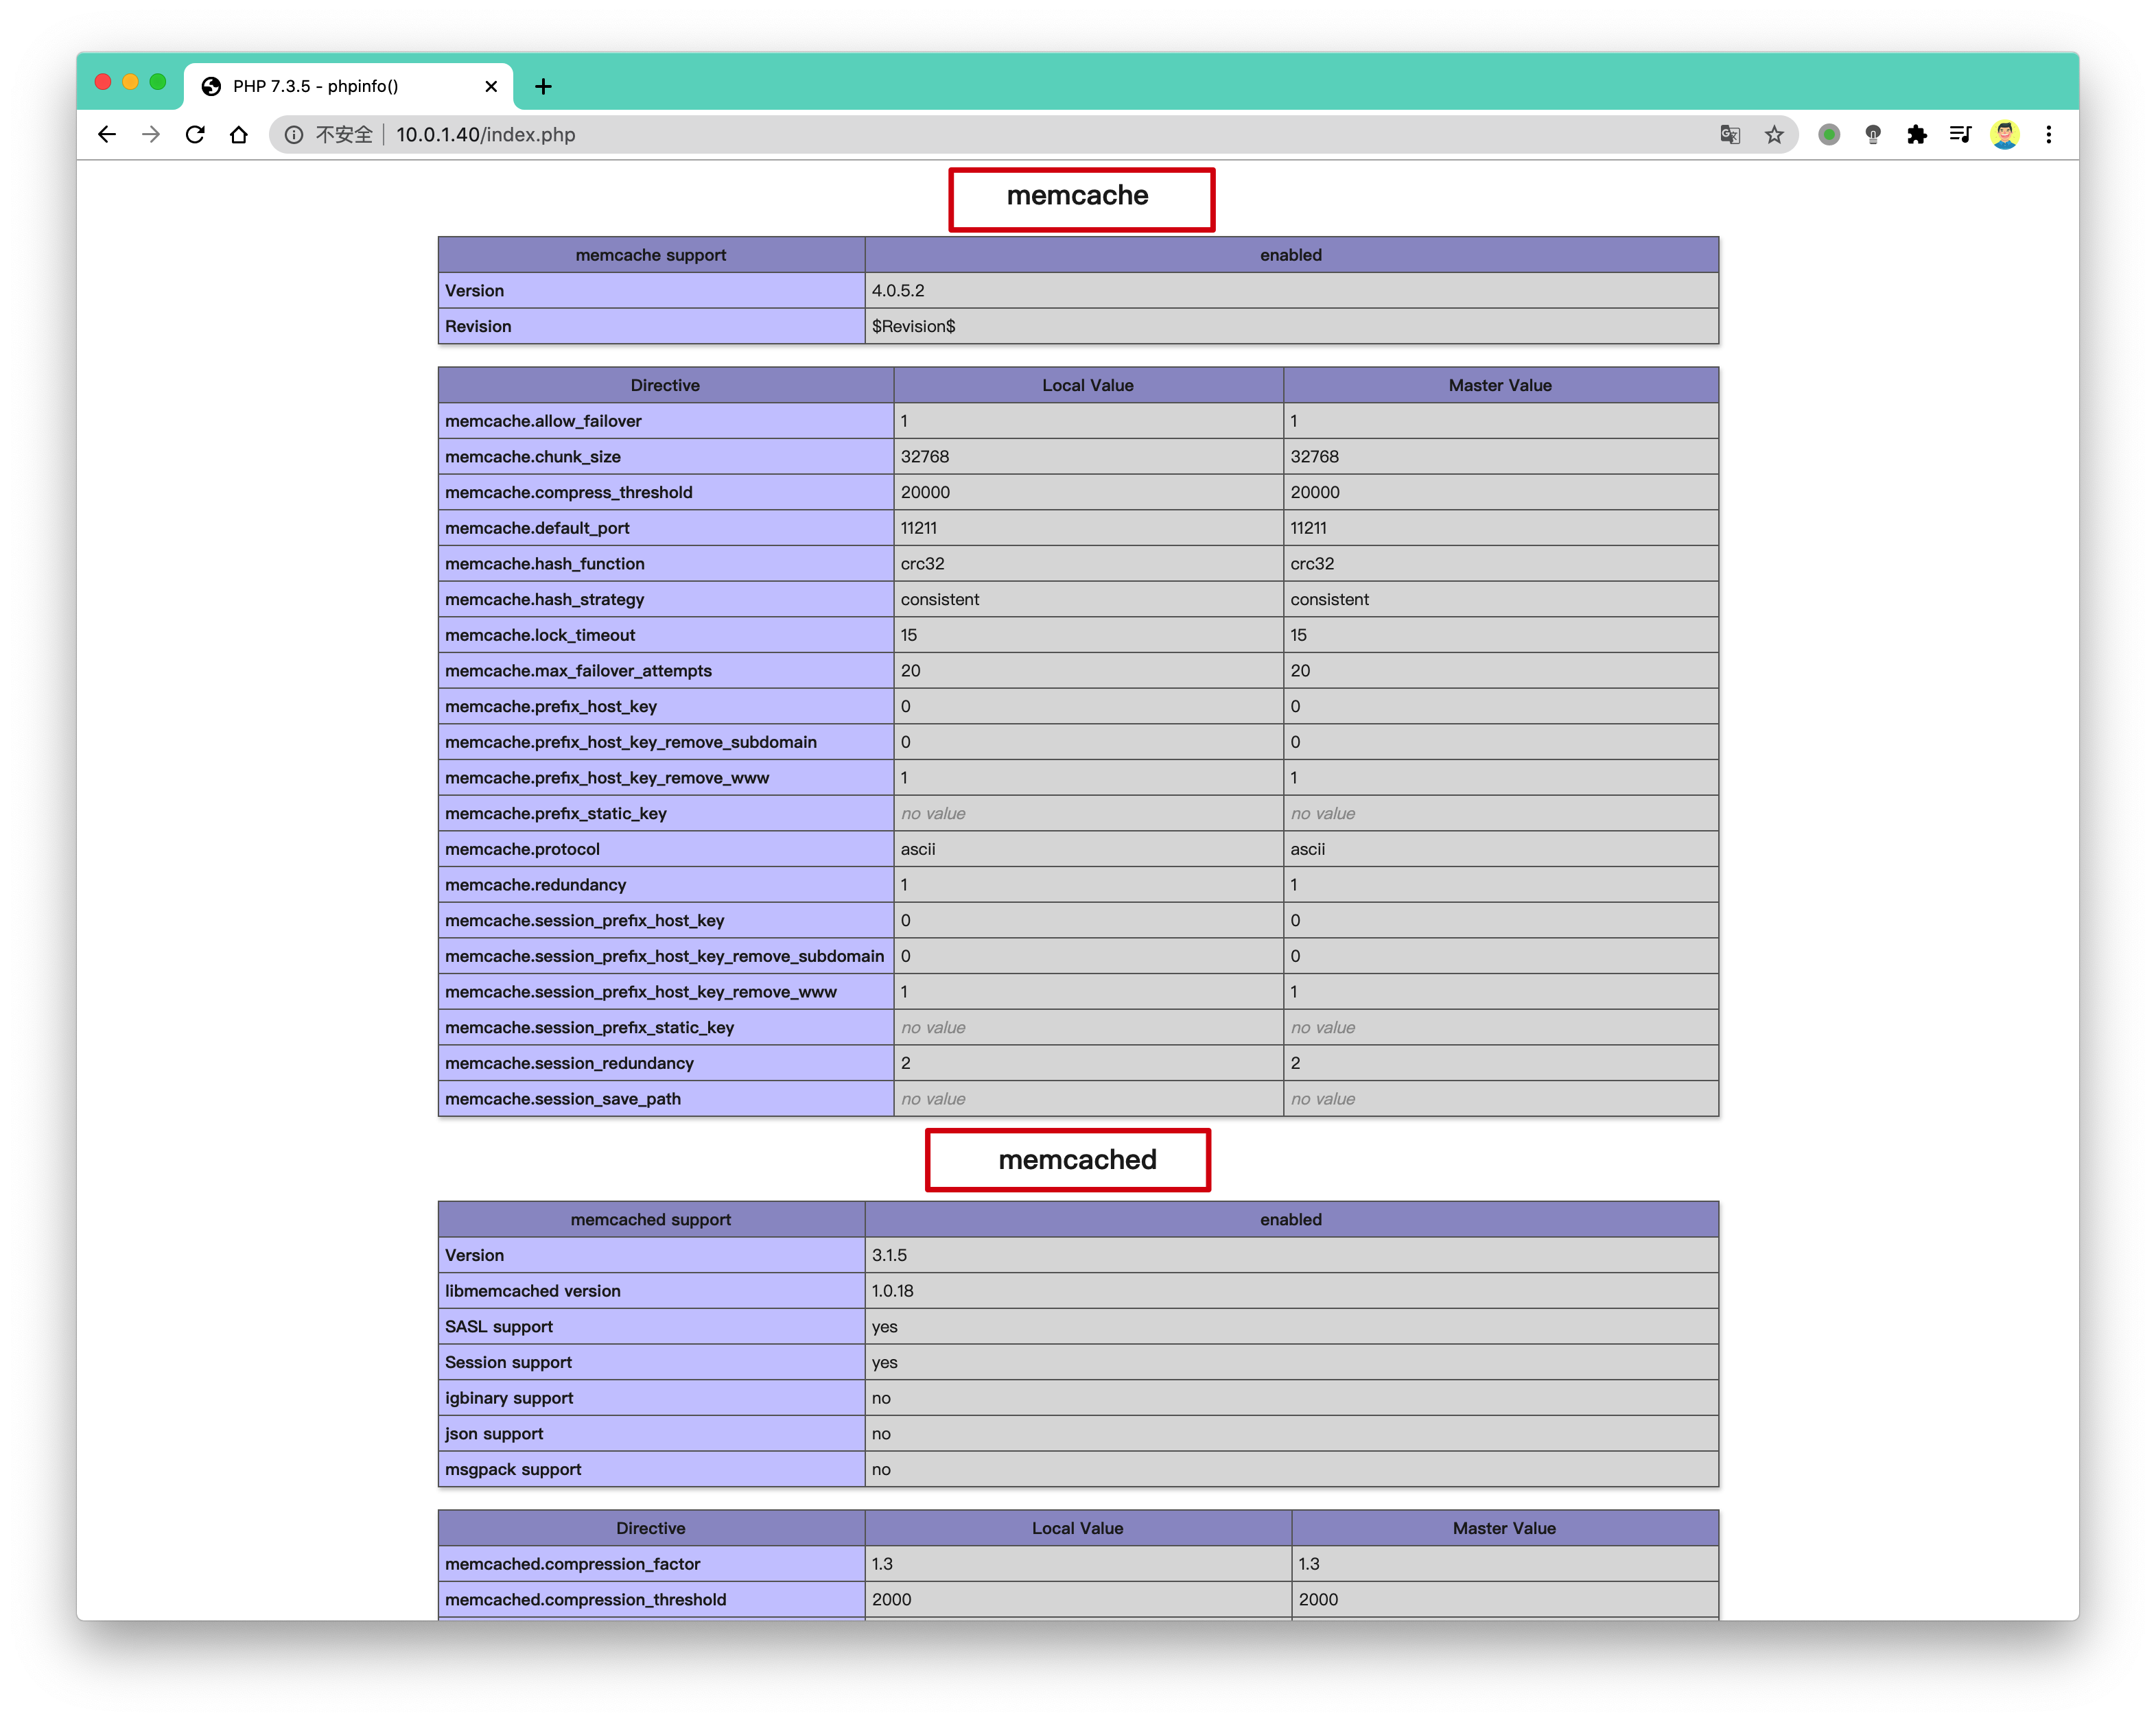
【验证phpinfo】
修改/opt/php7.3.5/lib/php.ini

# 修改如下3行信息
 751 extension_dir = "/opt/php7.3.5/lib/php/extensions/no-debug-non-zts-20180731/"
 752 extension = memcached.so
 753 extension = memcache.so

# 重新加载php-fpm服务,检验配置文件语法,正确才行
[root@memcached01 opt]# /opt/php7.3.5/sbin/php-fpm -t
[07-Aug-2020 05:31:38] NOTICE: configuration file /opt/php7.3.5/etc/php-fpm.conf test is successful


# 重启
[root@memcached01 opt]# pkill php-fpm
[root@memcached01 opt]# ps -ef|grep php-fpm
root      43691  11317  0 05:32 pts/0    00:00:00 grep --color=auto php-fpm
[root@memcached01 opt]# /opt/php7.3.5/sbin/php-fpm
[root@memcached01 opt]# ps -ef|grep php-fpm
root      43693      1  0 05:32 ?        00:00:00 php-fpm: master process (/opt/php7.3.5/etc/php-fpm.conf)
nginx     43694  43693  0 05:32 ?        00:00:00 php-fpm: pool www
nginx     43695  43693  0 05:32 ?        00:00:00 php-fpm: pool www
root      43697  11317  0 05:32 pts/0    00:00:00 grep --color=auto php-fpm
【验证php操作memcached】
[root@memcached01 blog]# pwd
/opt/nginx-1.16.0/html/blog
[root@memcached01 blog]# cat test_memcached.php


<?php                               #PHP开始标识
$memcache = new Memcache;           #创建一个Memcache对象
$memcache->connect('10.0.1.40','11211') or die ("Could not connect Mc server");                               #连接Memcached服务器
$memcache->set('name01','chaoge nb');         #设置一个变量到内存中
$get=$memcache->get('name01');                 #从内存中取出key
echo $get;                              #输出key值到屏幕
?>                                      #PHP结束标识
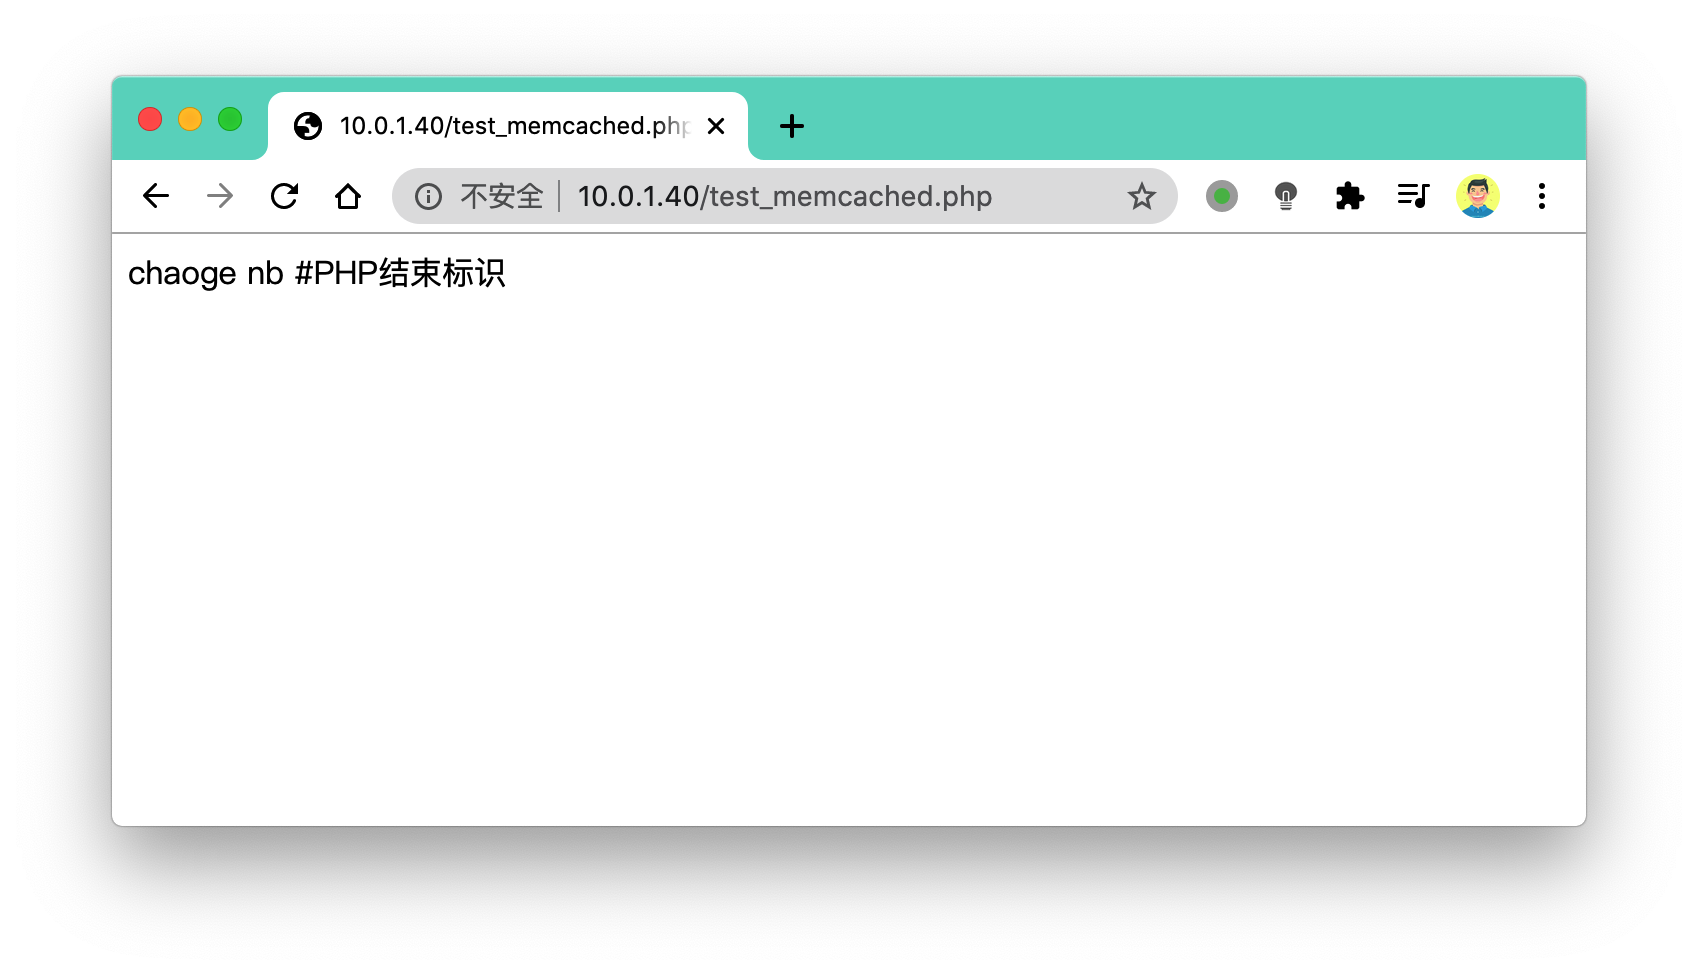
【测试脚本】
[root@memcached01 blog]# /opt/php7.3.5/bin/php test_memcached.php

chaoge nb                                      #PHP结束标识
Memadmin工具
在工作里,我们经常会去寻找一些强大的第三方工具,去帮助我们更方便的管理系统。
运维人员除了通过命令行的形式,去管理memcached,还可以使用一些很好用的第三方工具。例如memadmin工具,该软件依赖于PHP环境,且功能强大。
部署环境
该工具是基于PHP开发的,因此得部署好PHP环境,前面已经部署了LNMP环境,因此直接进行操作即可。
1.获取软件包,官网http://www.junopen.com/memadmin/
下载地址:http://www.junopen.com/memadmin/memadmin-1.0.12.tar.gz
wget http://www.junopen.com/memadmin/memadmin-1.0.12.tar.gz

2.解压缩
[root@memcached01 opt]# tar -zxf memadmin-1.0.12.tar.gz

3.移动该程序,到lnmp站点下即可,此时去了解下nginx的配置
[root@memcached01 opt]# mv memadmin /opt/nginx-1.16.0/html/blog/

4.此时已经可以直接访问该程序
http://10.0.1.40/memadmin/index.php
默认的账号密码是 admin
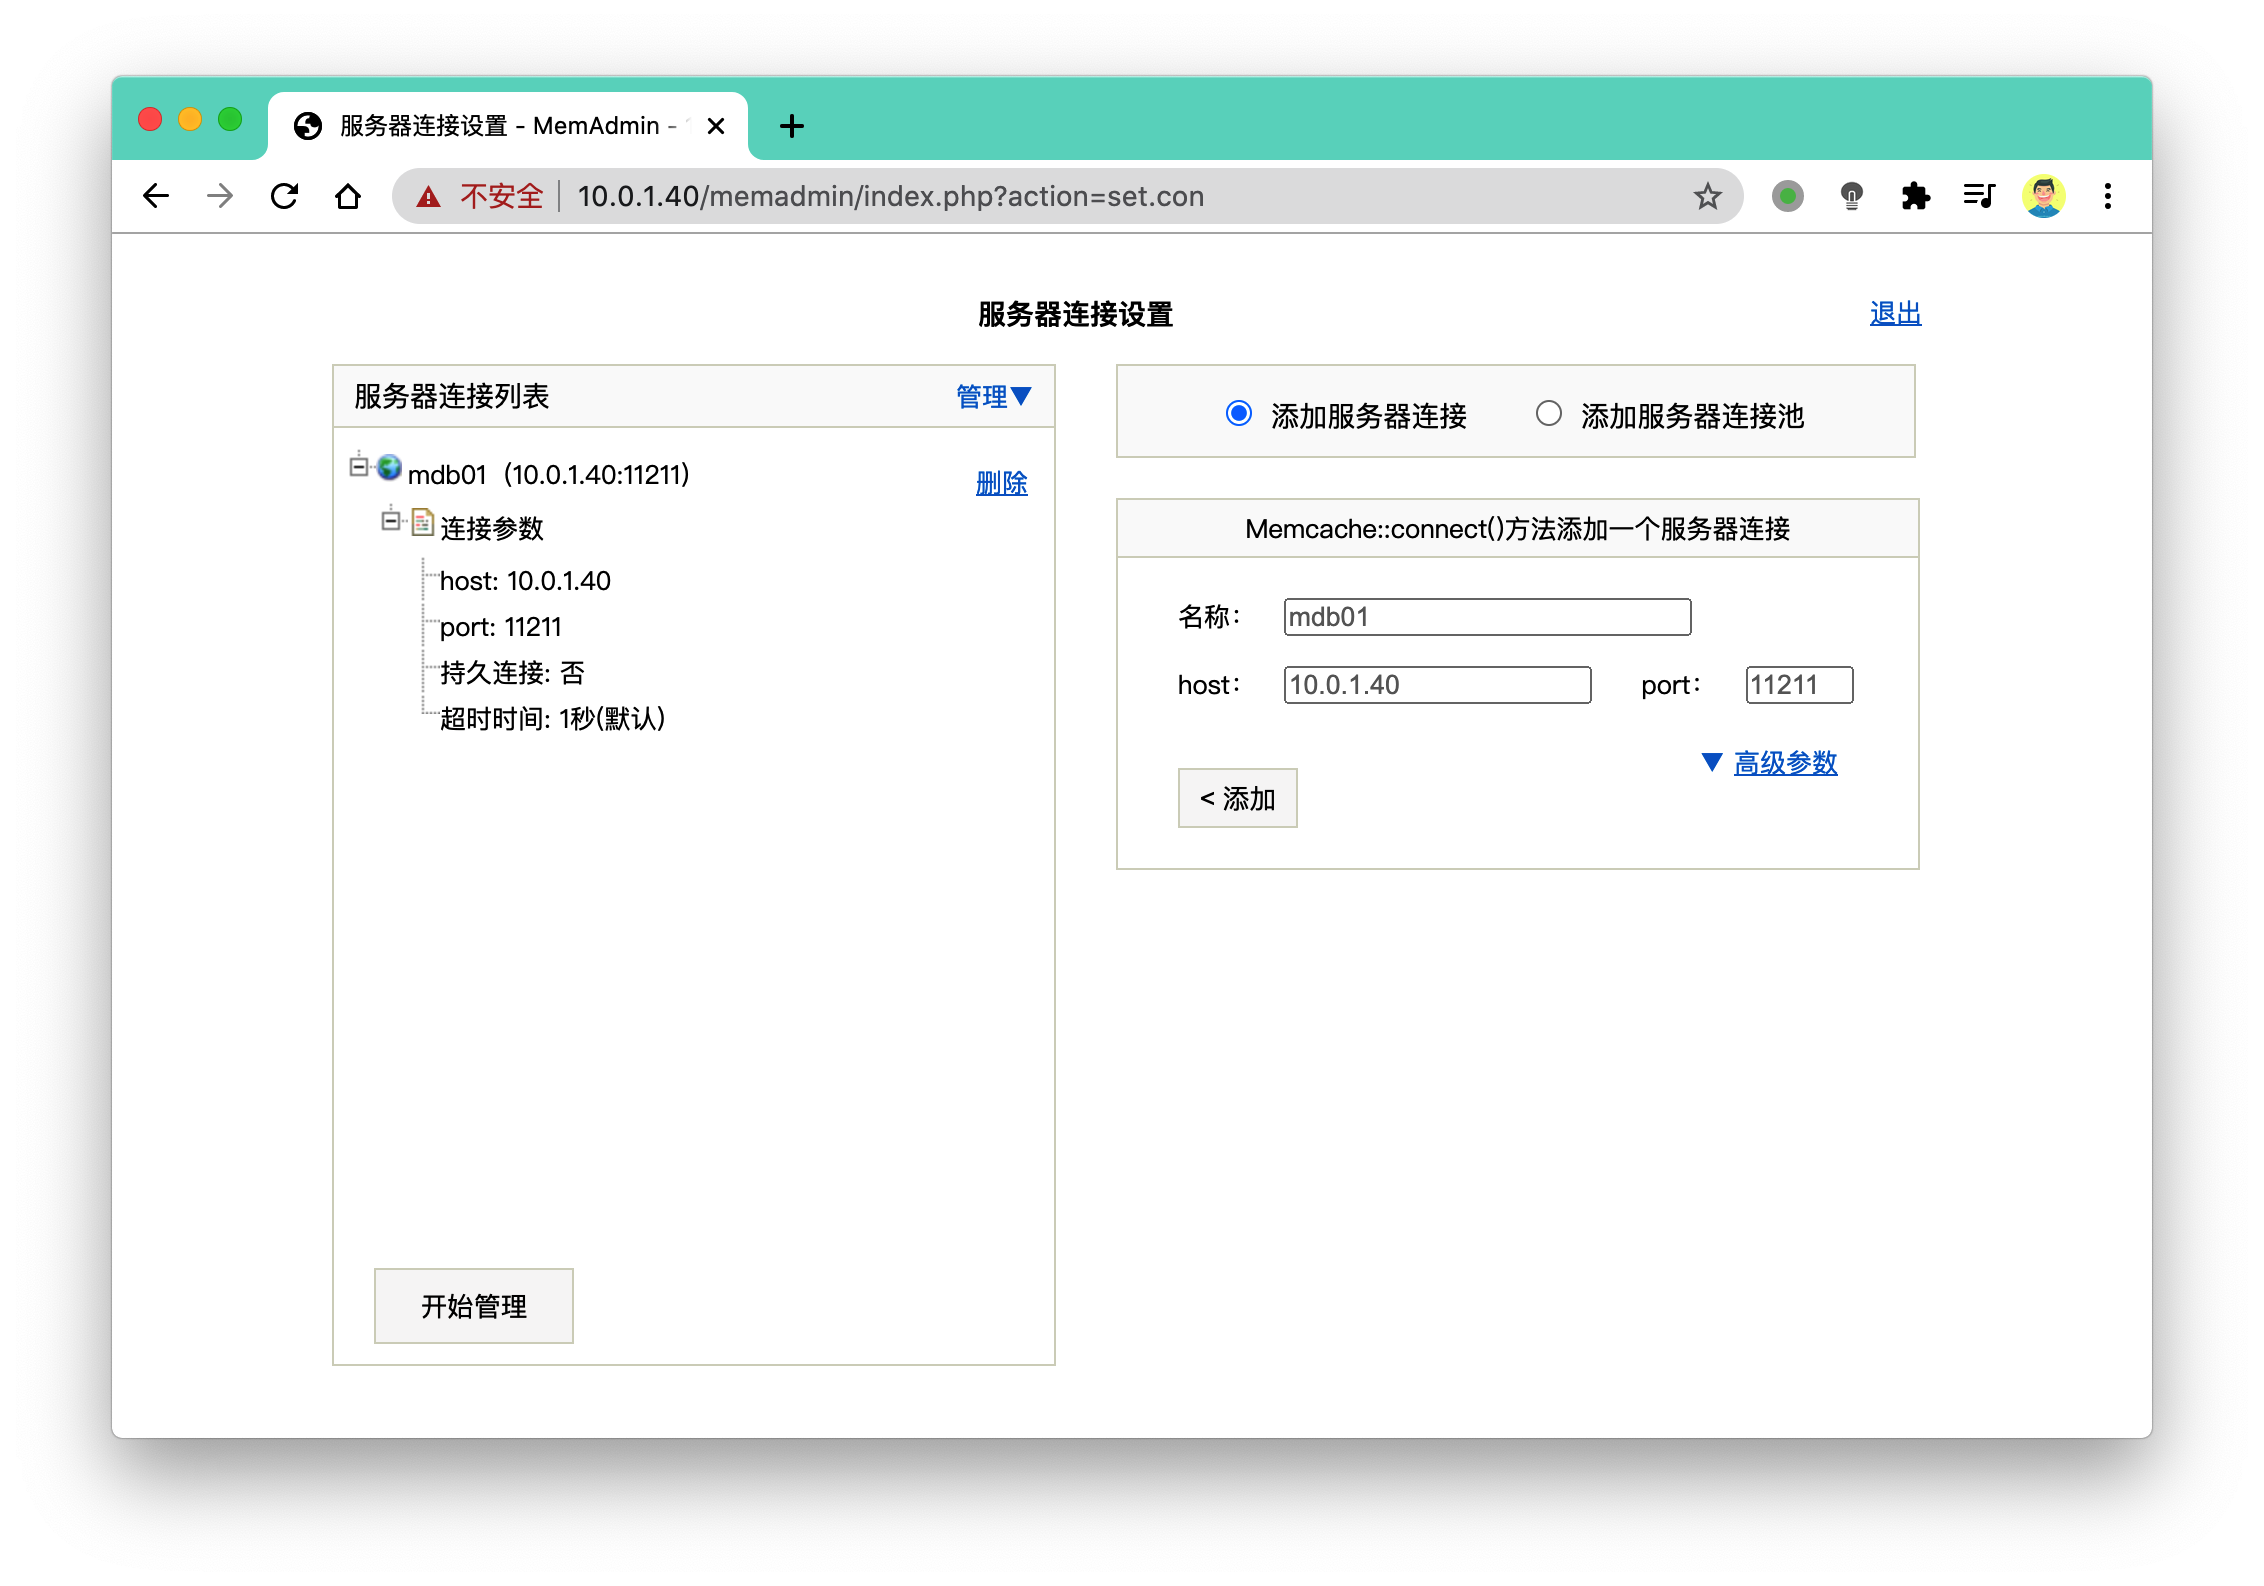
新建连接
这样的数据库管理界面,最好是通过nginx进行访问限制,只能内网访问。
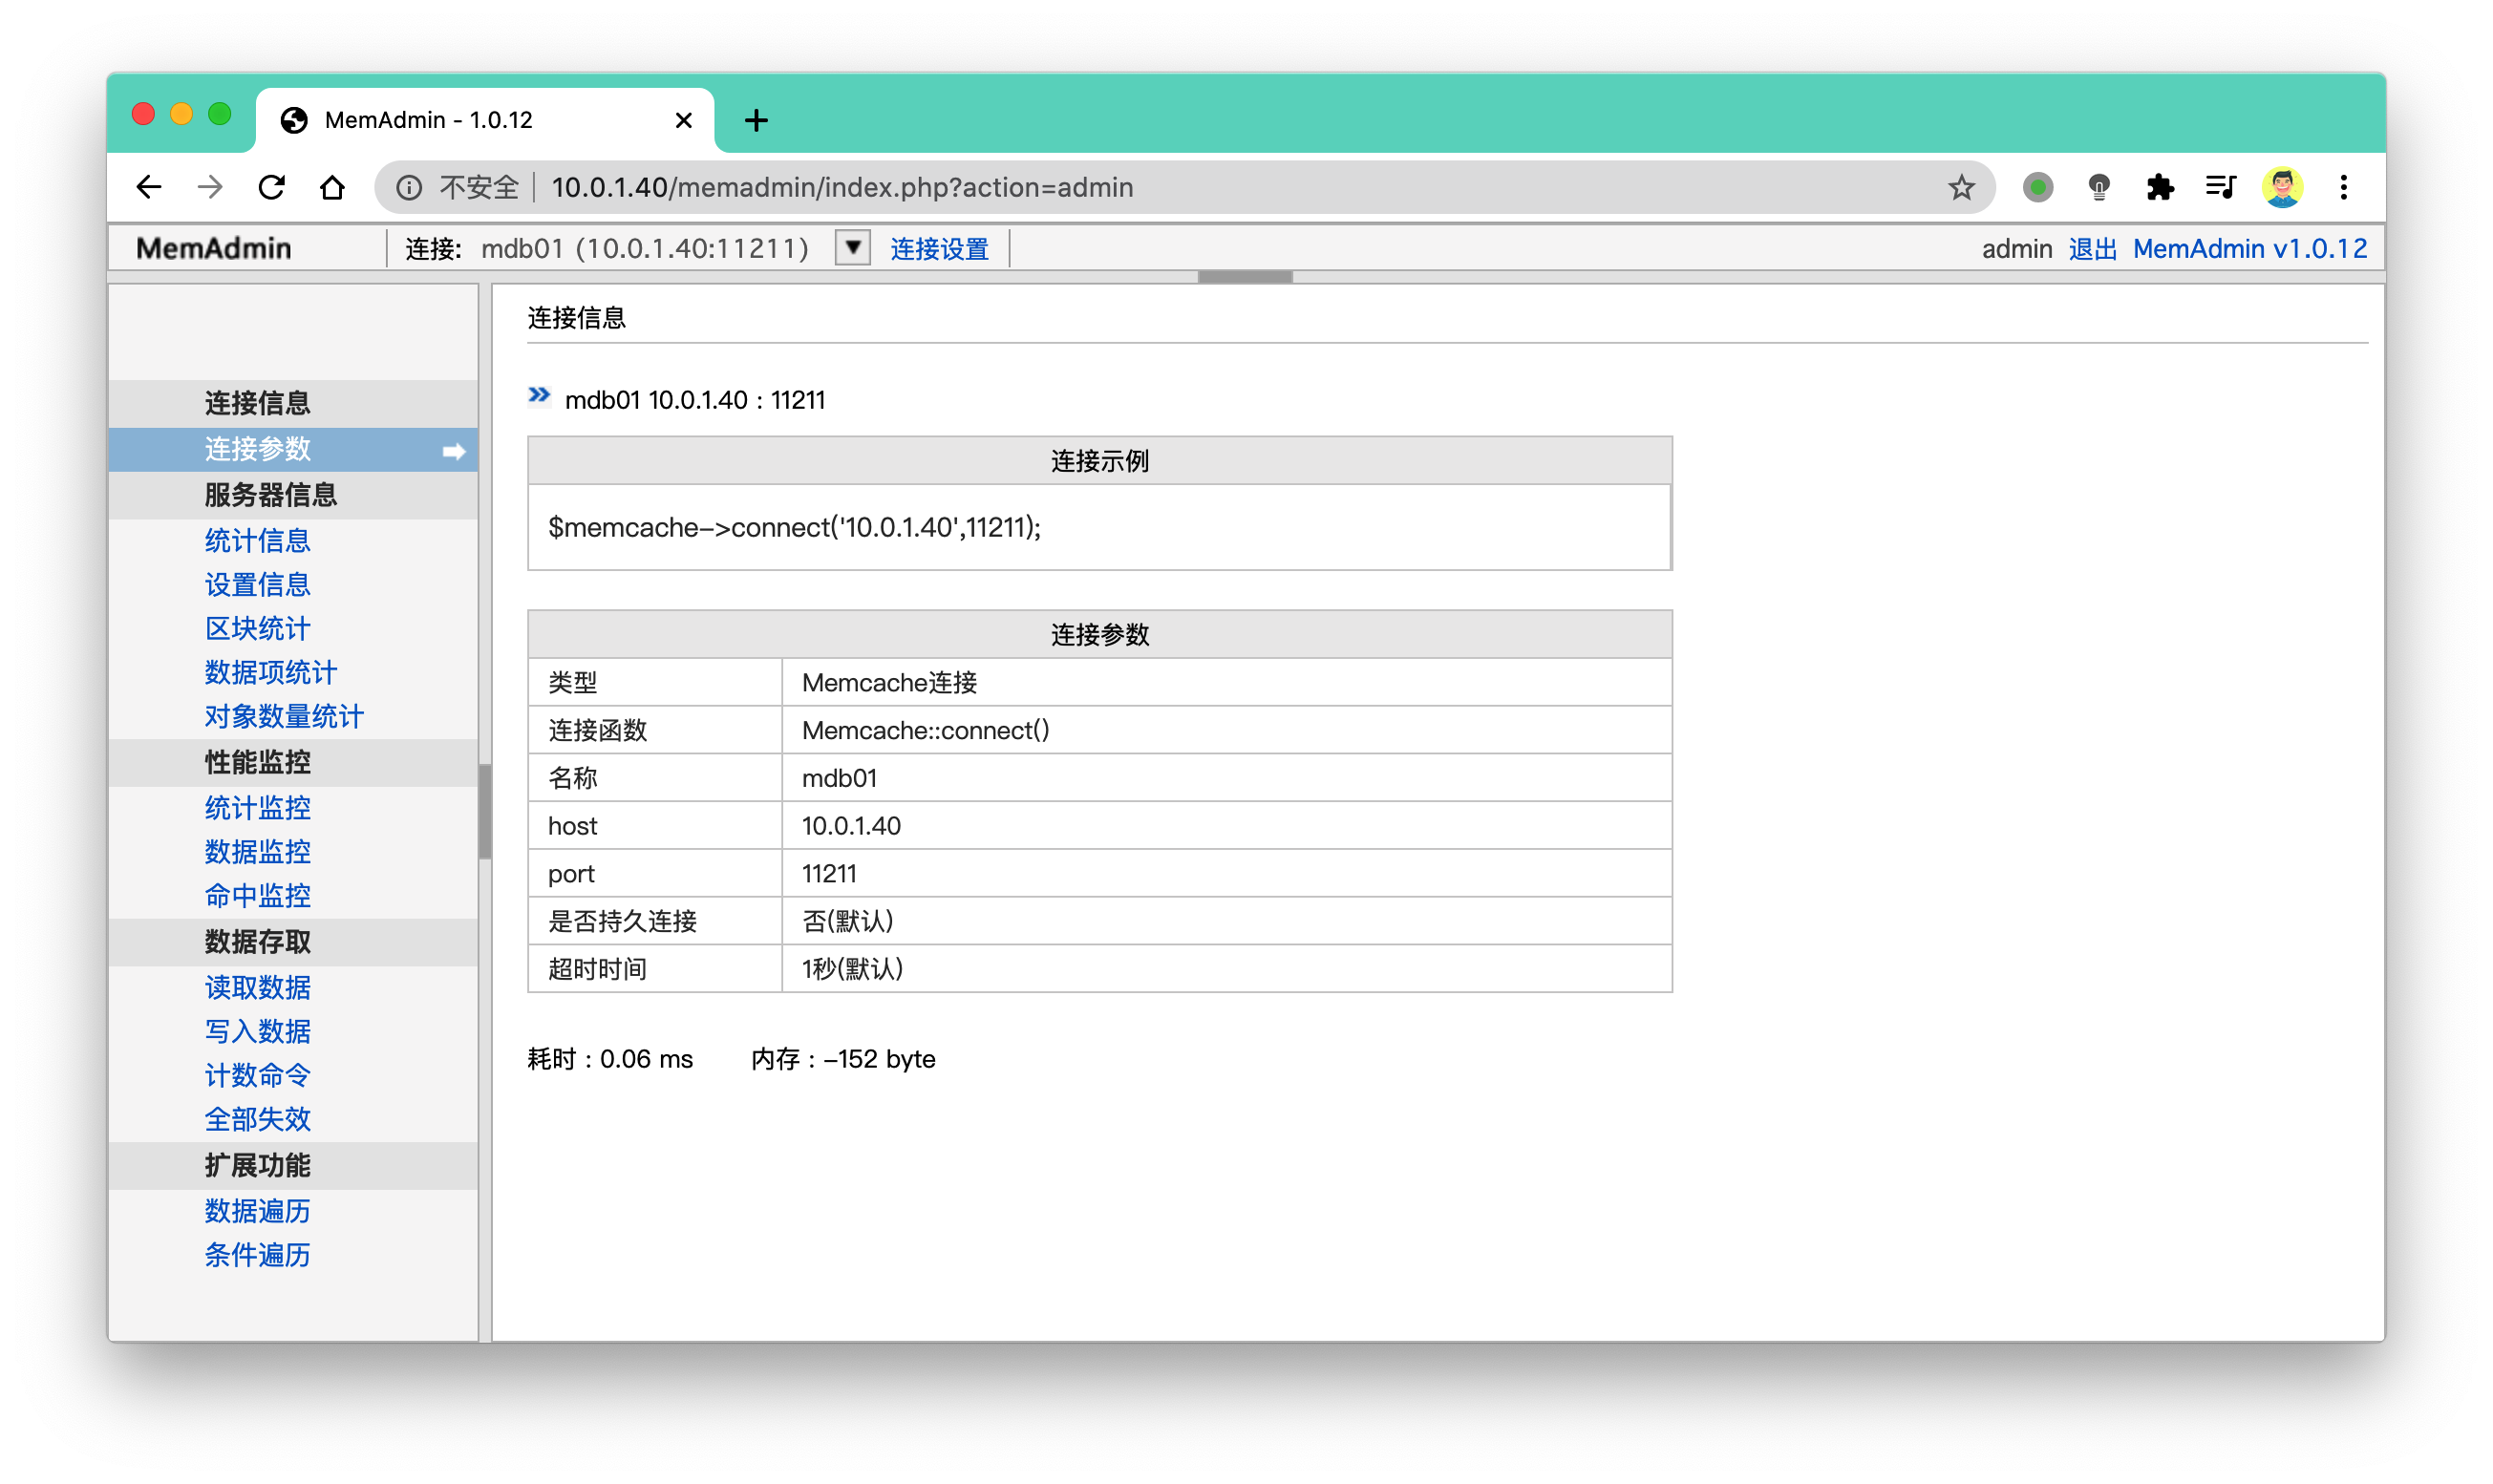
开始管理
只要memcached正确启动,连接的ip+port正确,即可进入管理
【基本界面】
【数据统计信息】
常见数据库的key信息如下,主要统计memcached的读写次数,总key等。
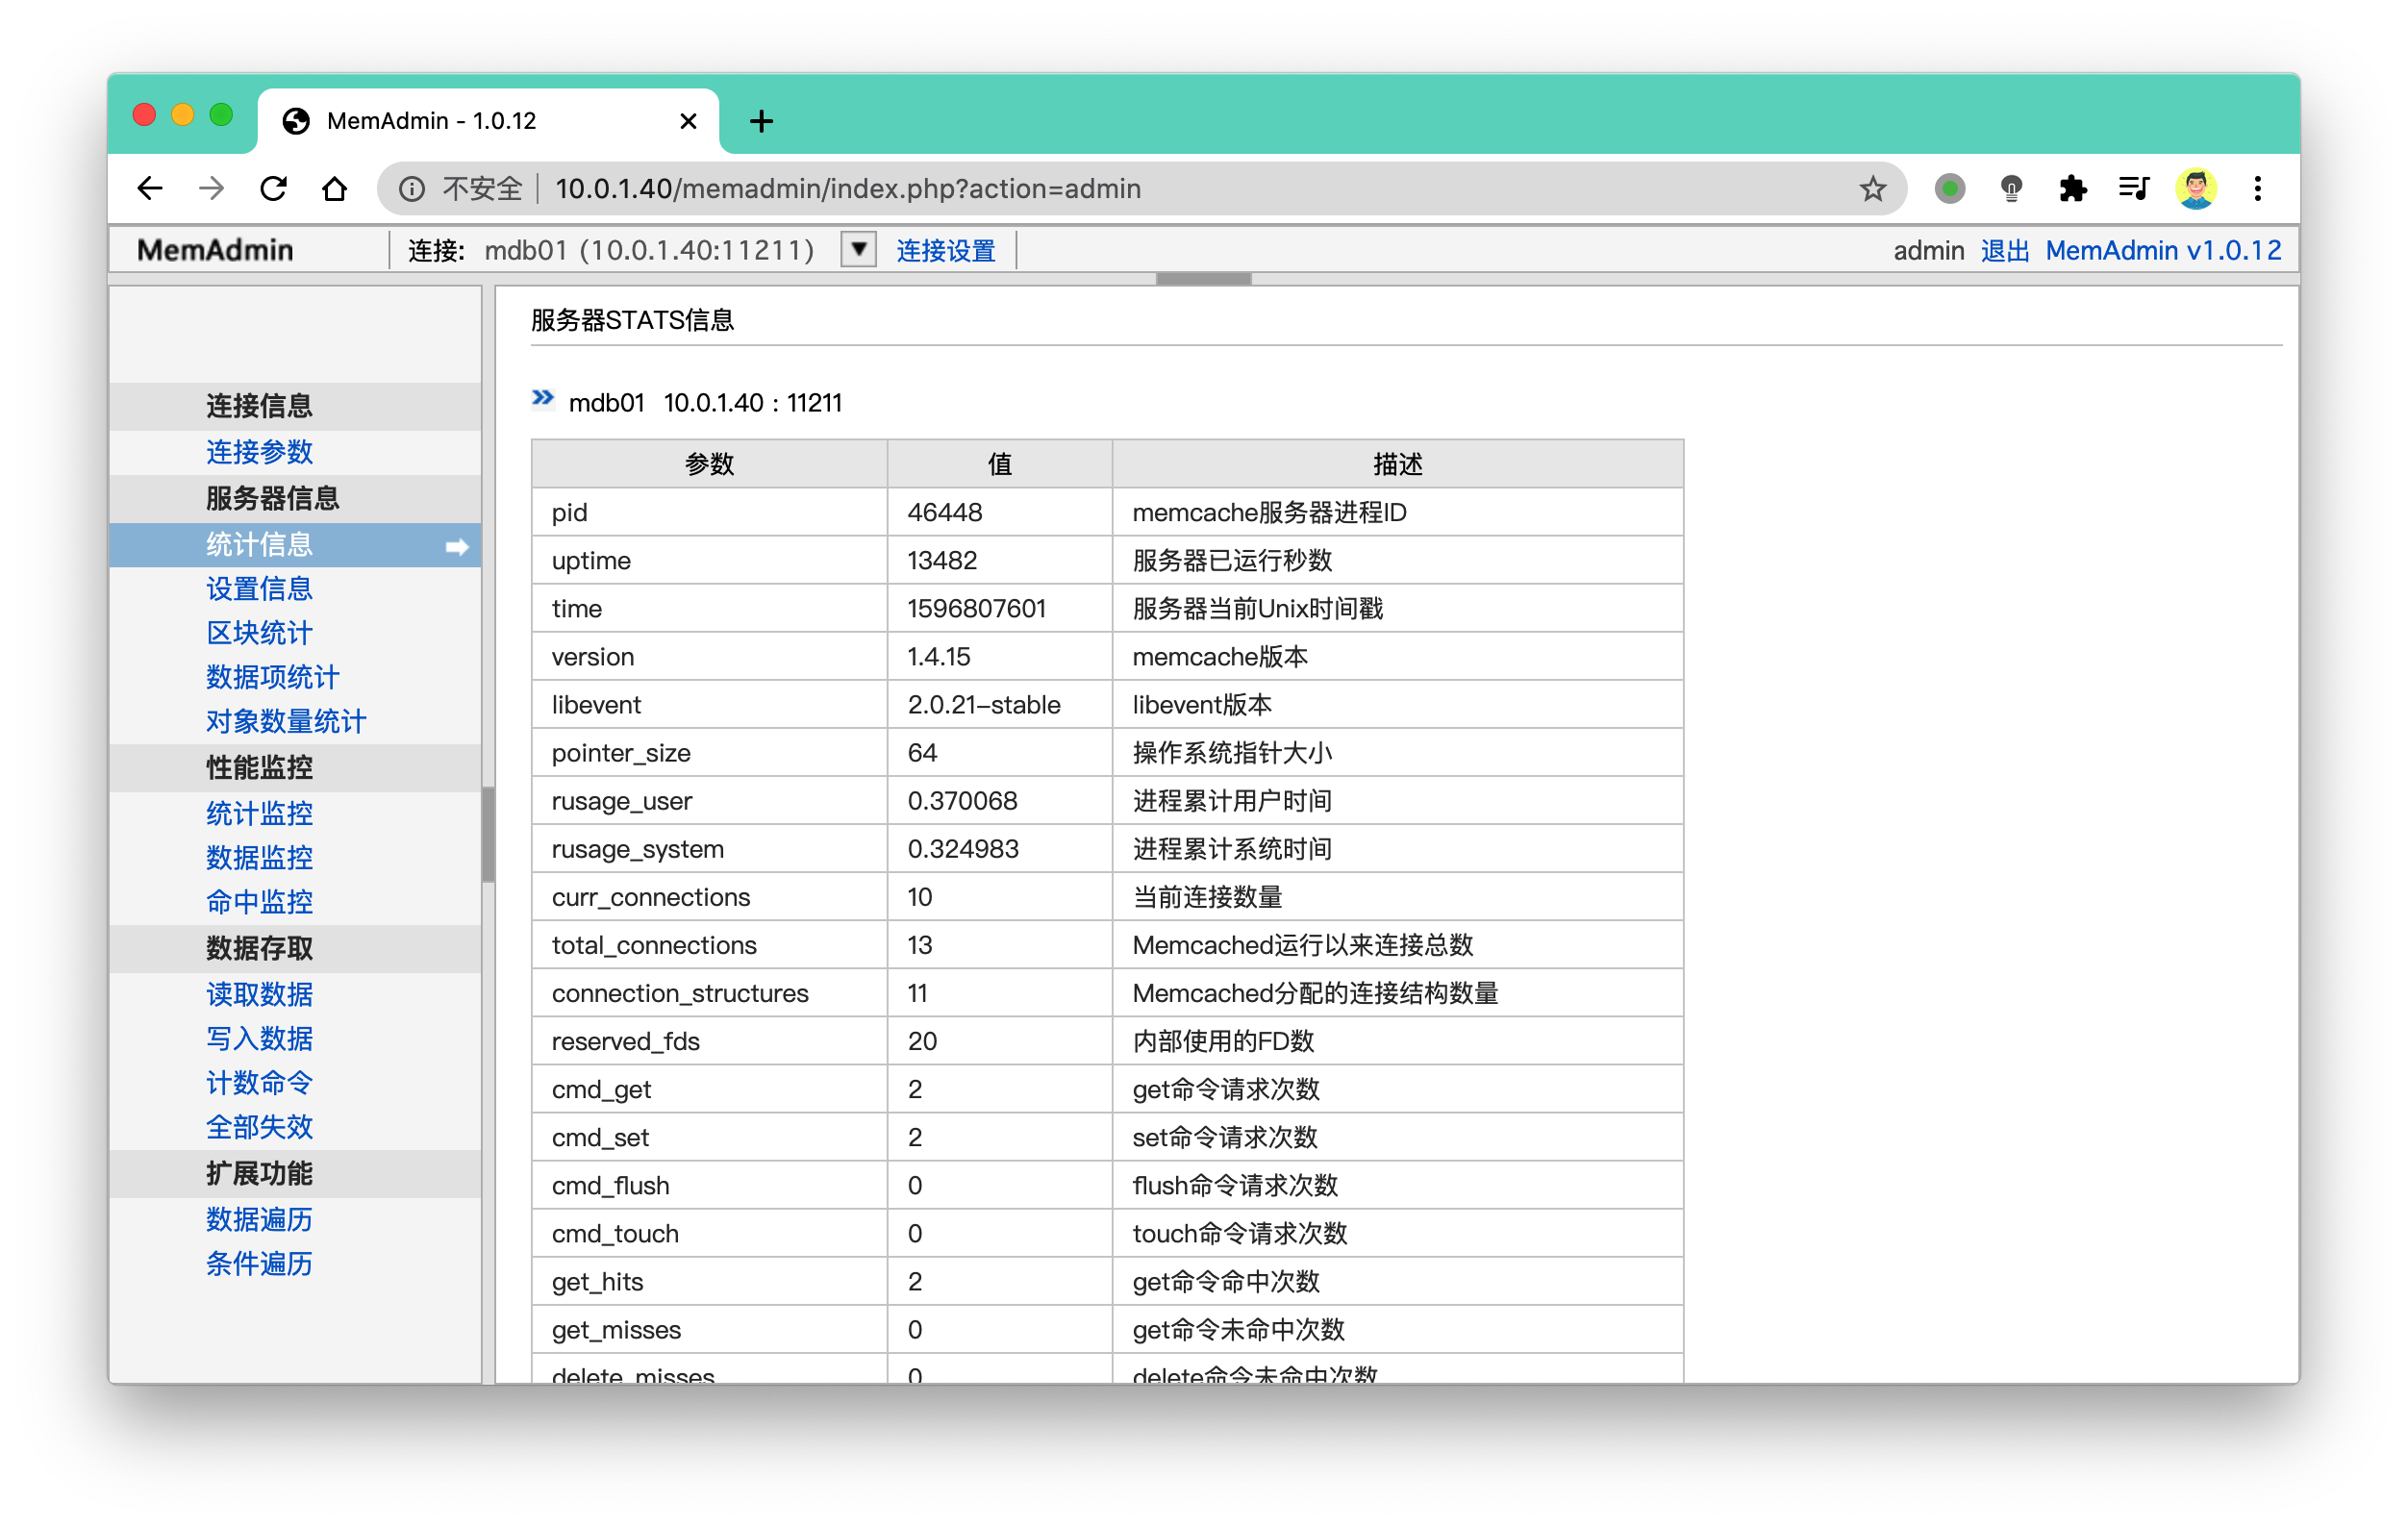
通过这样的页面,可以更为直观清晰的掌握数据库信息,这也是运维开发人员的重要技能。
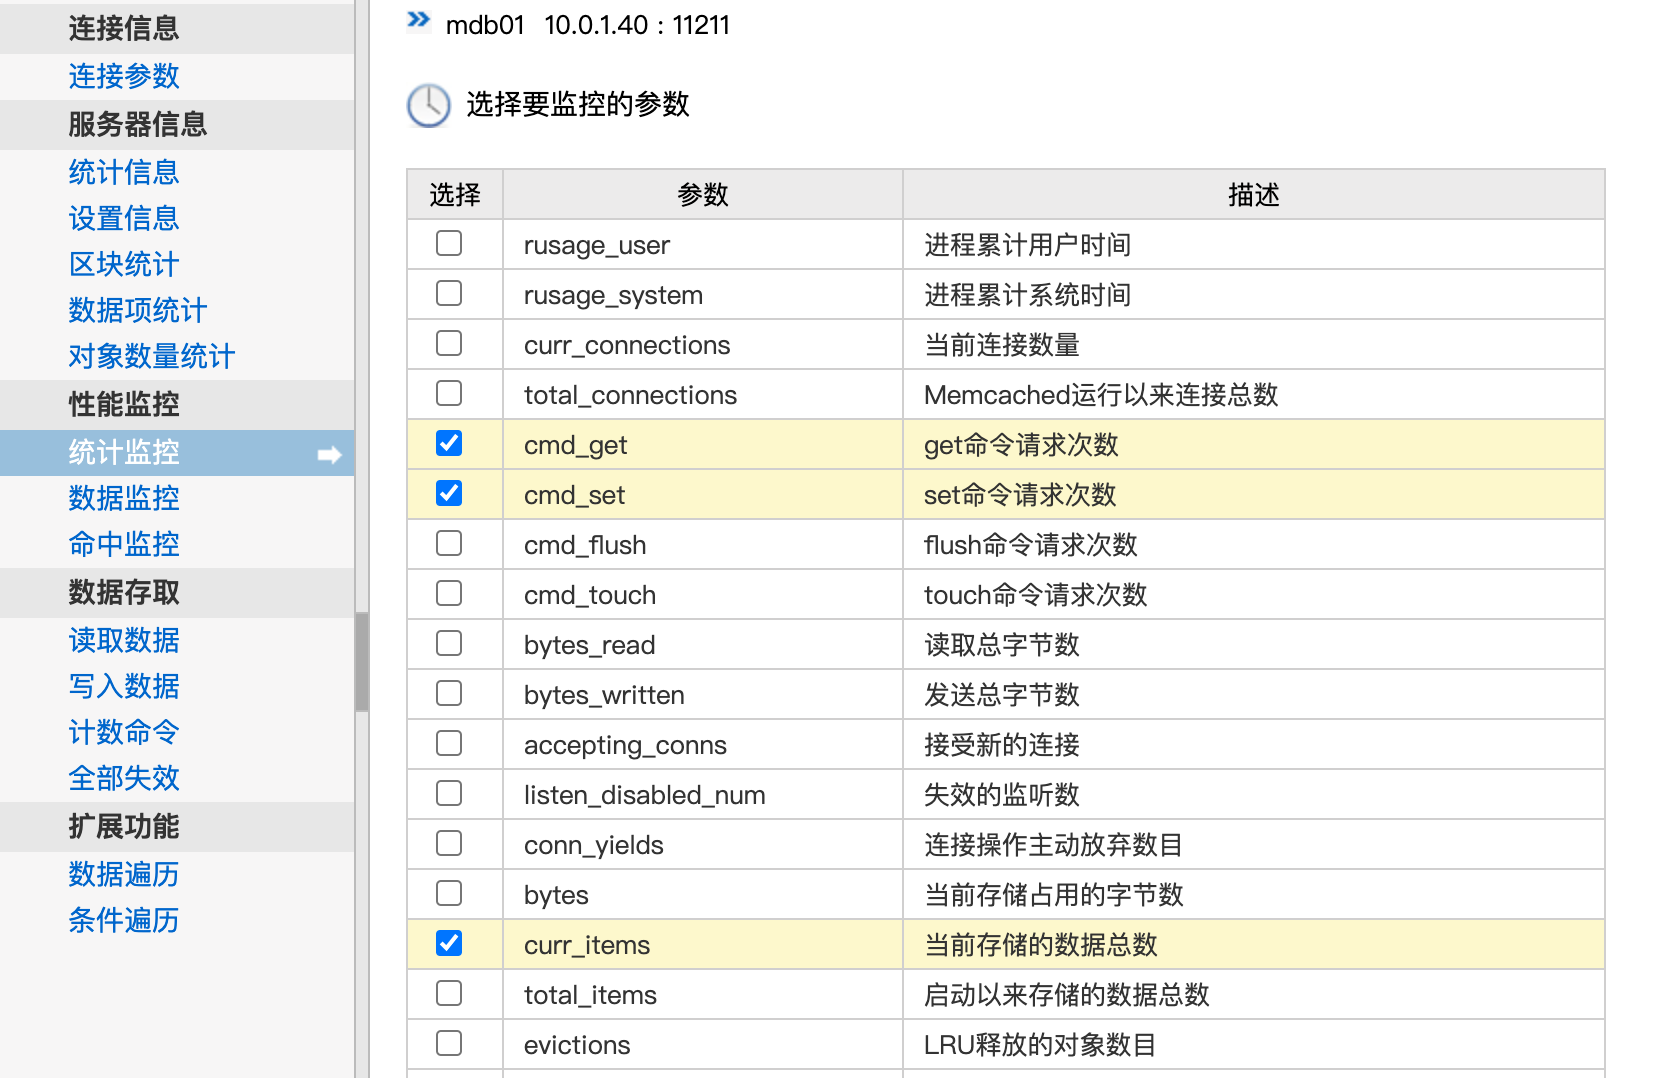
【统计get次数】
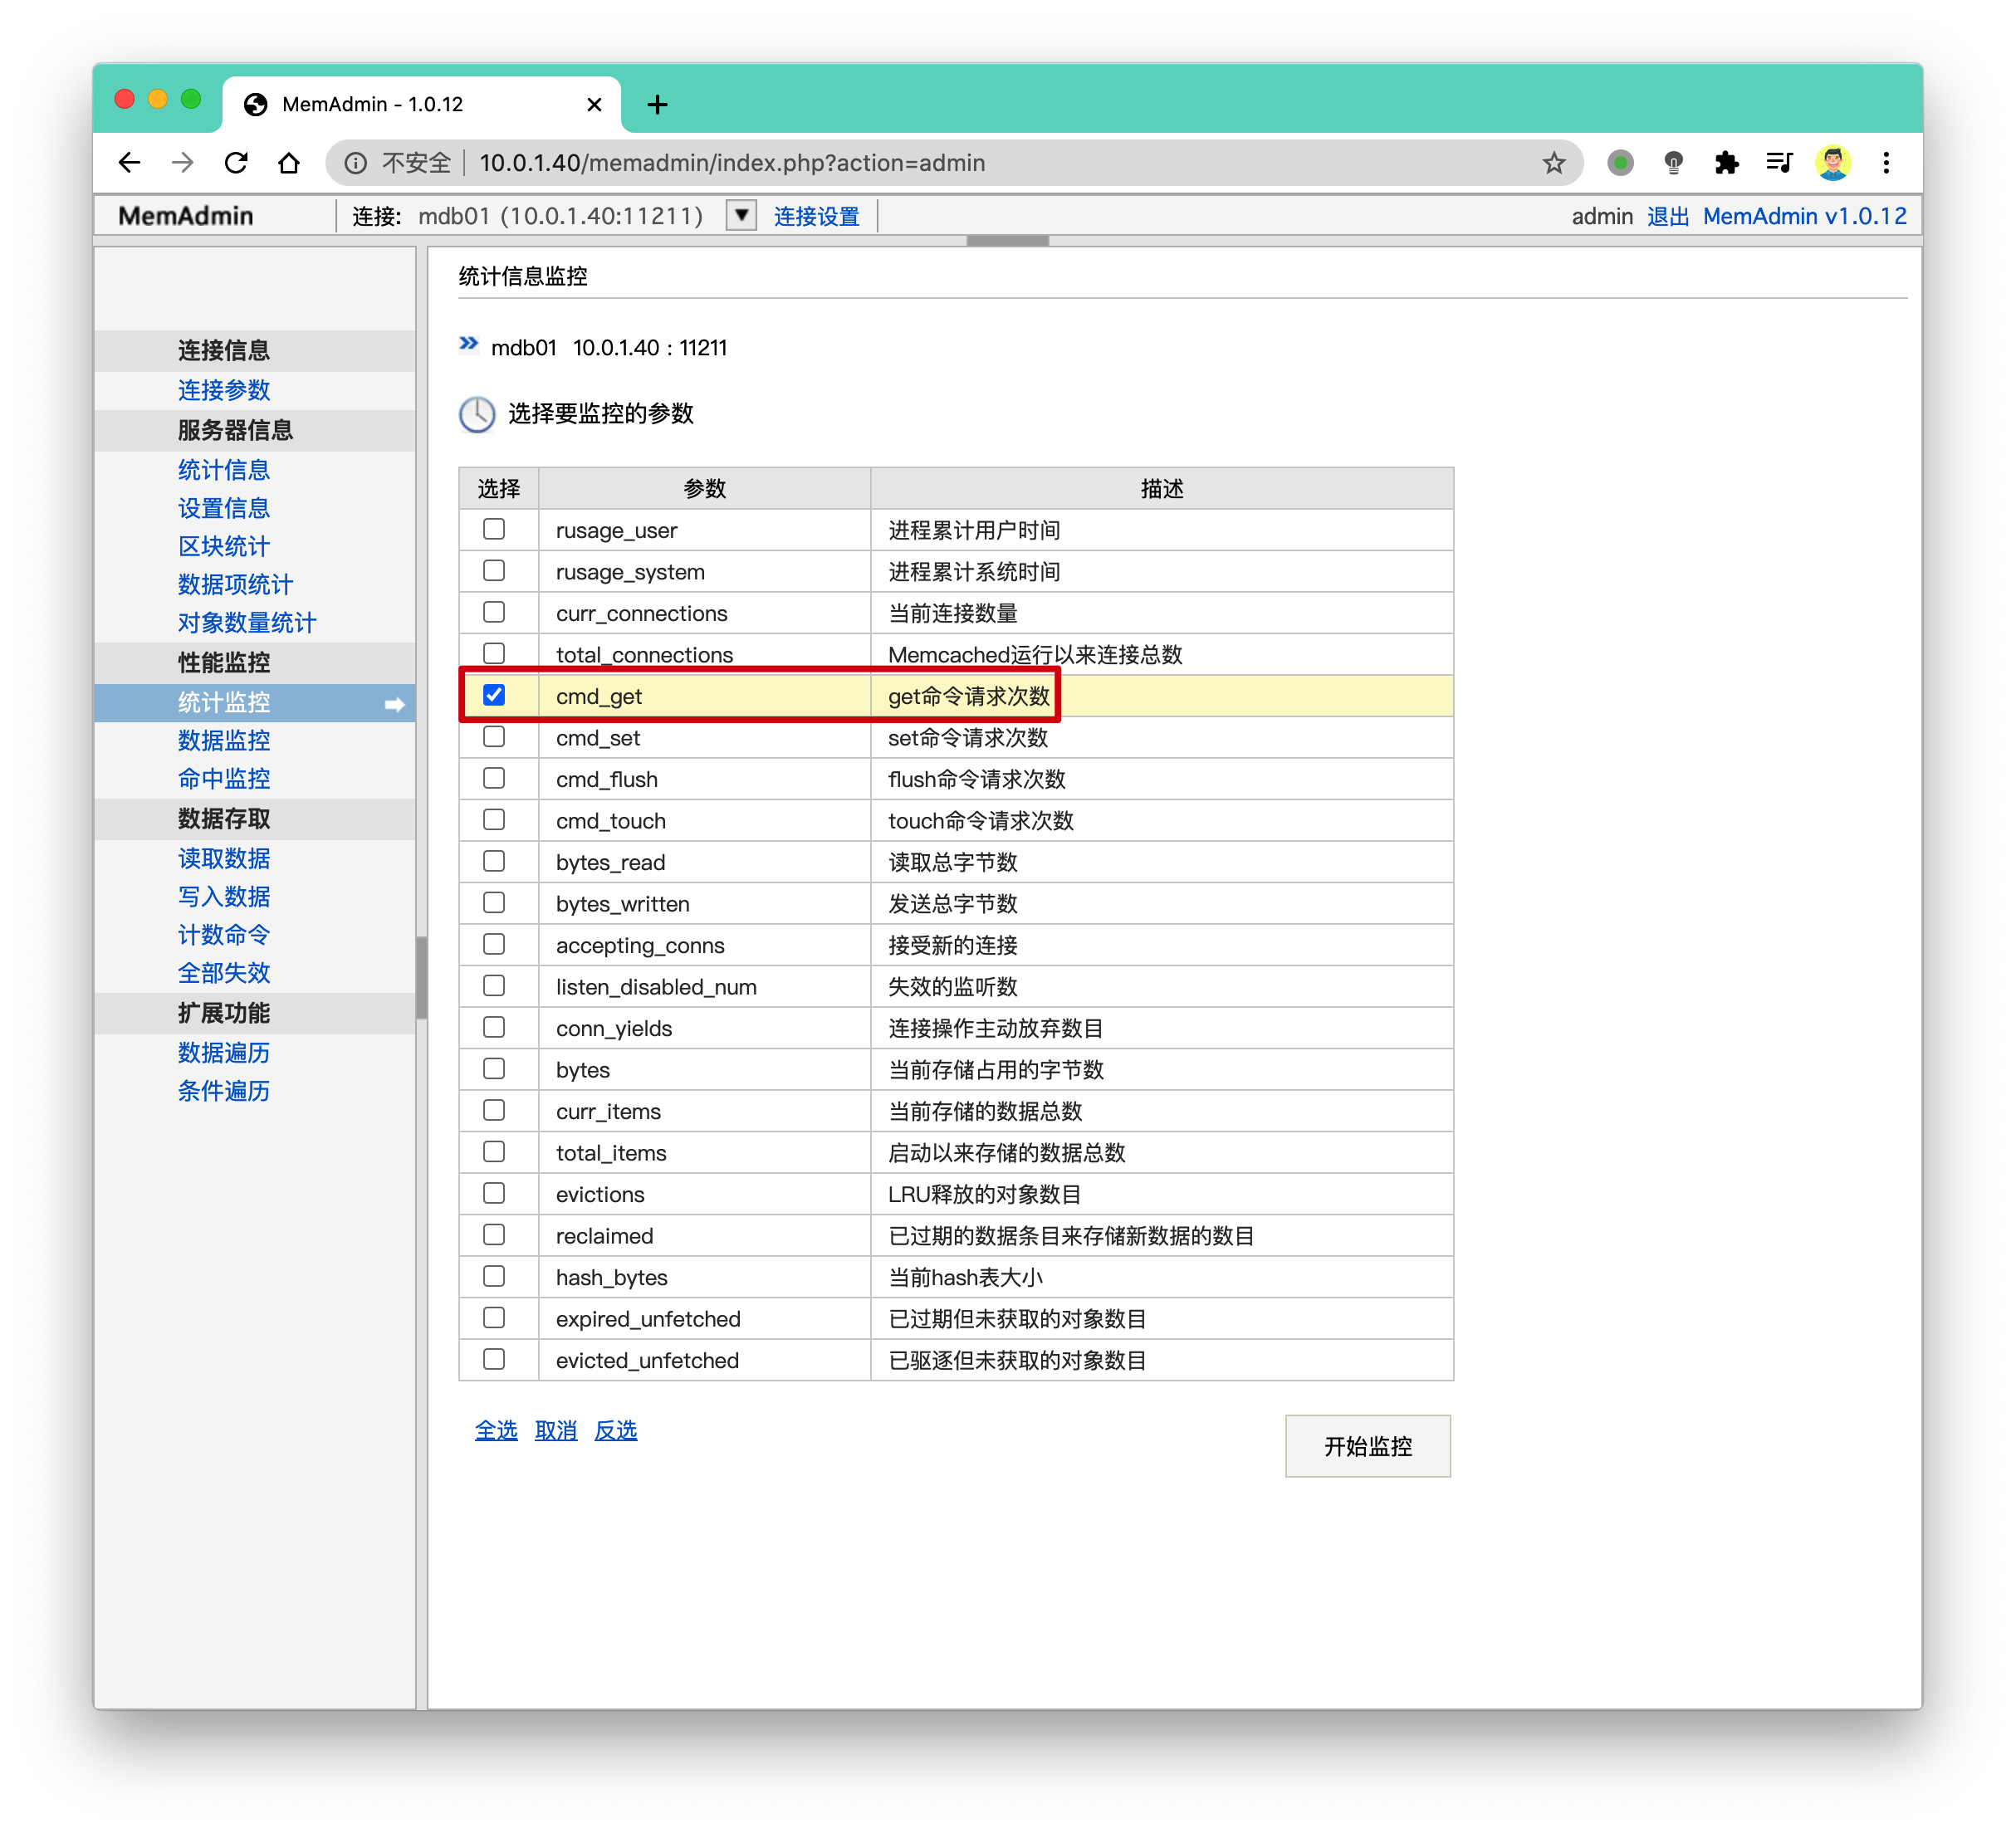
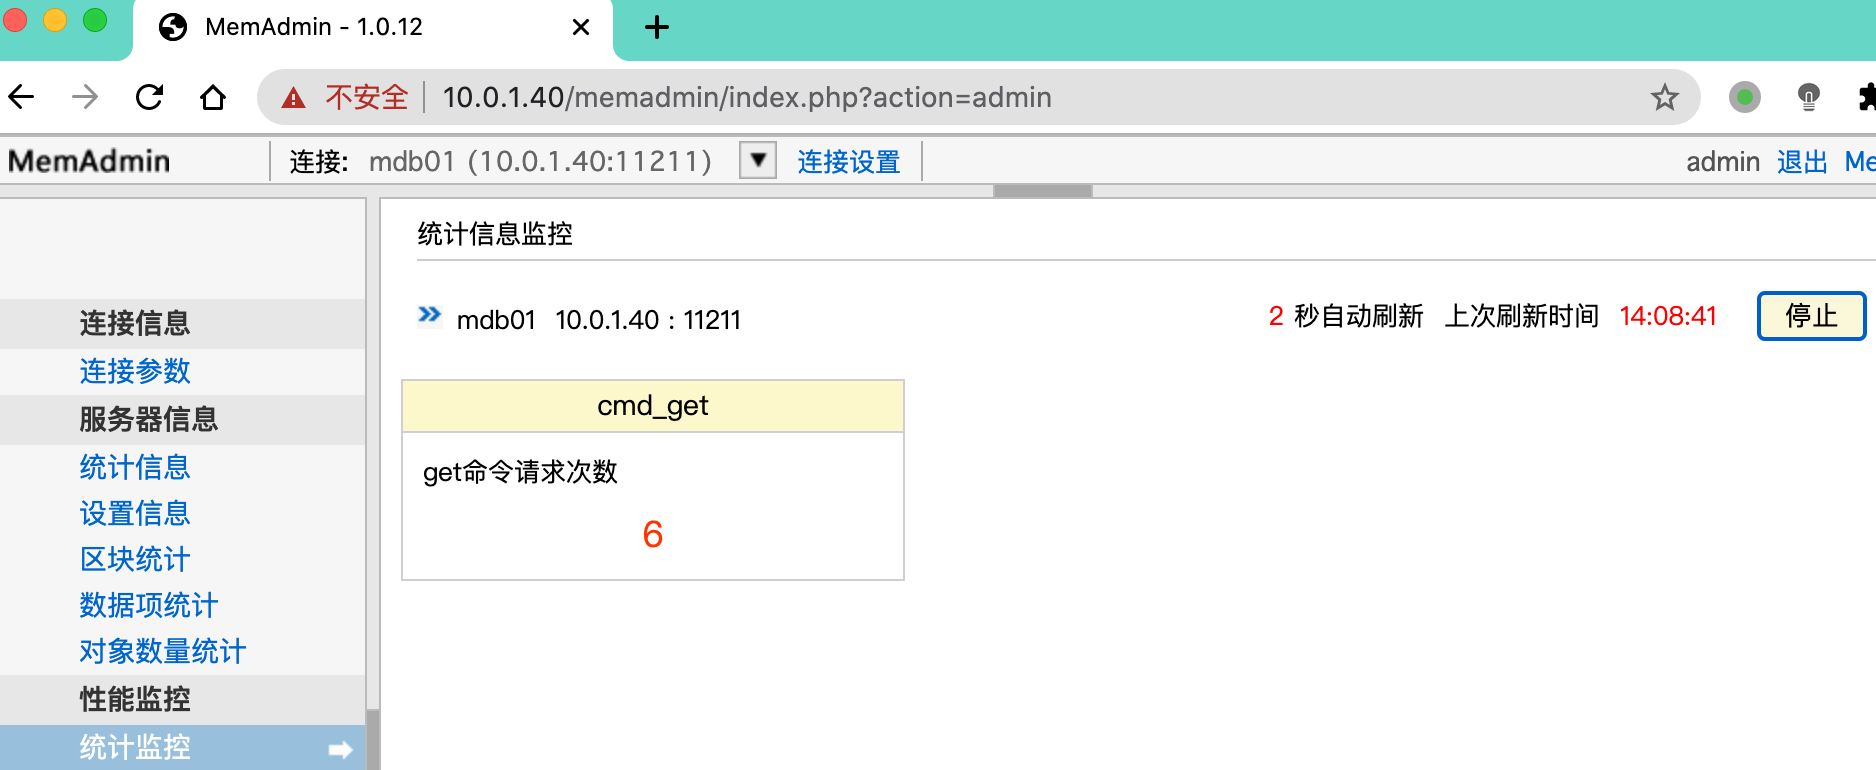
设置刷新频率
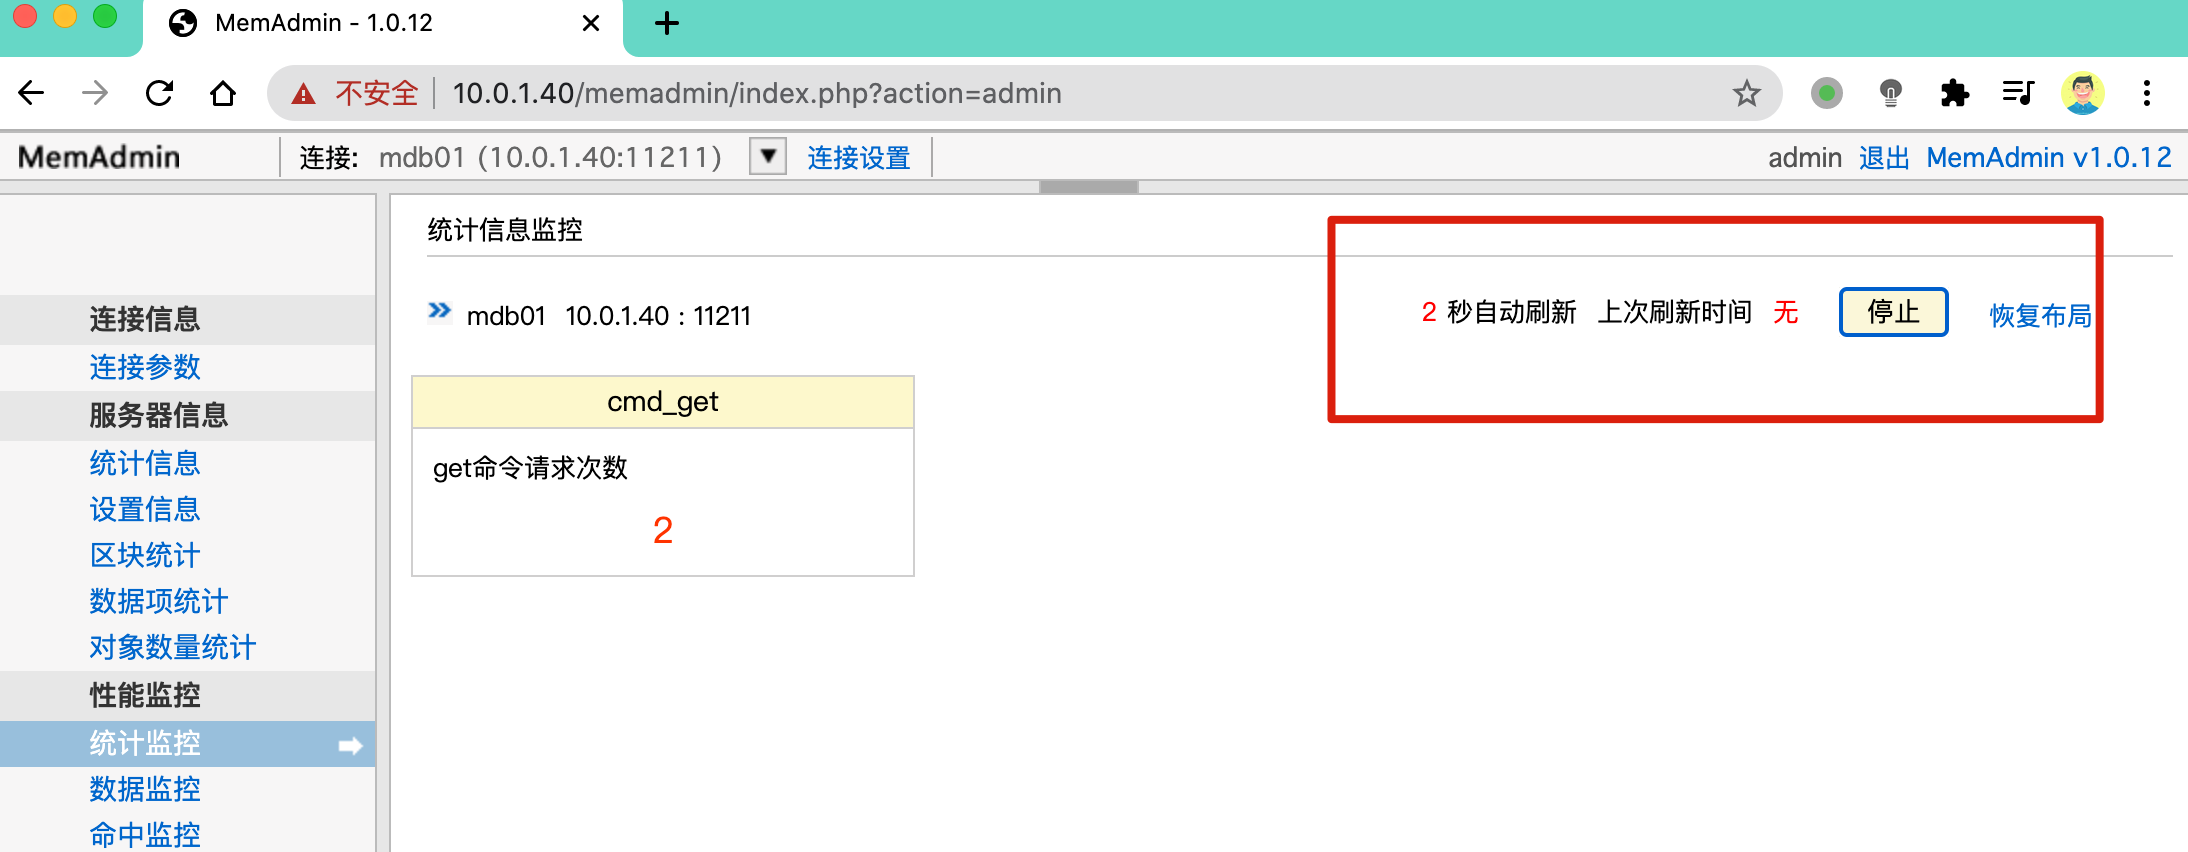
[root@memcached01 blog]# printf "get chaoge01
"|nc 10.0.1.40 11211
END
[root@memcached01 blog]# printf "get chaoge01
"|nc 10.0.1.40 11211
END
[root@memcached01 blog]# printf "get chaoge01
"|nc 10.0.1.40 11211
END
[root@memcached01 blog]# printf "get chaoge01
"|nc 10.0.1.40 11211
END
【统计多个指标】
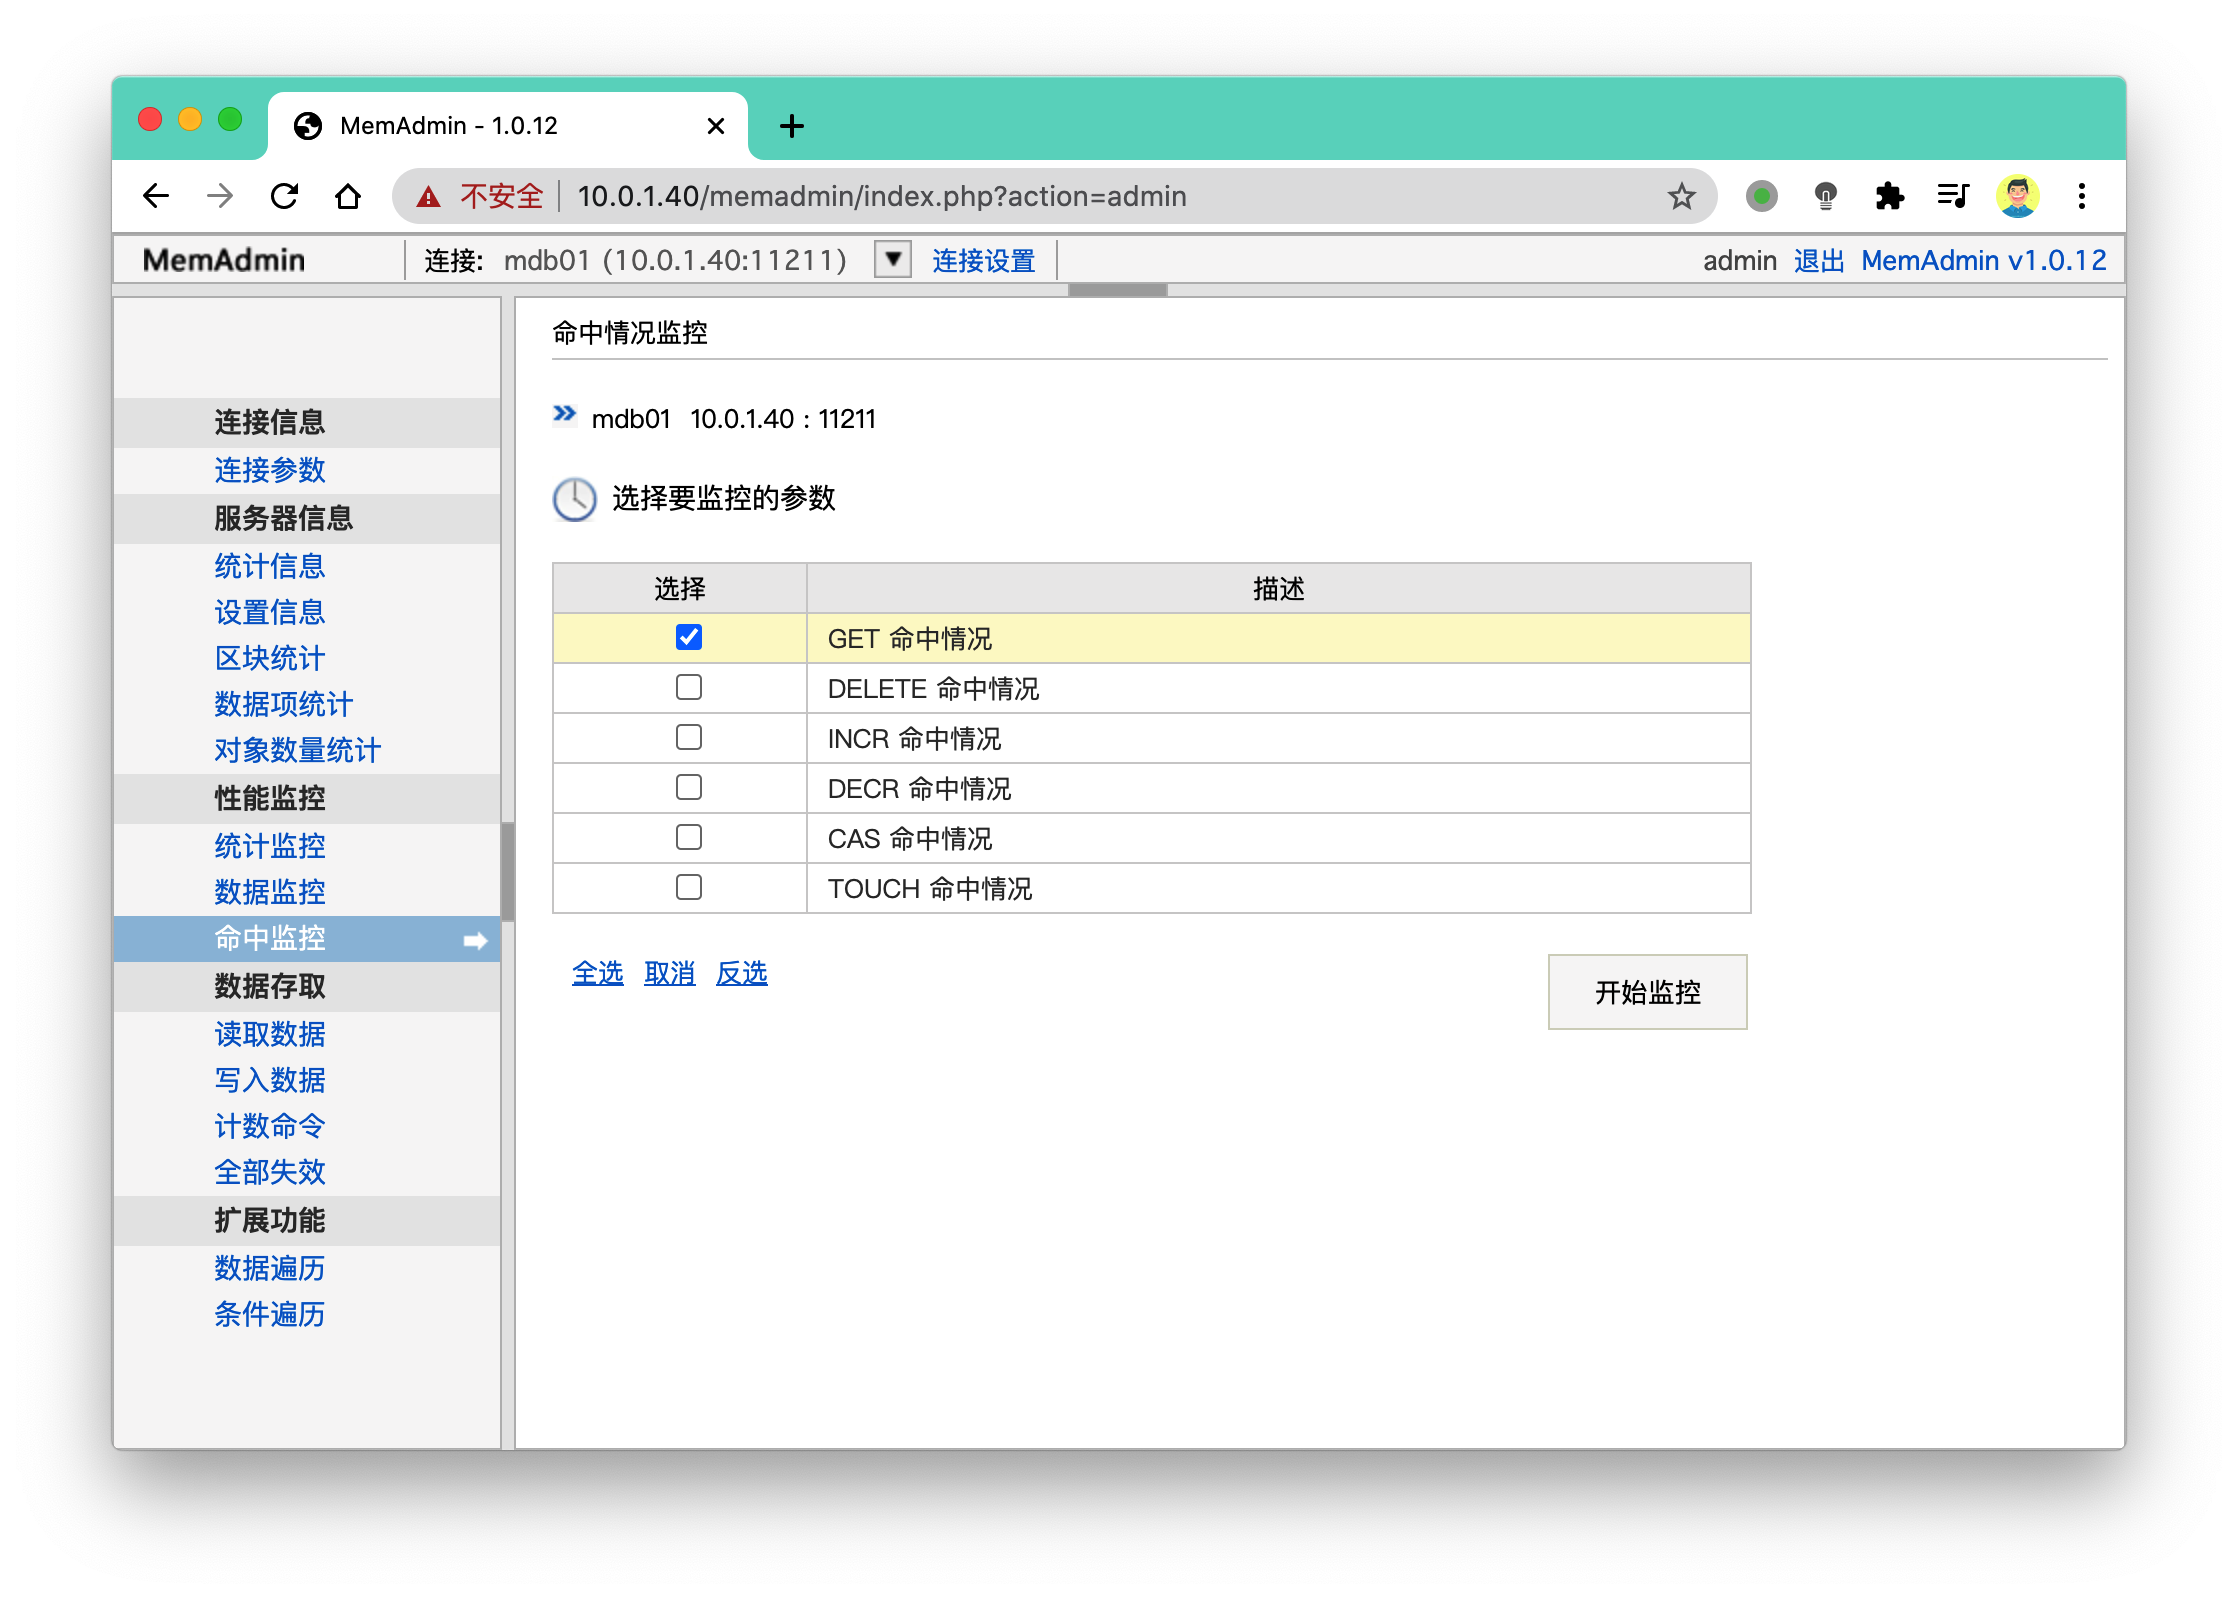
【统计命中率】
命中率就表示用户get查找数据,在memcached缓存中成功找到了。
多次未找到数据,命中率越来越低
[root@memcached01 blog]# printf "get chaoge01
"|nc 10.0.1.40 11211
END
[root@memcached01 blog]# printf "get chaoge01
"|nc 10.0.1.40 11211
END
[root@memcached01 blog]# printf "get chaoge01
"|nc 10.0.1.40 11211
END
[root@memcached01 blog]# printf "get chaoge01
"|nc 10.0.1.40 11211
END
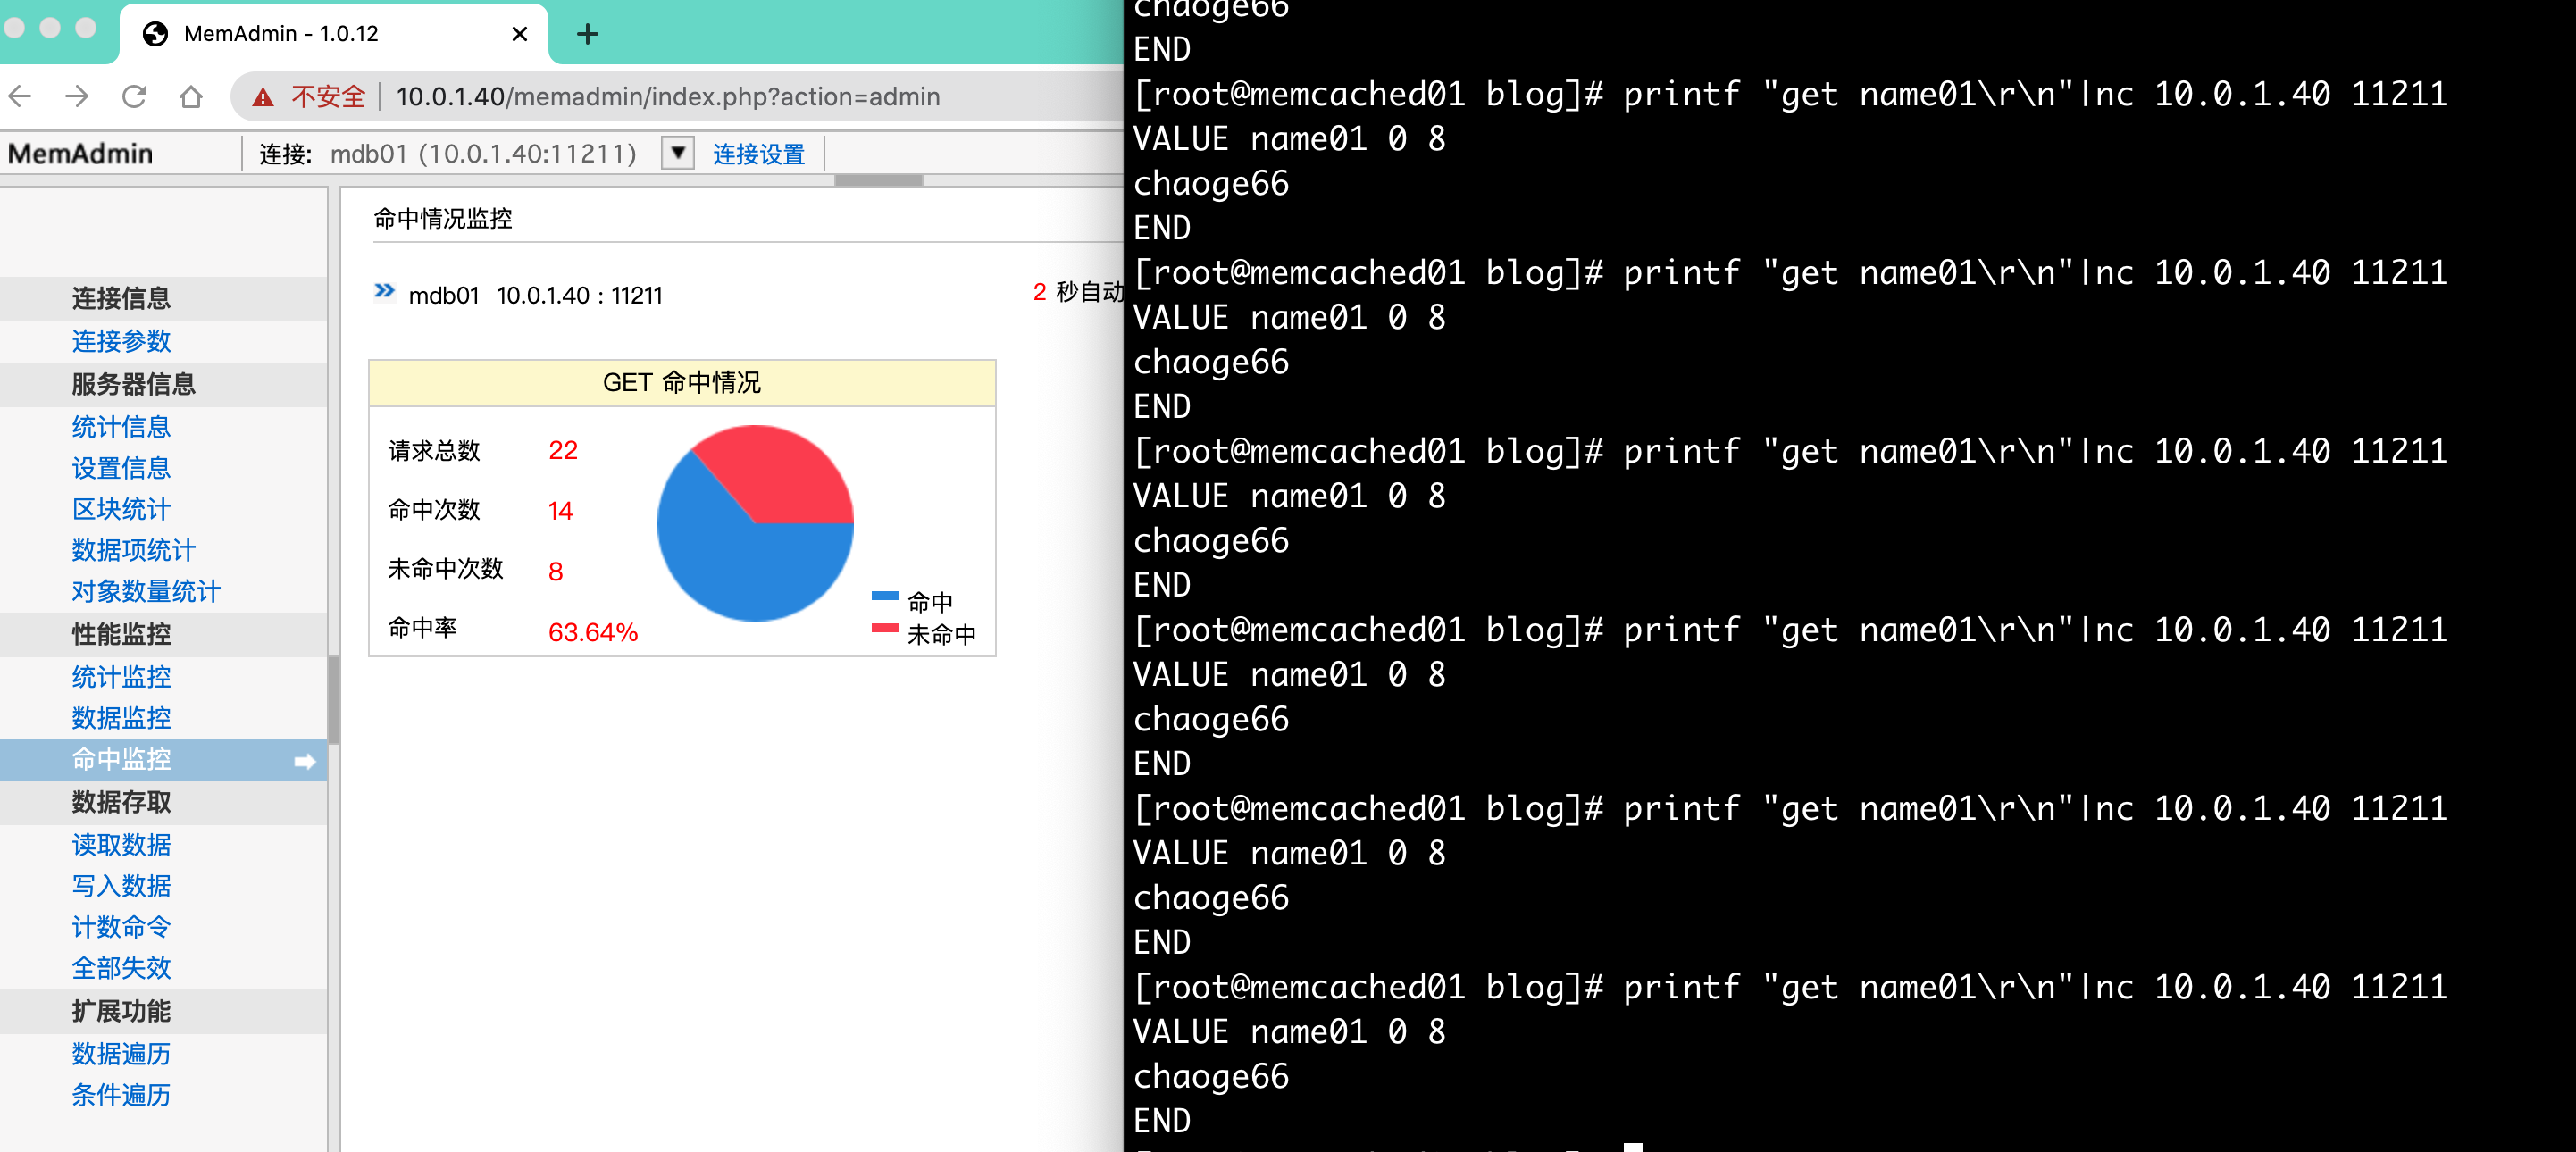
成功找到数据,命中率变高,运维同学可以根据此命中率,来判断,用户获取数据是否有缓存失效等问题
[root@memcached01 blog]# printf "get name01
"|nc 10.0.1.40 11211
VALUE name01 0 8
chaoge66
END
[root@memcached01 blog]# printf "get name01
"|nc 10.0.1.40 11211
VALUE name01 0 8
chaoge66
END
[root@memcached01 blog]# printf "get name01
"|nc 10.0.1.40 11211
VALUE name01 0 8
chaoge66
END
[root@memcached01 blog]# printf "get name01
"|nc 10.0.1.40 11211
VALUE name01 0 8
chaoge66
END
[root@memcached01 blog]# printf "get name01
"|nc 10.0.1.40 11211
VALUE name01 0 8
chaoge66
END
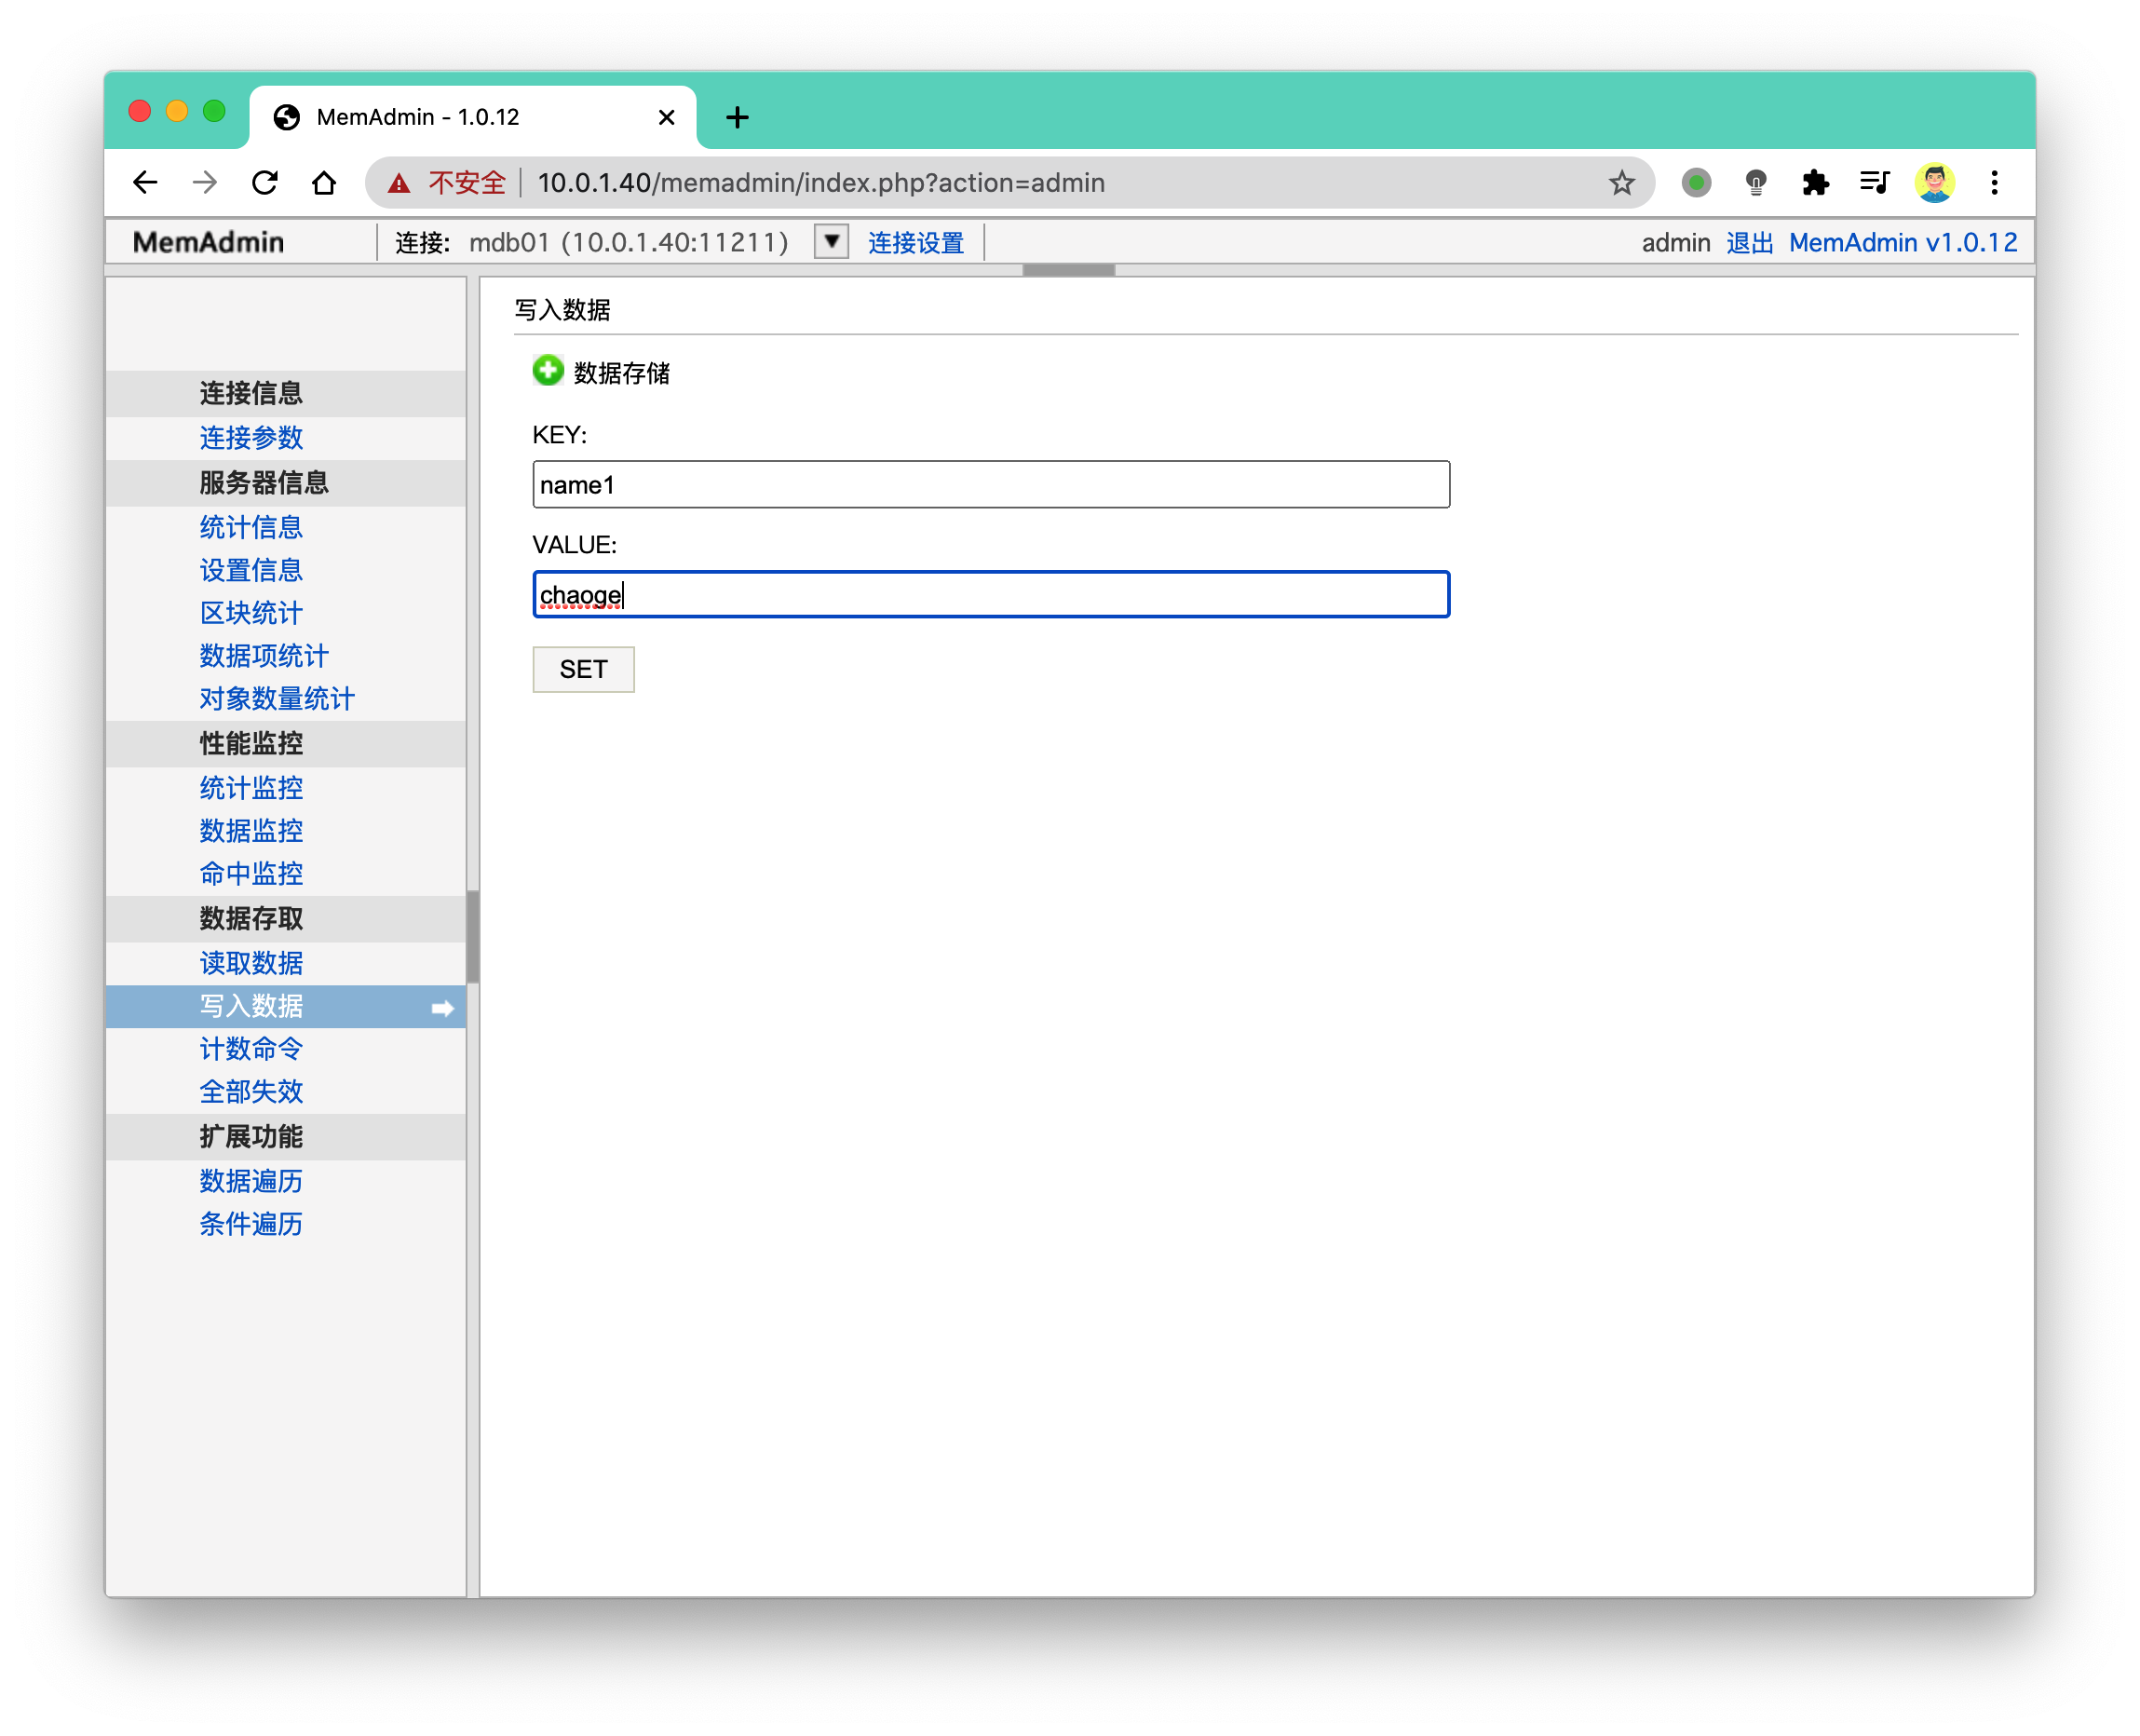
【读写数据】
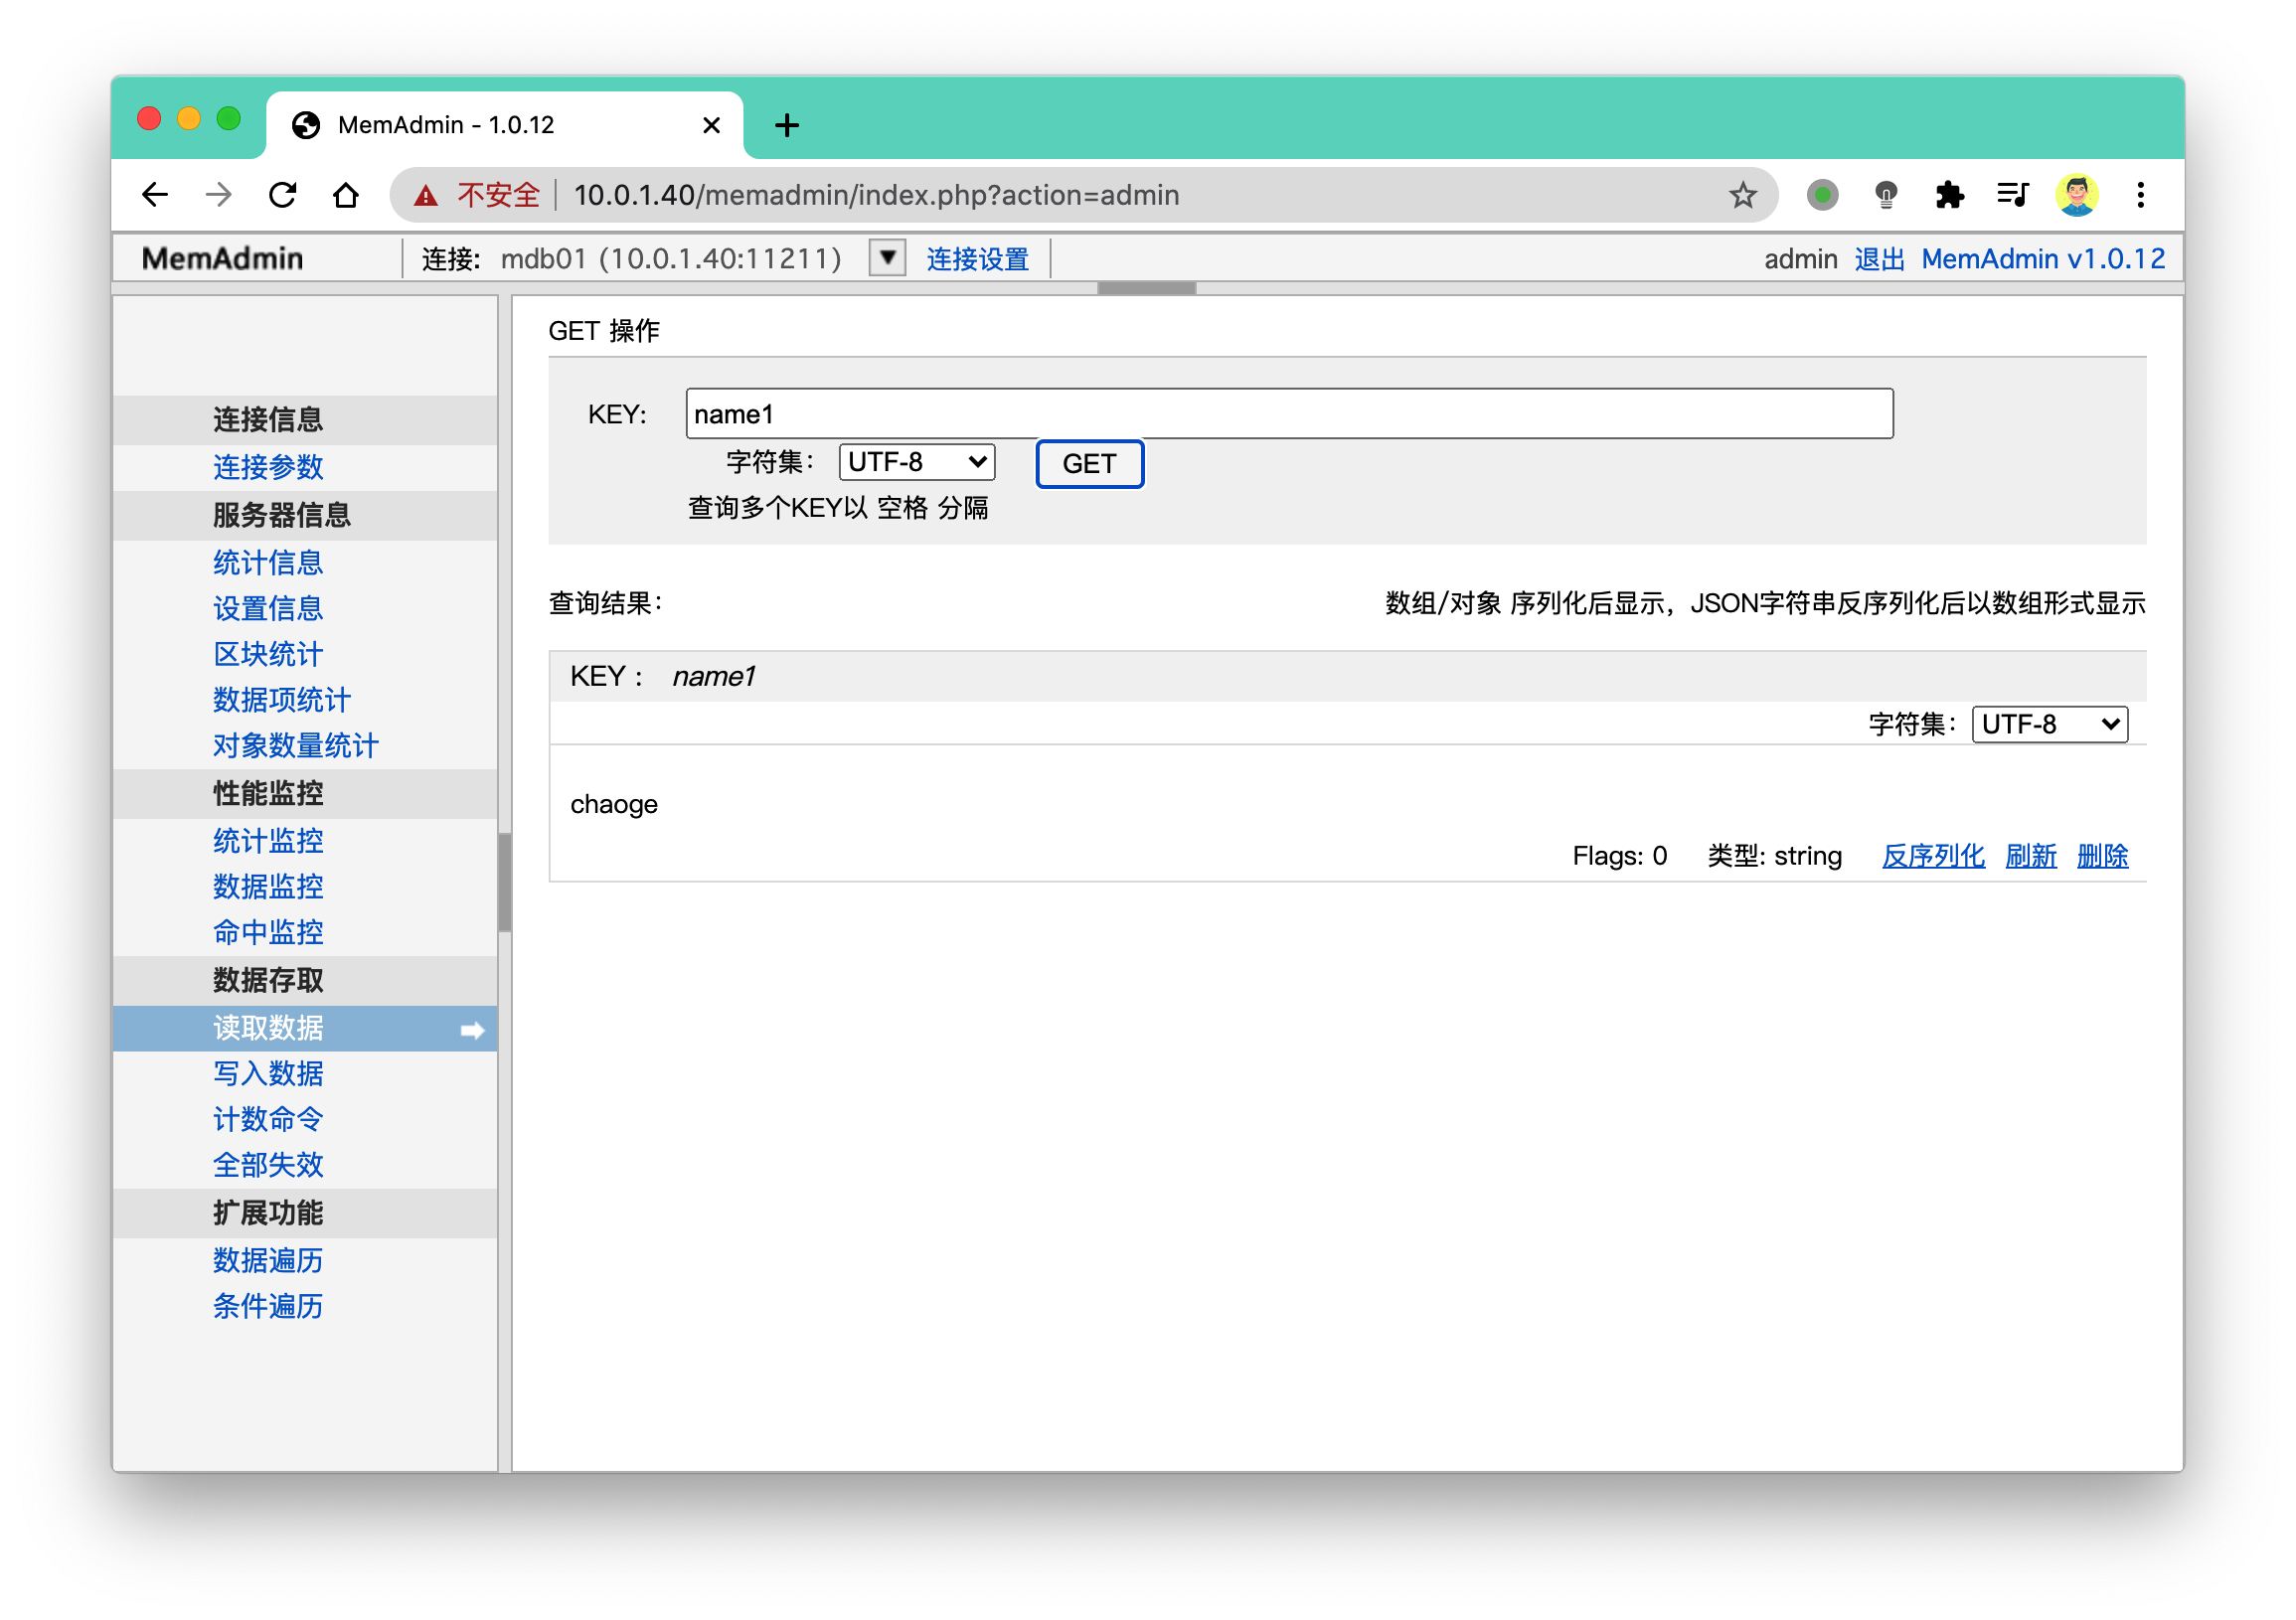
部署wordpress
https://www.cnblogs.com/abc1234567/p/14186665.html#_label15
注意严格按照笔记来操作,使用mysql,而不是mariadb数据库wordpress只能用mysql,而不是mariadb。且虚拟机的内存给大一点
部署memcached来缓存wordpress数据
wordpress缓存数据缓存到memcached中
https://cn.wordpress.org/plugins/memcached/
下载链接
wget https://downloads.wordpress.org/plugin/memcached.3.2.2.zip

#解压缩
unzip memcached.3.2.2.zip

# 得到配置文件
[root@memcached01 memcached]# pwd
/opt/memcached
[root@memcached01 memcached]# ls
object-cache.php  readme.txt
# 需要做做如下的事情
# 吧object-cache.php文件,移动到nginx站点下,也就是wordpress站点下
Install this file to wp-content/object-cache.php

# 操作如下
[root@memcached01 wp-content]# cd /opt/memcached
[root@memcached01 memcached]# ls
object-cache.php  readme.txt
[root@memcached01 memcached]#
[root@memcached01 memcached]# cp object-cache.php /opt/nginx-1.16.0/html/blog/wp-content/

# 修改该配置文件,修改wordpress的缓存放入memcached地址
[roo t@memcached01 wp-content]# grep 10.0.1.40 object-cache.php  -n
745:            $buckets = array( '10.0.1.40:11211' );

# 此时可以访问博客站点,,可以打开memadmin检测
此时使用memadmin来统计get命中率
其实在登录的时候,wordpress的数据以及缓存到memached里了
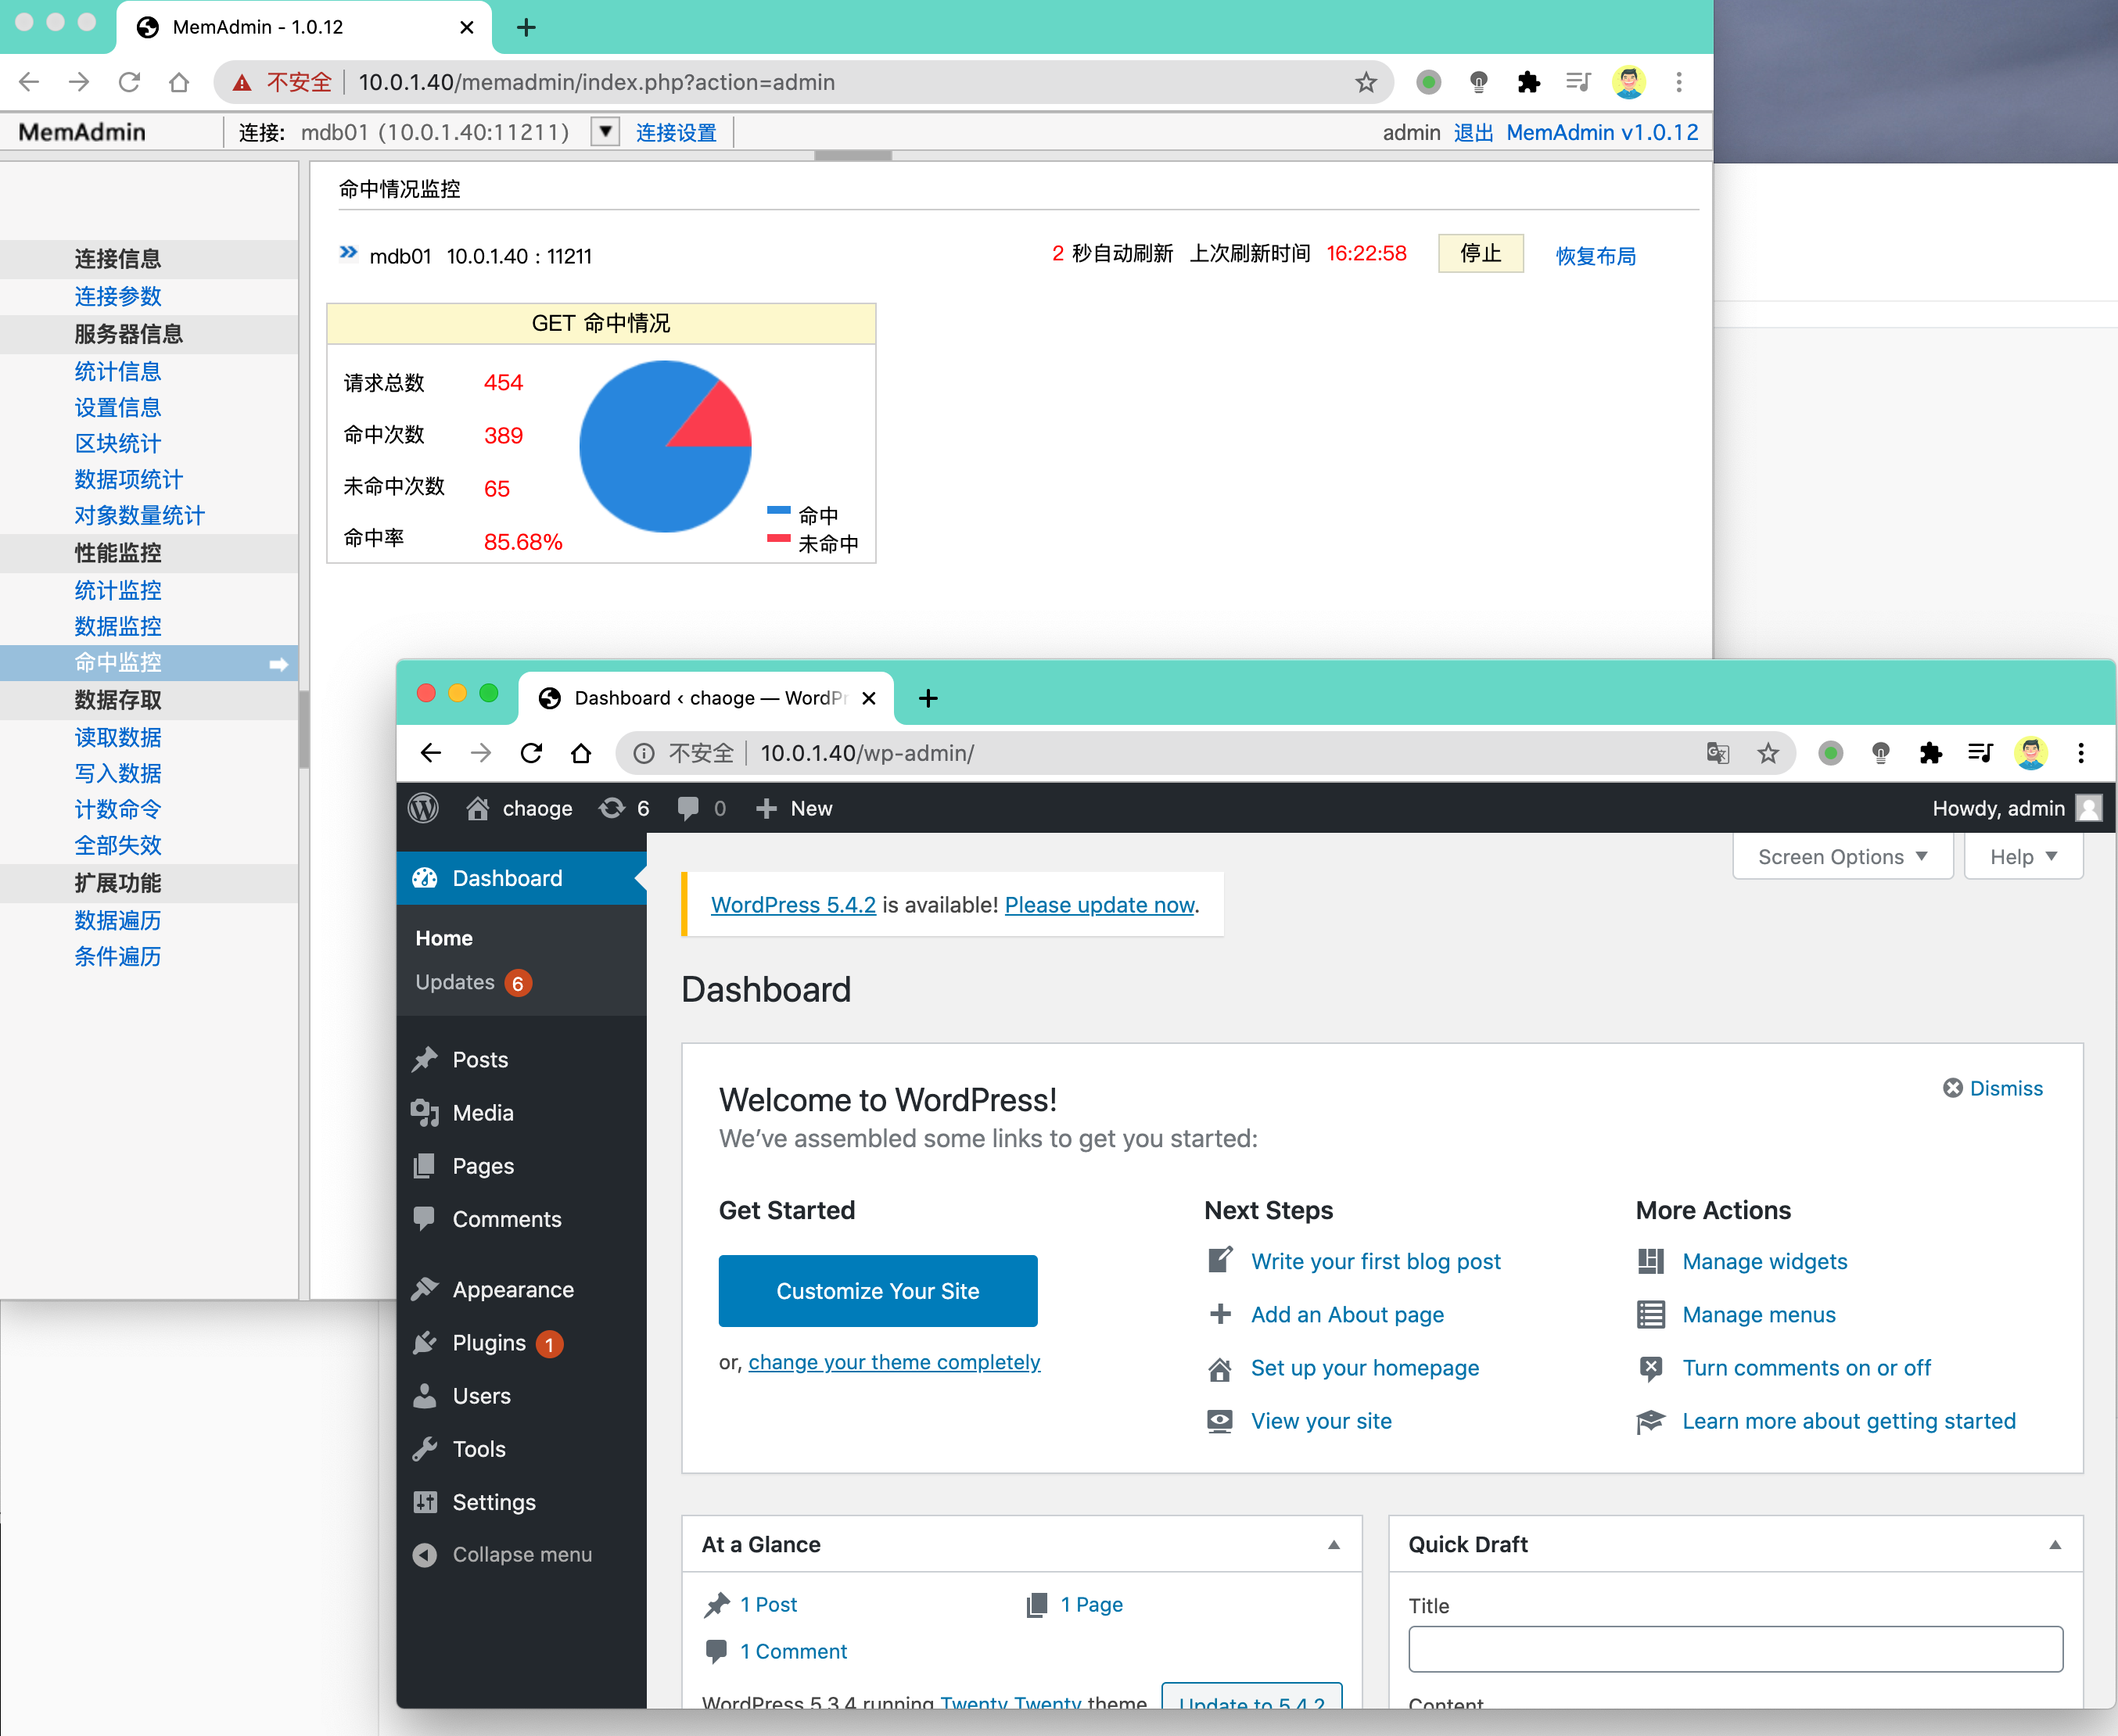
用wordpress来写一篇文章
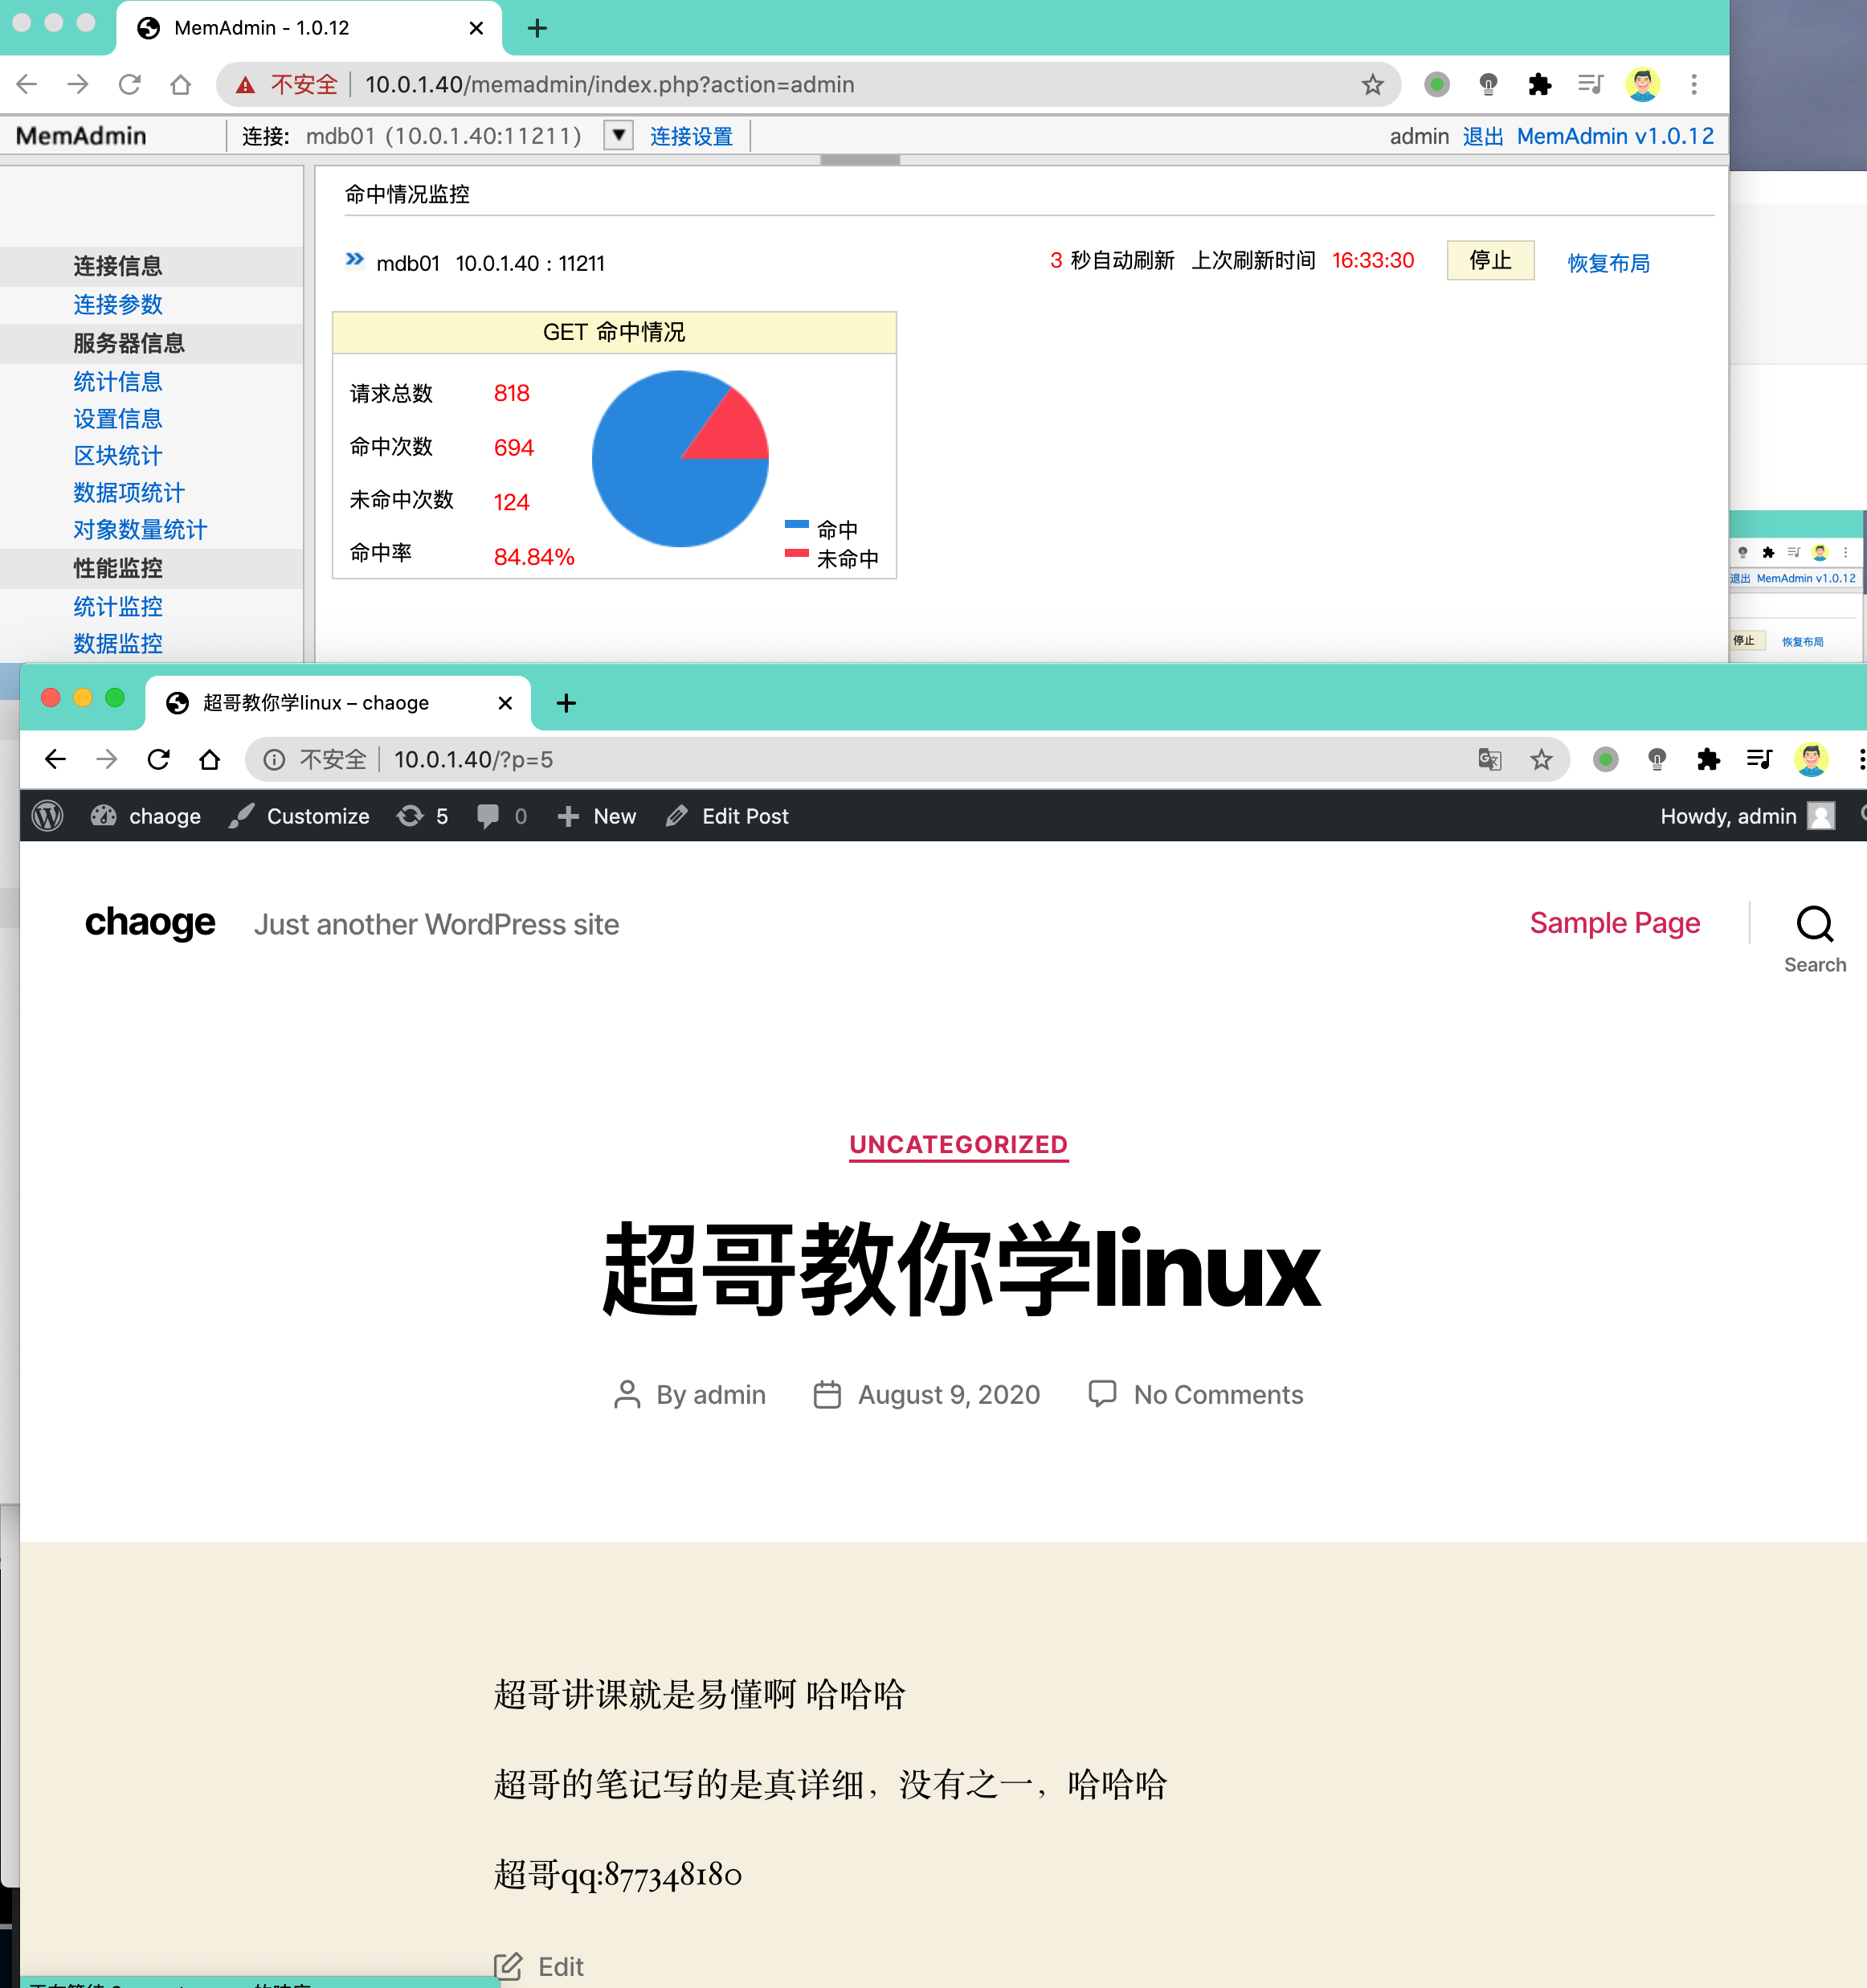
此时可以查看memcached的数据到底存了些什么
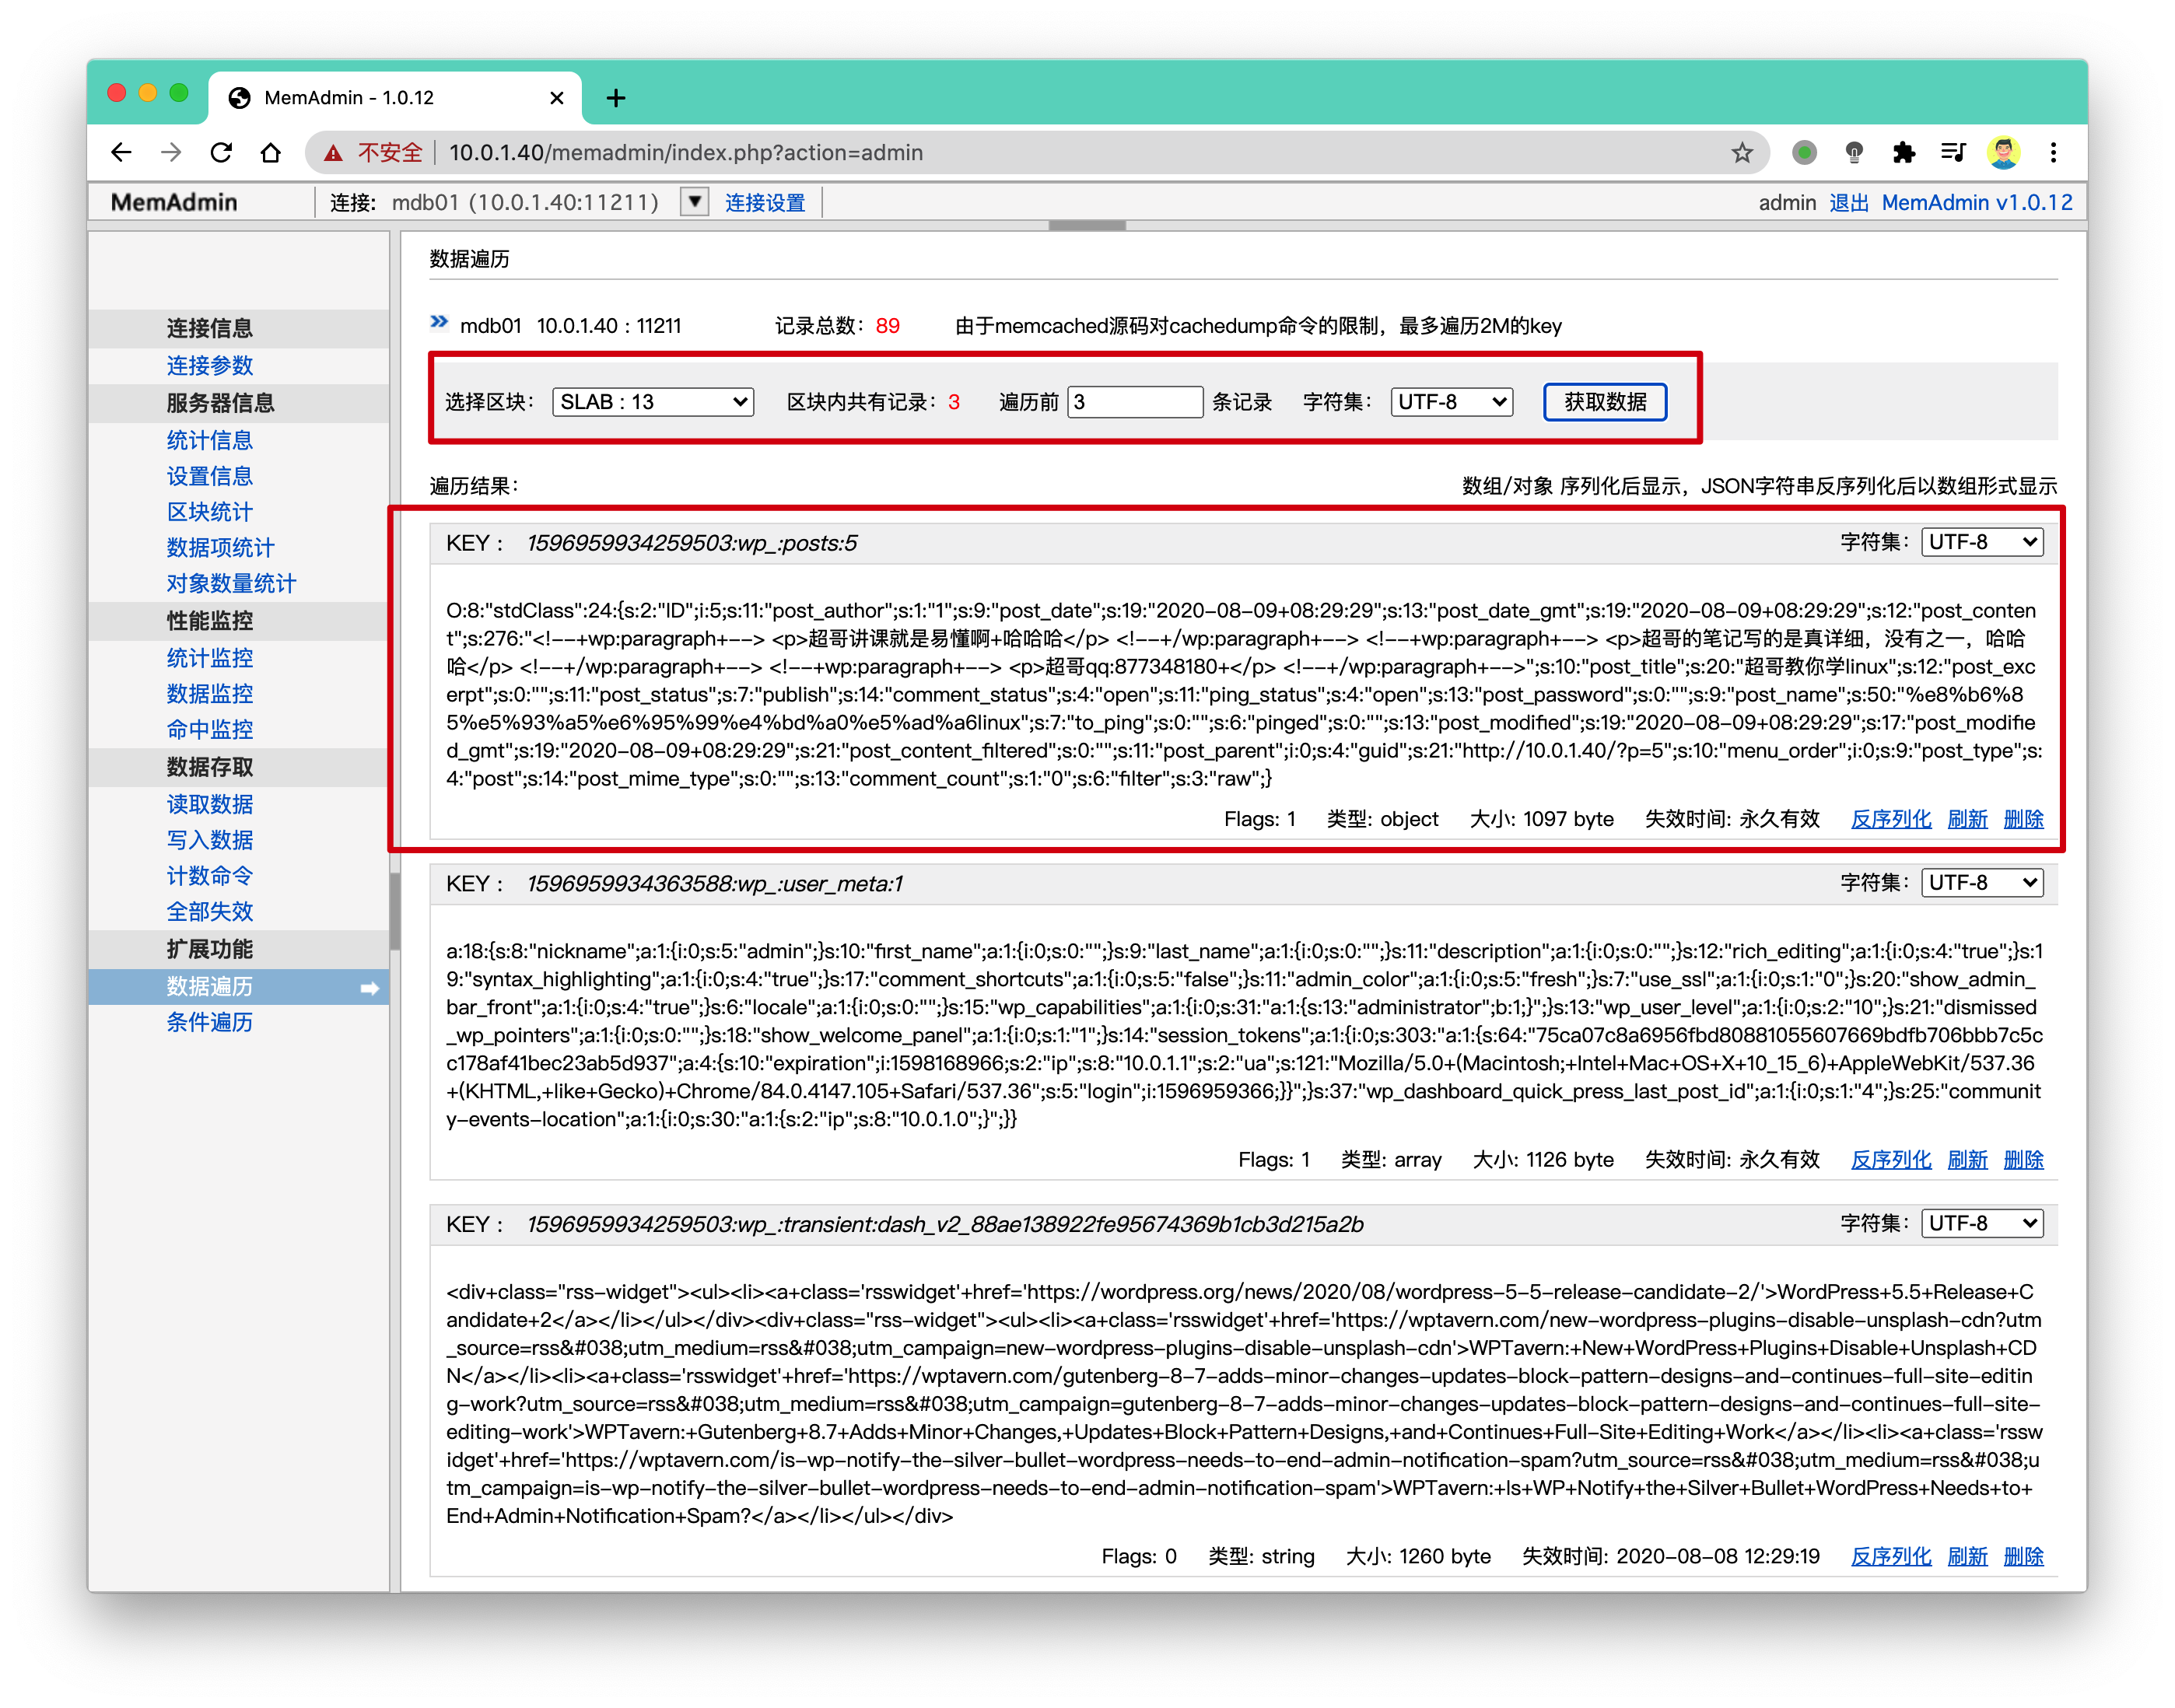
也可以在命令行中,登录查看wordpress数据
1.wordpress数据是存在mysql数据库的,且缓存到memcached里,加快访问,可以在mysql里找数据
大致SQL如下
mysql> show databases;
mysql> use wordpress;
mysql> shwo tables;
mysql> desc wp_posts;

select * from wp_posts where ID=6G;
memcached案例二(会话共享)
session的作用
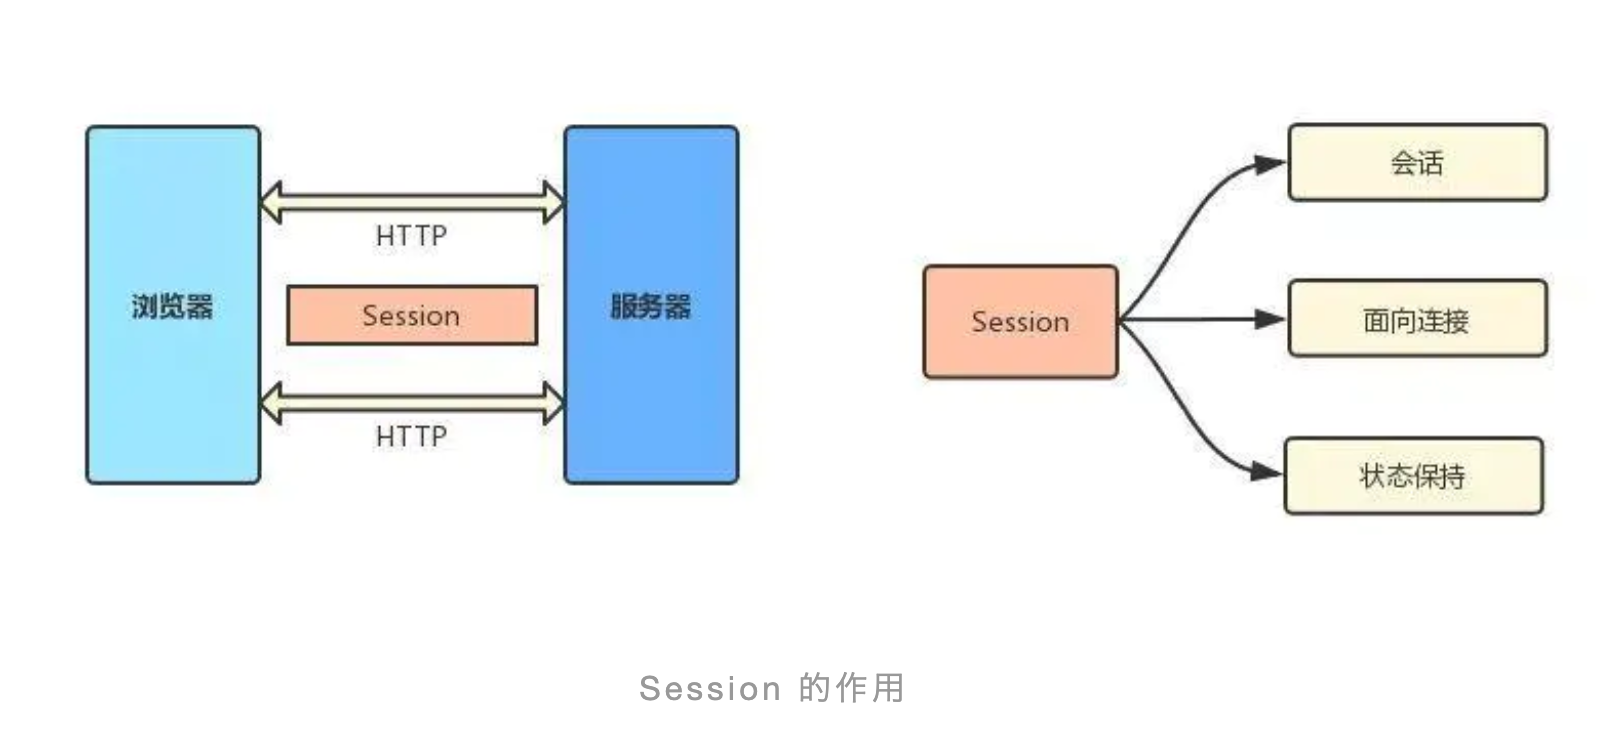
session主要是web开发中设置,服务器会为每个用户创建一个会话(session),存储用户的相关信息,便于再后续的请求中,都能够定位同一个上下文。
例如你在登录了淘宝网之后,又继续点击淘宝网的其他页面进行了跳转,淘宝网是怎么知道,你还是你?这就是因为session的作用,服务器通过你的session记录,知道了你,还是你。
如果用户没有session,服务器会创建一个session独享,直到会话过期或者主动释放(用户退出登录),服务器才会终止session。
分布式架构的session
【单体服务器架构】
在单体服务器的年代,session直接保存在单台机器,完全没有任何问题,也就是我们学习的LNMP架构。
【分布式架构】
这就涉及到我们所学的web集群,lnmp集群了
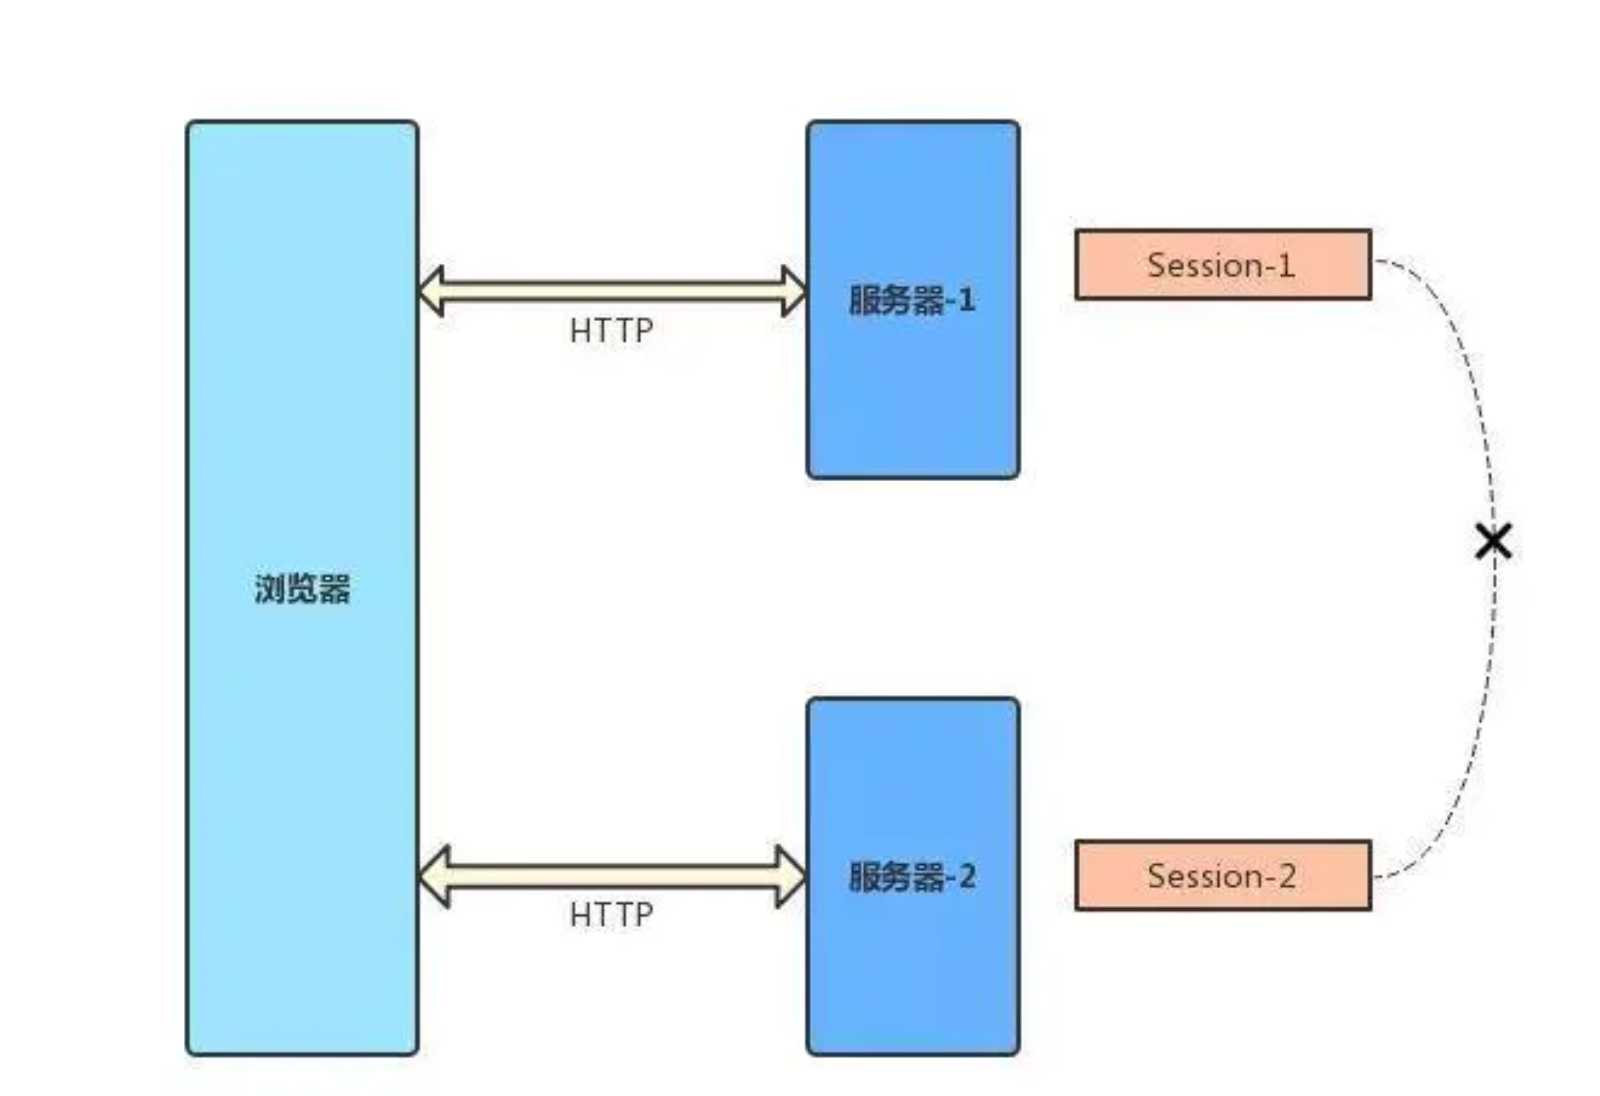
随着分布式架构的流行,单个服务器已经不能满足系统的需要了,通常都会把系统部署在多台服务器上,通过负载均衡把请求分发到其中的一台服务器上;
那么很有可能第一次请求访问的 A 服务器,创建了 Session ,但是第二次访问到了 B 服务器,这时就会出现取不到 Session 的情况;
于是,分布式架构中,Session 共享就成了一个很大的问题。
分布式架构session解决方案
1. 禁用session
这种场景是存在的,当然不会用于普通的web站点,而是在一些【无状态服务】下进行的接口开发,每一次的接口访问,是不依赖于上一次的session的。这个我们了解即可。
2. 存入cookie
cookie是存在用户浏览器本地的,如果我们把session也存入用户本地,这可以解决session分布式的问题,但是缺点也很大,就是信息不安全,如果黑客在你本地盗取了cookie,你的账户就有危险了。
3. ip绑定策略
这种方案是利用负载均衡的IP绑定策略,例如超哥交给大家的Nginx负载均衡的算法,ip_hash,能够保证用户请求只发往一个后台机器,但是这种也有缺点,就是当后端对应的单台服务器如果挂掉,则会影响一大批用户,风险也很大。
4. 服务器session同步
在服务器之间进行对session文件同步,可以保证每台服务器上都有有效的session信息,但是缺点是服务器规模如果较大,效率会很低,且有延迟。
5. 使用缓存数据库
最优的方案是将用户session信息存入redis,memcached这样的数据库中,这的优点是
1. 使用memcached进行session共享
2. 可以水平扩展,增加memcached服务器
3. 可以跨服务器进行session共享,甚至跨平台,如网页和app端
4. 服务器重启数据也不丢失,这个得依赖于redis的持久化功能,memcached无法实现
部署memcached会话共享
完成session共享有如下2个方案:
1.通过程序实现,web01只需要向memcached里写入session,web01向memcached读取session,当做普通数据来读写

2.通过php的配置修改,php默认是将用户session存储在文件里,改为Memcached存储
修改php配置文件
有关session设置的,php配置文件,有如下
[root@memcached01 php7.3.5]# grep '^session'  lib/php.ini
session.save_handler = files
session.use_strict_mode = 0
session.use_cookies = 1
session.use_only_cookies = 1
session.name = PHPSESSID
session.auto_start = 0
session.cookie_lifetime = 0
session.cookie_path = /
session.cookie_domain =
session.cookie_httponly =
session.cookie_samesite =
session.serialize_handler = php
session.gc_probability = 1
session.gc_divisor = 1000
session.gc_maxlifetime = 1440
session.referer_check =
session.cache_limiter = nocache
session.cache_expire = 180
session.use_trans_sid = 0
session.sid_length = 26
session.trans_sid_tags = "a=href,area=href,frame=src,form="
session.sid_bits_per_character = 5
【操作如下】
修改两行有关会话数据的配置
[root@memcached01 php7.3.5]# grep 'session.save' lib/php.ini  -n
1337:; http://php.net/session.save-handler
1338:session.save_handler = files
1346:;     session.save_path = "N;/path"
1362:;     session.save_path = "N;MODE;/path"
1366:; http://php.net/session.save-path
1367:;session.save_path = "/tmp"
1458:;       (see session.save_path above), then garbage collection does *not*
修改命令
# 替换一行配置,并且在最底行加上一行配置
[root@memcached01 php7.3.5]# sed -i 's#session.save_handler = files#session.save_handler = memcache#;$a session.save_path = "tcp://10.0.1.40:11211"'  /opt/php7.3.5/lib/php.ini


# 检查替换结果
[root@memcached01 php7.3.5]# grep '^session.save' lib/php.ini  -n
1338:session.save_handler = memcache
1948:session.save_path = "tcp://10.0.1.40:11211"
再来检查php的配置,因为需要php能够支持session的处理,通过phpinfo检查,或者命令
[root@memcached01 php7.3.5]# /opt/php7.3.5/bin/php -i |grep session

# 或者添加phpinfo文件,在lnmp站点下

cat test_info.php
<?php
phpinfo();
?>
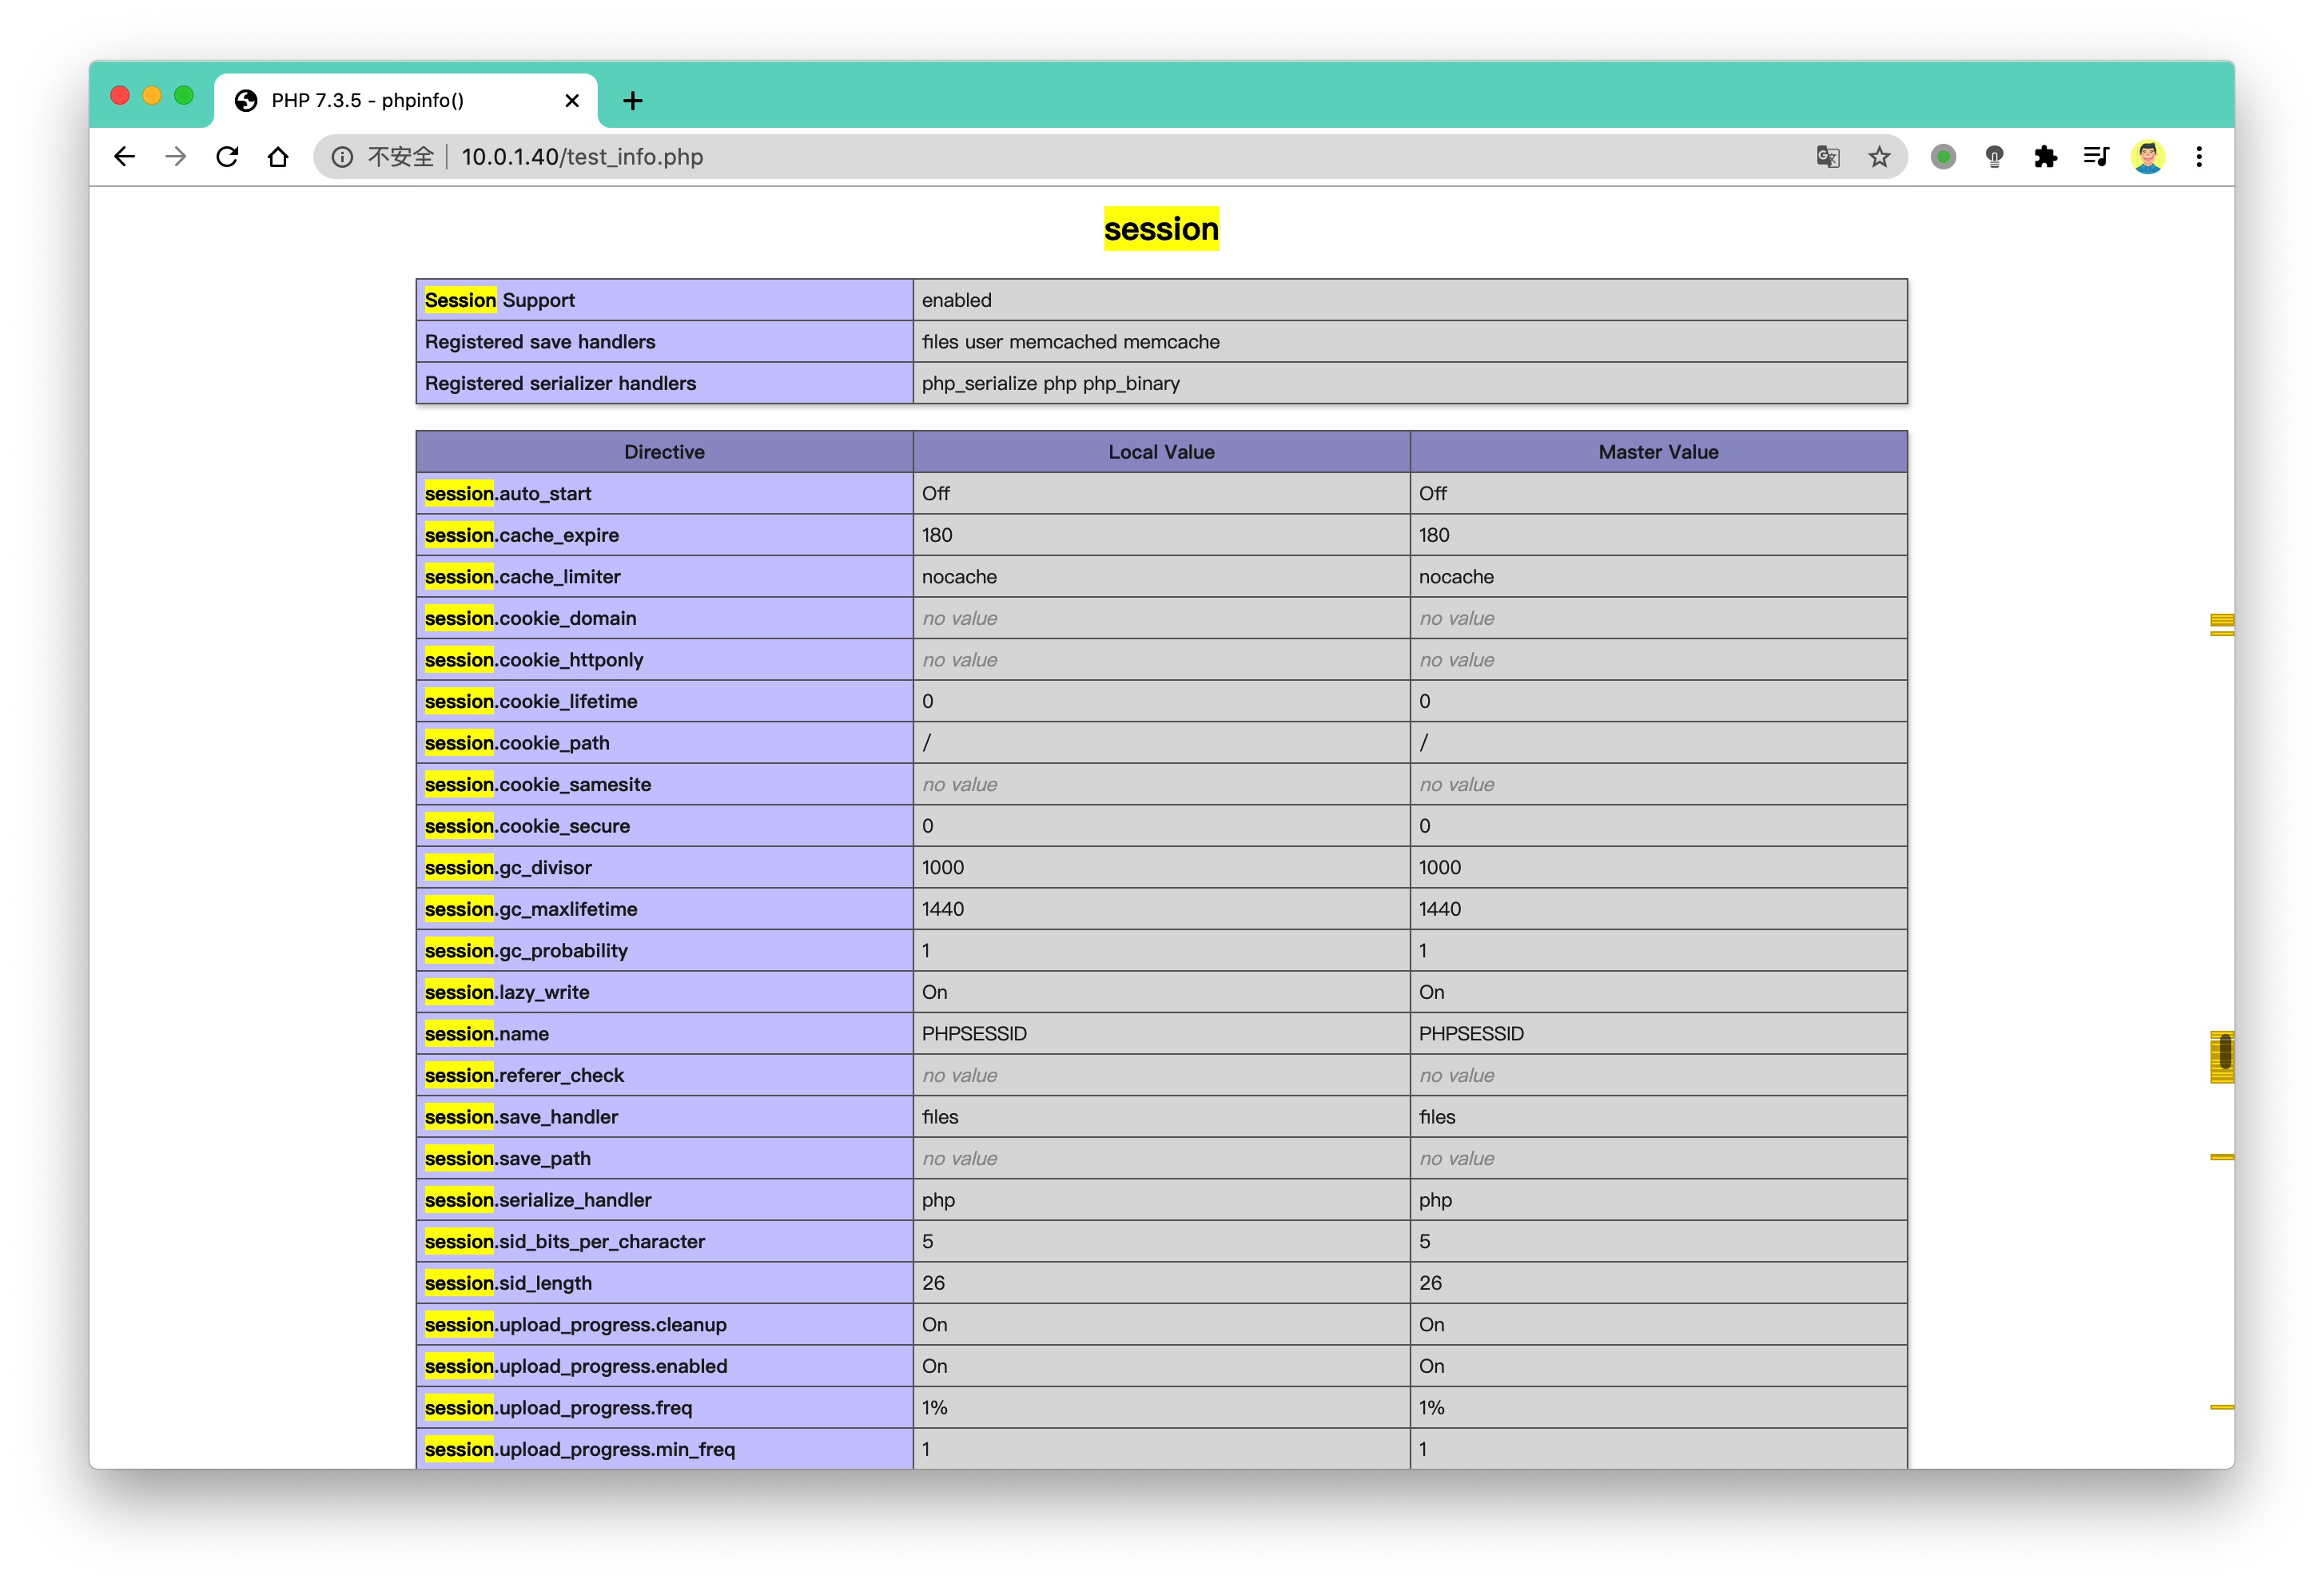
这里是告诉大家,如果你公司用的是php进行开发,那么php保存会话,写入到memcached的配置就是这样,改如上两行配置即可。当你公司用php开发的网站,用户登录后,php就会将用户的session信息,存入到memcached里,这就是我们运维人员所需要学会,以及执行的任务。