-
k8s是什么
Kubernetes简称为k8s,它是 Google 开源的容器集群管理系统。在 Docker 技术的基础上,为容器化的应用提供部署运行、资源调度、服务发现和动态伸缩等一系列完整功能,提高了大规模容器集群管理的便捷性。k8s是容器到容器云后的产物。但是k8s并不是万能,并不一定适合所有的云场景。官方有一段"What Kubernetes is not"的解释可能更有利我们的理解。
Kubernetes 不是一个传统意义上,包罗万象的 PaaS (平台即服务) 系统。我们保留用户选择的自由,这非常重要。
-
- Kubernetes 不限制支持的应用程序类型。 它不插手应用程序框架 (例如 Wildfly), 不限制支持的语言运行时 (例如 Java, Python, Ruby),只迎合符合 12种因素的应用程序,也不区分”应用程序”与”服务”。Kubernetes 旨在支持极其多样化的工作负载,包括无状态、有状态和数据处理工作负载。如果应用可以在容器中运行,它就可以在 Kubernetes 上运行。
- Kubernetes 不提供作为内置服务的中间件 (例如 消息中间件)、数据处理框架 (例如 Spark)、数据库 (例如 mysql)或集群存储系统 (例如 Ceph)。这些应用可以运行在 Kubernetes 上。
- Kubernetes 没有提供点击即部署的服务市场
- Kubernetes 从源代码到镜像都是非垄断的。 它不部署源代码且不构建您的应用程序。 持续集成 (CI) 工作流是一个不同用户和项目都有自己需求和偏好的领域。 所以我们支持在 Kubernetes 分层的 CI 工作流,但不指定它应该如何工作。
- Kubernetes 允许用户选择其他的日志记录,监控和告警系统 (虽然我们提供一些集成作为概念验证)
- Kubernetes 不提供或授权一个全面的应用程序配置语言/系统 (例如 jsonnet).
- Kubernetes 不提供也不采用任何全面机器配置、保养、管理或自我修复系统
-
Kubernetes的整体架构如下:
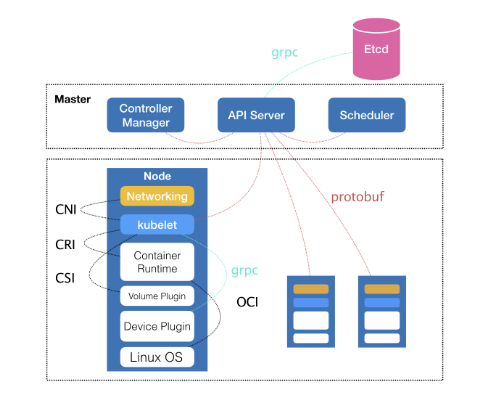
其中,控制节点,即Master节点,由三个紧密协作的独立组件组合而成,他们分别负责是API服务的kube-apiserver、负责调度的kube-scheduler,以及负责容器编排的kube-controller-manager。整个集群的持久化数据,则由kube-apiserver处理后保存在Etcd中。
在计算节点上最核心的部分,则是一个叫做kubelet的组件。
在 Kubernetes 项目中,kubelet 主要负责
1.kubelet同容器运行(running containers)时(比如 Docker 项目)打交道。而这个交互所依赖的,是一个称作 CRI(Container Runtime Interface)的远程调用接口,这个接口定义了容器运行时的各项核心操作,比如:启动一个容器需要的所有参数。
这也是为何,Kubernetes 项目并不关心你部署的是什么容器运行时、使用的什么技术实现,只要你的这个容器运行时能够运行标准的容器镜像,它就可以通过实现 CRI 接入到 Kubernetes 项目当中。
2.而具体的容器运行时,比如 Docker 项目,则一般通过 OCI 这个容器运行时规范同底层的 Linux 操作系统进行交互,即:把 CRI 请求翻译成对 Linux 操作系统的调用(操作 Linux Namespace 和 Cgroups 等)。
3.此外,kubelet 还通过 gRPC 协议同一个叫作 Device Plugin 的插件进行交互。这个插件,是 Kubernetes 项目用来管理 GPU 等宿主机物理设备的主要组件,也是基于 Kubernetes 项目进行机器学习训练、高性能作业支持等工作必须关注的功能。
4.kubelet 的另一个重要功能,则是调用网络插件和存储插件为容器配置网络和持久化存储。这两个插件与 kubelet 进行交互的接口,分别是 CNI(Container Networking Interface)和 CSI(Container Storage Interface)。
所以说,kubelet完全是为了实现Kubernets项目对容器的管理能力而重新实现的一个组件。
-
Kubernetes部署
-
安装docker
-
Kubernetes从1.6开始使用CRI(Container Runtime Interface)容器运行时接口。默认的容器运行时仍然是Docker,是使用kubelet中内置dockershim CRI来实现的
apt-get remove docker-ce
apt autoremove
apt-get install docker-ce
启动docker:
systemctl enable docker
systemctl start docker
-
-
安装kubeadm,kubelet, kubectl
-
kubeadm: 引导启动k8s集群的命令行工具。
kubelet: 在群集中所有节点上运行的核心组件, 用来执行如启动pods和containers等操作。
kubectl: 操作集群的命令行工具。
首先添加apt-key:
sudo apt update && sudo apt install -y apt-transport-https curl

curl -s https://mirrors.aliyun.com/kubernetes/apt/doc/apt-key.gpg | sudo apt-key add -
添加kubernetes源:
sudo vim /etc/apt/sources.list.d/kubernetes.list

deb https://mirrors.aliyun.com/kubernetes/apt/ kubernetes-xenial main
安装:
sudo apt update
sudo apt install -y kubelet kubeadm kubectl
sudo apt-mark hold kubelet kubeadm kubectl
初始化Master节点
在初始化之前,我们还有以下几点需要注意:
1.选择一个网络插件,并检查它是否需要在初始化Master时指定一些参数,比如我们可能需要根据选择的插件来设置--pod-network-cidr参数。参考:Installing a pod network add-on。
2.kubeadm使用eth0的默认网络接口(通常是内网IP)做为Master节点的advertise address,如果我们想使用不同的网络接口,可以使用--apiserver-advertise-address=<ip-address>参数来设置。如果适应IPv6,则必须使用IPv6d的地址,如:--apiserver-advertise-address=fd00::101。
3.1.13版本中终于解决了在国内无法拉取国外镜像的痛点,其增加了一个--image-repository参数,默认值是k8s.gcr.io,我们将其指定为国内镜像地址:registry.aliyuncs.com/google_containers
4.我们还需要指定--kubernetes-version参数,因为它的默认值是stable-1,会导致从https://dl.k8s.io/release/stable-1.txt下载最新的版本号,我们可以将其指定为固定版本(最新版:v1.13.1)来跳过网络请求。
#kubeadm init --image-repository registry.aliyuncs.com/google_containers --kubernetes-version v1.13.1 --pod-network-cidr=192.168.0.0/16
[init] Using Kubernetes version: v1.13.1
[preflight] Running pre-flight checks
[WARNING SystemVerification]: this Docker version is not on the list of validated versions: 18.09.0. Latest validated version: 18.06
[preflight] Pulling images required for setting up a Kubernetes cluster
[preflight] This might take a minute or two, depending on the speed of your internet connection
[preflight] You can also perform this action in beforehand using 'kubeadm config images pull'
[kubelet-start] Writing kubelet environment file with flags to file "/var/lib/kubelet/kubeadm-flags.env"
[kubelet-start] Writing kubelet configuration to file "/var/lib/kubelet/config.yaml"
[kubelet-start] Activating the kubelet service
[certs] Using certificateDir folder "/etc/kubernetes/pki"
[certs] Generating "etcd/ca" certificate and key
[certs] Generating "etcd/server" certificate and key
[certs] etcd/server serving cert is signed for DNS names [fn004 localhost] and IPs [121.197.130.187 127.0.0.1 ::1]
[certs] Generating "etcd/peer" certificate and key
[certs] etcd/peer serving cert is signed for DNS names [fn004 localhost] and IPs [121.197.130.187 127.0.0.1 ::1]
[certs] Generating "apiserver-etcd-client" certificate and key
[certs] Generating "etcd/healthcheck-client" certificate and key
[certs] Generating "ca" certificate and key
[certs] Generating "apiserver-kubelet-client" certificate and key
[certs] Generating "apiserver" certificate and key
[certs] apiserver serving cert is signed for DNS names [fn004 kubernetes kubernetes.default kubernetes.default.svc kubernetes.default.svc.cluster.local] and IPs [10.96.0.1 121.197.130.187]
[certs] Generating "front-proxy-ca" certificate and key
[certs] Generating "front-proxy-client" certificate and key
[certs] Generating "sa" key and public key
[kubeconfig] Using kubeconfig folder "/etc/kubernetes"
[kubeconfig] Writing "admin.conf" kubeconfig file
[kubeconfig] Writing "kubelet.conf" kubeconfig file
[kubeconfig] Writing "controller-manager.conf" kubeconfig file
[kubeconfig] Writing "scheduler.conf" kubeconfig file
[control-plane] Using manifest folder "/etc/kubernetes/manifests"
[control-plane] Creating static Pod manifest for "kube-apiserver"
[control-plane] Creating static Pod manifest for "kube-controller-manager"
[control-plane] Creating static Pod manifest for "kube-scheduler"
[etcd] Creating static Pod manifest for local etcd in "/etc/kubernetes/manifests"
[wait-control-plane] Waiting for the kubelet to boot up the control plane as static Pods from directory "/etc/kubernetes/manifests". This can take up to 4m0s
[apiclient] All control plane components are healthy after 21.504803 seconds
[uploadconfig] storing the configuration used in ConfigMap "kubeadm-config" in the "kube-system" Namespace
[kubelet] Creating a ConfigMap "kubelet-config-1.13" in namespace kube-system with the configuration for the kubelets in the cluster
[patchnode] Uploading the CRI Socket information "/var/run/dockershim.sock" to the Node API object "fn004" as an annotation
[mark-control-plane] Marking the node fn004 as control-plane by adding the label "node-role.kubernetes.io/master=''"
[mark-control-plane] Marking the node fn004 as control-plane by adding the taints [node-role.kubernetes.io/master:NoSchedule]
[bootstrap-token] Using token: b0x4dv.nbut63ktiaikcc24
[bootstrap-token] Configuring bootstrap tokens, cluster-info ConfigMap, RBAC Roles
[bootstraptoken] configured RBAC rules to allow Node Bootstrap tokens to post CSRs in order for nodes to get long term certificate credentials
[bootstraptoken] configured RBAC rules to allow the csrapprover controller automatically approve CSRs from a Node Bootstrap Token
[bootstraptoken] configured RBAC rules to allow certificate rotation for all node client certificates in the cluster
[bootstraptoken] creating the "cluster-info" ConfigMap in the "kube-public" namespace
[addons] Applied essential addon: CoreDNS
[addons] Applied essential addon: kube-proxy

Your Kubernetes master has initialized successfully!

To start using your cluster, you need to run the following as a regular user:

mkdir -p $HOME/.kube
sudo cp -i /etc/kubernetes/admin.conf $HOME/.kube/config
sudo chown $(id -u):$(id -g) $HOME/.kube/config

You should now deploy a pod network to the cluster.
Run "kubectl apply -f [podnetwork].yaml" with one of the options listed at:
https://kubernetes.io/docs/concepts/cluster-administration/addons/

You can now join any number of machines by running the following on each node
as root:

kubeadm join [公网IP]:6443 --token b0x4dv.nbut63ktiaikcc24 --discovery-token-ca-cert-hash sha256:551fe78b50dfe52410869685b7dc70b9a27e550241a6112d8d1fef2073759bb4
如果init出现了错误,需要重新init的时候,可以 #kubeadm reset 重新初始化集群。
接着执行:
mkdir -p $HOME/.kube
cp -i /etc/kubernetes/admin.conf $HOME/.kube/config
chown $(id -u):$(id -g) $HOME/.kube/config
kubectl get pods --all-namespaces //可以看到coredns的状态是pending,这事因为我们还没有安装网络插件

Calico是一个纯三层的虚拟网络方案,Calico 为每个容器分配一个 IP,每个 host 都是 router,把不同 host 的容器连接起来。与 VxLAN 不同的是,Calico 不对数据包做额外封装,不需要 NAT 和端口映射,扩展性和性能都很好。
默认情况下,Calico网络插件使用的的网段是192.168.0.0/16,在init的时候,我们已经通过--pod-network-cidr=192.168.0.0/16来适配Calico,当然你也可以修改calico.yml文件来指定不同的网段。
可以使用如下命令命令来安装Canal插件:
安装calico网络组件
kubectl apply -f https://docs.projectcalico.org/v3.3/getting-started/kubernetes/installation/hosted/rbac-kdd.yaml
kubectl apply -f https://docs.projectcalico.org/v3.3/getting-started/kubernetes/installation/hosted/kubernetes-datastore/calico-networking/1.7/calico.yaml

上图出现了拉取镜像失败的情况,可以通过systemctl status kubelet 查看报错原因,正确的结果如下:
NAMESPACE     NAME                                READY   STATUS    RESTARTS   AGE
kube-system   calico-node-wdgl5                   2/2     Running   0          90s
kube-system   coredns-78d4cf999f-jvxv9            1/1     Running   0          27m
kube-system   coredns-78d4cf999f-lmhdj            1/1     Running   0          27m
kube-system   etcd-fn004                      1/1     Running   0          26m
kube-system   kube-apiserver-fn004            1/1     Running   0          26m
kube-system   kube-controller-manager-fn004   1/1     Running   0          26m
kube-system   kube-proxy-rkzkc                    1/1     Running   0          27m
kube-system   kube-scheduler-fn004            1/1     Running   0          27m
以上就部署完了一个master节点,接下来就可以加入worker节点并进行测试了。
Master隔离
默认情况下,由于安全原因,集群并不会将pods部署在Master节点上。但是在开发环境下,我们可能就只有一个Master节点,这时可以使用下面的命令来解除这个限制:
kubectl taint nodes --all node-role.kubernetes.io/master-

加入worker节点
登录另外一台机器B:
直接执行:kubeadm join [masterIP]:6443 --token b0x4dv.nbut63ktiaikcc24 --discovery-token-ca-cert-hash sha256:551fe78b50dfe52410869685b7dc70b9a27e550241a6112d8d1fef2073759bb4
root@xxxx:/etc/kubernetes# kubeadm join [master_ip]:6443 --token b0x4dv.nbut63ktiaikcc24 --discovery-token-ca-cert-hash sha256:551fe78b50dfe52410869685b7dc70b9a27e550241a6112d8d1fef2073759bb4
[preflight] Running pre-flight checks
        [WARNING SystemVerification]: this Docker version is not on the list of validated versions: 18.09.0. Latest validated version: 18.06
[discovery] Trying to connect to API Server "master_ip:6443"
[discovery] Created cluster-info discovery client, requesting info from "https://master_ip:6443"
[discovery] Requesting info from "https://master_ip:6443" again to validate TLS against the pinned public key
[discovery] Cluster info signature and contents are valid and TLS certificate validates against pinned roots, will use API Server "master_ip:6443"
[discovery] Successfully established connection with API Server "master_ip:6443"
[join] Reading configuration from the cluster...
[join] FYI: You can look at this config file with 'kubectl -n kube-system get cm kubeadm-config -oyaml'
[kubelet] Downloading configuration for the kubelet from the "kubelet-config-1.13" ConfigMap in the kube-system namespace
[kubelet-start] Writing kubelet configuration to file "/var/lib/kubelet/config.yaml"
[kubelet-start] Writing kubelet environment file with flags to file "/var/lib/kubelet/kubeadm-flags.env"
[kubelet-start] Activating the kubelet service
[tlsbootstrap] Waiting for the kubelet to perform the TLS Bootstrap...
[patchnode] Uploading the CRI Socket information "/var/run/dockershim.sock" to the Node API object "fn001" as an annotation

This node has joined the cluster:
* Certificate signing request was sent to apiserver and a response was received.
* The Kubelet was informed of the new secure connection details.

Run 'kubectl get nodes' on the master to see this node join the cluster.
在master节点可以用#kubeadm token list 查看token.
等 一会儿就可以在master节点查看节点状态:

测试
首先验证kube-apiserver, kube-controller-manager, kube-scheduler, pod network 是否正常:
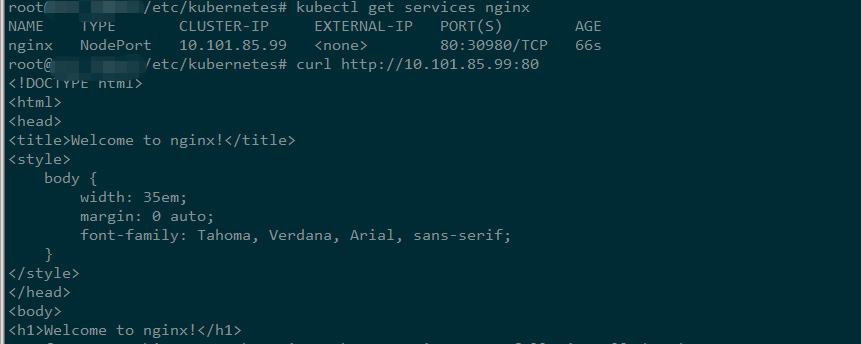
kubectl create deployment nginx --image=nginx:alpine   //部署一个nginx,包含2个pod
kubectl scale deployment nginx --replicas=2
kubectl get pods -l app=nginx -o wide  //验证nginx pod是否运行,会分配2个192.168.开头的集群IP
kubectl expose deployment nginx --port=80 --type=NodePort  //以nodePort 方式对外提供服务
kubectl get services nginx   //查看集群外可访问的Port
错误解决:
systemctl status kubelet //报错是因为配置文件人为被修改了,导致重启始终不成功。以下配置文件使用1.13的版本。供参考。
出现如下报错:
kubelet[12305]: Flag --cgroup-driver has been deprecated, This parameter should be set via the config file specified by the Kubelet's --config flag. S
systemd[1]: kubelet.service: Service lacks both ExecStart= and ExecStop= setting. Refusing.
需要检查/etc/systemd/system/kubelet.service.d/10-kubeadm.conf /lib/systemd/system/kubelet.service 这2个配置文件是否正确生成。正确配置如下:
vim /etc/systemd/system/kubelet.service.d/10-kubeadm.conf
# Note: This dropin only works with kubeadm and kubelet v1.11+
[Service]
Environment="KUBELET_KUBECONFIG_ARGS=--bootstrap-kubeconfig=/etc/kubernetes/bootstrap-kubelet.conf --kubeconfig=/etc/kubernetes/kubelet.conf"
Environment="KUBELET_CONFIG_ARGS=--config=/var/lib/kubelet/config.yaml"
# This is a file that "kubeadm init" and "kubeadm join" generates at runtime, populating the KUBELET_KUBEADM_ARGS variable dynamically
EnvironmentFile=-/var/lib/kubelet/kubeadm-flags.env
# This is a file that the user can use for overrides of the kubelet args as a last resort. Preferably, the user should use
# the .NodeRegistration.KubeletExtraArgs object in the configuration files instead. KUBELET_EXTRA_ARGS should be sourced from this file.
EnvironmentFile=-/etc/default/kubelet
ExecStart=
ExecStart=/usr/bin/kubelet $KUBELET_KUBECONFIG_ARGS $KUBELET_CONFIG_ARGS $KUBELET_KUBEADM_ARGS $KUBELET_EXTRA_ARGS
vim /lib/systemd/system/kubelet.service
[Unit]
Description=kubelet: The Kubernetes Node Agent
Documentation=https://kubernetes.io/docs/home/

[Service]
ExecStart=/usr/bin/kubelet
Restart=always
StartLimitInterval=0
RestartSec=10

[Install]
WantedBy=multi-user.target
参考链接:
https://kubernetes.io/docs/concepts/overview/what-is-kubernetes/