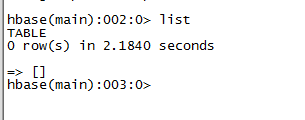
一、概述
理解为hadoop中的key-value存储,数据按列存储,基于HDFS和Zookeeper
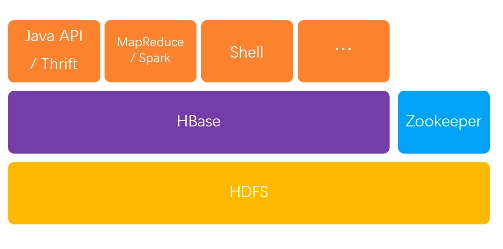
1.应用
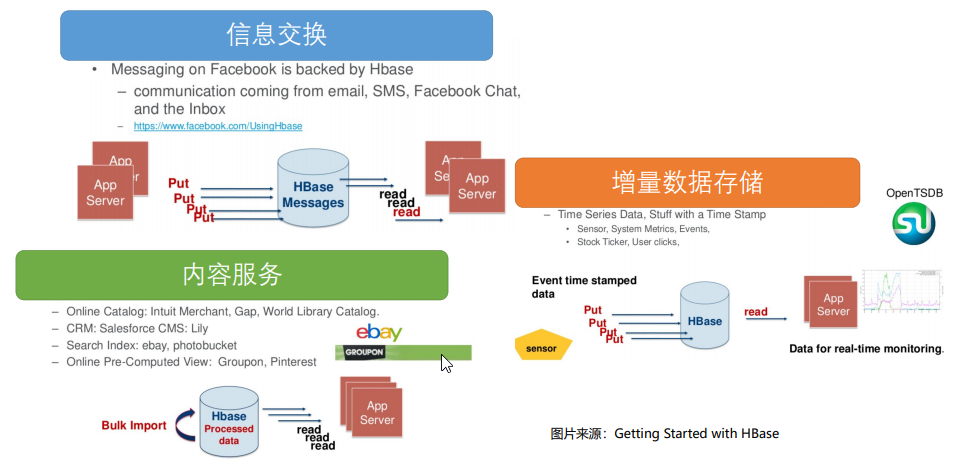
2.场景
适用场景:
- 存储格式:半结构化数据,结构化数据存储,Key-Value存储
- 数据版本:固定集合(多版本),定时删除(TTL)
- 更新:列族结构经常调整
- 写Pattern:高并发写入
不适用场景:
- 事务
- 复杂查询Operator:Join,Union,Group By
- 索引支持:不按照rowkey查询数据
- 读Pattern:高并发随机读
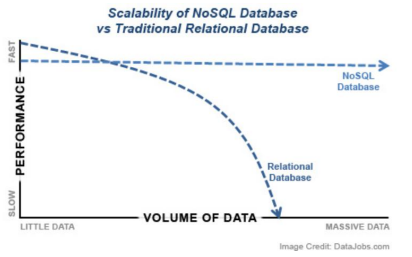
NoSQL线性扩展的功能,数据多了之后,可以不断增加机器
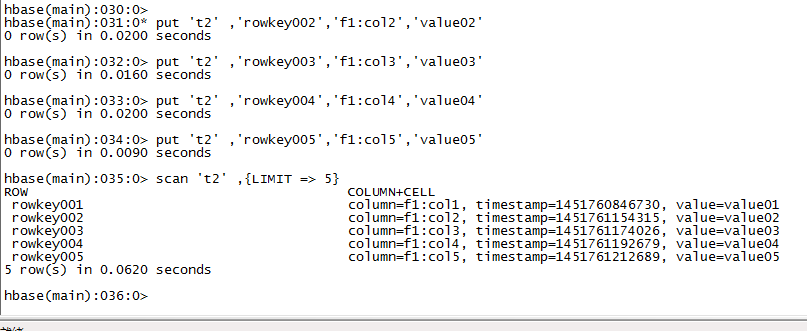
3.基本操作
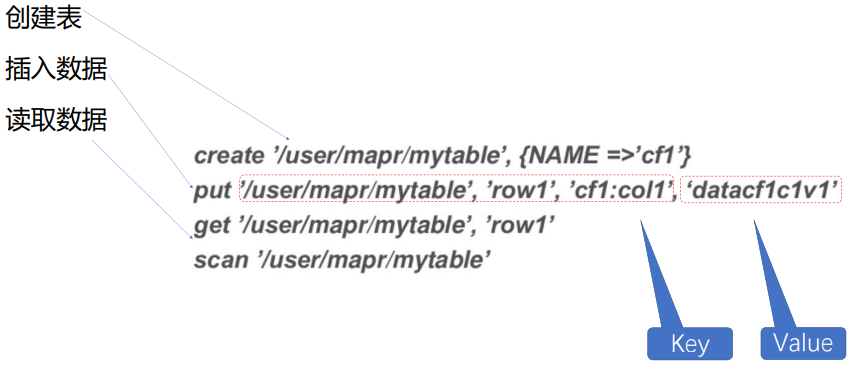
{NAME=>'cf1'} 列簇
row1 行号
cf1:col1 列簇下的列名


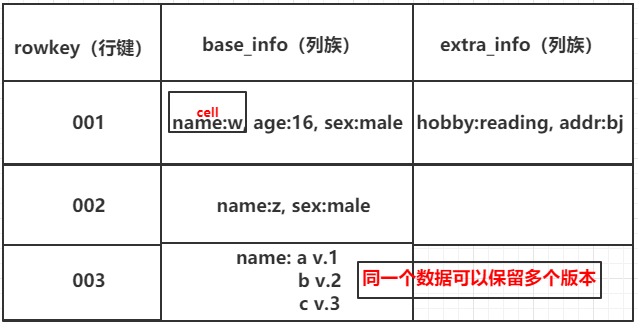
表结构
二、原理、架构与基本组件

HBase是主从结构,主是HMaster,从是RegionServer
HMaster统揽全局
当Client有读写请求的时候,HMaster去Zookeeper中查询表存在哪些节点上,将这些读写路由到Region Server上。client真的读写数据的时候,是和具体数据所在的节点上的Region Server打交道的,Region Server是真正支持读写请求的。HMaster,某节点上数据多了,能否切分到其他节点上,进行这些数据切分与合并的工作。
Zookeeper存储表在哪些节点的元信息,如果有多个HMaster,zookeeper决定哪个节点是真正的老大,哪些节点是备份。
HDFS,最终读写落实到磁盘上,是HDFS文件
1.细化

2.RDBMS行存储和Hbase列存储比较
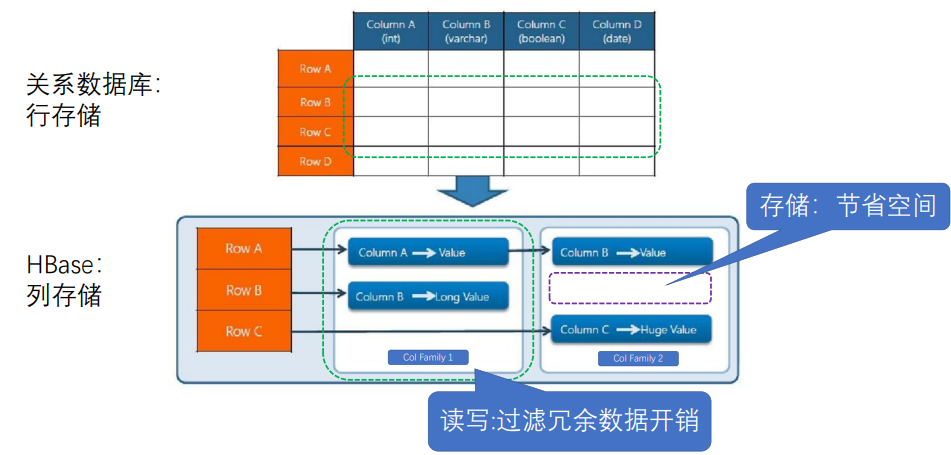
关系型数据库:每一行对应多列,相邻行是连续存储的
HBase:列存储,各列簇可能不在一起
3.数据模型
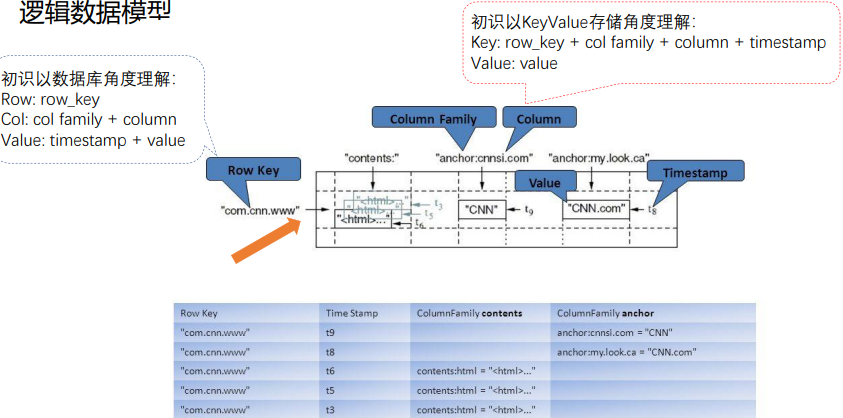
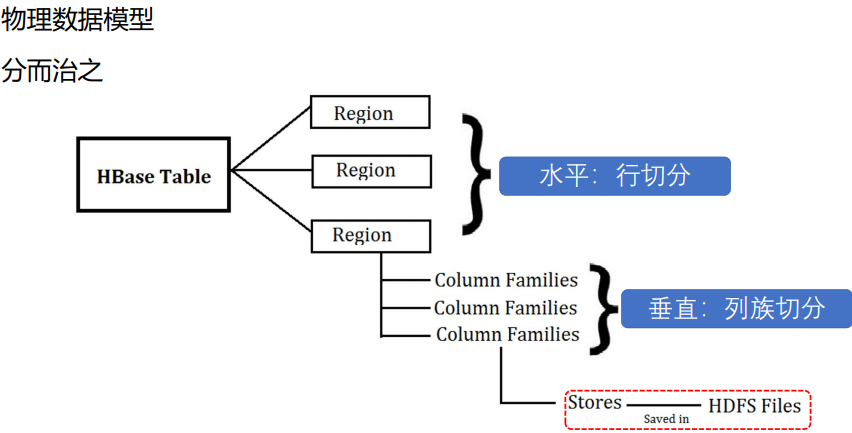
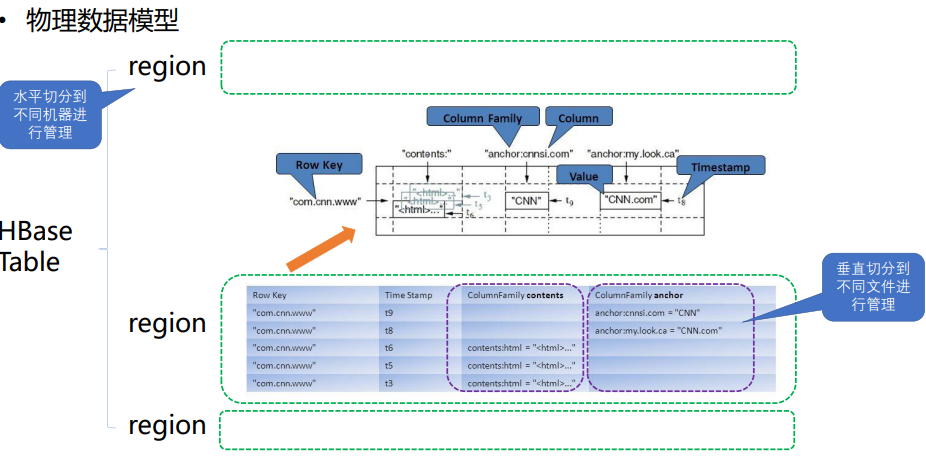
table中的所有行都按照row key的字典序排列。
table 在行的方向上分割为多个Hregion。

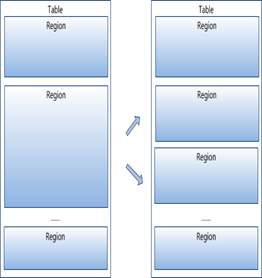
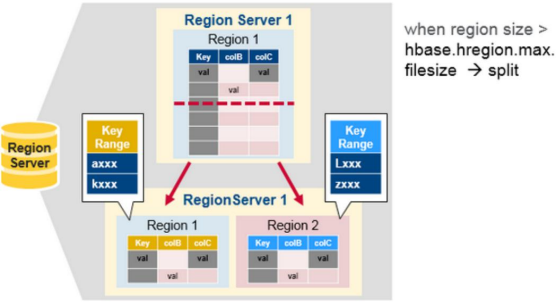
region按大小分割的,每个表一开始只有一个region,随着数据不断插入表,region不断增大,当增大到一个阀值的时候,Hregion就会等分会两个新的Hregion。当table中的行不断增多,就会有越来越多的Hregion。
HRegion虽然是分布式存储的最小单元,但并不是存储的最小单元。
事实上,HRegion由一个或者多个Store组成,每个store保存一个columns family。
每个Strore又由一个memStore和0至多个StoreFile组成。
如图:StoreFile以HFile格式保存在HDFS上。

HDFS查看HBase相关数据
[root@k8s-node2 bin]# hadoop dfs -ls /user/hbase/
DEPRECATED: Use of this script to execute hdfs command is deprecated.
Instead use the hdfs command for it.

Found 12 items
drwxr-xr-x   - root supergroup          0 2020-04-29 08:54 /user/hbase/.hbck
drwxr-xr-x   - root supergroup          0 2020-05-19 05:40 /user/hbase/.tmp
drwxr-xr-x   - root supergroup          0 2020-05-20 03:56 /user/hbase/MasterProcWALs
drwxr-xr-x   - root supergroup          0 2020-05-18 20:56 /user/hbase/WALs
drwxr-xr-x   - root supergroup          0 2020-05-19 15:26 /user/hbase/archive
drwxr-xr-x   - root supergroup          0 2020-04-29 08:54 /user/hbase/corrupt
drwxr-xr-x   - root supergroup          0 2020-04-29 09:05 /user/hbase/data
-rw-r--r--   3 root supergroup         42 2020-04-29 08:54 /user/hbase/hbase.id
-rw-r--r--   3 root supergroup          7 2020-04-29 08:53 /user/hbase/hbase.version
drwxr-xr-x   - root supergroup          0 2020-04-29 08:54 /user/hbase/mobdir
drwxr-xr-x   - root supergroup          0 2020-05-20 03:57 /user/hbase/oldWALs
drwx--x--x   - root supergroup          0 2020-04-29 08:54 /user/hbase/staging
hbase.id文件记录了hbase的id
hbase.version记录了hbase的版本,是一个二进制文件
.tmp是临时目录,是一个空目录
MasterProcWALs目录下含有一个HMaster主节点状态日志文件
WALs日志目录
oldWALs hbase操作相关的旧日志存放目录
data目录是最重要的目录,存储hbase数据,下面含有两个命名空间default和hbase,其中default是默认命名空间,如果创建的表未指定命名空间,将存放在该命名空间下,habse是系统命名空间,他们分别对应default和hbase目录,如果不创建表default目录为空
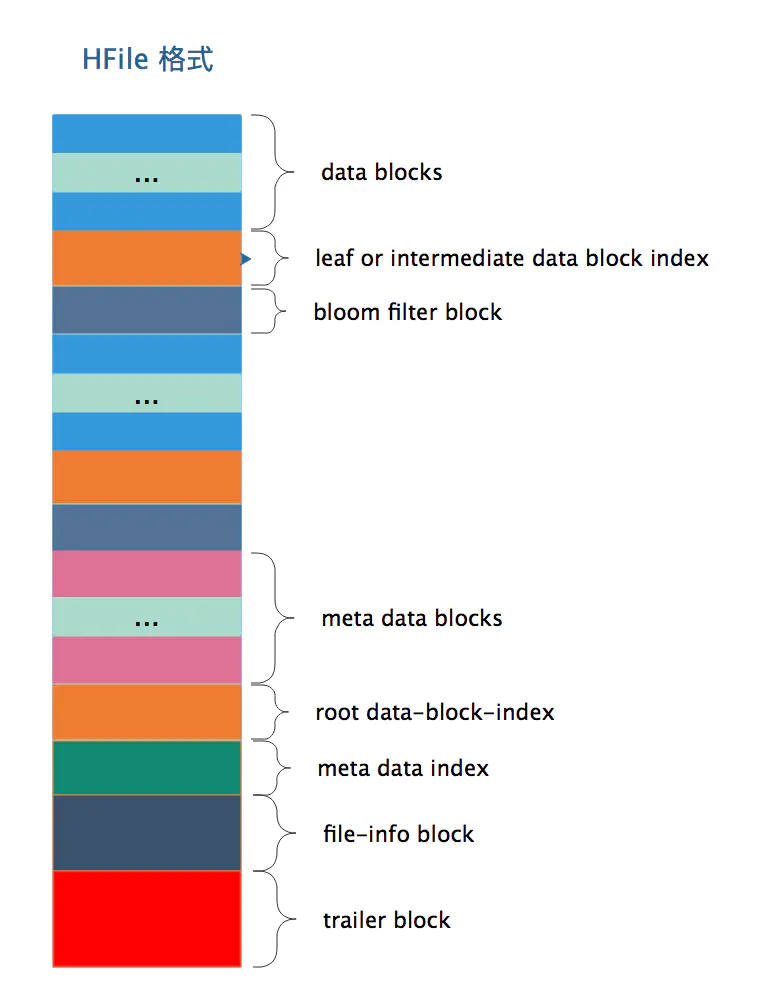
如上图所示,一个HFile内容是由一个个block组成的,按照block类型可分为:
- datablock 存放的key-value数据,一般一个datablock大小默认为64KB,
- data index block,其中存放的是datablock的index,索引可以是多级索引,中间索引,叶子索引一般会分布在HFile文件当中。root 索引位置见图中 root data-block-index
- bloom filter block, 保存了bloom过滤器的值
- meta data block,meta data block有多个,且连续分布,见图中meta data block
- Data Index和Meta Index块记录了每个Data块和Meta块的起始点
- file-info block, 其中记录了关于文件的一些信息,比如:HFile中最大的key、平均Key长度、HFile创建时间戳、data block使用的编码方式等等
- trailer block,每个HFile文件都会有的,对于不同版本的HFile(有V1,V2,V3三个版本,V2和V3相差不大)来说trailer长度可能不一样,但是同一个版本的所有HFile trailer的长度都是一样长的,并且trailer的最后4B一定是版本信息
从上图可以看出在meta data block之前,datablock、bloom filter block,叶子/中间层data block索引是相间分布的,meta block之后就不会再有data block了

每个Data Block除了开头的Magic以外就是一个个KeyValue对拼接而成, Magic内容就是一些随机数字,目的是防止数据损坏

KeyLength和ValueLength:两个固定的长度,分别代表Key和Value的长度
Key部分:
Row Length是固定长度的数值,表示RowKey的长度
Row就是RowKey
Column Family Length是固定长度的数值,表示Family的长度
接着就是Column Family,再接着是Qualifier
然后是两个固定长度的数值,表示Time Stamp和Key Type(Put/Delete)
Value部分:
没有这么复杂的结构,就是纯粹的二进制数据
查看Hfile文件
该文件存储在HDFS中,找到存储路径
[root@k8s-node2 bin]# hadoop dfs -ls /user/hbase/data/default/peoples/1c200c07ab5a9d6001a8ab09930a05dd
DEPRECATED: Use of this script to execute hdfs command is deprecated.
Instead use the hdfs command for it.

Found 6 items
-rw-r--r--   3 root supergroup         42 2020-05-17 02:49 /user/hbase/data/default/peoples/1c200c07ab5a9d6001a8ab09930a05dd/.regioninfo
drwxr-xr-x   - root supergroup          0 2020-05-18 22:00 /user/hbase/data/default/peoples/1c200c07ab5a9d6001a8ab09930a05dd/.tmp
drwxr-xr-x   - root supergroup          0 2020-05-19 15:20 /user/hbase/data/default/peoples/1c200c07ab5a9d6001a8ab09930a05dd/contactinfo
drwxr-xr-x   - root supergroup          0 2020-05-19 15:20 /user/hbase/data/default/peoples/1c200c07ab5a9d6001a8ab09930a05dd/name
drwxr-xr-x   - root supergroup          0 2020-05-19 15:20 /user/hbase/data/default/peoples/1c200c07ab5a9d6001a8ab09930a05dd/personalinfo
drwxr-xr-x   - root supergroup          0 2020-05-18 20:56 /user/hbase/data/default/peoples/1c200c07ab5a9d6001a8ab09930a05dd/recovered.edits
[root@k8s-node2 bin]# hadoop dfs -ls /user/hbase/data/default/peoples/1c200c07ab5a9d6001a8ab09930a05dd/name
上面name等标黄的都是列族名,里面是HFile文件
hadoop dfs -ls /user/hbase/data/default/peoples/1c200c07ab5a9d6001a8ab09930a05dd/name
DEPRECATED: Use of this script to execute hdfs command is deprecated.
Instead use the hdfs command for it.

Found 1 items
-rw-r--r--   3 root supergroup       7221 2020-05-19 15:20 /user/hbase/data/default/peoples/1c200c07ab5a9d6001a8ab09930a05dd/name/779e4a6e0170419093d300a2911a95b5
该文件是二进制的无法直接查看,hbase为我们提供了工具
[root@k8s-node2 bin]# ./hbase org.apache.hadoop.hbase.io.hfile.HFile -e -p -f /user/hbase/data/default/peoples/1c200c07ab5a9d6001a8ab09930a05dd/name/779e4a6e0170419093d300a2911a95b5
SLF4J: Class path contains multiple SLF4J bindings.
SLF4J: Found binding in [jar:file:/bigdata/hadoop-2.9.2/share/hadoop/common/lib/slf4j-log4j12-1.7.25.jar!/org/slf4j/impl/StaticLoggerBinder.class]
SLF4J: Found binding in [jar:file:/bigdata/hbase-2.2.4/lib/client-facing-thirdparty/slf4j-log4j12-1.7.25.jar!/org/slf4j/impl/StaticLoggerBinder.class]
SLF4J: See http://www.slf4j.org/codes.html#multiple_bindings for an explanation.
SLF4J: Actual binding is of type [org.slf4j.impl.Log4jLoggerFactory]

K: 0/name:first/1589857087753/Put/vlen=6/seqid=24 V: Marcel
K: 0/name:last/1589857087753/Put/vlen=6/seqid=24 V: Haddad
K: 1/name:first/1589857087803/Put/vlen=8/seqid=25 V: Franklin
K: 1/name:last/1589857087803/Put/vlen=5/seqid=25 V: Holtz
K: 1/name:name1/1589855012535/Put/vlen=2/seqid=23 V: ww
...
K代表key,V代表value
1/name:name1/1589855012535/Put/vlen=2/seqid=23

keyrow/family:column/timestamp/datatype/valuelength/seqid
Java API中提供了Cell接口,每个cell实质都是keyvalue对,可以看成keyrow+family+column+timestamp,KeyValue类实现了Cell接口
4.KV存储引擎 LSM Tree
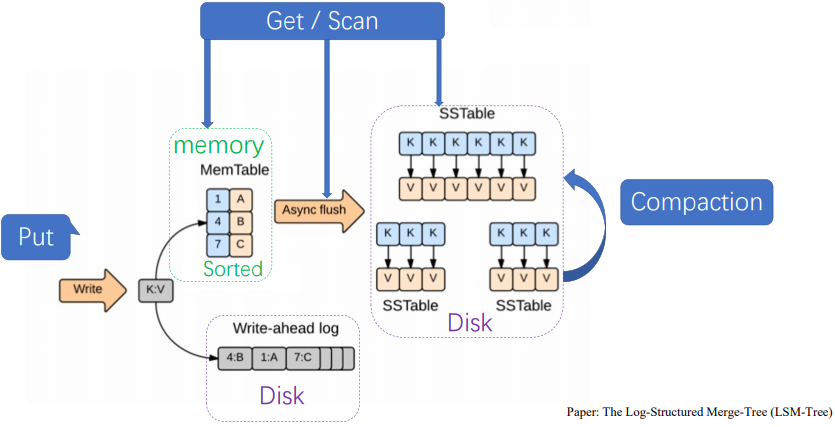
5.存储引擎组件及作用
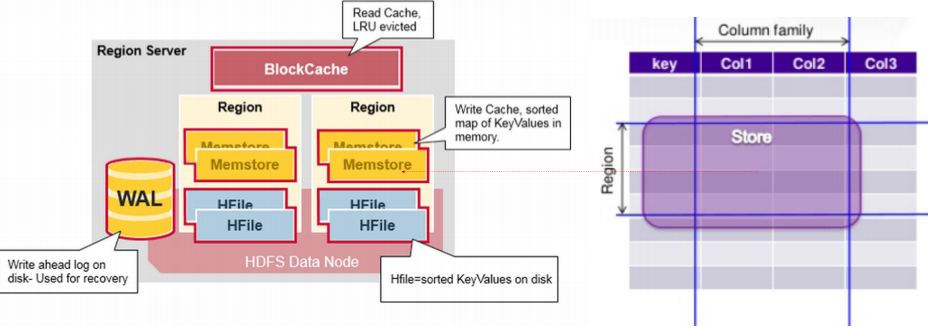
6.写入与读取

客户端写keyvalue的数据,首先请求到regionserver,先落盘写Write Ahead log,成功则写入Memstore,写入完成后,会定期将Memstore信息通过compaction合并到HFile,写可能落到region1也可能落到region2
client根据master路由到不同的region上,先在Memstore里读,若有,直接返回,若没有,找对应的HFile,先从最新的HFile读,一层层读到最老的
HLog(WAL log)
WAL 意为Write ahead log(http://en.wikipedia.org/wiki/Write-ahead_logging),类似mysql中的binlog,用来做灾难恢复只用,Hlog记录数据的所有变更。在分布式系统环境中,无法避免系统出错或者宕机,一旦HRegionServer以外退出,MemStore中的内存数据就会丢失,引入HLog就是防止这种情况
每个Region Server维护一个Hlog,而不是每个Region一个。这样不同region(来自不同table)的日志会混在一起,这样做的目的是不断追加单个文件相对于同时写多个文件而言,可以减少磁盘寻址次数,因此可以提高对table的写性能。带来的麻烦是,如果一台region server下线,为了恢复其上的region,需要将region server上的log进行拆分,然后分发到其它region server上进行恢复。
每次用户操作写入Memstore的同时,也会写一份数据到HLog文件,HLog文件定期会滚动出新,并删除旧的文件(已持久化到StoreFile中的数据)。当HRegionServer意外终止后,HMaster会通过Zookeeper感知,HMaster首先处理遗留的HLog文件,将不同region的log数据拆分,分别放到相应region目录下,然后再将失效的region重新分配,领取到这些region的HRegionServer在Load Region的过程中,会发现有历史HLog需要处理,因此会Replay HLog中的数据到MemStore中,然后flush到StoreFiles,完成数据恢复。
7.写入顺序
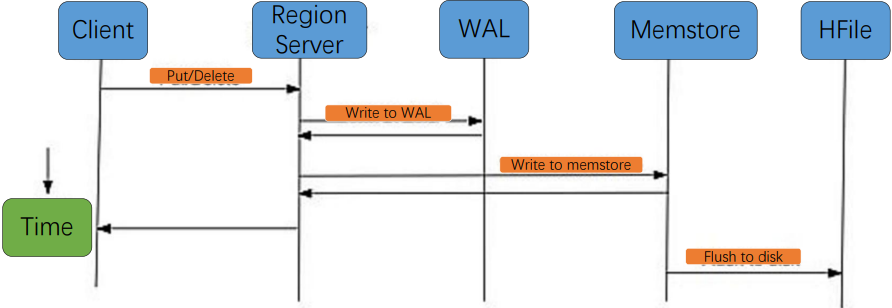

- WAL:数据被发出之后第一时间被写入WAL。由于WAL是基于HDFS来实现的,所以也可以说现在cell就已经被持久化了,但是WAL只是一个暂存的日志,它是不区分Store的。这些数据是不能被直接读取和使用
- Memstore:数据随后会立即被放入Memstore中进行整理。Memstore会负责按照LSM树的结构来存放数据。这个过程就像我们在打牌的时候,抓牌之后在手上对牌进行整理的过程。
- HFile:最后当Memstore到达一定的大小阈值,或者达到了刷写时间间隔阀值的时候,HBaes会把这个Memstore的内容刷写到HDFS上一个新的HFile文件。至此数据真正地被持久化到硬盘上,就算宕机、断电数据也不会丢失了。
HBase minor and major compaction
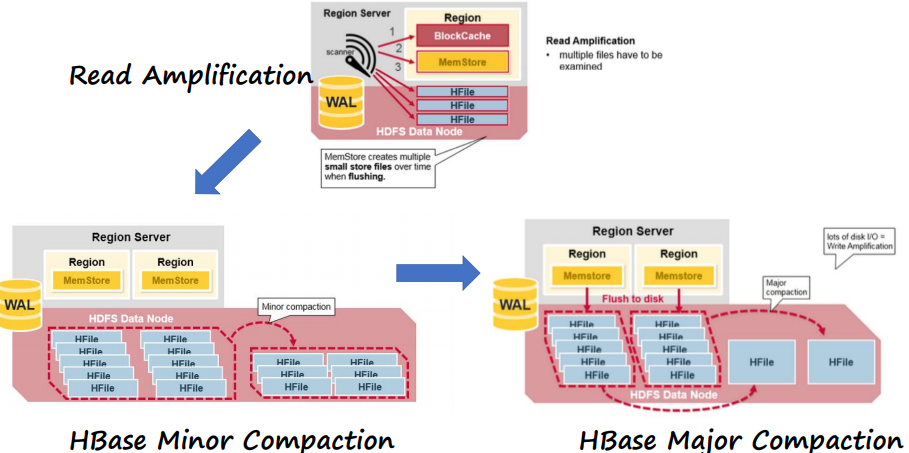
写的越来越多的时候,会出现写放大,不断写,不断compaction,磁盘上产生了大量的HFile,MemStore产生了太多的小的文件,于是,读的时候,大量的HFile文件都要读一遍,造成大量小文件读的问题。
通过合并小文件解决
Major Compaction最激进的是把所有HFile都合并成一个。这种合并过程中要大量归并排序,进行大量IO,造成在线服务一段时间不能运行,放在夜里等时间做
Minor Copaction,将部分HFile合并成部分大的HFile
8.Region Size过大Region Split
9.容错性
进程组件Master/Region Server
zookeeper replication持久化元数据信息副本
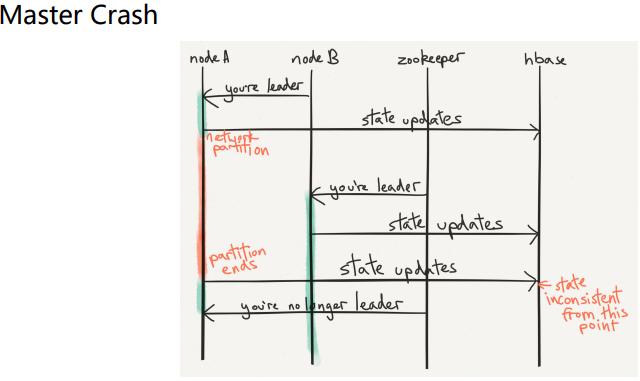
HA:zookeeper leader election of Master
数据
WAL 持久化操作,保证memstore数据可以通过replay恢复
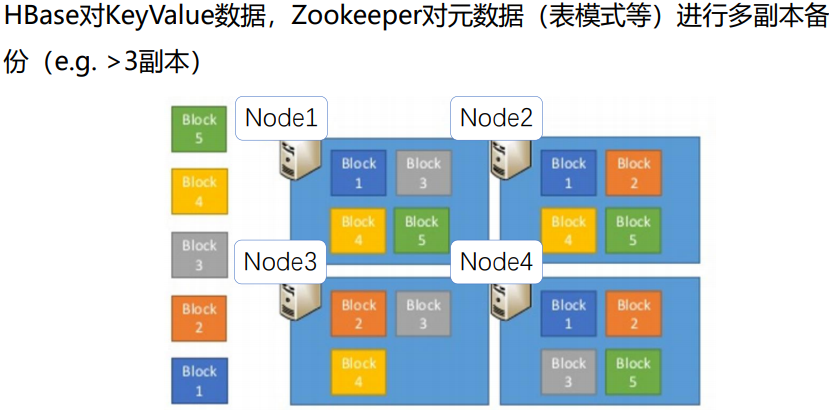
HDFS replication持久化数据多副本,保证丢失File可以被恢复

10.Replication
11.Crash Recovery

12.Leader Election
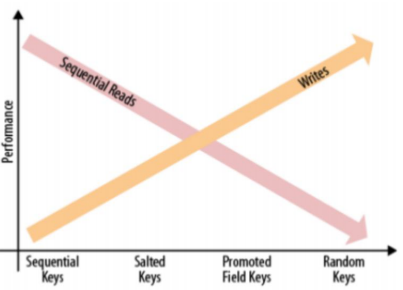
13.RowKey设计
HBase设计适合读写Pattern的key,数据负载均衡与高效顺序(Scan)读取时常矛盾
- Sequential Keys
- Saulted Keys
- Promoted field Keys
- Hash Keys
三、分布式集群部属
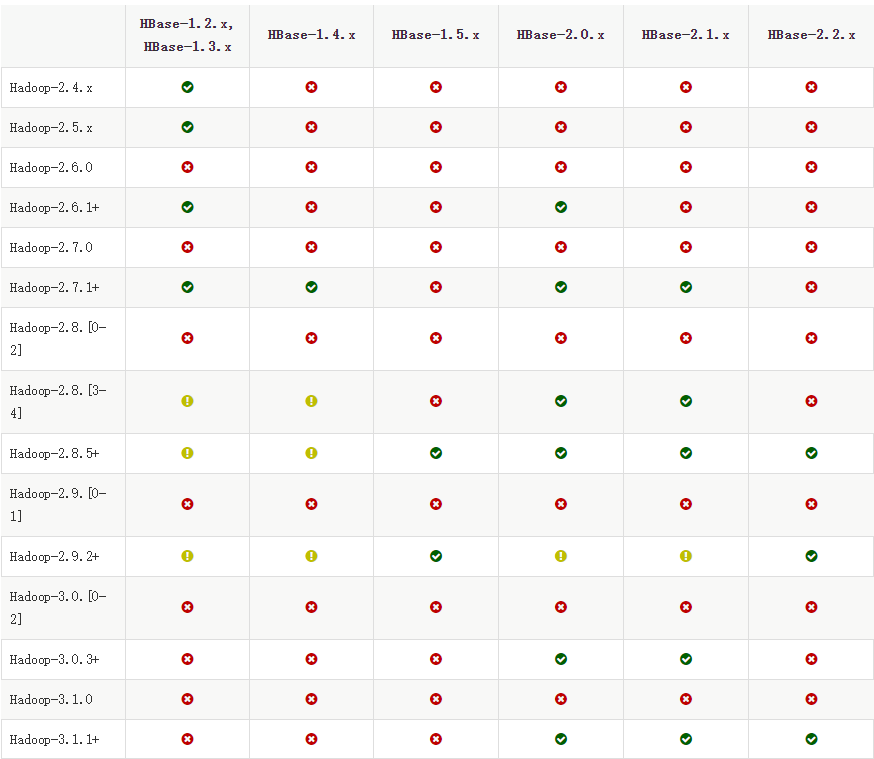
HBase和Hadoop版本兼容性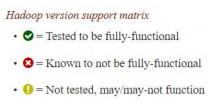
主要目录结构
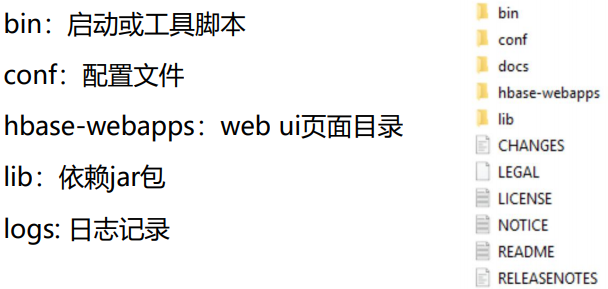
bin目录主要脚本
| *.rb |
工具脚本 运行方式:hbase-jruby脚本 参数 |
| hbase-cleanup.sh | 删除zk或hdfs内容 |
| hbase | 最终被调用脚本 |
| hbase-config.sh | 启动环境配置脚本,一般不直接调用 |
| hbase-daemon.sh | 组件启动脚本 |
conf目录主要配置文件
| hbase-env.sh | 环境变量配置 |
| hbase-site.xml | 运行参数配置 |
| log4j.properties | log配置 |
Shell
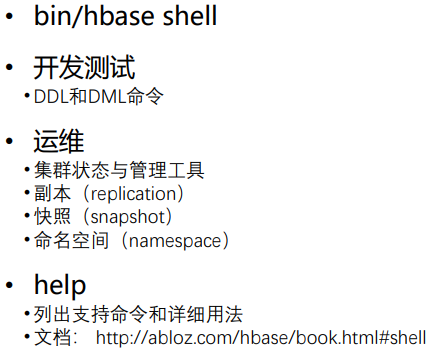
HBase shell example

命令
| alter | 修改列族(column family)模式 |
| count | 统计表中行的数量 |
| create | 创建表 |
| describe | 显示表相关的详细信息 |
| delete | 删除指定对象的值(可以为表,行,列对应的值,另外也可以指定时间戳的值) |
| deleteall | 删除指定行的所有元素值 |
| disable | 使表无效 |
| drop | 删除表 |
| enable | 使表有效 |
| exists | 测试表是否存在 |
| exit | 退出hbase shell |
| get | 获取行或单元(cell)的值 |
| incr | 增加指定表,行或列的值 |
| list | 列出hbase中存在的所有表 |
| put | 向指向的表单元添加值 |
| tools | 列出hbase所支持的工具 |
| scan | 通过对表的扫描来获取对用的值 |
| status | 返回hbase集群的状态信息 |
| shutdown | 关闭hbase集群(与exit不同) |
| truncate | 重新创建指定表 |
| version | 返回hbase版本信息 |
表的管理
1)通过list可以列出所有已创建的表(除-ROOT表和.META表(被过滤掉了))hbase(main)> list
2)创建表,其中t1是表名,f1、f2是t1的列族。hbase中的表至少有一个列族.它们之中,列族直接影响hbase数据存储的物理特性。
# 语法:create <table>, {NAME => <family>, VERSIONS => <VERSIONS>}
# 例如:创建表t1,有两个family name:f1,f2,且版本数均为2hbase(main)> create 't1',{NAME => 'f1', VERSIONS => 2},{NAME => 'f2', VERSIONS => 2}
3)删除表
分两步:首先disable,然后drop
例如:删除表t1
hbase(main)> disable 't1'hbase(main)> drop 't1'
4)查看表的结构
# 语法:describe(desc) <table> (可以看到这个表的所有默认参数)
# 例如:查看表t1的结构hbase(main)> describe 't1' / desc 't1'
5)修改表结构
修改表结构必须先disable
# 语法:alter 't1', {NAME => 'f1'}, {NAME => 'f2', METHOD => 'delete'}
# 例如:修改表test1的cf的TTL为180天
hbase(main)> disable 'test1'
hbase(main)> alter 'test1',{NAME=>'body',TTL=>'15552000'},{NAME=>'meta', TTL=>'15552000'}hbase(main)> enable 'test1'
权限管理
1)分配权限
# 语法 : grant <user> <permissions> <table> <column family> <column qualifier> 参数后面用逗号分隔
# 权限用五个字母表示: "RWXCA".
# READ('R'), WRITE('W'), EXEC('X'), CREATE('C'), ADMIN('A')
# 例如,给用户‘test'分配对表t1有读写的权限,
hbase(main)> grant 'test','RW','t1'
2)查看权限
# 语法:user_permission <table>
# 例如,查看表t1的权限列表
hbase(main)> user_permission 't1'
3)收回权限
# 与分配权限类似,语法:revoke <user> <table> <column family> <column qualifier>
# 例如,收回test用户在表t1上的权限
hbase(main)> revoke 'test','t1'
表数据的增删改查
1)添加数据
# 语法:put <table>,<rowkey>,<family:column>,<value>,<timestamp>
# 例如:给表t1的添加一行记录:rowkey是rowkey001,family name:f1,column name:col1,value:value01,timestamp:系统默认hbase(main)> put 't1','rowkey001','f1:col1','value01'
用法比较单一。
2)查询数据
a)查询某行记录
# 语法:get <table>,<rowkey>,[<family:column>,....]
# 例如:查询表t1,rowkey001中的f1下的col1的值
hbase(main)> get 't1','rowkey001', 'f1:col1'
# 或者:
hbase(main)> get 't1','rowkey001', {COLUMN=>'f1:col1'}
# 查询表t1,rowke002中的f1下的所有列值hbase(main)> get 't1','rowkey001'
b)扫描表
# 语法:scan <table>, {COLUMNS => [ <family:column>,.... ], LIMIT => num}
# 另外,还可以添加STARTROW、TIMERANGE和FITLER等高级功能
# 例如:扫描表t1的前5条数据
hbase(main)> scan 't1',{LIMIT=>5}
c)查询表中的数据行数
# 语法:count <table>, {INTERVAL => intervalNum, CACHE => cacheNum}
# INTERVAL设置多少行显示一次及对应的rowkey,默认1000;CACHE每次去取的缓存区大小,默认是10,调整该参数可提高查询速度
# 例如,查询表t1中的行数,每100条显示一次,缓存区为500
hbase(main)> count 't1', {INTERVAL => 100, CACHE => 500}
3)删除数据
a )删除行中的某个列值
# 语法:delete <table>, <rowkey>, <family:column> , <timestamp>,必须指定列名
# 例如:删除表t1,rowkey001中的f1:col1的数据
hbase(main)> delete 't1','rowkey001','f1:col1'
注:将删除改行f1:col1列所有版本的数据
b )删除行
# 语法:deleteall <table>, <rowkey>, <family:column> , <timestamp>,可以不指定列名,删除整行数据
# 例如:删除表t1,rowk001的数据
hbase(main)> deleteall 't1','rowkey001'
c)删除表中的所有数据
# 语法: truncate <table>
# 其具体过程是:disable table -> drop table -> create table
# 例如:删除表t1的所有数据
hbase(main)> truncate 't1'
Region管理
1)移动region
# 语法:move 'encodeRegionName', 'ServerName'
# encodeRegionName指的regioName后面的编码,ServerName指的是master-status的Region Servers列表
# 示例
hbase(main)>move '4343995a58be8e5bbc739af1e91cd72d', 'db-41.xxx.xxx.org,60020,1390274516739'
2)开启/关闭region
# 语法:balance_switch true|false
hbase(main)> balance_switch
3)手动split
# 语法:split 'regionName', 'splitKey'
4)手动触发major compaction
#语法:
#Compact all regions in a table:
#hbase> major_compact 't1'
#Compact an entire region:
#hbase> major_compact 'r1'
#Compact a single column family within a region:
#hbase> major_compact 'r1', 'c1'
#Compact a single column family within a table:
#hbase> major_compact 't1', 'c1'
配置管理及节点重启
1)修改hdfs配置
hdfs配置位置:/etc/hadoop/conf
# 同步hdfs配置
cat /home/hadoop/slaves|xargs -i -t scp /etc/hadoop/conf/hdfs-site.xml hadoop@{}:/etc/hadoop/conf/hdfs-site.xml
#关闭:
cat /home/hadoop/slaves|xargs -i -t ssh hadoop@{} "sudo /home/hadoop/cdh4/hadoop-2.0.0-cdh4.2.1/sbin/hadoop-daemon.sh --config /etc/hadoop/conf stop datanode"
#启动:
cat /home/hadoop/slaves|xargs -i -t ssh hadoop@{} "sudo /home/hadoop/cdh4/hadoop-2.0.0-cdh4.2.1/sbin/hadoop-daemon.sh --config /etc/hadoop/conf start datanode"
2)修改hbase配置
hbase配置位置:
# 同步hbase配置
cat /home/hadoop/hbase/conf/regionservers|xargs -i -t scp /home/hadoop/hbase/conf/hbase-site.xml hadoop@{}:/home/hadoop/hbase/conf/hbase-site.xml
# graceful重启
cd ~/hbase
bin/graceful_stop.sh --restart --reload --debug inspurXXX.xxx.xxx.org
分布式HBase部属
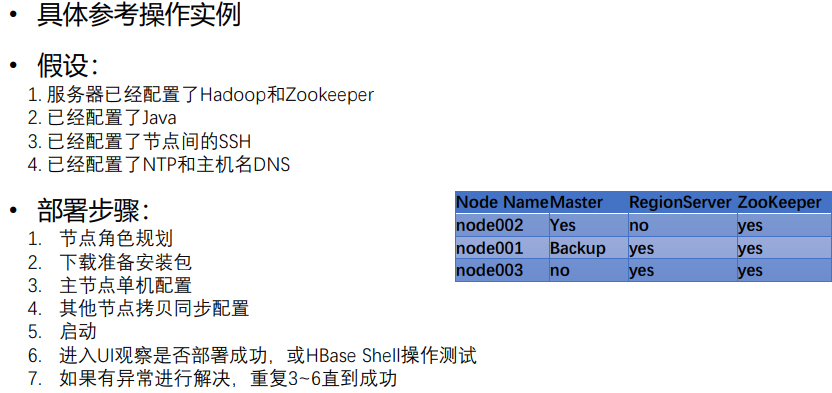
三个节点:node01、node02、node03,都要进行如下步骤:
将HBase下载到/bigdata文件夹下
解压 tar -zxvf hbase-2.1.5-bin.tar.gz
进入HBase的conf文件夹
cd hbase-2.1.5/conf
配置hbase-env.sh
设置jdk路径:export JAVA_HOME=/usr/local/jdk
启用外部zookeeper:export HBASE_MANAGES_ZK=false
配置hbase-site.xml
<configuration>
    <property>
        <name>hbase.zookeeper.property.dataDir</name>
        <value>/usr/local/zookeeper/data</value>
    </property>
    <property>
        <name>hbase.cluster.distributed</name>
        <value>true</value>
    </property>
    <property>
        <name>hbase.rootdir</name>
        <value>hdfs://node02:9000/user/hbase</value>
    </property>
    <property>
        <name>hbase.zookeeper.quorum</name>
        <value>node01:2181,node02:2181,node03:2181</value>
    </property>
</configuration>
配置regionservers:node01
node03
创建backup-masters: node01
进入lib下,拷贝client-facing-thirdparty下的jar包到lib目录:
cp client-facing-thirdparty/htrace-core-3.1.0-incubating.jar
node02为master,在node02中启动hbase
查看日志出现了下面错误
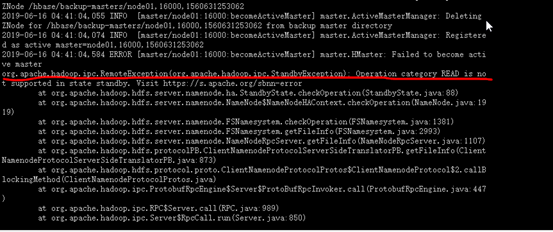
搜索说是hdfs的node02是standby的,不可以。将node02设置为active即可。
四、Java API
DDL操作
配置
public class HBaseConfigUtil {
    public static Configuration getHBaseConfiguration() {
        Configuration configuration = HBaseConfiguration.create();
        configuration.addResource(new Path("/bigdata/hbase-2.1.5/conf/hbase-site.xml"));
        return configuration;
    }
}
创建表格
public class CreateTable {
    public static void main(String[] args) {
        Configuration conf = HBaseConfigUtil.getHBaseConfiguration();
        Connection connection = null;
        Admin admin = null;

        try {
            connection = ConnectionFactory.createConnection(conf);
            admin = connection.getAdmin();

            String tableName = "peoples";

            if(!admin.isTableAvailable(TableName.valueOf(tableName))) {
                HTableDescriptor hbaseTable = new HTableDescriptor(TableName.valueOf(tableName));
                hbaseTable.addFamily(new HColumnDescriptor("name"));
                hbaseTable.addFamily(new HColumnDescriptor("contactinfo"));
                hbaseTable.addFamily(new HColumnDescriptor("personalinfo"));
                admin.createTable(hbaseTable);
            }
        } catch (Exception e) {
          e.printStackTrace();
        } finally {
            try{
                if(admin != null) {
                    admin.close();
                }
                if(connection != null && !connection.isClosed()) {
                    connection.close();
                }
            } catch (Exception e2) {
                e2.printStackTrace();
            }
        }
    }
}
java -cp HBaseJava-jar-with-dependencies.jar com.hbasejava.example.CreateTable
进入shell
cd /bigdata/hbase-2.1.5/bin
./hbase shell
列出所有表,并扫描
hbase(main):001:0> list
TABLE
peoples
1 row(s)
Took 2.5868 seconds
=> ["peoples"]

hbase(main):002:0> scan 'peoples'
ROW                                        COLUMN+CELL
0 row(s)
Took 0.7385 seconds
向表中插入数据
public class InsertIntoTable {
    public static void main(String[] args) {
        InsertIntoTable object = new InsertIntoTable();
        object.insertRecords();
    }

    public void insertRecords() {
        Configuration config = HBaseConfigUtil.getHBaseConfiguration();
        Connection connection = null;
        Table table = null;

        try {
            connection = ConnectionFactory.createConnection(config);
            table = connection.getTable(TableName.valueOf("peoples"));

            //            creating sample data that can be used to save into hbase table
            String[][] people = {
                    { "1", "Marcel", "Haddad", "marcel@xyz.com", "M", "26", "www.google.com" },
                    { "2", "Franklin", "Holtz", "franklin@xyz.com", "M", "24", "www.bing.com" },
                    { "3", "Dwayne", "McKee", "dwayne@xyz.com", "M", "27", "www.bing.com" },
                    { "4", "Rae", "Schroeder", "rae@xyz.com", "F", "31", "www.baidu.com" },
                    { "5", "Rosalie", "burton", "rosalie@xyz.com", "F", "25", "www.baidu.com" },
                    { "6", "Gabriela", "Ingram", "gabriela@xyz.com", "F", "24", "www.baidu.com" },
                    { "7", "Marcel", "Haddad", "marcel@xyz.com", "M", "26", "www.facebook.com" },
                    { "8", "Franklin", "Holtz", "franklin@xyz.com", "M", "24", "www.facebook.com" },
                    { "9", "Dwayne", "McKee", "dwayne@xyz.com", "M", "27", "www.google.com" },
                    { "10", "Rae", "Schroeder", "rae@xyz.com", "F", "31", "www.google.com" },
                    { "11", "Rosalie", "burton", "rosalie@xyz.com", "F", "25", "www.google.com" },
                    { "12", "Gabriela", "Ingram", "gabriela@xyz.com", "F", "24", "www.google.com" } };

            for (int i = 0; i < people.length; i ++) {
                Put person = new Put(Bytes.toBytes(i));
                person.addColumn(Bytes.toBytes("name"), Bytes.toBytes("first"), Bytes.toBytes(people[i][1]));
                person.addColumn(Bytes.toBytes("name"), Bytes.toBytes("last"), Bytes.toBytes(people[i][2]));
                person.addColumn(Bytes.toBytes("contactinfo"), Bytes.toBytes("email"), Bytes.toBytes(people[i][3]));
                person.addColumn(Bytes.toBytes("personalinfo"), Bytes.toBytes("gender"), Bytes.toBytes(people[i][4]));
                person.addColumn(Bytes.toBytes("personalinfo"), Bytes.toBytes("age"), Bytes.toBytes(people[i][5]));
                person.addColumn(Bytes.toBytes("personalinfo"), Bytes.toBytes("web"), Bytes.toBytes(people[i][6]));
                table.put(person);
            }
        } catch (Exception e) {
            e.printStackTrace();
        } finally {
            try{
                if(connection != null && !connection.isClosed()) {
                    connection.close();
                }
            } catch (Exception e2) {
                e2.printStackTrace();
            }
        }
    }
}
列出所有表
public class ListTables {
    public static void main(String[] args) {
        ListTables object = new ListTables();
        object.listTables();
    }

    public void listTables() {
        Configuration config = HBaseConfigUtil.getHBaseConfiguration();
        Connection connection = null;
        Admin admin = null;

        try {
            connection = ConnectionFactory.createConnection(config);
            admin = connection.getAdmin();

            HTableDescriptor tableDescriptor[] = admin.listTables();

            for(int i = 0; i < tableDescriptor.length; i ++) {
                System.out.println(tableDescriptor[i].getNameAsString());
            }
        } catch (Exception e) {
            e.printStackTrace();
        } finally {
            try{
                if(admin != null) {
                    admin.close();
                }
                if(connection != null && !connection.isClosed()) {
                    connection.close();
                }
            } catch (Exception e2) {
                e2.printStackTrace();
            }
        }
    }
}
读取指定行
public class ReadTable {
    public static void main(String[] args) {
        ReadTable object = new ReadTable();
        object.readTableData(args[0]);
    }

    public void readTableData(String rowKey) {
        Configuration config = HBaseConfigUtil.getHBaseConfiguration();
        Connection connection = null;
        Table table = null;

        try {
            connection = ConnectionFactory.createConnection(config);
            table = connection.getTable(TableName.valueOf("peoples"));

            Get get = new Get(Bytes.toBytes(rowKey));

            Result result = table.get(get);

            byte[] firstNameValue = result.getValue(Bytes.toBytes("name"), Bytes.toBytes("first"));
            byte[] lastNameValue = result.getValue(Bytes.toBytes("name"), Bytes.toBytes("last"));
            byte[] emailValue = result.getValue(Bytes.toBytes("contactinfo"), Bytes.toBytes("email"));
            byte[] genderValue = result.getValue(Bytes.toBytes("personalinfo"), Bytes.toBytes("gender"));
            byte[] ageValue = result.getValue(Bytes.toBytes("personalinfo"), Bytes.toBytes("age"));

            String firstName = Bytes.toString(firstNameValue);
            String lastName = Bytes.toString(lastNameValue);
            String email = Bytes.toString(emailValue);
            String gender = Bytes.toString(genderValue);
            String age = Bytes.toString(ageValue);
            System.out.println("First Name:" + firstName);
            System.out.println("last Name:" + lastName);
            System.out.println("email:" + email);
            System.out.println("gender:" + gender);
            System.out.println("age:" + age);
            System.out.println("finished Get");

        } catch (Exception e) {
            e.printStackTrace();
        } finally {
            try{
                if(connection != null && !connection.isClosed()) {
                    connection.close();
                }
            } catch (Exception e2) {
                e2.printStackTrace();
            }
        }
    }
}
扫描全表
public class ScanTable {
    public static void main(String[] args) {
        ScanTable object = new ScanTable();
        object.scanTableData();
    }

    public void scanTableData() {
        Configuration config = HBaseConfigUtil.getHBaseConfiguration();
        Connection connection = null;
        Table table = null;
        ResultScanner resultScanner = null;

        try {
            //建立连接
            connection = ConnectionFactory.createConnection(config);
            //取到table
            table = connection.getTable(TableName.valueOf("peoples"));

            Scan scan = new Scan();
            //增加想读出的列的名字
            scan.addColumn(Bytes.toBytes("name"), Bytes.toBytes("first"));
            scan.addColumn(Bytes.toBytes("name"), Bytes.toBytes("last"));
            scan.addColumn(Bytes.toBytes("contactinfo"), Bytes.toBytes("email"));
            scan.addColumn(Bytes.toBytes("personalinfo"), Bytes.toBytes("gender"));
            scan.addColumn(Bytes.toBytes("personalinfo"), Bytes.toBytes("age"));

            resultScanner = table.getScanner(scan);
            //通过next遍历
            for(Result result = resultScanner.next(); result != null; result = resultScanner.next()) {
                //二进制数组
                byte[] firstNameValue = result.getValue(Bytes.toBytes("name"), Bytes.toBytes("first"));
                byte[] lastNameValue = result.getValue(Bytes.toBytes("name"), Bytes.toBytes("last"));
                byte[] emailValue = result.getValue(Bytes.toBytes("contactinfo"), Bytes.toBytes("email"));
                byte[] genderValue = result.getValue(Bytes.toBytes("personalinfo"), Bytes.toBytes("gender"));
                byte[] ageValue = result.getValue(Bytes.toBytes("personalinfo"), Bytes.toBytes("age"));
                //转为字符串
                String firstName = Bytes.toString(firstNameValue);
                String lastName = Bytes.toString(lastNameValue);
                String email = Bytes.toString(emailValue);
                String gender = Bytes.toString(genderValue);
                String age = Bytes.toString(ageValue);

                System.out.println("First Name:" + firstName);
                System.out.println("last Name:" + lastName);
                System.out.println("email:" + email);
                System.out.println("gender:" + gender);
                System.out.println("age:" + age);
                System.out.println("finished Get");
            }
        } catch (Exception e) {
            e.printStackTrace();
        } finally {
            try{
                if(connection != null && !connection.isClosed()) {
                    connection.close();
                }
            } catch (Exception e2) {
                e2.printStackTrace();
            }
        }
    }
}
public class FilterTable {
    public static void main(String[] args) {
        FilterTable object = new FilterTable();
        object.scanFilterTableData();
    }

    public void scanFilterTableData() {
        Configuration config = HBaseConfigUtil.getHBaseConfiguration();
        Connection connection = null;
        Table table = null;
        ResultScanner resultScanner = null;

        try {
            connection = ConnectionFactory.createConnection(config);
            table = connection.getTable(TableName.valueOf("peoples"));

            SingleColumnValueFilter filter1 = new SingleColumnValueFilter(Bytes.toBytes("personalinfo"), Bytes.toBytes("gender"), CompareOp.EQUAL, Bytes.toBytes("F"));
            SingleColumnValueFilter filter2 = new SingleColumnValueFilter(Bytes.toBytes("personalinfo"), Bytes.toBytes("age"), CompareOp.EQUAL, Bytes.toBytes("25"));

            FilterList filterList = new FilterList(FilterList.Operator.MUST_PASS_ALL);

            filterList.addFilter(filter1);
            filterList.addFilter(filter2);

            Scan scan = new Scan();
            scan.setFilter(filterList);
            scan.addColumn(Bytes.toBytes("name"), Bytes.toBytes("first"));
            scan.addColumn(Bytes.toBytes("name"), Bytes.toBytes("last"));
            scan.addColumn(Bytes.toBytes("contactinfo"), Bytes.toBytes("email"));
            scan.addColumn(Bytes.toBytes("personalinfo"), Bytes.toBytes("gender"));
            scan.addColumn(Bytes.toBytes("personalinfo"), Bytes.toBytes("age"));

            resultScanner = table.getScanner(scan);

            for(Result result = resultScanner.next(); result != null; result = resultScanner.next()) {
                byte[] firstNameValue = result.getValue(Bytes.toBytes("name"), Bytes.toBytes("first"));
                byte[] lastNameValue = result.getValue(Bytes.toBytes("name"), Bytes.toBytes("last"));
                byte[] emailValue = result.getValue(Bytes.toBytes("contactinfo"), Bytes.toBytes("email"));
                byte[] genderValue = result.getValue(Bytes.toBytes("personalinfo"), Bytes.toBytes("gender"));
                byte[] ageValue = result.getValue(Bytes.toBytes("personalinfo"), Bytes.toBytes("age"));

                String firstName = Bytes.toString(firstNameValue);
                String lastName = Bytes.toString(lastNameValue);
                String email = Bytes.toString(emailValue);
                String gender = Bytes.toString(genderValue);
                String age = Bytes.toString(ageValue);

                System.out.println("First Name:" + firstName);
                System.out.println("last Name:" + lastName);
                System.out.println("email:" + email);
                System.out.println("gender:" + gender);
                System.out.println("age:" + age);
                System.out.println("finished Get");
            }
        } catch (Exception e) {
            e.printStackTrace();
        } finally {
            try{
                if(connection != null && !connection.isClosed()) {
                    connection.close();
                }
            } catch (Exception e2) {
                e2.printStackTrace();
            }
        }
    }
}
public class DeleteTable {
    public static void main(String[] args) {
        Configuration conf = HBaseConfigUtil.getHBaseConfiguration();
        Connection connection = null;
        Admin admin = null;

        try {
            connection = ConnectionFactory.createConnection(conf);
            admin = connection.getAdmin();

            TableName tableName = TableName.valueOf("peoples");

            if(admin.isTableAvailable(tableName)) {
                admin.disableTable(tableName);
                admin.deleteTable(tableName);
            }
        } catch (Exception e) {
            e.printStackTrace();
        } finally {
            try{
                if(admin != null) {
                    admin.close();
                }
                if(connection != null && !connection.isClosed()) {
                    connection.close();
                }
            } catch (Exception e2) {
                e2.printStackTrace();
            }
        }
    }
}
五、使用MapReduce
1.环境配置
pom.xml配置Hadoop依赖和HBase依赖
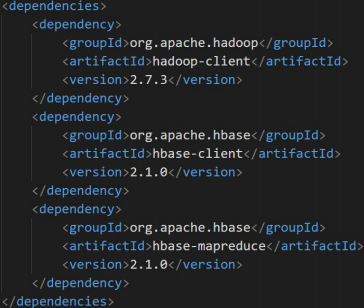
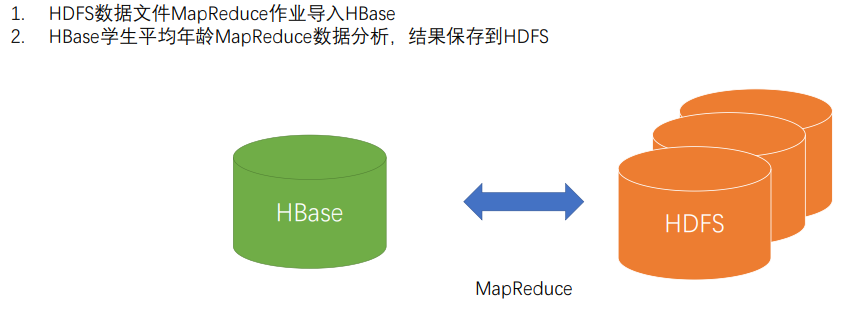
2.任务
学生数据分析
参考资料
新建Maven项目
<?xml version="1.0" encoding="UTF-8"?>
<project xmlns="http://maven.apache.org/POM/4.0.0"
         xmlns:xsi="http://www.w3.org/2001/XMLSchema-instance"
         xsi:schemaLocation="http://maven.apache.org/POM/4.0.0 http://maven.apache.org/xsd/maven-4.0.0.xsd">
    <modelVersion>4.0.0</modelVersion>

    <groupId>com.example.hbasemr</groupId>
    <artifactId>HBaseMapReduce</artifactId>
    <version>1.0-SNAPSHOT</version>

    <properties>
        <project.build.sourceEncoding>UTF-8</project.build.sourceEncoding>
        <project.reporting.outputEncoding>UTF-8</project.reporting.outputEncoding>
        <java.version>1.8</java.version>
        <maven.compiler.source>1.8</maven.compiler.source>
        <maven.compiler.target>1.8</maven.compiler.target>
    </properties>
    <repositories>
        <repository>
            <id>nexus-aliyun</id>
            <name>Nexus aliyun</name>
            <url>http://maven.aliyun.com/nexus/content/groups/public</url>
        </repository>
    </repositories>
    <dependencies>
        <dependency>
            <groupId>org.apache.hadoop</groupId>
            <artifactId>hadoop-client</artifactId>
            <version>2.7.3</version>
        </dependency>
        <dependency>
            <groupId>org.apache.hbase</groupId>
            <artifactId>hbase-client</artifactId>
            <version>2.1.0</version>
        </dependency>
        <dependency>
            <groupId>org.apache.hbase</groupId>
            <artifactId>hbase-mapreduce</artifactId>
            <version>2.1.0</version>
        </dependency>
    </dependencies>
    <build>
        <finalName>${project.artifactId}</finalName>
        <plugins>
            <plugin>
                <artifactId>maven-compiler-plugin</artifactId>
                <version>3.3</version>
                <configuration>
                    <source>1.8</source>
                    <target>1.8</target>
                </configuration>
            </plugin>
            <plugin>
                <artifactId>maven-assembly-plugin</artifactId>
                <executions>
                    <execution>
                        <phase>package</phase>
                        <goals>
                            <goal>single</goal>
                        </goals>
                    </execution>
                </executions>
                <configuration>
                    <archive>
                        <manifest>
                            <mainClass>com.example.hbasemr.Driver</mainClass>
                        </manifest>
                    </archive>
                    <descriptorRefs>
                        <descriptorRef>jar-with-dependencies</descriptorRef>
                    </descriptorRefs>
                </configuration>
            </plugin>
        </plugins>
    </build>
</project>
测试数据导入
hadoop jar HBaseMR-jar-with-dependencies.jar ImportFromHDFS
MapReduce HBase数据分析
新建main函数,先空着
定义mapper和reducer
mapper
是TableMapper,只需keyout和valueout
TEXT 年龄 InWritable 1
重写map方法
判断是否有该列,如果有就读取
public class HBaseToHDFS {
    public static void main(String[] args) throws Exception {
        Configuration conf = HBaseConfiguration.create();
        conf.set("fs.defaultFS", "hdfs://node002:9000/");
        conf.set("hbase.zookeeper.quorum", "node001:2181,node003:2181,node003:2181");

        FileSystem fs = FileSystem.get(conf);

        Job job = Job.getInstance(conf);
        job.setJarByClass(HBaseToHDFS.class);

        Scan scan = new Scan();
        scan.addColumn("info".getBytes(), "age".getBytes());

        TableMapReduceUtil.initTableMapperJob(
                "student".getBytes(),
                scan,
                HBaseToHDFSMapper.class,
                Text.class,
                IntWritable.class,
                job,
                false
        );

        job.setReducerClass(HBaseToHDFSMapper.HBaseToHDFSReducer.class);
        job.setOutputKeyClass(Text.class);
        job.setOutputValueClass(DoubleWritable.class);

        Path outputPath = new Path("/student/avgresult");

        if(fs.exists(outputPath)) {
            fs.delete(outputPath);
        }

        FileOutputFormat.setOutputPath(job, outputPath);
        System.exit(job.waitForCompletion(true) ? 0 : 1);
    }

    public static class HBaseToHDFSMapper extends TableMapper<Text, IntWritable> {
        Text outKey = new Text("age");
        IntWritable outValue = new IntWritable();

        @Override
        protected void map(ImmutableBytesWritable key, Result value, Context context) throws IOException, InterruptedException {
            boolean isContainsColumn = value.containsColumn("info".getBytes(), "age".getBytes());
            if(isContainsColumn) {
                List<Cell> listCells = value.getColumnCells("info".getBytes(), "age".getBytes());
                Cell cell = listCells.get(0);
                byte[] cloneValue = CellUtil.cloneValue(cell); //克隆数据
                String ageValue = Bytes.toString(cloneValue); //转为字符串
                outValue.set(Integer.parseInt(ageValue)); //将outValue设为当期的年龄
                context.write(outKey, outValue); //写到map的输出中
            }
        }

        public static class HBaseToHDFSReducer extends Reducer<Text, IntWritable, Text, DoubleWritable> {

            DoubleWritable outValue = new DoubleWritable();

            @Override
            //输入是map的输出
            protected void reduce(Text key, Iterable<IntWritable> values, Context context) throws IOException, InterruptedException {
                int count = 0;
                int sum = 0;

                for(IntWritable value: values) { //遍历当前的所有年龄
                    count ++;
                    sum += value.get();
                }

                double avgAge = sum * 1.0 / count;
                outValue.set(avgAge);
                context.write(key, outValue); //写入到HDFS
            }
        }
    }
}
