1、概述
布局管理器的用途:
a、可以更好的管理组件;
b、通过使用布局管理器,Android应用程序可以做到平台无关性
布局管理器都是ViewGroup的子类,所有可充当容器的父类都是ViewGroup,而ViewGroup也是View的子类

下面分别介绍常用的布局管理器
2、线性布局管理器
LinearLayout,最常用的布局之一。它提供控件水平或垂直排列的模型
常用属性及其对应方法:

gravity 可取属性说明:

当需要为gravity设多个值时,可用|分隔开
布局XML:


 1 <?xml version="1.0" encoding="utf-8"?>
 2 <LinearLayout xmlns:android="http://schemas.android.com/apk/res/android"
 3 android:orientation="horizontal"
 4 android:layout_width="fill_parent"
 5 android:layout_height="fill_parent"
 6 android:id="@+id/lla"
 7 android:gravity="right"
 8 >
 9
10 <Button
11 android:text="添加"
12 android:id="@+id/Button01"
13 android:layout_width="wrap_content"
14 android:layout_height="wrap_content">
15 </Button>
16
17 </LinearLayout>
JAVA代码:
 1 // 计数器,记录按钮个数
 2     int count = 0;
 3
 4     @Override
 5     public void onCreate(Bundle savedInstanceState) { // 重写 onCreate 方法
 6         super.onCreate(savedInstanceState);
 7         setContentView(R.layout.horizontal_layout);
 8         // 获取屏幕中的按钮控件对象
 9         Button button = (Button) findViewById(R.id.Button01);
10
11         // 为按钮添加 OnClickListener 接口实现
12         button.setOnClickListener(
13
14
15         new View.OnClickListener() {
16
17             public void onClick(View v) {
18                 // 获取线性布局对象
19                 LinearLayout ll = (LinearLayout) findViewById(R.id.lla);
20
21                 String msg = MainActivity.this.getResources().getString(
22                         R.string.button);
23                 // 创建一个 Button 对象
24                 Button tempbutton = new Button(MainActivity.this);
25
26
27
28                 tempbutton.setText(msg + (++count)); // 设置 Button 控件显示的内容
29                 // 设置 Button 的宽度
30                 tempbutton.setWidth(80);
31                 // 向线性布局中添加 View
32                 ll.addView(tempbutton);
33
34
35
36             }
37
38         });
39
40     }
运行效果:每点击添加按钮一次会在下方垂直生成一个按钮
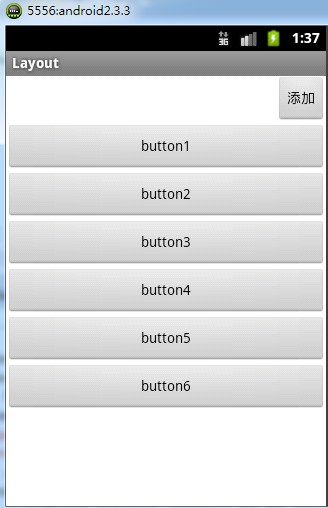
将布局文件中
android:orientation="vertical"
vertical改为horizontal
每点击一次会在右方水平方向生成一个按钮

当水平方向该行容不下一个宽度为80的按钮时,按钮就会被压缩,如下图

此时再点击添加按钮时,画面没有任何变化,不会另起一行添加按钮,超出屏幕的将不会被显示。
3、表格布局
TableLayout 类似HTML里的Table分为行和列来管理。
每一行为一个TableRow,也可以为View对象。当为View对象时就跨越该行所有列
TableRow中可以添加子控件,每个子控件为一列。并不会为每个单元格绘制边框
每个单元格为一个View,可以有空的单元格,也可以跨越多列
一个列的宽度由该列最宽的单元格决定的
TableLayout 可以设置三种属性
Shrinkable :它可以被压缩以适应其父容器的大小
Stretchable :它可以被拉伸以填满空闲区域
Collapsed :该列被隐藏

如果要对多列进行设置,用逗号隔开
这三个属性在JAVA代码也有对应的方法,值得一提的是它是继承Linearlayout的
布局XML:
  1 <LinearLayout xmlns:android="http://schemas.android.com/apk/res/android"
  2     android:id="@+id/LinearLayout01"
  3     android:layout_width="fill_parent"
  4     android:layout_height="fill_parent"
  5     android:background="@drawable/water"
  6     android:gravity="bottom"
  7     android:orientation="vertical" >
  8
  9     <TableLayout
 10         android:id="@+id/TableLayout01"
 11         android:layout_width="fill_parent"
 12         android:layout_height="wrap_content" >
 13
 14         <TextView
 15             android:id="@+id/TextView01"
 16             android:layout_width="wrap_content"
 17             android:layout_height="wrap_content"
 18             android:layout_centerInParent="true"
 19             android:layout_margin="4px"
 20             android:background="@drawable/darkgray"
 21             android:text="@string/tv1" >
 22         </TextView>
 23     </TableLayout>
 24
 25     <TableLayout
 26         android:id="@+id/TableLayout02"
 27         android:layout_width="fill_parent"
 28         android:layout_height="wrap_content"
 29         android:stretchColumns="0" >
 30
 31         <TableRow
 32             android:id="@+id/TableRow01"
 33             android:layout_width="wrap_content"
 34             android:layout_height="wrap_content" >
 35
 36             <TextView
 37                 android:id="@+id/TextView02"
 38                 android:layout_width="wrap_content"
 39                 android:layout_height="wrap_content"
 40                 android:layout_centerInParent="true"
 41                 android:layout_margin="4px"
 42                 android:background="@drawable/blue"
 43                 android:text="@string/tvStrech" >
 44             </TextView>
 45
 46             <TextView
 47                 android:id="@+id/TextView03"
 48                 android:layout_width="wrap_content"
 49                 android:layout_height="wrap_content"
 50                 android:layout_centerInParent="true"
 51                 android:layout_margin="4px"
 52                 android:text="@string/tvShort" >
 53             </TextView>
 54         </TableRow>
 55     </TableLayout>
 56
 57     <TableLayout
 58         android:id="@+id/TableLayout03"
 59         android:layout_width="fill_parent"
 60         android:layout_height="wrap_content"
 61         android:collapseColumns="1"
 62         android:shrinkColumns="0" >
 63
 64         <TableRow
 65             android:id="@+id/TableRow02"
 66             android:layout_width="wrap_content"
 67             android:layout_height="wrap_content" >
 68
 69             <TextView
 70                 android:id="@+id/TextView04"
 71                 android:layout_width="wrap_content"
 72                 android:layout_height="wrap_content"
 73                 android:layout_centerInParent="true"
 74                 android:layout_margin="4px"
 75                 android:background="@drawable/darkgray"
 76                 android:text="@string/tvShrink" >
 77             </TextView>
 78
 79             <TextView
 80                 android:id="@+id/TextView05"
 81                 android:layout_width="wrap_content"
 82                 android:layout_height="wrap_content"
 83                 android:layout_centerInParent="true"
 84                 android:layout_margin="4px"
 85                 android:background="@drawable/lightred"
 86                 android:text="@string/tvShort" >
 87             </TextView>
 88
 89             <TextView
 90                 android:id="@+id/TextView06"
 91                 android:layout_width="wrap_content"
 92                 android:layout_height="wrap_content"
 93                 android:layout_centerInParent="true"
 94                 android:layout_margin="4px"
 95                 android:background="@drawable/blue"
 96                 android:text="@string/tvLong" >
 97             </TextView>
 98         </TableRow>
 99     </TableLayout>
100
101 </LinearLayout>
运行效果:

4、相对布局
RelativeLayout子控件 的位置由兄弟控件或父容器来决定的
如果A控件由B控件来决定位置,则布局文件B控件要在A控件声明之前
常用属性
第一类:属性值为true或false
android:layout_centerHrizontal 水平居中
android:layout_centerVertical 垂直居中
android:layout_centerInparent 相对于父元素完全居中
android:layout_alignParentBottom 贴紧父元素的下边缘
android:layout_alignParentLeft 贴紧父元素的左边缘
android:layout_alignParentRight 贴紧父元素的右边缘
android:layout_alignParentTop 贴紧父元素的上边缘
android:layout_alignWithParentIfMissing 如果对应的兄弟元素找不到的话就以父元素做参照物
第二类:属性值必须为id的引用名“@id/id-name”
android:layout_below 在某元素的下方
android:layout_above 在某元素的的上方
android:layout_toLeftOf 在某元素的左边
android:layout_toRightOf 在某元素的右边
android:layout_alignTop 本元素的上边缘和某元素的的上边缘对齐
android:layout_alignLeft 本元素的左边缘和某元素的的左边缘对齐
android:layout_alignBottom 本元素的下边缘和某元素的的下边缘对齐
android:layout_alignRight 本元素的右边缘和某元素的的右边缘对齐
第三类:属性值为具体的像素值,如30dip,40px
android:layout_marginBottom 离某元素底边缘的距离
android:layout_marginLeft 离某元素左边缘的距离
android:layout_marginRight 离某元素右边缘的距离
android:layout_marginTop 离某元素上边缘的距离
布局XML:
 1 <RelativeLayout xmlns:android="http://schemas.android.com/apk/res/android"
 2     xmlns:tools="http://schemas.android.com/tools"
 3     android:layout_width="match_parent"
 4     android:layout_height="match_parent"
 5     android:paddingBottom="@dimen/activity_vertical_margin"
 6     android:paddingLeft="@dimen/activity_horizontal_margin"
 7     android:paddingRight="@dimen/activity_horizontal_margin"
 8     android:paddingTop="@dimen/activity_vertical_margin"
 9     tools:context=".MainActivity" >
10
11     <TextView
12         android:layout_width="wrap_content"
13         android:layout_height="wrap_content"
14         android:text="@string/hello_world"
15         android:id="@+id/tv1"
16         android:layout_centerInParent="true"
17         />
18
19     <TextView
20         android:layout_width="wrap_content"
21         android:layout_height="wrap_content"
22         android:text="big"
23         android:textSize="30sp"
24         android:id="@+id/tv2"
25         android:layout_toRightOf="@id/tv1"
26         android:layout_alignBottom="@id/tv1"
27         />
28
29     <TextView
30         android:layout_width="wrap_content"
31         android:layout_height="wrap_content"
32         android:text="middle"
33         android:textSize="20sp"
34         android:id="@+id/tv3"
35         android:layout_above="@id/tv1"
36         android:layout_alignLeft="@id/tv1"
37         />
38
39 </RelativeLayout>
运行效果:

5、帧布局
FrameLayout在屏幕上开辟一块区域,在这块区域可以添加多个控件
但都会被对其到屏幕左上角,并且大小取决于最大的控件,如果控件一样大,只能看到最上面的控件
布局XML:
 1 <?xml version="1.0" encoding="utf-8"?>
 2 <FrameLayout xmlns:android="http://schemas.android.com/apk/res/android"
 3     android:layout_width="fill_parent"
 4     android:layout_height="fill_parent"
 5     android:orientation="vertical" >
 6
 7     <TextView
 8         android:layout_width="fill_parent"
 9         android:layout_height="fill_parent"
10         android:background="@drawable/lightgray"
11         android:gravity="center"
12         android:text="big" />
13
14     <TextView
15         android:layout_width="150dp"
16         android:layout_height="150dp"
17         android:background="@drawable/darkgray"
18         android:gravity="center"
19         android:text="middle" />
20
21     <TextView
22         android:layout_width="50dp"
23         android:layout_height="50dp"
24         android:background="@drawable/blue"
25         android:gravity="center"
26         android:text="small" />
27
28 </FrameLayout>
运行效果:

6、绝对布局
AbsoluteLayout是绝对位置布局。在此布局中的子元素的android:layout_x和android:layout_y属性将生效,用于描述该子元素的坐标位置。
屏幕左上角为坐标原点(0,0),第一个0代表横坐标,向右移动此值增大,第二个0代表纵坐标,向下移动,此值增大。
在此布局中的子元素可以相互重叠。在实际开发中,通常不采用此布局格式,因为它的界面代码过于刚性,以至于有可能不能很好的适配各种终端。
由于不采用,在此就不演示代码了。