一、Controller的使用
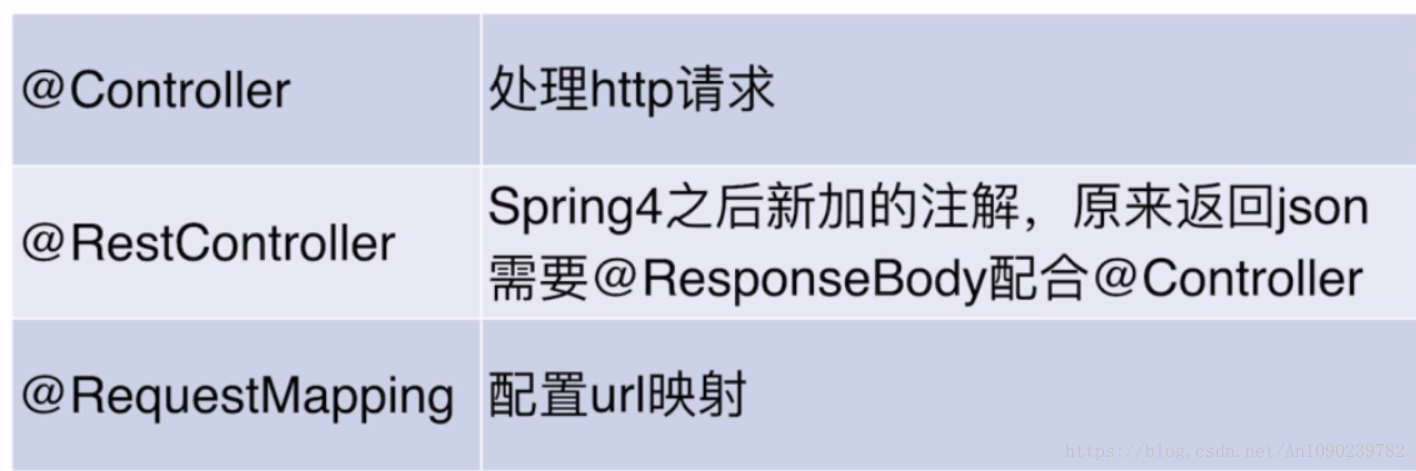
Controller必须配合模板的使用。
//设置一个数组,可以通过两个地址,hello/hi访问
@RequestMapping(value={"/hello","/hi"})
public String say(){
    return "Hello Spring Boot!";
}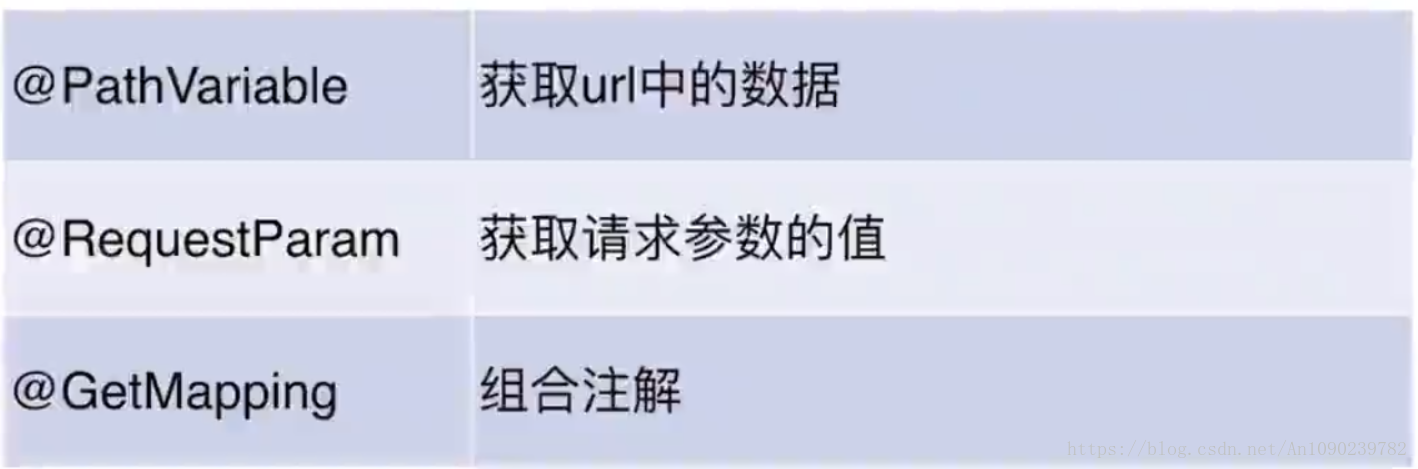
//访问地址时传参
//localhost:8080/100/say

@RequestMapping(value="/{id}/say",method = RequestMethod.GET)
public String say(@PathVariable("id") Integer id){
    return "id:"+id;
}
//访问地址时传参
//localhost:8080/100/?id=111
@RequestMapping(value="/say",method = RequestMethod.GET)
public String say(@RequestParam("id") Integer id){
return "id:"+MyId;
}
//给id设置默认值,设置默认值为0
public String say(@RequestParam(value = "id",required = false,defaultValue = "0") Integer id){
return "id:"+MyId;
}
//简化RequestMapping
改用@GetMapping(value = "/say")二、使用随机数
在一些情况下,有些参数我们需要希望它不是一个固定的值,比如密钥、服务端口等。Spring Boot的属性配置文件中可以通过${random}来产生int值、long值或者string字符串,来支持属性的随机值。
# 随机字符串
com.didispace.blog.value=${random.value}
# 随机int
com.didispace.blog.number=${random.int}
# 随机long
com.didispace.blog.bignumber=${random.long}
# 10以内的随机数
com.didispace.blog.test1=${random.int(10)}
# 10-20的随机数
com.didispace.blog.test2=${random.int[10,20]}
三、配置文件
1、自动配置
Spring Boot 提供了默认的配置,如默认的 Bean ,去运行 Spring 应用。它是非侵入式的,只提供一个默认实现。
大多数情况下,自动配置的 Bean 满足了现有的业务场景,不需要去覆盖。但如果自动配置做的不够好,需要覆盖配置。
Spring Boot 不单单从 application.properties 获取配置,所以我们可以在程序中多种设置配置属性。按照以下列表的优先级排列:
1.命令行参数
2.java:comp/env 里的 JNDI 属性
3.JVM 系统属性
4.操作系统环境变量
5.RandomValuePropertySource 属性类生成的 random.* 属性
6.应用以外的 application.properties(或 yml)文件
7.打包在应用内的 application.properties(或 yml)文件
8.在应用 @Configuration 配置类中,用 @PropertySource 注解声明的属性文件
9.SpringApplication.setDefaultProperties 声明的默认属性
2、自定义属性
通过 @ConfigurationProperties(prefix = “home”) 注解,将配置文件中以 home 前缀的属性值自动绑定到对应的字段中。同是用 @Component 作为 Bean 注入到 Spring 容器中。
如果不是用 application.properties 文件,而是用 application.yml 的文件,对应配置如下:
## 家乡属性
home:
  province: 浙江省
  city: 温岭松门
  desc: 我家住在${home.province}的${home.city}
键值对冒号后面,必须空一格。
注意:
application.properties 配置中文值的时候,读取出来的属性值会出现乱码问题。但是 application.yml 不会出现乱码问题。原因是,Spring Boot 是以 iso-8859 的编码方式读取 application.properties 配置文件。
四、构建一个较为复杂的RESTful API
@RestController
@RequestMapping(value="/users")     // 通过这里配置使下面的映射都在/users下
public class UserController {

    // 创建线程安全的Map
    static Map<Long, User> users = Collections.synchronizedMap(new HashMap<Long, User>());

    @RequestMapping(value="/", method=RequestMethod.GET)
    public List<User> getUserList() {
        // 处理"/users/"的GET请求,用来获取用户列表
        // 还可以通过@RequestParam从页面中传递参数来进行查询条件或者翻页信息的传递
        List<User> r = new ArrayList<User>(users.values());
        return r;
    }

    @RequestMapping(value="/", method=RequestMethod.POST)
    public String postUser(@ModelAttribute User user) {
        // 处理"/users/"的POST请求,用来创建User
        // 除了@ModelAttribute绑定参数之外,还可以通过@RequestParam从页面中传递参数
        users.put(user.getId(), user);
        return "success";
    }

    @RequestMapping(value="/{id}", method=RequestMethod.GET)
    public User getUser(@PathVariable Long id) {
        // 处理"/users/{id}"的GET请求,用来获取url中id值的User信息
        // url中的id可通过@PathVariable绑定到函数的参数中
        return users.get(id);
    }

    @RequestMapping(value="/{id}", method=RequestMethod.PUT)
    public String putUser(@PathVariable Long id, @ModelAttribute User user) {
        // 处理"/users/{id}"的PUT请求,用来更新User信息
        User u = users.get(id);
        u.setName(user.getName());
        u.setAge(user.getAge());
        users.put(id, u);
        return "success";
    }

    @RequestMapping(value="/{id}", method=RequestMethod.DELETE)
    public String deleteUser(@PathVariable Long id) {
        // 处理"/users/{id}"的DELETE请求,用来删除User
        users.remove(id);
        return "success";
    }

}
下面针对该Controller编写测试用例验证正确性,具体如下。当然也可以通过浏览器插件等进行请求提交验证。
@RunWith(SpringJUnit4ClassRunner.class)
@SpringApplicationConfiguration(classes = MockServletContext.class)
@WebAppConfiguration
public class ApplicationTests {

    private MockMvc mvc;

    @Before
    public void setUp() throws Exception {
        mvc = MockMvcBuilders.standaloneSetup(new UserController()).build();
    }

    @Test
    public void testUserController() throws Exception {
        // 测试UserController
        RequestBuilder request = null;

        // 1、get查一下user列表,应该为空
        request = get("/users/");
        mvc.perform(request)
                .andExpect(status().isOk())
                .andExpect(content().string(equalTo("[]")));

        // 2、post提交一个user
        request = post("/users/")
                .param("id", "1")
                .param("name", "测试大师")
                .param("age", "20");
        mvc.perform(request)
                .andExpect(content().string(equalTo("success")));

        // 3、get获取user列表,应该有刚才插入的数据
        request = get("/users/");
        mvc.perform(request)
                .andExpect(status().isOk())
                .andExpect(content().string(equalTo("[{"id":1,"name":"测试大师","age":20}]")));

        // 4、put修改id为1的user
        request = put("/users/1")
                .param("name", "测试终极大师")
                .param("age", "30");
        mvc.perform(request)
                .andExpect(content().string(equalTo("success")));

        // 5、get一个id为1的user
        request = get("/users/1");
        mvc.perform(request)
                .andExpect(content().string(equalTo("{"id":1,"name":"测试终极大师","age":30}")));

        // 6、del删除id为1的user
        request = delete("/users/1");
        mvc.perform(request)
                .andExpect(content().string(equalTo("success")));

        // 7、get查一下user列表,应该为空
        request = get("/users/");
        mvc.perform(request)
                .andExpect(status().isOk())
                .andExpect(content().string(equalTo("[]")));

    }

}
五、@SpringBootApplication注解
声明当前类为sprinboot的入口类。而一个springboot项目内有且只能有一个这个注解存在。
六、SpringBoot与JSP
springboot内部对jsp的支持并不是特别理想,而springboot推荐的视图是Thymeleaf。
6.1配置springboot支持jsp
打开pom.xml(maven配置文件)可以看到我们之前构建项目时已经添加了web模块,而springboot给我们自动添加了spring-boot-starter-tomcat配置引入。springboot内部集成了tomcat组件,这里我们就不需要重复引入tomcat组件。
JSP maven
我们先来添加jsp的maven支持,如下图4所示:
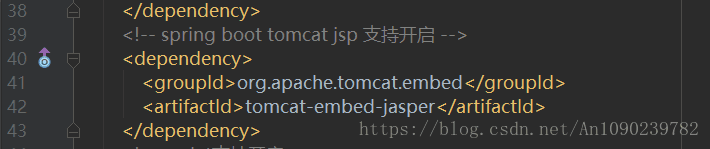
Servlet maven
我们还需要引入jsp对servlet容器的支持,如下图5所示:

JSTL maven
除了上面的jsp,servlet支持以外,如果你还需要在jsp页面使用jstl标签来处理界面逻辑,那么需要引入jstl maven,如下图6所示:
