1. 概述
Ansible是新出现的自动化运维工具,基于Python开发,集合了众多运维工具(puppet、cfengine、chef、func、fabric)的优点,实现了批量系统配置、批量程序部署、批量运行命令等功能。Ansible是一个批量的自动化部署工具。
ansible:
模块:
1) yaml 用来编写yaml脚本的语言
2) paramiko 模拟ssh协议连接linux客户端
3) jinja2 模板语言
工作原理:
ansible通过hosts文件和免秘钥(配置文件用户名密码端口号)来实现批量管理主机。
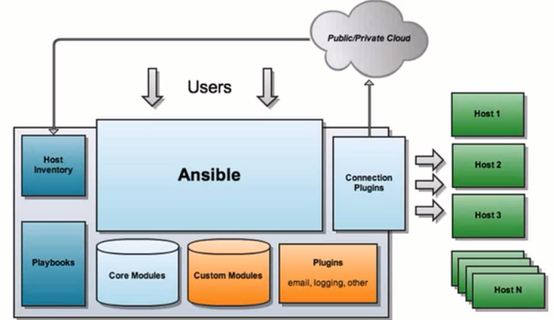
Ansible是基于模块工作的,本身没有批量部署的能力。真正具有批量部署的是ansible所运行的模块,ansible只是提供一种框架。主要包括:
1> Ansible:Ansible的核心程序;
2> connection plugins:连接插件,负责和被监控端实现通信,即Ansible和host的通信;
3> Host inventory:指定操作的主机,是一个配置文件里面定义监控的主机;
4> Core Modules:核心模块,Ansible执行任何管理任务都不是由Ansible自己完成,而是由核心模块完成;Ansible管理主机之前,先调用core Modules中的模块,然后指明管理Host Lnventory中的主机,就可以完成管理主机。
5> Custom Modules:自定义模块,完成Ansible核心模块无法完成的功能,此模块支持任何语言编写。
Ansible将很多命令集成为模块调用。
6> Playbook:YAML格式文件,多个任务定义在一个文件中,使用时可以统一调用,“剧本”用来定义那些主机需要调用那些模块来完成的功能。剧本执行多个任务时,非必需可以让节点一次性运行多个任务。
简而言之ansible有如下的特点:
- Stupied Simple ,上手简单,学习曲线平滑
- SSH by default ,安全,无需安装客户端(agent)
- 配置简单、功能强大、扩展性强
- 支持API及自定义模块,可通过Python轻松扩展
- 通过Playbooks来定制强大的配置、状态管理
- 提供一个功能强大、操作性强的Web管理界面和REST API接口——AWX平台(web界面很少用)
- 幂等性:一种操作重复多次结果相同
2. Ansible的安装
三台主机,192.168.16.4为服务机,.5、.6为服务机
Ansible安装需要用到扩展源(epel源),扩展源配置完成即可用yum进行下载
在.3上下载安装
[root@localhost ~]# yum install ansible -y
稍等……..
Complete!
Ansible的配置文件
/etc/ansible/ansible.cfg
/etc/ansible/hosts
3. Ansible客户端配置
有两种方法
1> 进入服务端配置文件进行配置
#在文件末尾写入配置
[root@localhost ~]# vim /etc/ansible/hosts
[zxj]                                                    #组名
192.168.16.5 ansible_ssh_user=root ansible_ssh_port=22 ansible_ssh_pass=zxjwrl
192.168.16.6 ansible_ssh_user=root ansibel_ssh_port=22 ansible_ssh_pass=zxjwrl
   #远程节点主机        用户               端口           密码
[root@localhost ~]# vim /etc/ansible/ansible.cfg
host_key_checking = False                  #进入配置文件,关掉检查
2> 免秘钥登录
sshd服务
配置完成后,查看Ansible是否与管理节点通
[root@localhost ~]# ansible zxj -m ping       #主机组名可以替换为单独的节点ip或者直接改为all,all表示所有主机,ip表示组名下单独的一个节点
192.168.16.6 | SUCCESS => {
    "changed": false,
    "ping": "pong"
}
192.168.16.5 | SUCCESS => {
    "changed": false,
    "ping": "pong"
}
4. Ansible支持的模块
查看Ansible的模块
[root@localhost ~]# ansible-doc -l
常用的模块
ping 模块:            尝试连接主机,如果测试成功会返回‘pong’
command模块:          在远程节点执行命令
yum模块:              使用yum软件包管理工具管理软件包
shell模块:            和command模块类似,执行命令,支持变量等符号
cron模块 :            管理定时任务,计划任务
service模块:          管理程序服务
file模块:             设置文件属性
copy模块:             复制本地文件到远程主机
script模块:           传送本地的一个脚本并在远程主机上执行
setup模块:            获取远程主机的参数信息
user模块:             管理用户账户
group模块:            添加或者删除用户组
查看具体模块的用法,以yum模块为例
[root@localhost ~]# ansible-doc -s yum
- name: Manages packages with the `yum' package manager
  yum:
      allow_downgrade:       # Specify if the named
…….
state:                 # Whether to install (`present' or `installed', `latest'), or remove (`absent' or `removed') a package. `present' and `installed' will simply ensure that a
                               desired package is installed. `latest' will update the specified package if it's not of the latest available version. `absent'
                               and `removed' will remove the specified package. Default is `None', however in effect the default action is `present' unless the
                               `autoremove' option is¬ enabled for this module, then `absent' is inferred.
5. Ansible常用命令相关概念
协程:线程的处理单元;
线程:最小的调度单位;
进程:是最小的管理单元;
一个进程里面至少1个线程,一个线程或者多个线程可以在一个进程里面。
hoc命令行下的命令:
|
ansible-doc -l |
查看支持的模块 |
|
ansible-doc -s MODEL_NAME |
查看模块的用法 |
|
-f forks |
指定启动并发线程数以减少服务器压力,如ansible -f 5 表示启动五个线程 |
|
-m model_name |
要使用的模块 |
|
-a args1 |
特有的参数,即调用的模块里面的参数,使用-a调用 |
|
ansible all -m ping |
查看client端是否正常ping通 |
通过调用来执行命令举例详解
格式: ansible 组名 -m model_name -a 执行命令
#查看客户端信息
[root@localhost ~]# ansible zxj -m setup
……..

#复制文件
#复制并改名
[root@localhost ~]# ansible zxj -m copy  -a "src=/root/zxj.txt dest=/root/wrl.txt"
192.168.16.6 | CHANGED => {                        #源文件        目标文件
    "changed": true,                               #注意幂等性
    "checksum": "da39a3ee5e6b4b0d3255bfef95601890afd80709",
    "dest": "/root/wrl.txt",
    "gid": 0,
    "group": "root",
    "md5sum": "d41d8cd98f00b204e9800998ecf8427e",
    "mode": "0644",
    "owner": "root",
    "secontext": "system_u:object_r:admin_home_t:s0",
    "size": 0,
    "src": "/root/.ansible/tmp/ansible-tmp-1557345658.29-197424182241042/source",
    "state": "file",
    "uid": 0
}
192.168.16.5 | CHANGED => {
    "changed": true,
    "checksum": "da39a3ee5e6b4b0d3255bfef95601890afd80709",
    "dest": "/root/wrl.txt",
    "gid": 0,
    "group": "root",
    "md5sum": "d41d8cd98f00b204e9800998ecf8427e",
    "mode": "0644",
    "owner": "root",
    "secontext": "system_u:object_r:admin_home_t:s0",
    "size": 0,
    "src": "/root/.ansible/tmp/ansible-tmp-1557345658.28-200767865941415/source",
    "state": "file",
    "uid": 0
}

#在客户机下查看
.5:
[root@localhost ~]# ls
anaconda-ks.cfg  wrl.txt
.6:
[root@localhost ~]# ls
anaconda-ks.cfg  wrl.txt

#command命令
[root@localhost ~]# ansible zxj -m command -a 'date'              #-a后面的引号内可以加任何正确的命令
192.168.16.6 | CHANGED | rc=0 >>
Thu May  9 03:52:53 CST 2019
192.168.16.5 | CHANGED | rc=0 >>
Thu May  9 03:52:53 CST 2019

#command命令会进行警告。进入配置文件/etc/ansible/ansible.cfg改command_warnings = False

#创建、删除用户
[root@localhost ~]# ansible zxj -m user -a "name=zxj state=present"   #user模块  用户名  执行状态(此处为别名)
[root@localhost ~]# ansible zxj -m user -a "name=zxj state=absent"


#安装、卸载软件
[root@localhost ~]# ansible zxj -m yum -a "name=httpd state=latest"
[root@localhost ~]# ansible zxj -m yum -a "name=httpd state=absent"
#如果用install、remove等必须写成单词的过去式
#注意:yum模块和yum命令同名,因此执行时会警告,进入配置文件/etc/ansible/ansible.dfg改deprecation_warnings = False


#启动apache服务
[root@localhost ~]# ansible zxj -m service -a "name=httpd state=started"
#stopped、restarted、started等均为过去式,ansible不支持systemctl,用centos6及以前版本的service代替

#运行脚本
[root@localhost ~]# ansible zxj -m script -a "/tmp/test.sh"        #为脚本绝对路径

等等
6. Playbook
一个任务为play,多个任务为playbooks
6.1 yaml(yml)
yaml是一个可读性高的用来表达资料序列的格式,yaml参考了其他多种语言,包括:xml,c语言,python,perl以及电子邮件格式RFC2822等,ClarkEvans在2001年在首次发表了这种语言。
yaml的可读性好
yaml和脚本语言的交互性好
yaml使用实现语言的数据类型
yaml有一个一致的信息模型
yaml易于实现
yaml可以基于流程来处理
yaml表达能力强,扩展性好
6.2 playbook下的5种模块
tasks:主程序;
variables:变量,以变量形式传参;
templates:模板;
handlers:触发器;
roles:角色。
6.3 playbook书写规范
脚本名以 .yaml或yml结尾;
一定不能使用tab键,yaml有严格的缩进要求;
每个冒号:后面必须有空格;
注意:
1)以冒号结尾不需要空格
2)表示文件路径的模版可以不需要空格
想要表示列表项,使用一个短横杠加一个空格。多个项使用同样的缩进级别作为同一个列表的一部。
6.4 ansiblb-playbook常用命令
1)对剧本语法检测
ansible-playbook --syntax-check /root/ansible/httpd.yaml
2)-C模拟执行剧本
ansible-playbook -C /root/ansible/httpd.yaml
3)执行剧本
ansible-playbook /root/ansible/httpd.yaml
6.5 ansible实例详解
#创建实例文件
[root@localhost ~]# vim example.yaml           # 以yaml或者yml
- hosts: zxj                                   # - 必须顶格写,后面必须加空格,hosts:表示定义主机组,冒号后面必须加空格,后面跟的内容可以是all、ip或主机名
  remote_user: root                            # 指定远程用户,以root运行,remote必须和host对齐,冒号后面必须加空格
  tasks:                                       # 调用任务模块,tasks必须与remote对齐,在tasks下面开始写命令
  - name: create userzxj                       # 横杆和task对齐,与name之间必须有空格,冒号后面必须加空格,后面定义任务名
    user: name=userzxj                         # 调用user模块,user必须与name对齐,冒号后面必须加空格。一个任务已经完成,可以继续往下添加任务,格式一致

#如添加复制任务
  - name: copy httpd.conf
    copy: src=/etc/httpd/conf/httpd.conf  dest=/root/test/httpd.conf

#或者定义变量,通过jinjia2里的模板语言{{ }}来引用变量执行
- hosts: zxj
  remote_user: root
  vars:                                       #定义变量
  - p: httpd.conf                             #p为变量名,与横杠间必须有空格,http为变量值
  tasks:
  - name: create userzxj
    user: name=userzxj
  - name: copy httpd.conf
    copy: src=/etc/httpd/conf/{{ p }} dest=/root/test/{{ p }}  #引用变量


#再定义触发器,触发器仅由相邻的上一个任务触发,上一个任务执行成功才触发执行
- hosts: zxj
  remote_user: root
  vars:
  - p: httpd.conf
  tasks:
  - name: create userzxj
    user: name=userzxj
  - name: copy httpd.conf
    copy: src=/etc/httpd/conf/{{ p }} dest=/root/test/{{ p }}
    notify:                                    #申明定义触发器
    - service httpd restarted                  #定义触发器名字
  handlers:                                    #定义触发器,必须在最后,必须与hosts对齐
  - name: service httpd restarted              #定义任务名,必须与触发器名字相同
    service: name=httpd state=restarted        #调用service模块,执行命令

:wq

#执行yaml文件用命令ansible-playbook
[root@localhost ~]# ansible-playbook example.yaml
PLAY [zxj]  ********************************************************

TASK [Gathering Facts] **********************************************      #测试ansible是否与客户端连通,该任务自动执行
ok: [192.168.16.5]                           #幂等性,由于先前执行过,并没有改变,但该命令执行成功
ok: [192.168.16.6]

TASK [create userzxj]   *********************************************      #执行第一个任务
ok: [192.168.16.6]
ok: [192.168.16.5]
TASK [copy httpd.conf] **********************************************      #执行第二个任务
changed: [192.168.16.5]                     #幂等性,由于先前并没有执行过,因此改变,任务执行成功
changed: [192.168.16.6]

RUNNING HANDLER [service httpd restarted]   *************************      #第二个命令执行成功自动触发
changed: [192.168.16.6]
changed: [192.168.16.5]

PLAY RECAP  *****************************************************
192.168.16.5          : ok=4    changed=2    unreachable=0    failed=0
192.168.16.6          : ok=4    changed=2    unreachable=0    failed=0

#服务端查看httpd启动
#.5:
[root@localhost ~]# ss -tnl
LISTEN     0      128    :::80                 :::*
.6
[root@localhost ~]# ss -tnl
LISTEN     0      128    :::80                 :::*                        #端口前的星号表示ipv4,冒号表示ipv6和ipve4

#可以创建多个触发器,依托于上一个任务

#还可以进行迭代创建
- hosts: zxj
  remote_user: root
  vars:
  - p: httpd.conf
  tasks:
  - name: create many users
    user: name={{ item }}                #进行迭代创建
    with_items:                          #使用迭代
    - zxj1                               #创建多个用户
    - zxj2
    - zxj3

#模块均可进行迭代执行

#对于模板模块template,在配置文件里写入对应模板,yaml文件在执行命令模块的时候调用模板模块就可以了,如:
#要执行复制http文件任务,进入httpd配置文件,将监听端口改为jinjia2的模板文件,紧接着修改ansible的配置文件
[root@localhost ~]# vim /etc/httpd/conf/httpd.conf
#Listen 12.34.56.78:80
Listen {{ port }}                        # 变量名可以任意取
[root@localhost ~]# vim example.yaml
  - name: copy httpd.conf
    template: src=/etc/httpd/conf/{{ p }} dest=/root/test/{{ p }}
[root@localhost ~]# vim /etc/ansible/hosts
## db-[99:101]-node.example.com
[zxj]
192.168.16.5 ansible_ssh_user=root ansible_ssh_port=22 ansible_ssh_pass=zxjwrl port=5000                            #写入端口,写入变量
192.168.16.6 ansible_ssh_user=root ansible_ssh_port=22 ansible_ssh_pass=zxjwrl port=6000

#引用多个模板文件时可以在该配置文件后面空格后继续写
7. Roles
什么情况下用到roles:
假如现在有3个被管理主机,第一个要配置成httpd,第二个要配置成php服务器,第三个要配置成MySQL服务器。要如何来定义playbook?
第一个play用到第一个主机上,用来构建httpd,第二个play用到第二个主机上,用来构建php,第三个play用到第三个主机上,用来构建MySQL。这些个play定义在playbook中比较麻烦,将来也不利于模块化调用,不利于多次调用。比如说后来又加进来一个主机,这个第4个主机既是httpd服务器,又是php服务器,只能写第4个play,上面写上安装httpd和php。这样playbook中的代码就重复了。这时我们可以通过roles来实现,将各个模块命令集成在roles下的服务里面,直接调用服务即可。
Roles实例详解
使用目录代替命令,各个目录如下:
files:定义src(源)文件
handlers:定义触发器
tasks:定义任务
templates:定义模板文件
vars:定义变量
各个目录写入文件后放入server目录,执行时直接调用目录。
#1 创建级联目录
[root@localhost ~]#mkdir-p playbooks/roles/{webservers,dbservers}/{files,handlers,tasks,templates,vars}
[root@localhost ~]# tree playbooks/             #查看定义的roles树
playbooks/
└── roles
    ├── dbservers                               #角色
    │   ├── files
    │   ├── handlers
    │   ├── tasks
    │   ├── templates
    │   └── vars
    └── webservers                              #角色
        ├── files
        ├── handlers
        ├── tasks
        ├── templates
        └── vars

#2. 编辑命令
[root@localhost ~]# vim playbooks/roles/webservers/tasks/main.yml      #文件名必须是main.yaml或者main.yml在创建的文件里直接写任务,不必再声明组名等信息
- name: create user userzxj                    #写入多个命令
  user: name=userzxj
- name: service httpd start
  service: name=httpd state=started
:wq

#3. 创建与roles同等级别的site(站点)文件
[root@localhost ~]# cd playbooks/
[root@localhost playbooks]# vim site.yml       #文件名必须为site
- hosts: zxj                                   #定义组名和远程用户
  remote_user: root
  roles:                                       #调用roles
  - webservers                                 #写入角色,执行角色下的任务
  - dbservers
:wq

#4. 执行任务
[root@localhost playbooks]# ansible-playbook site.yml  #执行site文件
PLAY [zxj] *********************************************************
TASK [Gathering Facts]***********************************************
ok: [192.168.16.6]
ok: [192.168.16.5]
TASK [webservers : create user userzxj]**********************************
changed: [192.168.16.6]
changed: [192.168.16.5]
TASK [webservers : service httpd start]************************************
changed: [192.168.16.6]
changed: [192.168.16.5]
PLAY RECAP *******************************************************
192.168.16.5           : ok=3    changed=2    unreachable=0    failed=0
192.168.16.6           : ok=3    changed=2    unreachable=0    failed=0
#执行成功
files目录:定义roles后scr(源文件)不需要写绝对路径,只声明路径即可
#1. 准备实验文件
[root@localhost playbooks]# cp /etc/httpd/conf/httpd.conf  roles/webservers/files/

#2. 写入任务目录
[root@localhost playbooks]# vim roles/webservers/tasks/main.yml
- name: copy httpd
  copy: src=httpd.conf  dest=/root/test/httpd.conf     #scr不需要再写绝对路径
:wq

#3. 执行site.yml
[root@localhost playbooks]# ansible-playbook site.yml
……
192.168.16.5            : ok=2    changed=1    unreachable=0    failed=0
192.168.16.6            : ok=2    changed=1    unreachable=0    failed=0
handlers目录,触发任务
#1. 写入任务文件,不需要以handlers结尾
[root@localhost playbooks]# vim roles/webservers/tasks/main.yml
- name: copy httpd
  copy: src=httpd.conf  dest=/root/test/httpd.conf
  notify:                              #声明触发
  - restart httpd                      #定义名称,不需要再以handlers结尾

#2. 写入handlers下的main.yml
[root@localhost playbooks]# vim roles/webservers/handlers/main.yml
- name: restart httpd
  service: name=httpd state=restarted

#3. 执行site.yml
[root@localhost playbooks]# ansible-playbook site.yml
PLAY [zxj] ***************
TASK [Gathering Facts] *********
ok: [192.168.16.5]
ok: [192.168.16.6]
TASK [webservers : copy httpd] **************
changed: [192.168.16.5]
changed: [192.168.16.6]
RUNNING HANDLER [webservers : restart httpd] ************* #触发
changed: [192.168.16.6]
changed: [192.168.16.5]
PLAY RECAP ************
192.168.16.5            : ok=3    changed=2    unreachable=0    failed=0
192.168.16.6            : ok=3    changed=2    unreachable=0    failed=0
template目录,执行copy命令时调用定义的模板参数
#1. 写入任务文件
[root@localhost playbooks]# vim roles/webservers/tasks/main.yml
- name: copy httpd
  template: src=httpd.conf  dest=/root/test/httpd.conf   #src不写绝对路径
  notify:
  - restart httpd

#2. 定义模板参数
[root@localhost playbooks]# cp roles/webservers/files/httpd.conf   roles/webservers/templates/httpd.conf
[root@localhost playbooks]# vim roles/webservers/templates/httpd.conf
#Listen 12.34.56.78:80
Listen {{ port }}                                       #更改监听端口为模板参数

#3. 更改配置文件
[root@localhost ~]# vim /etc/ansible/hosts
[zxj]
192.168.16.5 ansible_ssh_user=root ansible_ssh_port=22 ansible_ssh_pass=zxjwrl port=5000                                    #写入参数
192.168.16.6 ansible_ssh_user=root ansible_ssh_port=22 ansible_ssh_pass=zxjwrl port=6000                                    #写入参数

#4. 执行site.yml文件
[root@localhost playbooks]# ansible-playbook site.yml
PLAY [zxj]…….
TASK [webservers : copy httpd] *
changed: [192.168.16.5]
changed: [192.168.16.6]
RUNNING HANDLER [webservers : restart httpd]
changed: [192.168.16.6]
changed: [192.168.16.5]
PLAY RECAP ***************
changed: [192.168.16.6]
changed: [192.168.16.5]
PLAY RECAP ***************
192.168.16.5            : ok=3    changed=2    unreachable=0    failed=0
192.168.16.6            : ok=3    changed=2    unreachable=0    failed=0
var目录,定义参数
#1. 定义var的main.yml
[root@localhost playbooks]# vim  roles/webservers/vars/main.yml
p: httpd.conf                #定义变量p,变量值为httpd.conf

#2. 修改任务变量
[root@localhost playbooks]# vim roles/webservers/tasks/main.yml
- name: copy httpd
  template: src={{ p }} dest=/root/test/{{ p }}
  notify:
  - restart httpd

#3. 执行site.yml
roles下的角色,如webserver、dbserver等可以并排写入与roles同级的site.yml文件,执行多个角色,每个角色都可以写入多个任务,实现不同量的批量部署。