1. IOC的实现原理在初始化一个Spring容器时,Spring会去解析指定的xml文件,当解析到其中的<bean>标签时,会根据该标签中的class属性指定的类的全路径名,通过反射创建该类的对象,并将该对象存入内置的Map中管理。其中键就是该标签的id值,值就是该对象。
ApplicationContext context = new ClassPathXmlApplicationContext("applicationContext.xml");
之后,当通过getBean方法来从容器中获取对象时,其实就是根据传入的条件在内置的Map中寻找是否有匹配的键值,如果有则将该键值对中保存的对象返回,如果没有匹配到则抛出异常。
Person p1 = (Person) context.getBean("person");
由此可以推测而知:默认情况下,多次获取同一个id的bean,得到的将是同一个对象。
Person p1 = (Person) context.getBean("person");
Person p2 = (Person) context.getBean("person");
即使是同一个类,如果配置过多个<bean>标签具有不同的id,每个id都会在内置Map中有一个键值对,其中的值是这个类创建的不同的对象
<bean id="person" class="cn.tedu.domain.Person"></bean>
<bean id="person2" class="cn.tedu.domain.Person"></bean>
同一个<beans>标签下不允许配置多个同id的<bean>标签,如果配置则启动抛异常
<bean id="person2" class="cn.tedu.domain.Person"></bean>
<bean id="person2" class="cn.tedu.domain.Person"></bean>错误
2.无参构造创建对象
<bean id="person" class="cn.tedu.domain.Person"></bean>
Spring工厂创建对象
<bean id="student" class="cn.tedu.domain.StudentSpring"></bean>
!!!重点:一般都用无参构造创建对象,就算带有参构造,也要写一个无参构造用来给sping反射对象,当是一个抽象类,接口什么的没有无参就使用spring工厂创建对象
3.别名标签
<bean id="person" class="cn.tedu.domain.Person"></bean>
<alians name="person" alians="p1"/>
4.<bean id="hero" class="cn.tedu.domain.Hero" autowire="byName">
<!-- <property name="cat" ></property> -->会自动通过Name中的cat找到bean不用写
</bean>
<bean id="cat" class="cn.tedu.domain.cat"></bean>
5.spring注解完成IOC(控制反转)
1.开启包扫描
<context:component-scan base-package="cn.tedu.domain"/>
2.在类上加上注解@component
@component (加入自己定义的id)当然默认的是第一个字母小写,如果第二个字母也是大写,则id就是它本身
6.spring注解完成DI(依赖注入)
1.开启包扫描
<context:component-scan base-package="cn.tedu.domain"/>
2.开启注解方式属性注入
<context:annotation-config/>
3.指定要读取的properties文件
<context:property-placeholder location="classpath:/p.properties"/>
4.@Value(${id})写在属性上
5.声明要引用的集合数据
<bean id="hero" class="cn.tedu.domain.Hero" autowire="byName">
<property name="name" value="上官婉儿"></property>
<property name="age" value="18"></property>
<property name="jobs">
<list>
<value>总路</value>
<value>上路</value>
<value>打野</value>
</list>
</property>
<property name="set">
<set>
<value>s1</value>
<value>s2</value>
<value>s3</value>
<value>s4</value>
<value>s5</value>
</set>
</property>
<property name="map">
<map>
<entry key="k1" value="v1"></entry>
<entry key="k2" value="v2"></entry>
<entry key="k3" value="v3"></entry>
<entry key="k4" value="v4"></entry>
</map>
</property>
<property name="props">
<props>
<prop key="p1">pv1</prop>
<prop key="p2">pv2</prop>
<prop key="p3">pv3</prop>
<prop key="p4">pv4</prop>
</props>
</property>
</bean>
5.@Value("{@props}")写在非基本属性上
6.@Autowired
@Qualifier("dogx")写在自定义属性上
<bean id="dogx" class="cn.tedu.domian.dog"></bean>
7.注解实现单例和多例(其他注解)
@Scope("prototype")
@Lazy
@PostConstruct
@PreDestroy
7.装饰模式是去加强方法和新增方法
代理模式步调用原来方法来改造被代理本身
8.通过接口来实现不同的数据库切换,还有静态代理
9.在myeclipse上改项目发布的路径,右键项目——>Properties——>MyEclipse——>Web更改
10.
@RequestMapping("/hello.action")
public ModolAndView hello() {
ModolAndView mav = new ModolAndView();
mav.addAttribute("msg2","hello sptingMVC~");
return mav;
}
@RequestMapping("/hello2.action")
public String hello2(Modol modol) {
modol.addAttribute("msg2","hello2 sptingMVC~");
return "hello2";
}
11.
<form action="${pageContext.request.contextPath }/test04.action">
用户名<input type=="text" name="name"/>
年龄<input type=="text name="age"/>
狗名<input type=="text" name="dog.name"/>
狗龄<input type=="text" name="dog.age"/>
<input type=="submit" value="提交"/>
</form>
12.SpringMVC解决乱码问题
<!-- 全站乱码解决过滤器 -->只对POST提交有效
<filter>
<filter-name>characterEncodingFilter</filter-name>
<filter-class>org.springframework.web.filter.CharacterEncodingFilter</filter-class>
<init-param>
<param-name>encoding</param-name>
<param-value>utf-8</param-value>
</init-param>
</filter>
<filter-mapping>
<filter-name>characterEncodingFilter</filter-name>
<url-pattern>/*</url-pattern>
</filter-mapping>
对GET方式
username = new String(username.getByte("ios8859-1"),"utf-8");
13.注册用户自定义类型转换器,命令springmvc在处理日期时用指定的日起格式化器
@InitBinder
public void InitBinder(ServletRequestDataBinder binder){
binder.registerCustomEditor(Date.class,new CustomDateEditor(new SimpleDateFormat("yyyy-mm-dd"))
}
14.SpringMVC文件上传
1.表单
1.表单必须是Post提交
2.表单必须是enctype="multipart/form-data"
3.文件上传项必须有name属性

2.在配置文件中配置文件上传工具

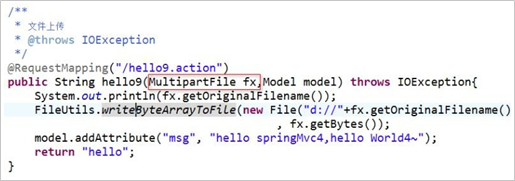
3.在Controller中实现文件上传

@RequestMapping("/test09.action")
public void test(String name,String addr,MultiparFile f01) throws IOException{
InputStream in = f01.getInputStream();
OutputStream out = new FileOutputDtream("d://"+f01.getName());
byte [] tmp = new byte[1024];
int len = 0;
while((len = in.read(tmp))!=0){
out.write(tmp,0,len);
}
out.flush();
out.close();
in.close();
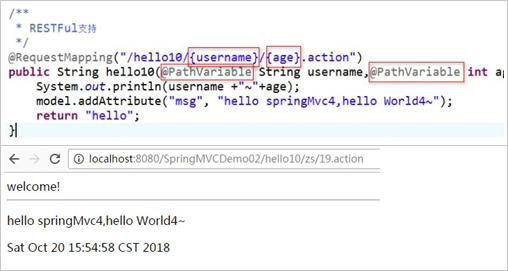
15.路径动态数据的获取(RESTFul风格的请求参数处理)

16. Spring帮忙完成请求转发和重定向
forward:/xxx.action
redirect:/xxx.action
可以利用转发 实现允许用户访问WEB-INF下保护的指定资源(重定向不行,因为它是用户第二次访问不到)
17.首先SpringMVC默认的是requset传递数据,通过注解和直接写来达到session传递参数
1.@Controller
@SessionAttributes("msg1")所有msg1都在session放一份
public class Details03{
@RequestMapping("/Detail03/test04.action")
public String test04(Model model){
modol.addAttribute("msg2","hello2 sptingMVC~");
return "forward:/WEB-INF/d03_test01.jsp";
@RequestMapping("/Detail03/test05.action")
public String test05(HttpSession session){
session.setAttribute("msg2","hello2 sptingMVC~");
return "forward:/WEB-INF/d03_test01.jsp";
}
18.异常处理
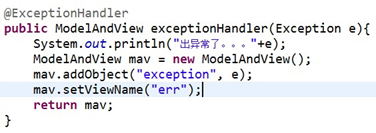
a. 为当前Controller配置错误处理

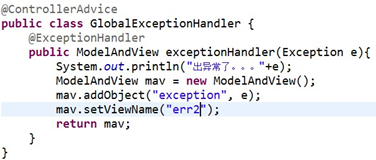
b.注解方式配置全局的错误处理

c.配置文件方式配置全局错误处理,在SpringMVC配置文件中配置( b和c等价 )
<!-- 配置全局错误提示 -->
<bean class="org.springframework.web.servlet.handler.SimpleMappingExceptionResolver">
<property name="exceptionMappings"> <props>
<prop key="java.lang.NullPointerException">null_err</prop>
<prop key="java.io.IOException">io_err</prop>
<prop key="java.lang.Throwable">g_err</prop> </props>
</property>
</bean>