有一种方法就是macvlan了。添加到rc.local文件中,具体不再阐述。
此方法只适合编译固件的情况下调整WAN/LAN顺序。
wr703n等(包含其他未列出的单网口路由,AP),修改WAN LAN排序,通过修改package/base-files/files/etc/config/network文件是无论如何都无法改变wan lan的排序。由于wr703n的CPU是ar9331 SOC,集成交换芯片,且只引出一个网口,为此只有一个eth0,工作于其他的如eth1 eth2都是无法跟网口相通的。OpenWRT默认的是使用lan口,编译好后需要自己添加wan,将lan改成eth1或者其他非eth0才能正常工作。
废话不多说,进入正题。
1.打开target/linux/ar71xx/base-files/etc/uci-defaults/network文件,确保文件权限为777,可写就行。
2.搜索 tl-wr703n | ,删除此行。如图1,意思是将同类接口的都归为一类,避免繁杂。
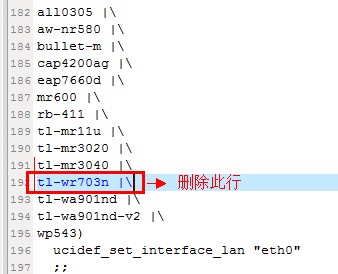
图1
3.仿照里面格式添加以下内容,如图2
tl-wr703n)
ucidef_set_interface_wan “eth0″
ucidef_set_interface_lan “eth1″
;;
ucidef_set_interface_wan “eth0″ 设定wan口为eth0
ucidef_set_interface_lan “eth1″ 设定lan口为eth1
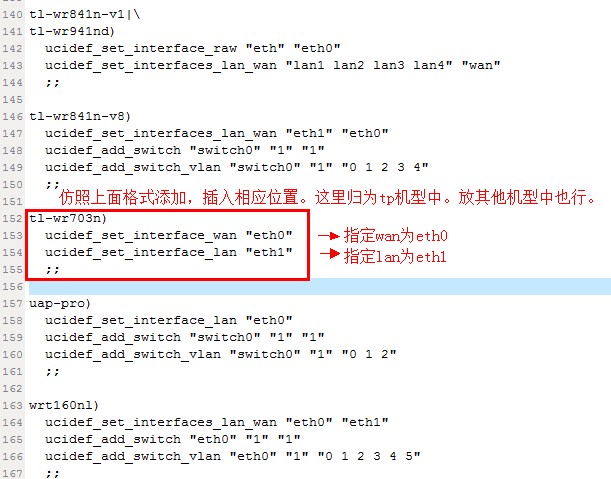
图2
4.修改package/base-files/files/etc/config/network文件,添加wan信息。
# Copyright (C) 2006 OpenWrt.org
config interface loopback
option ifname lo
option proto static
option ipaddr 127.0.0.1
option netmask 255.0.0.0config interface lan
option ifname eth1
option type bridge
option proto static
option netmask 255.255.255.0
option ipaddr 192.168.1.1config interface wan
option ifname eth0
option proto dhcp
option ifname 指定接口名字。
5.保存,编译。
不过这样子建立出的eth接口的MAC是随机生成的。如果想要顺序于本机MAC,可做如下修改。图3
修改以下文件:target/linux/ar71xx/files/arch/mips/ath79/mach-tl-wr703n.c
static void __init tl_wr703n_setup(void)
{
u8 *mac = (u8 *) KSEG1ADDR(0x1f01fc00);
u8 *ee = (u8 *) KSEG1ADDR(0x1fff1000);ath79_register_m25p80(&tl_wr703n_flash_data);
ath79_register_leds_gpio(-1, ARRAY_SIZE(tl_wr703n_leds_gpio),
tl_wr703n_leds_gpio);
ath79_register_gpio_keys_polled(-1, TL_WR703N_KEYS_POLL_INTERVAL,
ARRAY_SIZE(tl_wr703n_gpio_keys),
tl_wr703n_gpio_keys);gpio_request_one(TL_WR703N_GPIO_USB_POWER,
GPIOF_OUT_INIT_HIGH | GPIOF_EXPORT_DIR_FIXED,
“USB power”);
ath79_register_usb();ath79_init_mac(ath79_eth0_data.mac_addr, mac, 0);
ath79_init_mac(ath79_eth1_data.mac_addr, mac, 1);ath79_register_mdio(0, 0x0);
/* WAN port */
ath79_register_eth(0);
/* LAN port */
ath79_register_eth(1);ath79_register_wmac(ee, mac);
}
在 ath79_init_mac(ath79_eth0_data.mac_addr, mac, 0); 下插入ath79_init_mac(ath79_eth1_data.mac_addr, mac, 1);
ath79_init_mac(ath79_eth1_data.mac_addr, mac, 1); eth1代表需要递增递减mac的接口,“mac,1“在mac末位数+1。可用减号,代表在原mac末位减去。
注释:
在 ath79_register_eth(0); 下插入ath79_register_eth(1);
ath79_register_eth(1); 新增eth1接口。
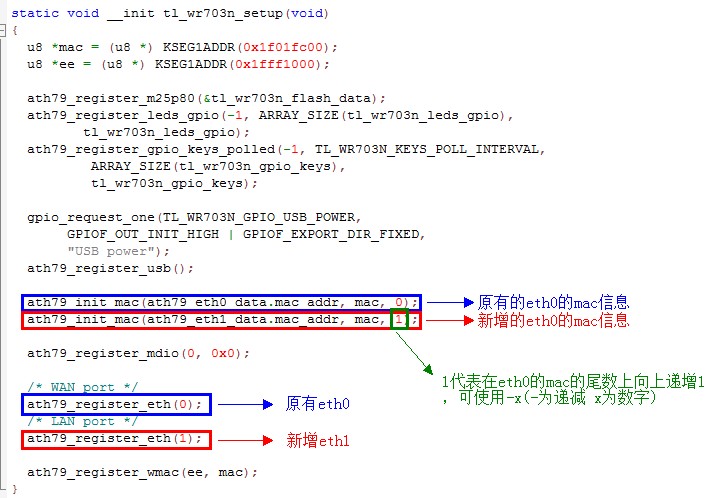
图3