vuex-状态管理工具
对于vuex来说,它只是一个状态管理工具,当有些变量不止在组件间用时,可能很多页面都会复用。我们使用vuex进行管理。
state:设置初始值状态。
getters:store仓库的计算属性,主要作用是派生出一些新的状态。比如将state状态的数据进行一次映射或者筛选。
mutations:对state数据进行赋值操作,并进行相应操作;利用store.commit()触发该操作,
actions处理异步操作,可以使用commit方法,使用store.dispatch()触发。
实现数据的持久化--跟localStorage结合使用
设置state的状态:
const state = {
    status: '0'
};
设置getters:
    getStatus(state) {
        let t = localStorage.getItem('isLogined')
        if (t == null || t== undefined) {
            t = state.isLogined;
        }
        state.isLogined=t;
        return state.isLogined;
    }
设置mutations:
SET_STATE(state, val) {
        state.status = val;
        try {
            localStorage.setItem('isLogined',val);
        } catch (e) {
            console.log(e);
        }
    }
使用-----在页面的计算属性 根据getter获取状态
computed:{
      isLogined(){
        return this.$store.getters['getStatus'];
    }
}
操作----修改状态即在方法中调用commit:
methods:{
  handleStatus(){
     this.$store.commit('SET_STATUS','1');
  }
}
(小知识点:如果是在公共函数内调用,请引入store的index的js文件,调用store.getters和store.commit)
storage的存储方式:
localStorage的存储是按照字符串存储的(以上例子为存储字符串格式)。如果存储为对象格式,会出现返回值是{Object object}的情况,那么,存储时要将数据转成string格式,请使用如下方式:
localStorage.setItem('obj',JSON.stringfy(object));
storage的读取和使用:
JSON.parse(localStorage.getItem('obj'));
注意点:
getter的值是要根据依赖值进行变化的, 即如果return的返回值不是state的数据,则监听不到数据变化。
假如只是return localStorage.getItem('status')的话, 则数据不会更新。必须进行state的赋值和return操作。
如果不需要对数据二次改造的话,也可以写到state的初始值: status: localStorage.getItem('isLogined') || '0'。这样的话取数据只能用this.$store.state.status来获取了。
---同理,computed的计算属性也应该和data的数据依赖。
插播一点: 可使用node require引入文件的方式 遍历模板,避免模板过多,每次引入文件。
const modulesFiles = require.context('./modules', false, /\.js$/);
const modules = modulesFiles.keys().reduce((modules, modulePath) => {
  // set './app.js' => 'app'  $1是正则里边的捕获,(.*)内的内容;
  const moduleName = modulePath.replace(/^\.\/(.*)\.\w+$/, '$1');
  const value = modulesFiles(modulePath);
  modules[moduleName] = value.default;
  return modules;
}, {});

const store = new Vuex.Store({
  modules,
});
---------------------------------------------------------------想看原理的请继续往下划,如何使用------------------------------------------------------------------------------------------------------------
实现原理
1、vuex本质是一个对象,有两个属性:install方法和Store类。
2、install方法的作用是将store这个实例挂载到所有组件。
3、Store这个类有commit,dispatch方法,store类将用户传入的数据包装成data,作为new Vue的参数,从而实现state的响应式。
- 剖析vuex本质
Vue项目中是怎么引入Vuex?
- 安装Vuex,再通过
import Vuex from 'vuex'引入 - 先 var store = new Vuex.Store({...}),再把store作为参数的一个属性值,new Vue({store})
- 通过Vue.use(Vuex) 使得每个组件都可以拥有store实例
使用Vue.use(), 而 Vue.use的使用原则是执行对象的install方法。 如果参数是对象,则执行对象的install方法,如果是函数,则将函数当成install执行。
class store{

}

function install (){

}

export default {store, install}
1、插件的类型,可以是install方法,也可以是一个包含install方法的对象。
2、插件只能被安装一次,保证插件列表中不能有重复的插件。
实现:
Vue.use = function(plugin){
 const installedPlugins = (this._installedPlugins || (this._installedPlugins = []));
 if(installedPlugins.indexOf(plugin)>-1){
  return this;
 }
 <!-- 其他参数 -->
 const args = toArray(arguments,1);
 args.unshift(this);
 if(typeof plugin.install === 'function'){
  plugin.install.apply(plugin,args);
 }else if(typeof plugin === 'function'){
  plugin.apply(null,plugin,args);
 }
 installedPlugins.push(plugin);
 return this;
}
注意点: 首先要判断插件是不是已经注册过,如果注册过,则直接终止方法。保证相同插件不会被重复加载。
通过Vue.use(Vuex) 使得每个组件都可以拥有store实例:
function install() {
  Vue.mixin({
    beforeCreate() {
      if (this.$options && this.$options.store) { //根组件,传入vue的参数,可通过$options.store访问。
        this.$store = this.$options.store;
      } else { //不是根组件
        this.$store = this.$parent && this.$parent.store;
      }
    },
  });
}
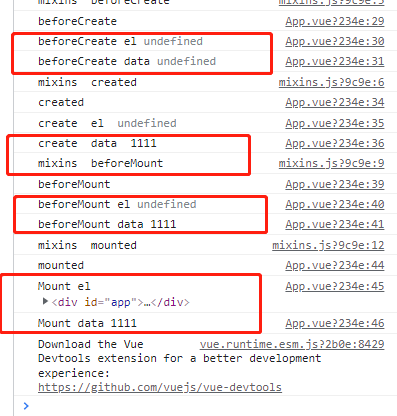
mixin的作用是将mixin的内容混合到Vue的初始化options中。为什么是beforeCreate 中执行? 因为created中,$options已经初始化好了。
现在实现类store
let Vue
//myVuex.js
class Store {
    constructor(options) {
        this.vm = new Vue({
            data: {
                state: options.state
            }
        })

        let getters = options.getter || {}
        this.getters = {}
        Object.keys(getters).forEach(getterName => {
            Object.defineProperty(this.getters, getterName, {
                get: () => {
                    return getters[getterName](this.state)
                }
            })
        })

        let mutations = options.mutations || {}
        this.mutations = {}
        Object.keys(mutations).forEach(mutationName => {
            this.mutations[mutationName] = (arg) => {
                mutations[mutationName](this.state, arg)
            }
        })

        let actions = options.actions
        this.actions = {}
        Object.keys(actions).forEach(actionName => {
            this.actions[actionName] = (arg) => {
                actions[actionName](this, arg)
            }
        })

    }
    //dispatch,commit是方法;其余getter,state是属性!!!
    dispatch(method, arg) {
        this.actions[method](arg)
    }
    commit = (method, arg) => {
        console.log(method);
        console.log(this.mutations);
        this.mutations[method](arg)
    }
    get state() {
        return this.vm.state
    }
}
let install = function (vue) {
    ×××省略
}

let Vuex = {
    Store,
    install
}

export default Vuex
生命周期执行顺序:
data和el什么时候有数据:

参考文章:
https://zhuanlan.zhihu.com/p/166087818