我的项目目录:
TestCelery/ ├── proj │ ├── celeryconfig.py │ ├── celery.py │ ├── init.py │ └── tasks.py └── test.py
celery.py内容如下:
from celery import Celery

# 创建celery实例
app = Celery('demo')
app.config_from_object('proj.celeryconfig')

# 自动搜索任务
app.autodiscover_tasks(['proj'])
celeryconfig.p模块内容如下:
from kombu import Exchange, Queue
BROKER_URL = 'redis://:332572@127.0.0.1:6379/1'
CELERY_RESULT_BACKEND = 'redis://:332572@127.0.0.1:6379/2'
tasks.py模块内容如下:
from proj.celery import app as celery_app

# 创建任务函数
@celery_app.task
def my_task1():
    print("任务函数(my_task1)正在执行....")

@celery_app.task
def my_task2():
    print("任务函数(my_task2)正在执行....")

@celery_app.task
def my_task3():
    print("任务函数(my_task3)正在执行....")
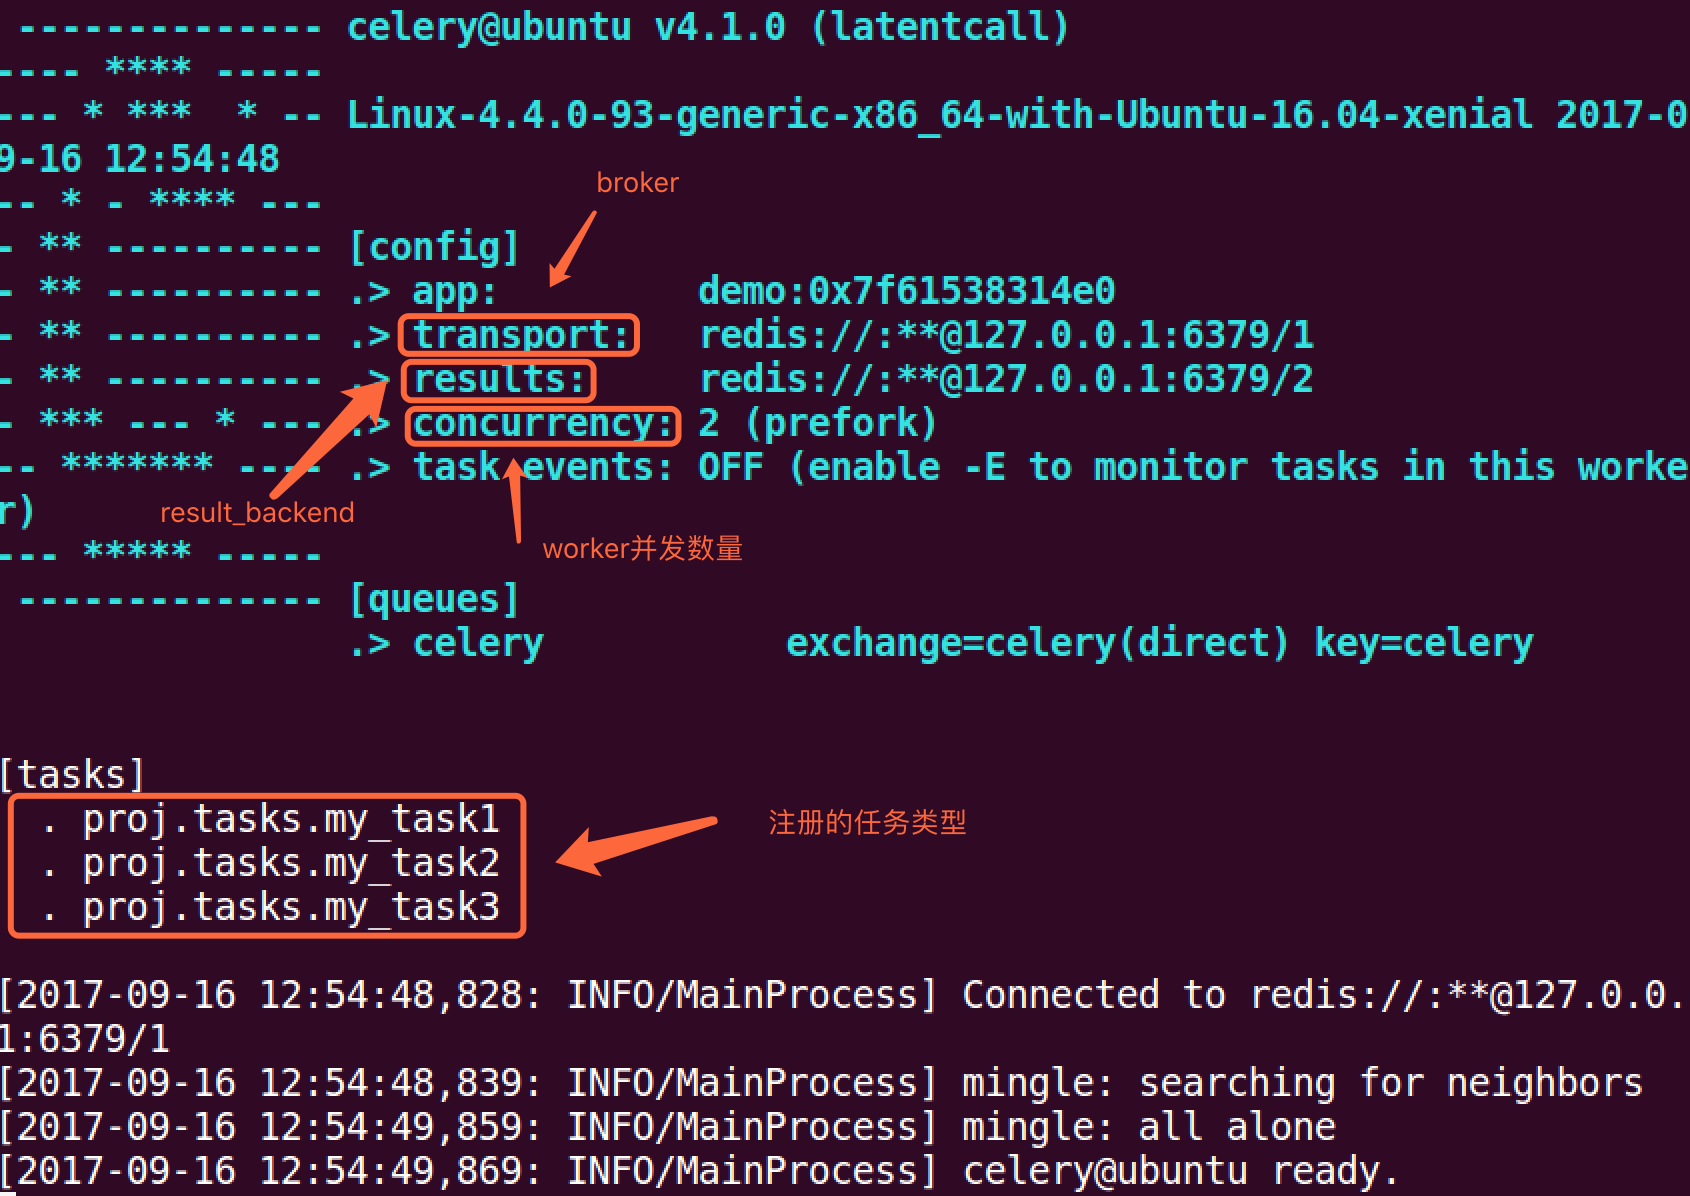
启动worker:
celery -A proj worker -l info
键入ctrl+c可关闭worker.
调用任务,可使用delay()方法:
my_task.delay(2, 2)
也可以使用apply_async()方法,该方法可让我们设置一些任务执行的参数,例如,任务多久之后才执行,任务被发送到那个队列中等等.
my_task.apply_async((2, 2), queue='my_queue', countdown=10)
任务my_task将会被发送到my_queue队列中,并且在发送10秒之后执行。
如果我们直接执行任务函数,将会直接执行此函数在当前进程中,并不会向broker发送任何消息。
无论是delay()还是apply_async()方式都会返回AsyncResult对象,方便跟踪任务执行状态,但需要我们配置result_backend.
每一个被吊用的任务都会被分配一个ID,我们叫Task ID.
1. signature
我们到目前为止只是学习了如何使用delay()方法,当然这个方法也是非常常用的。但是有时我们并不想简单的将任务发送到队列中,我们想将一个任务函数(由参数和执行选项组成)作为一个参数传递给另外一个函数中,为了实现此目标,Celery使用一种叫做signatures的东西。
一个signature包装了一个参数和执行选项的单个任务调用。我们可将这个signature传递给函数。
我们先看下tasks.py模块中定义的任务函数:
from proj.celery import app as celery_app

# 创建任务函数
@celery_app.task
def my_task1():
    print("任务函数(my_task1)正在执行....")

@celery_app.task
def my_task2():
    print("任务函数(my_task2)正在执行....")

@celery_app.task
def my_task3():
    print("任务函数(my_task3)正在执行....")
我们将my_task1()任务包装称一个signature:
t1 = my_task1.signatures(countdown=10)
t1.delay()
2. Primitives
这些primitives本身就是signature对象,因此它们可以以多种方式组合成复杂的工作流程。primitives如下:
group: 一组任务并行执行,返回一组返回值,并可以按顺序检索返回值。
chain: 任务一个一个执行,一个执行完将执行return结果传递给下一个任务函数.
tasks.py模块如下:
from proj.celery import app as celery_app

# 创建任务函数
@celery_app.task
def my_task1(a, b):
    print("任务函数(my_task1)正在执行....")
    return a + b

@celery_app.task
def my_task2(a, b):
    print("任务函数(my_task2)正在执行....")
    return a + b

@celery_app.task
def my_task3(a, b):
    print("任务函数(my_task3)正在执行....")
    return a + b
group案例如下(test.py模块):
from proj.tasks import my_task1
from proj.tasks import my_task2
from proj.tasks import my_task3
from celery import group

# 将多个signature放入同一组中
my_group = group((my_task1.s(10, 10), my_task2.s(20, 20), my_task3.s(30, 30)))
ret = my_group() # 执行组任务
print(ret.get())  # 输出每个任务结果

chain案例如下(test.py模块):
from proj.tasks import my_task1
from proj.tasks import my_task2
from proj.tasks import my_task3
from celery import chain

# 将多个signature组成一个任务链
# my_task1的运行结果将会传递给my_task2
# my_task2的运行结果会传递给my_task3
my_chain = chain(my_task1.s(10, 10) | my_task2.s(20) | my_task3.s(30))
ret = my_chain()  # 执行任务链
print(ret.get())  # 输出最终结果

假如我们有两个worker,一个worker专门用来处理邮件发送任务和图像处理任务,一个worker专门用来处理文件上传任务。
我们创建两个队列,一个专门用于存储邮件任务队列和图像处理,一个用来存储文件上传任务队列。
Celery支持AMQP(Advanced Message Queue)所有的路由功能,我们也可以使用简单的路由设置将指定的任务发送到指定的队列中.
我们需要配置在celeryconfig.py模块中配置 CELERY_ROUTES 项, tasks.py模块修改如下:
from proj.celery import app as celery_app


@celery_app.task
def my_task1(a, b):
    print("my_task1任务正在执行....")
    return a + b


@celery_app.task
def my_task2(a, b):
    print("my_task2任务正在执行....")
    return a + b


@celery_app.task
def my_task3(a, b):
    print("my_task3任务正在执行....")
    return a + b


@celery_app.task
def my_task4(a, b):
    print("my_task3任务正在执行....")
    return a + b


@celery_app.task
def my_task5():
    print("my_task5任务正在执行....")


@celery_app.task
def my_task6():
    print("my_task6任务正在执行....")


@celery_app.task
def my_task7():
    print("my_task7任务正在执行....")
我们通过配置,将send_email和upload_file任务发送到queue1队列中,将image_process发送到queue2队列中。
我们修改celeryconfig.py:
broker_url='redis://:@127.0.0.1:6379/1'
result_backend='redis://:@127.0.0.1:6379/2'


task_routes=({
    'proj.tasks.my_task5': {'queue': 'queue1'},
    'proj.tasks.my_task6': {'queue': 'queue1'},
    'proj.tasks.my_task7': {'queue': 'queue2'},
    },
)
test.py:
from proj.tasks import *

# 发送任务到路由指定的队列中
my_task5.delay() my_task6.delay() my_task7.delay()
  开启两个worker服务器,分别处理两个队列: ```python celery -A proj worker --loglevel=info -Q queue1 celery -A proj worker --loglevel=info -Q queue2
我们同样也可以通过apply_aynsc()方法来设置任务发送到那个队列中:
my_task1.apply_async(queue='queue1')
我们也可设置一个worker服务器处理两个队列中的任务:
celery -A proj worker --loglevel=info -Q queue1,queue2