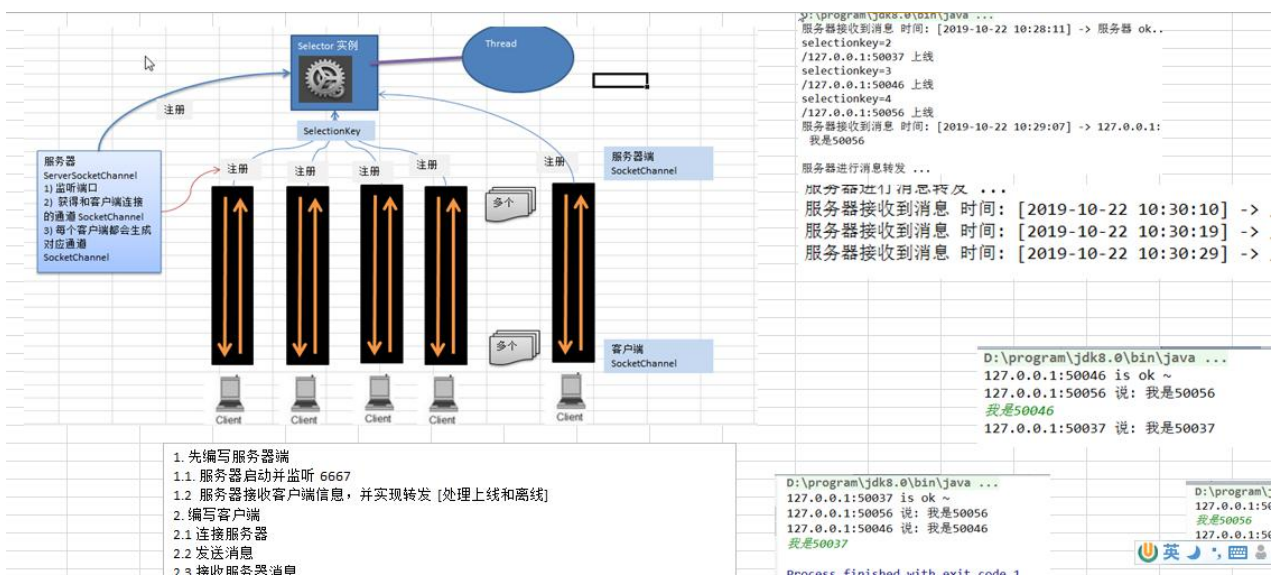
nio实现群聊系统
实例要求
1) 编写一个 NIO 群聊系统,实现服务器端和客户端之间的数据简单通讯(非阻塞)
2) 实现多人群聊
3) 服务器端:可以监测用户上线,离线,并实现消息转发功能
4) 客户端:通过 channel 可以无阻塞发送消息给其它所有用户,同时可以接受其它用户发送的消息(有服务器转发
得到)
示意图分析
代码
1、服务端
import java.io.IOException;
import java.net.InetSocketAddress;
import java.nio.ByteBuffer;
import java.nio.channels.*;
import java.util.Iterator;

public class GroupChatServer {
    //定义属性
    private Selector selector;
    private ServerSocketChannel listenChannel;
    private static final int PORT = 6667;

    //构造器
    //初始化工作
    public GroupChatServer() {

        try {

            //得到选择器
            selector = Selector.open();
            //ServerSocketChannel
            listenChannel =  ServerSocketChannel.open();
            //绑定端口
            listenChannel.socket().bind(new InetSocketAddress(PORT));
            //设置非阻塞模式
            listenChannel.configureBlocking(false);
            //将该listenChannel 注册到selector
            listenChannel.register(selector, SelectionKey.OP_ACCEPT);

        }catch (IOException e) {
            e.printStackTrace();
        }

    }

    //监听
    public void listen() {

        System.out.println("监听线程: " + Thread.currentThread().getName());
        try {

            //循环处理
            while (true) {

                int count = selector.select();
                if(count > 0) {//有事件处理

                    //遍历得到selectionKey 集合
                    Iterator<SelectionKey> iterator = selector.selectedKeys().iterator();
                    while (iterator.hasNext()) {
                        //取出selectionkey
                        SelectionKey key = iterator.next();

                        //监听到accept
                        if(key.isAcceptable()) {
                            SocketChannel sc = listenChannel.accept();
                            sc.configureBlocking(false);
                            //将该 sc 注册到seletor
                            sc.register(selector, SelectionKey.OP_READ);

                            //提示
                            System.out.println(sc.getRemoteAddress() + " 上线 ");

                        }
                        if(key.isReadable()) { //通道发送read事件,即通道是可读的状态
                            //处理读 (专门写方法..)

                            readData(key);

                        }
                        //当前的key 删除,防止重复处理
                        iterator.remove();
                    }

                } else {
                    System.out.println("等待....");
                }
            }

        }catch (Exception e) {
            e.printStackTrace();

        }finally {
            //发生异常处理....

        }
    }

    //读取客户端消息
    private void readData(SelectionKey key) {

        //取到关联的channle
        SocketChannel channel = null;

        try {
           //得到channel
            channel = (SocketChannel) key.channel();
            //创建buffer
            ByteBuffer buffer = ByteBuffer.allocate(1024);

            int count = channel.read(buffer);
            //根据count的值做处理
            if(count > 0) {
                //把缓存区的数据转成字符串
                String msg = new String(buffer.array());
                //输出该消息
                System.out.println("form 客户端: " + msg);

                //向其它的客户端转发消息(去掉自己), 专门写一个方法来处理
                sendInfoToOtherClients(msg, channel);
            }

        }catch (IOException e) {
            try {
                System.out.println(channel.getRemoteAddress() + " 离线了..");
                //取消注册
                key.cancel();
                //关闭通道
                channel.close();
            }catch (IOException e2) {
                e2.printStackTrace();;
            }
        }
    }

    //转发消息给其它客户(通道)
    private void sendInfoToOtherClients(String msg, SocketChannel self ) throws  IOException{

        System.out.println("服务器转发消息中...");
        System.out.println("服务器转发数据给客户端线程: " + Thread.currentThread().getName());
        //遍历 所有注册到selector 上的 SocketChannel,并排除 self
        for(SelectionKey key: selector.keys()) {

            //通过 key  取出对应的 SocketChannel
            Channel targetChannel = key.channel();

            //排除自己
            if(targetChannel instanceof  SocketChannel && targetChannel != self) {

                //转型
                SocketChannel dest = (SocketChannel)targetChannel;
                //将msg 存储到buffer
                ByteBuffer buffer = ByteBuffer.wrap(msg.getBytes());
                //将buffer 的数据写入 通道
                dest.write(buffer);
            }
        }

    }

    public static void main(String[] args) {

        //创建服务器对象
        GroupChatServer groupChatServer = new GroupChatServer();
        groupChatServer.listen();
    }
}

//可以写一个Handler
class MyHandler {
    public void readData() {

    }
    public void sendInfoToOtherClients(){

    }
}
2、客户端
import java.io.IOException;
import java.net.InetSocketAddress;
import java.nio.ByteBuffer;
import java.nio.channels.SelectionKey;
import java.nio.channels.Selector;
import java.nio.channels.SocketChannel;
import java.util.Iterator;
import java.util.Scanner;
import java.util.Set;

public class GroupChatClient {

    //定义相关的属性
    private final String HOST = "127.0.0.1"; // 服务器的ip
    private final int PORT = 6667; //服务器端口
    private Selector selector;
    private SocketChannel socketChannel;
    private String username;

    //构造器, 完成初始化工作
    public GroupChatClient() throws IOException {

        selector = Selector.open();
        //连接服务器
        socketChannel = socketChannel.open(new InetSocketAddress("127.0.0.1", PORT));
        //设置非阻塞
        socketChannel.configureBlocking(false);
        //将channel 注册到selector
        socketChannel.register(selector, SelectionKey.OP_READ);
        //得到username
        username = socketChannel.getLocalAddress().toString().substring(1);
        System.out.println(username + " is ok...");

    }

    //向服务器发送消息
    public void sendInfo(String info) {

        info = username + " 说:" + info;

        try {
            socketChannel.write(ByteBuffer.wrap(info.getBytes()));
        }catch (IOException e) {
            e.printStackTrace();
        }
    }

    //读取从服务器端回复的消息
    public void readInfo() {

        try {

            int readChannels = selector.select();
            if(readChannels > 0) {//有可以用的通道

                Iterator<SelectionKey> iterator = selector.selectedKeys().iterator();
                while (iterator.hasNext()) {

                    SelectionKey key = iterator.next();
                    if(key.isReadable()) {
                        //得到相关的通道
                       SocketChannel sc = (SocketChannel) key.channel();
                       //得到一个Buffer
                        ByteBuffer buffer = ByteBuffer.allocate(1024);
                        //读取
                        sc.read(buffer);
                        //把读到的缓冲区的数据转成字符串
                        String msg = new String(buffer.array());
                        System.out.println(msg.trim());
                    }
                }
                iterator.remove(); //删除当前的selectionKey, 防止重复操作
            } else {
                //System.out.println("没有可以用的通道...");

            }

        }catch (Exception e) {
            e.printStackTrace();
        }
    }

    public static void main(String[] args) throws Exception {

        //启动我们客户端
        GroupChatClient chatClient = new GroupChatClient();

        //启动一个线程, 每个3秒,读取从服务器发送数据
        new Thread() {
            public void run() {

                while (true) {
                    chatClient.readInfo();
                    try {
                        Thread.currentThread().sleep(3000);
                    }catch (InterruptedException e) {
                        e.printStackTrace();
                    }
                }
            }
        }.start();

        //发送数据给服务器端
        Scanner scanner = new Scanner(System.in);

        while (scanner.hasNextLine()) {
            String s = scanner.nextLine();
            chatClient.sendInfo(s);
        }
    }


}
零拷贝
概念
从字面意思理解就是数据不需要来回的拷贝,大大提升了系统的性能。
传统I/O模型
缓冲区是所有I/O的基础,I/O讲的无非就是把数据移进或移出缓冲区;进程执行I/O操作,就是向操作系统发出请求,让它要么把缓冲区的数据排干(写),要么填充缓冲区(读);下面看一个java进程发起read请求加载数据大致的流程图:
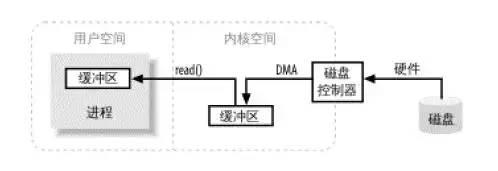
进程发起read请求之后,内核接收到read请求之后,会先检查内核空间中是否已经存在进程所需要的数据,如果已经存在,则直接把数据copy给进程的缓冲区;如果没有内核随即向磁盘控制器发出命令,要求从磁盘读取数据,磁盘控制器把数据直接写入内核read缓冲区,这一步通过DMA完成;接下来就是内核将数据copy到进程的缓冲区;
如果进程发起write请求,同样需要把用户缓冲区里面的数据copy到内核的socket缓冲区里面,然后再通过DMA把数据copy到网卡中,发送出去;
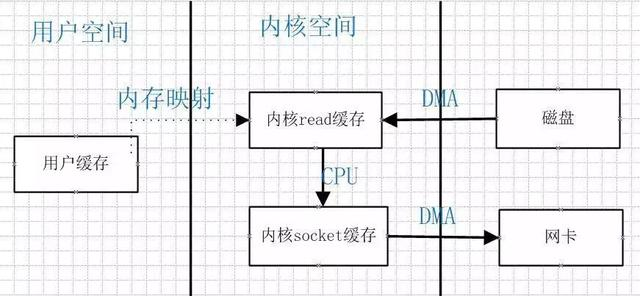
mmap 优化
1) mmap 通过内存映射,将文件映射到内核缓冲区,同时,用户空间可以共享内核空间的数据。这样,在进行网络传输时,就可以减少内核空间到用户空间的拷贝次数。如下图
2) mmap 示意图
sendFile优化
1) Linux 2.1 版本 提供了 sendFile 函数,其基本原理如下:数据根本不经过用户态,直接从内核缓冲区进入到Socket Buffer,同时,由于和用户态完全无关,就减少了一次上下文切换
2) 示意图和小结
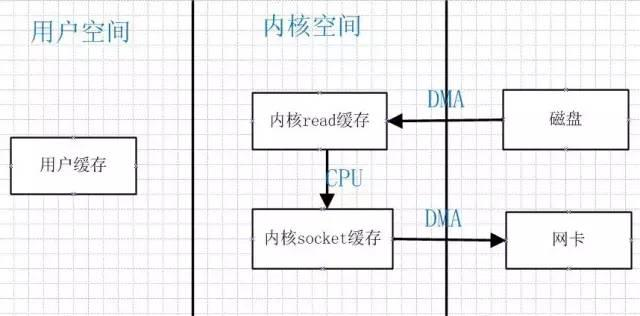
数据传送只发生在内核空间,所以减少了一次上下文切换;但是还是存在一次copy,能不能把这一次copy也省略掉,Linux2.4内核中做了改进,将Kernel buffer中对应的数据描述信息(内存地址,偏移量)记录到相应的socket缓冲区当中,这样连内核空间中的一次cpu copy也省掉了;
注:零拷贝,是从操作系统的角度来说的。因为内核缓冲区之间,没有数据是重复的(只有 kernel buffer 有 一份数据)。
mmap 和 sendFile 的区别
1) mmap 适合小数据量读写,sendFile 适合大文件传输。
2) mmap 需要 4 次上下文切换,3 次数据拷贝;sendFile 需要 3 次上下文切换,最少 2 次数据拷贝。
3) sendFile 可以利用 DMA 方式,减少 CPU 拷贝,mmap 则不能(必须从内核拷贝到 Socket 缓冲区)。
案例
1、服务端
package com.atguigu.nio.zerocopy;

import java.net.InetSocketAddress;
import java.net.ServerSocket;
import java.nio.ByteBuffer;
import java.nio.channels.ServerSocketChannel;
import java.nio.channels.SocketChannel;

//服务器
public class NewIOServer {
    public static void main(String[] args) throws Exception {

        InetSocketAddress address = new InetSocketAddress(7001);

        ServerSocketChannel serverSocketChannel = ServerSocketChannel.open();

        ServerSocket serverSocket = serverSocketChannel.socket();

        serverSocket.bind(address);

        //创建buffer
        ByteBuffer byteBuffer = ByteBuffer.allocate(4096);

        while (true) {
            SocketChannel socketChannel = serverSocketChannel.accept();

            int readcount = 0;
            while (-1 != readcount) {
                try {

                    readcount = socketChannel.read(byteBuffer);

                }catch (Exception ex) {
                   // ex.printStackTrace();
                    break;
                }
                //
                byteBuffer.rewind(); //倒带 position = 0 mark 作废
            }
        }
    }
}
2、客户端
package com.atguigu.nio.zerocopy;

import java.io.FileInputStream;
import java.net.InetSocketAddress;
import java.nio.channels.FileChannel;
import java.nio.channels.SocketChannel;

public class NewIOClient {
    public static void main(String[] args) throws Exception {

        SocketChannel socketChannel = SocketChannel.open();
        socketChannel.connect(new InetSocketAddress("localhost", 7001));
        String filename = "protoc-3.6.1-win32.zip";

        //得到一个文件channel
        FileChannel fileChannel = new FileInputStream(filename).getChannel();

        //准备发送
        long startTime = System.currentTimeMillis();

        //在linux下一个transferTo 方法就可以完成传输
        //在windows 下 一次调用 transferTo 只能发送8m , 就需要分段传输文件, 而且要主要
        //传输时的位置 =》 课后思考...
        //transferTo 底层使用到零拷贝
        long transferCount = fileChannel.transferTo(0, fileChannel.size(), socketChannel);

        System.out.println("发送的总的字节数 =" + transferCount + " 耗时:" + (System.currentTimeMillis() - startTime));

        //关闭
        fileChannel.close();

    }
}