一、LSTM预测未来一年某航空公司的客运流量
给你一个数据集,只有一列数据,这是一个关于时间序列的数据,从这个时间序列中预测未来一年某航空公司的客运流量。数据形式:

二、实战
1)数据下载
你可以google passenger.csv文件,即可找到对应的项目数据,如果没有找到,这里提供数据的下载链接:https://pan.baidu.com/s/1a7h5ZknDyT0azW9mv5st7w 提取码:u5h3
2)jupyter notebook
桌面新建airline文件夹,passenger.csv移动进去,按住shift+右键,选择在此处新建命令窗口,输入jupyter notebook,新建名为airline_predict的脚本
3)查看数据:
import pandas as pd
df = pd.read_csv('passenger.csv', header=None)
df.columns = ['time', 'passengers']
df.head(12)
结果如下:我们发现数据以年为单位,记录了每一年中每一月份的乘客量

我们来做出趋势图,看看客运量是如何变化的:
df = df.set_index('time')#将第一列设置为行索引
df.head(12)

import matplotlib.pyplot as plt
df['passengers'].plot()
plt.show()
结果如下:从图上看出,客运量还是逐年增加的


4)处理数据,划分训练集和测试集
import pandas as pd
import numpy as np
from sklearn.preprocessing import MinMaxScaler

class Airline_Predict:
    def __init__(self, filename, sequence_length=10, split=0.8):
        self.filename = filename
        self.sequence_length = sequence_length
        self.split = split

    def load_data(self):
        df = pd.read_csv(self.filename, sep=',', usecols=[1], header=None)

        data_all = np.array(df).astype('float')
        print(data_all.shape)#(144, 1)

        #数据归一化
        MMS = MinMaxScaler()
        data_all = MMS.fit_transform(data_all)
        print(data_all.shape)

        #构造输入lstm的3D数据:(133, 11, 1)
        #其中特征是10个,第11个是数值标签

        data = []
        for i in range( len(data_all) - self.sequence_length - 1 ):
            data.append( data_all[ i: i+self.sequence_length+1 ] )

        #global reshaped_data
        reshaped_data = np.array(data).astype('float64')
        print(reshaped_data.shape)#(133, 11, 1)

        #打乱第一维数据
        np.random.shuffle(reshaped_data)

        #对133组数据处理,每组11个数据,前10个作为特征,第11个是数值标签:(133, 10,1)
        x = reshaped_data[:, :-1]
        print('samples shape:', x.shape, '
')#(133, 10, 1)
        y = reshaped_data[:, -1]
        print('labels shape:', y.shape, '
')#(133, 1)

        #构建训练集
        split_boundary = int(reshaped_data.shape[0] * self.split)
        train_x = x[:split_boundary]
        print('train_x shape:', train_x.shape)

        #构建测试集
        test_x = x[ split_boundary: ]
        print('test_x shape:', test_x.shape)

        #训练集标签
        train_y = y[ : split_boundary ]
        print('train_y shape', train_y.shape)

        #测试集标签
        test_y = y[ split_boundary: ]
        print('test_y shape', test_y.shape)

        return train_x, train_y, test_x, test_y, MMS

filename = 'passenger.csv'
AirLine = Airline_Predict(filename)
train_x, train_y, test_x, test_y, MMS = AirLine.load_data()
5)训练模型
#coding=gbk
import pandas as pd
import numpy as np
from sklearn.preprocessing import MinMaxScaler
import warnings
warnings.filterwarnings('ignore')
from keras.models import Sequential
from keras.layers import LSTM, Dense, Activation
import matplotlib.pyplot as plt
class Airline_Predict:
def __init__(self, filename, sequence_length=10, split=0.8):
self.filename = filename
self.sequence_length = sequence_length
self.split = split
def load_data(self):
df = pd.read_csv(self.filename, sep=',', usecols=[1], header=None)
data_all = np.array(df).astype('float')
print(data_all.shape)#(144, 1)
#数据归一化
MMS = MinMaxScaler()
data_all = MMS.fit_transform(data_all)
print(data_all.shape)
#构造输入lstm的3D数据:(133, 11, 1)
#其中特征是10个,第11个是数值标签
data = []
for i in range( len(data_all) - self.sequence_length - 1 ):
data.append( data_all[ i: i+self.sequence_length+1 ] )
#global reshaped_data
reshaped_data = np.array(data).astype('float64')
print(reshaped_data.shape)#(133, 11, 1)
#打乱第一维数据
np.random.shuffle(reshaped_data)
#对133组数据处理,每组11个数据,前10个作为特征,第11个是数值标签:(133, 10,1)
x = reshaped_data[:, :-1]
print('samples shape:', x.shape, '
')#(133, 10, 1)
y = reshaped_data[:, -1]
print('labels shape:', y.shape, '
')#(133, 1)
#构建训练集
split_boundary = int(reshaped_data.shape[0] * self.split)
train_x = x[:split_boundary]
print('train_x shape:', train_x.shape)
#构建测试集
test_x = x[ split_boundary: ]
print('test_x shape:', test_x.shape)
#训练集标签
train_y = y[ : split_boundary ]
print('train_y shape', train_y.shape)
#测试集标签
test_y = y[ split_boundary: ]
print('test_y shape', test_y.shape)
return train_x, train_y, test_x, test_y, MMS
def build_model(self):
#LSTM函数的input_dim参数是输入的train_x的最后一个维度
#train_x的维度为(n_samples, time_sequence_steps, input_dim)
#在keras 的官方文档中,说了LSTM是整个Recurrent层实现的一个具体类,它需要的输入数据维度是:
#形如(samples,timesteps,input_dim)的3D张量
#而这个time_sequence_steps就是我们采用的时间窗口,即把一个时间序列当成一条长链,我们固定一个一定长度的窗口对这个长链进行采用
#这里使用了两个LSTM进行叠加,第二个LSTM的第一个参数指的是输入的维度,这和第一个LSTM的输出维度并不一样,这也是LSTM比较随意的地方
#最后一层采用了线性层
model = Sequential()
model.add( LSTM( input_dim=1, output_dim=50, return_sequences=True ) )
print( "model layers:",model.layers )
model.add( LSTM(100, return_sequences=False) )
model.add( Dense( output_dim=1 ) )
model.add( Activation('linear') )
model.compile( loss='mse', optimizer='rmsprop' )
return model
def train_model(self, train_x, train_y, test_x, test_y):
model = self.build_model()
try:
model.fit( train_x, train_y, batch_size=512, nb_epoch=100, validation_split=0.1 )
predict = model.predict(test_x)
#print(predict.size)
predict = np.reshape( predict, (predict.size, ) )#变成向量
test_y = np.reshape( test_y, (test_y.size, ) )
except KeyboardInterrupt:
print('predict:',predict)
print('test_y',test_y)
print('After predict:
',predict)
print('The right test_y:
',test_y)
try:
fig1 = plt.figure(1)
plt.plot(predict, 'r')
plt.plot(test_y, 'g-')
plt.title('This pic is drawed using Standard Data')
plt.legend(['predict', 'true'])
except Exception as e:
print(e)
return predict, test_y
filename = 'passenger.csv'
AirLine = Airline_Predict(filename)
train_x, train_y, test_x, test_y, MMS = AirLine.load_data()
predict_y, test_y = AirLine.train_model(train_x, train_y, test_x, test_y)
#对标注化后的数据还原
predict_y = MMS.inverse_transform( [ [i] for i in predict_y ] )
test_y = MMS.inverse_transform( [ [i] for i in test_y ] )
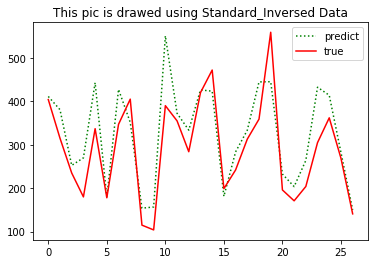
fig2 = plt.figure(2)
plt.plot(predict_y, 'g:', label='prediction')
plt.plot(test_y, 'r-', label='True')
plt.title('This pic is drawed using Standard_Inversed Data')
plt.legend(['predict', 'true'])
plt.show()
print('predict:',np.reshape(predict_y, (predict_y.size,)) )
print('True:',np.reshape(test_y, (test_y.size,)))

三、代码结构
