Nio学习
文章是自己学习后的一个总结,如果有什么理解不对的地方,欢迎留言
这一章你只需要明白什么是NIO,NIO中有什么,NIO能做什么即可。
更为详细的解释,可以去看JAVA NIO这本书,当然博主也在慢慢学习,也会在别的随笔中写出更为详细的解释!加油啊小伙伴!
什么是Nio?
java.nio全称java non-blocking IO(实际上是 new io),是指jdk1.4 及以上版本里提供的新api(New IO) ,为所有的原始类型(boolean类型除外)提供缓存支持的数据容器,使用它可以提供非阻塞式的高伸缩性网络。
什么是阻塞式什么是非阻塞式?
- 传统IO: 传统的IO是阻塞式的,当服务器要从一个文件系统读取数据的时候,需要建立一个线程去读取,但是刚开始读取的时候,有可能文件系统并没有把数据准备好,但是该线程只能等待文件系统把数据准备好再进行读的操作,无法先去做别的事情。这就是阻塞
- NIO : Nio可以解决传统IO中的堵塞问题,使用了Selector (选择器,稍后会详解)监听,数据有没有准备好,当数据准备好,服务器在为该读操作分配线程。这样一来,服务器可以很好的利用仅有的线程资源。
就好比生活中在某滴上预约了车,估摸这8:00司机会到达,你7:50就在小区门口等待,那么你将有10分钟的等待时间,这就是阻塞。相反,你等8:00司机到了并且给你打电话通知你已经到小区门口了,这个时候你再出门。这样你是不是就节约了10分钟,而这10分钟内,你可以选择干点有人生意义的事情,这样就是非阻塞。
但是请注意一点,并不是用了NIO就不会发生堵塞!!!并不是用了NIO就不会发生堵塞!!!并不是用了NIO就不会发生堵塞!!!重要的事情说三遍。在NIO中也分阻塞和非阻塞,后面会说。
你应该了解的NIO中三个组件
NIO中有三个重要概念,(⊙o⊙)…怎么说捏,如果没记住,那你恐怕没有办法继续向下看。
- Buffer: 缓冲区,用来存储数据的容器。实际上是个数组
- channel: 通道, 表示IO源和应用程序之间的连接
- selector: 选择器,如果channel注册进选择器中,那么selector就可以监听channel。一个selector可以监听多个channel.
Buffer可以理解成火车,Channel可以理解为铁路,buffer在channel中行驶。因此,我能得出一个结论,channel并不存储数据!!!
Channel每次都从buffer中读数据,也把数据写入到buffer中
buffer学习(java.nio.Buffer)
buffer实际上是一个数组,buffer可以有多种类型, java中的基本类型都可以和buffer关联(boolean除外).
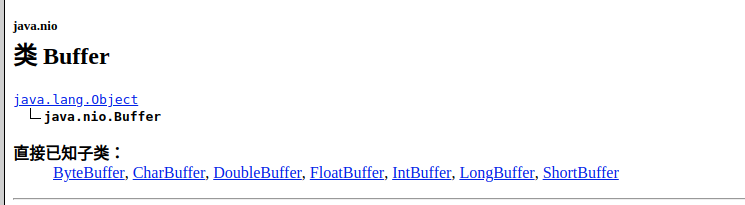
突然间觉得boolean好可怜,人家不带它玩,用的最多的可能就是ByteBuffer了。
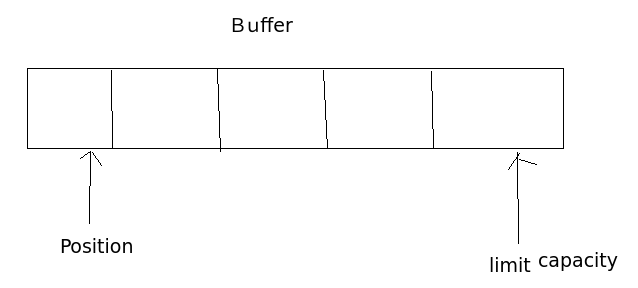
在Buffer中还有三个重要概念:容量、限制和位置.
- position:标记当前操作数所在位置
- limit:表示缓冲区中可以操作数据的大小,limit后的数据不能读写
- capacity: 标记当前容量大小
比如我初始化一个
ByteBuffer buffer = new ByteBuffer.allocate(5);
(allocate可以指定buffer缓冲区的大小。)那么position,limit,capacith的关系如下
画图太难了,臣妾做不到啊!!!这个时候我
String str = "123";
buffer.put(str.getBytes());
那么position就会移动到第三格,limit,capacity还是不会变。
但是如果如果把buffer切换成读模式
buffer.flip()
那么当前position: 3 , limit: 3, capacity: 5


    @Test
    public void test() {
        String str = "123";
        //指定buffer的容量大小
        ByteBuffer buffer = ByteBuffer.allocate(1024);
        //属性
        System.out.println("-----------------------");
        //当前操作的数据所在的位置
        System.out.println(buffer.position());
        //界限,表示缓冲区中可以操作数据的大小, limit后的数据不能读写
        System.out.println(buffer.limit());
        //缓冲区中最大存储数据容量
        System.out.println(buffer.capacity());

        buffer.put(str.getBytes());
        System.out.println("---------put--------------");
        System.out.println(buffer.position());
        System.out.println(buffer.limit());
        System.out.println(buffer.capacity());
        //切换成读模式
        buffer.flip();
        System.out.println("---------flip--------------");
        System.out.println(buffer.position());
        System.out.println(buffer.limit());
        System.out.println(buffer.capacity());

        byteArrs = new byte[buffer.limit()];
        ByteBuffer byteBuffer = buffer.get(byteArrs);
        System.out.println(byteBuffer.toString());
        // rewind,切换成读模式,可以重新读
        buffer.rewind();
        System.out.println("===========rewind============");
        System.out.println(buffer.toString());

        //清空缓存区
        buffer.clear();
    }
Channel(java.nio.channels.Channel)
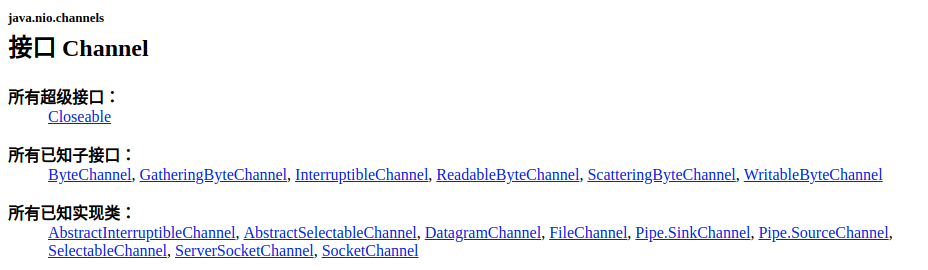
channel中主要的实现类:FileChannel,SocketChannel,ServerSocketChannel。
获取Channel的方法:
JDK1.7以前: 通过IO流获得到channel
    /**
     * 利用通道完成文件复制
     * @throws IOException
     */
    @Test
    public void test() {
        long start = System.currentTimeMillis();
        FileInputStream fis = null;
        FileOutputStream fos = null;
        FileChannel inChannel = null;
        FileChannel outChannel = null;
        try {
            //jdk1.7以前NIO 的获取通道的写法
            fis  = new FileInputStream("./resource/Java NIO.pdf");
            fos = new FileOutputStream("./resource/demoCopyTest.jpeg");

            //1.获取通道
            inChannel = fis.getChannel();
            outChannel = fos.getChannel();
            //2.创建缓冲区,并分配大小
            ByteBuffer byteBuffer = ByteBuffer.allocate(1024);
            //3.把数据写进缓冲区
            while (inChannel.read(byteBuffer) != -1) {

                //4.切换读取数据模式
                byteBuffer.flip();
                outChannel.write(byteBuffer);
                byteBuffer.clear();
            }
        } catch (IOException e) {
            // TODO Auto-generated catch block
            e.printStackTrace();
        } finally {
            try {
                if (outChannel != null) {
                    outChannel.close();
                }
                if (inChannel != null) {
                    inChannel.close();
                }
                if (fos != null) {
                    fos.close();
                }
                if (fis != null) {
                    fis.close();
                }
            } catch (IOException e) {
                // TODO Auto-generated catch block
                e.printStackTrace();
            }
        }
        long end = System.currentTimeMillis();
        System.out.println("耗费时间非直接缓存" + (end - start));
    }
JDK1.7以后:可以直接通过Open方法获得到channel
    @Test
    public void test2() {
        long start = System.currentTimeMillis();
        FileChannel inChannel = null;
        FileChannel outChannel = null;

        try {
            //建立通道
            inChannel = FileChannel.open(Paths.get("./resource/Java NIO.pdf"), StandardOpenOption.READ);
            outChannel = FileChannel.open(Paths.get("./resource/Java NIOCopyTest2.pdf"), StandardOpenOption.READ, StandardOpenOption.WRITE, StandardOpenOption.CREATE);

        //    inChannel.transferTo(0, inChannel.size(), outChannel);
            outChannel.transferFrom(inChannel, 0, inChannel.size());
        } catch (IOException e) {
            // TODO Auto-generated catch block
            e.printStackTrace();
        } finally {
            try {
                if (outChannel != null) {
                    outChannel.close();
                }
                if (inChannel != null) {
                    inChannel.close();
                }
            } catch (IOException e) {
                // TODO Auto-generated catch block
                e.printStackTrace();
            }

        }
        long end = System.currentTimeMillis();
        System.out.println("耗费时间直接缓冲区" + (end - start));
    }
    /**
     * 直接缓冲区,用内存映射文件完成
     * 可能遇到的问题: 文件已经copy完成,但是程序可能没有完成。我们只能控制什么时候写入映射文件,但是不能控制什么时候从映射文件写入磁盘
     */
    @Test
    public void test1() {
        long start = System.currentTimeMillis();
        FileChannel inChannel = null;
        FileChannel outChannel = null;
        MappedByteBuffer inMap = null;
        MappedByteBuffer outMap = null;

        try {
            //建立通道
            inChannel = FileChannel.open(Paths.get("./resource/Java NIO.pdf"), StandardOpenOption.READ);
            outChannel = FileChannel.open(Paths.get("./resource/Java NIOCopyTest2.pdf"), StandardOpenOption.READ, StandardOpenOption.WRITE, StandardOpenOption.CREATE);
            //因为是内存文件映射,我们不需要读流,内存映射文件
            //MappedByteBuffer 相当于allocateDriect()
            inMap = inChannel.map(MapMode.READ_ONLY, 0, inChannel.size());
            outMap = outChannel.map(MapMode.READ_WRITE, 0, inChannel.size());
            byte[] bytes = new byte[inMap.limit()];
            inMap.get(bytes);
            outMap.put(bytes);
        } catch (IOException e) {
            // TODO Auto-generated catch block
            e.printStackTrace();
        } finally {
            try {
                if (outChannel != null) {
                    outChannel.close();
                }
                if (inChannel != null) {
                    inChannel.close();
                }
            } catch (IOException e) {
                // TODO Auto-generated catch block
                e.printStackTrace();
            }

        }
        long end = System.currentTimeMillis();
        System.out.println("耗费时间直接缓冲区" + (end - start));
    }
selector(java.nio.channels.Selector )
使用Selector可以实现非阻塞,创建selector
Selector selector = Selector.open();
阻塞式NIO和非阻塞式NIO
NIO是如何实现非阻塞式IO的?
嗯。。这个问题我们还是得看一张图。阻塞式是这样的,客户端直接和服务器端建立连接,不需要中间监听器

没用Selector所以还是阻塞式NIO
    @Test
    public void serverTest() {
        ServerSocketChannel serverSocketChannel = null;
        FileChannel fileChannel = null;
        SocketChannel socketChannel = null;
        try {
            serverSocketChannel = ServerSocketChannel.open();
            serverSocketChannel.bind(new InetSocketAddress(9898));
            socketChannel = serverSocketChannel.accept();
            ByteBuffer byteBuffer = ByteBuffer.allocate(1024);
            fileChannel = FileChannel.open(Paths.get("./resource/blockTest.jpeg"), StandardOpenOption.WRITE, StandardOpenOption.CREATE);

            while (socketChannel.read(byteBuffer) != -1) {
                byteBuffer.flip();
                System.out.println(byteBuffer);
                fileChannel.write(byteBuffer);
                byteBuffer.clear();
            }
        } catch (IOException e) {
            // TODO Auto-generated catch block
            e.printStackTrace();
        } finally {
            try {
                if (fileChannel != null) {
                    fileChannel.close();
                }
                if (serverSocketChannel != null) {
                    serverSocketChannel.close();
                }
                if (socketChannel != null) {
                    socketChannel.close();
                }
            } catch (IOException e) {
                // TODO Auto-generated catch block
                e.printStackTrace();
            }
        }
    }
非阻塞式是这样的
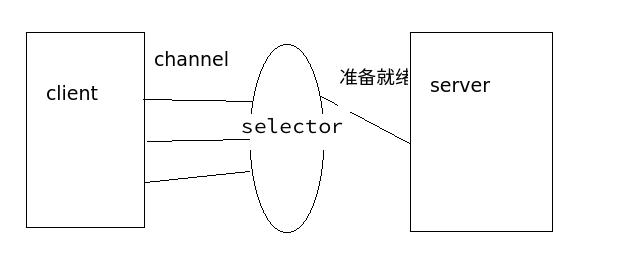
当客户端发请求时会先到达Selector,Selector就像一堵墙一样堵在了客户端和服务器段。发请求的同时把channel注册到selector中。Selector监听channel的状态
渠道分为4种状态:
public static final int OP_READ = 1 << 0;
public static final int OP_WRITE = 1 << 2;
public static final int OP_CONNECT = 1 << 3;
public static final int OP_ACCEPT = 1 << 4;
拿SocketChannel来举例子,服务器端
    @Test
    public void server() {
        ServerSocketChannel serverSocketChannel = null;
        try {
            serverSocketChannel = ServerSocketChannel.open();
            serverSocketChannel.configureBlocking(false);
            //创建Selector对象
            Selector selector = Selector.open();
            //把serverSocketChannel交给Selector管理,并绑定监听状态OP_ACCEPT
            serverSocketChannel.register(selector, SelectionKey.OP_ACCEPT);
            serverSocketChannel.bind(new InetSocketAddress(9898));
            while (selector.select() > 0) {
                //获得迭代器
                Iterator<SelectionKey> iterator = selector.selectedKeys().iterator();
                while (iterator.hasNext()) {
                    SelectionKey selectionKey = iterator.next();
                    //判断channel是否是 is ready to accept准备
                    if (selectionKey.isAcceptable()) {
                        //服务器连接请求!!!这个时候才连接,而不是像阻塞Io那样,不管三七二十一直接连接请求
                        SocketChannel socketChannel = serverSocketChannel.accept();
                        //设置成非阻塞
                        socketChannel.configureBlocking(false);
                        //注册channel到selector,这里注意,SocketChannel是一个新的渠道也需要注册
                        //监听read
                        socketChannel.register(selector, SelectionKey.OP_READ);
                    } else if (selectionKey.isReadable()){
                        //获取当前选择器中读就绪的channel
                        SocketChannel socketChannel = (SocketChannel)selectionKey.channel();
                        ByteBuffer buffer = ByteBuffer.allocate(1024);
                        int len = 0;
                        while ((len = socketChannel.read(buffer) )!= -1) {
                            buffer.flip();
                            //这里可以把客户端传过来的byte做一些转化
                            System.out.println(buffer);
                            buffer.clear();
                        }
                    }
                    //从迭代器中把已经完成是事件移除
                    iterator.remove();
                }
            }
        } catch (IOException e) {
            // TODO Auto-generated catch block
            e.printStackTrace();
        }
    }