转至https://yq.aliyun.com/articles/25578
Yeoman 介绍
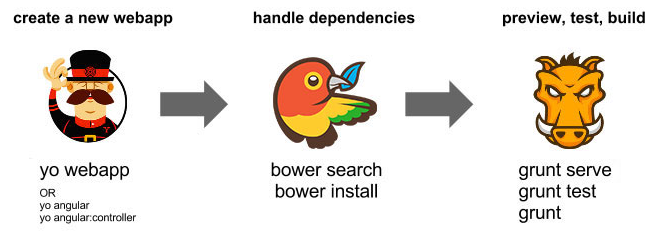
Yeoman 是 Google 的团队和外部贡献者团队合作开发的,他的目标是通过 Grunt(一个用于开发任务自动化的命令行工具)和 Bower(一个HTML、CSS、Javascript 和图片等前端资源的包管理器)的包装为开发者创建一个易用的工作流。
Yeoman 的目的不仅是要为新项目建立工作流,同时还是为了解决前端开发所面临的诸多严重问题,例如零散的依赖关系。
Yeoman 主要有三部分组成:yo(脚手架工具)、grunt(构建工具)、bower(包管理器)。这三个工具是分别独立开发的,但是需要配合使用,来实现我们高效的工作流模式。
- Yo 搭建新应用的脚手架,编写你的 Grunt 配置并且安装你有可能在构建中需要的相关的 Grunt 任务。
- Grunt 被用来构建,预览以及测试你的项目,感谢来自那些由 Yeoman 团队和 runt-contrib 所管理的任务的帮助。
- Bower 被用来进行依赖管理,所以你不再需要手动的下载和管理你的脚本了。
下面这幅图很形象的表明了他们三者之间的协作关系。
Yeoman 特性:
快速创建骨架应用程序。使用可自定义的模板(例如:HTML5、Boilerplate、Twitter Bootstrap 等)、AMD(通过 RequireJS)以及其他工具轻松地创建新项目的骨架。自动编译 CoffeeScrip 和 Compass。在做出变更的时候,Yeoman 的 LiveReload 监视进程会自动编译源文件,并刷新浏览器,而不需要你手动执行。自动完善你的脚本。所有脚本都会自动针对 JSHint 运行,从而确保它们遵循语言的最佳实践。内建的预览服务器。你不需要启动自己的 HTTP 服务器。内建的服务器用一条命令就可以启动。非常棒的图像优化。使用 OptPNG 和 JPEGTran 对所有图像做了优化。生成 AppCache 清单。Yeoman 会为你生成应用程序缓存的清单,你只需要构建项目就好。“杀手级”的构建过程。你所做的工作不仅被精简到最少,让你更加专注,为你节省大量工作。集成的包管理。Yeoman 让你可以通过命令行轻松地查找新的包,安装并保持更新,而不需要你打开浏览器。对 ES6 模块语法的支持。你可以使用最新的 ECMAScript 6 模块语法来编写模块。这还是一种实验性的特性,它会被转换成 ES5,从而你可以在所有流行的浏览器中使用编写的代码。PhantomJS 单元测试。你可以通过 PhantomJS 轻松地运行单元测试。当你创建新的应用程序的时候,它还会为你自动创建测试内容的骨架。
安装
安装前提
一份完整的新手上路指南在这里可以找到,但是对于那些希望快速上手操练的家伙,请确定你已经安装了 Node.js, Git。Ruby 和 Compass 是可选的(如果你想要使用Compass)。
Node.js 版本要求为 v0.10.x+,npm 版本要求为 v2.1.0+,运行下面命令 检查版本:
$ node --version && npm --version
也可以检查 Git 版本:
$ git --version
安装 Yeoman 工具集
确保 Node 安装之后,安装 Yeoman 工具集:
$ npm install --global yo bower grunt-cli
运行下面命令检查是否安装成功:
$ yo --version && bower --version && grunt --version

1.4.5
1.3.12
grunt-cli v0.1.13
安装 AngularJS 的生成器
Yeoman 生成器使用 npm 命令,现在可用的生成器数量已经超过了 1000+个生成器,这其中很多都是由开源社区编写的。
你可以安装 web 应用的生成器
$ npm install -g generator-webapp
也可以安装 generator-angular 生成器:
$ npm install --global generator-angular
创建项目
创建一个目录用于作为工程目录:
$ mkdir mytodo && cd mytodo
你可以查看所有的生成器:
$ yo
? 'Allo june! What would you like to do?
  Run a generator
  Angular
  Karma
  Webapp
 Mocha
  ──────────────
  Update your generators
(Move up and down to reveal more choices)
运行 Angular 生成器,会提示你是否使用 Sass 和引入 Bootstrap,以及加载哪些 Angular 模块:
$ yo angular

     _-----_
    |       |    .--------------------------.
    |--(o)--|    |    Welcome to Yeoman,    |
   `---------´   |   ladies and gentlemen!  |
    ( _´U`_ )    '--------------------------'
    /___A___
     |  ~  |
   __'.___.'__
 ´   `  |° ´ Y `

Out of the box I include Bootstrap and some AngularJS recommended modules.

? Would you like to use Sass (with Compass)? No
? Would you like to include Bootstrap? Yes
? Which modules would you like to include? angular-animate.js, angular-cookies.js, angular-resource.js, angular-route.js, angular-sanitize.js, angular-touch.js
选择需要下载的模块,然后回车。过一段时间之后,生成的目录结构如下:
mytodo
├── Gruntfile.js
├── app
│   ├── 404.html
│   ├── favicon.ico
│   ├── images
│   │   └── yeoman.png
│   ├── index.html
│   ├── robots.txt
│   ├── scripts
│   │   ├── app.js
│   │   └── controllers
│   ├── styles
│   │   └── main.css
│   └── views
│       ├── about.html
│       └── main.html
├── bower.json
├── bower_components
├── package.json
└── test
    ├── karma.conf.js
    └── spec
        └── controllers
示例中的所有 js 代码都使用了严格模式,有关严格模式的内容可以参考 http://www.waylau.com/javascript-use-strict-mode/
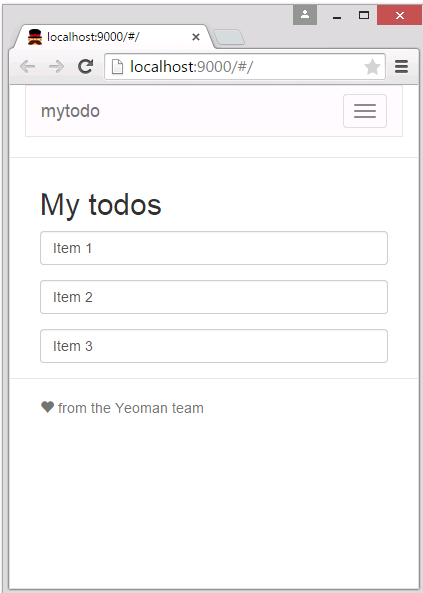
运行下面命令启动服务:
$ grunt serve
浏览器访问 ,你会看到:

创建 AngularJS 应用
创建新模板展现 Todo 列表
打开 scripts/controllers/main.js ,代码修改为:
'use strict';

angular.module('webApp').controller('MainCtrl', function ($scope) {
    $scope.todos = ['Item 1', 'Item 2', 'Item 3'];
  });
修改 views/main.html,将 todos 中的项目以 input 标签形式输出:
<div class="container">
  <h2>My todos</h2>
  <p class="form-group" ng-repeat="todo in todos">
    <input type="text" ng-model="todo" class="form-control">
  </p>
</div>
页面会显示如下:
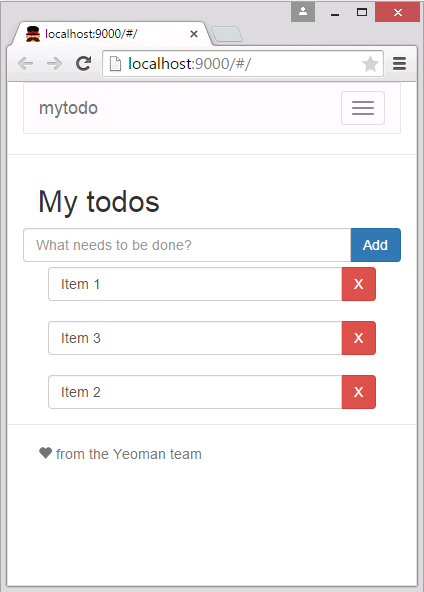
添加一个 todo 项
首先,添加一个输入框和添加按钮,将 views/main.html 修改为:
<div class="container">
  <h2>My todos</h2>

  <!-- Todos input -->
  <form role="form" ng-submit="addTodo()">
    <div class="row">
      <div class="input-group">
        <input type="text" ng-model="todo" placeholder="What needs to be done?" class="form-control">
        <span class="input-group-btn">
          <input type="submit" class="btn btn-primary" value="Add">
        </span>
      </div>
    </div>
  </form>
  <p></p>

  <!-- Todos list -->
  <p class="form-group" ng-repeat="todo in todos">
    <input type="text" ng-model="todo" class="form-control">
  </p>
</div>
这时候,页面内容如下:
修改 main.js 添加 addTodo() 事件:
'use strict';

angular.module('webApp')
  .controller('MainCtrl', function ($scope) {
    $scope.todos = ['Item 1', 'Item 2', 'Item 3'];
    $scope.addTodo = function () {
      $scope.todos.push($scope.todo);
      $scope.todo = '';
    };
  });
这样,就完成了添加 todo 项的功能。
移除一个 todo 项目
先在列表中每一个 todo 项目的边上加上一个移除按钮,修改 views/main.html 中 Todos list 注释部分的代码为:
<!-- Todos list -->
<p class="input-group" ng-repeat="todo in todos">
  <input type="text" ng-model="todo" class="form-control">
  <span class="input-group-btn">
    <button class="btn btn-danger" ng-click="removeTodo($index)" aria-label="Remove">X</button>
  </span>
</p>
修改 main.js 添加 removeTodo($index) 事件:
'use strict';

angular.module('webApp')
  .controller('MainCtrl', function ($scope) {
    $scope.todos = ['Item 1', 'Item 2', 'Item 3'];
    $scope.addTodo = function () {
      $scope.todos.push($scope.todo);
      $scope.todo = '';
    };

    $scope.removeTodo = function (index) {
      $scope.todos.splice(index, 1);
    };
  });
现在,删除按钮能够响应删除事件了。虽然我们可以添加和移除 Todo 事项,但是这些记录都不能永久地保存。一旦页面被刷新了,更改的记录都会不见了,又恢复到 main.js 中设置的todo 数组的值。
另外,上面添加 Todo 项时,如果重复添加相同的记录,则后台会报错,这是因为脚本中没有做校验。
对 Todo 事项进行排序
接下来,我们安装并引入 AngularUI Sortable 模块,使得 Todo 事项可以排序。这里,我们需要使用 bower 安装 angular-ui-sortable 和 jquery-ui:
$ bower install --save angular-ui-sortable jquery-ui
添加参数 --save 可以更新 bower.json 文件中关于 angular-ui-sortable 和 jquery-ui 的依赖,这样你就不用手动去 bower.json 中更新依赖了。
再次启动 grunt server:
$ grunt serve
为了使用Sortable模块,我们需要在 scripts/app.js 中更新Angular 模块,将 Sortable 可以加载到我们的应用中,更改前代码, 将 ui.sortable 添加进数组中,如下:
angular.module('webApp', [
    'ngAnimate',
    'ngCookies',
    'ngResource',
    'ngRoute',
    'ngSanitize',
    'ngTouch',
    'ui.sortable'
  ])
最后,在 views/main.html 中,我们需要将 ui-sortable 指令作为一个 div 将 ng-repeat 层包起来。
<!-- Todos list -->
<div ui-sortable ng-model="todos">
  <p class="input-group" ng-repeat="todo in todos">
添加一些内联的 CSS,将鼠标显示为 “可移动” 样式来告诉用户这些 todo 项是可以移动的:
<p class="input-group" ng-repeat="todo in todos" style="padding:5px 10px; cursor: move;">
完整代码如下:
<!-- Todos list -->
<div ui-sortable ng-model="todos">
  <p class="input-group" ng-repeat="todo in todos" style="padding:5px 10px; cursor: move;">
    <input type="text" ng-model="todo" class="form-control">
    <span class="input-group-btn">
      <button class="btn btn-danger" ng-click="removeTodo($index)" aria-label="Remove">X</button>
    </span>
  </p>
</div>
服务浏览器,我们就可以对 Todo 事项进行拖拽排序了。
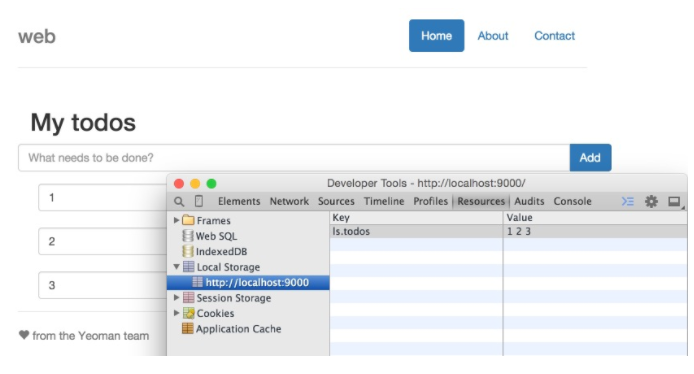
持久化存储
之前项目的数据,当浏览器刷新后就不会保存了。我们可以安装 Angular 模块 angular-local-storage,快速实现本地存储。
下载依赖:
$ bower install --save angular-local-storage
编辑 scripts/app.js 添加 LocalStorageModule的 适配器:
angular
  .module('webApp', [
    'ngAnimate',
    'ngCookies',
    'ngResource',
    'ngRoute',
    'ngSanitize',
    'ngTouch',
    'ui.sortable',
    'LocalStorageModule'
])
同时也要配置 localStorageServiceProvider,用 ls 作为 localStorage名称前缀:
.config(['localStorageServiceProvider', function(localStorageServiceProvider){
  localStorageServiceProvider.setPrefix('ls');
}])
完整的 scripts/app.js 文件:
'use strict';

angular
  .module('webApp', [
    'ngAnimate',
    'ngCookies',
    'ngResource',
    'ngRoute',
    'ngSanitize',
    'ngTouch',
    'ui.sortable',
    'LocalStorageModule'
  ]).config(['localStorageServiceProvider', function(localStorageServiceProvider){
    localStorageServiceProvider.setPrefix('ls');
  }]).config(function ($routeProvider) {
    $routeProvider
      .when('/', {
        templateUrl: 'views/main.html',
        controller: 'MainCtrl'
      })
      .when('/about', {
        templateUrl: 'views/about.html',
        controller: 'AboutCtrl'
      })
      .otherwise({
        redirectTo: '/'
      });
  });
然后,需要修改 scripts/controllers/main.js ,改为从本地存储访问数据:
'use strict';

angular.module('webApp').controller('MainCtrl', function ($scope, localStorageService) {

    // 初始化时为空
    var todosInStore = localStorageService.get('todos');

    $scope.todos = todosInStore && todosInStore.split('
') || [];

    // 监听变化
    $scope.$watch('todos', function () {
      localStorageService.add('todos', $scope.todos.join('
'));
    }, true);

    $scope.addTodo = function () {
      $scope.todos.push($scope.todo);
      $scope.todo = '';
    };

    $scope.removeTodo = function (index) {
      $scope.todos.splice(index, 1);
    };

  });
在浏览器中查看应用,你会发现 todo 列表中没有任何东西。因为这个应用从本地存储中读取了 todo 数组,而本地存储中还没有任何 todo 项。
在添加一些项目到列表后,我们再次刷新我们的浏览器的时候,这些项目都还在。
测试
Karma 是一个 JS 测试框架。Angular 生成器本身已经包括了两个测试框架:ngScenario 和 Jasmine。当之前我们运行 yo angular 的时候,在 mytodo 文件夹下会生成了一个 test 目录,还有一个 karma.conf.js 文件,它会被放入在 Node 模块中以使用 Karma。我们将会编辑一个 Jasmine 脚本来完成我们的测试。现在先来看看要怎么进行测试。
先安装依赖:
$ npm install -g phantomjs
$ npm install grunt-karma --save-dev
更新 Karma 配置
首先,修改 karma.conf.js,添加
  'bower_components/jquery/dist/jquery.js',
  'bower_components/jquery-ui/ui/jquery-ui.js',
  'bower_components/angular-ui-sortable/sortable.js',
最终的样子是:
files: [
  'bower_components/angular/angular.js',
  'bower_components/angular-mocks/angular-mocks.js',
  'bower_components/angular-animate/angular-animate.js',
  'bower_components/angular-cookies/angular-cookies.js',
  'bower_components/angular-resource/angular-resource.js',
  'bower_components/angular-route/angular-route.js',
  'bower_components/angular-sanitize/angular-sanitize.js',
  'bower_components/angular-touch/angular-touch.js',
  'bower_components/jquery/dist/jquery.js',
  'bower_components/jquery-ui/ui/jquery-ui.js',
  'bower_components/angular-ui-sortable/sortable.js',
  'app/scripts/**/*.js',
  'test/mock/**/*.js',
  'test/spec/**/*.js'
],
运行测试
现在回到命令行结束 grunt server 的进程(使用 Ctrl+c)。在 Gruntfile.js 中已经有了用于运行测试的 grunt 任务,可以直接像下面这样运行:
$ grunt test
添加更多测试
修改 test/spec/controllers/main.js 如下:
'use strict';

describe('Controller: MainCtrl', function () {

  // load the controller's module
  beforeEach(module('webApp'));

  var MainCtrl,
    scope;

  // Initialize the controller and a mock scope
  beforeEach(inject(function ($controller, $rootScope) {
    scope = $rootScope.$new();
    MainCtrl = $controller('MainCtrl', {
      $scope: scope
    });
  }));

  it('should attach a list of awesomeThings to the scope', function () {
    expect(scope.awesomeThings.length).toBe(3);
  });

  it('should add items to the list', function () {
    scope.todo = 'Test 1';
    scope.addTodo();
    expect(scope.todos.length).toBe(4);
  });

  it('should add then remove an item from the list', function () {
    scope.todo = 'Test 1';
    scope.addTodo();
    scope.removeTodo(0);
    expect(scope.todos.length).toBe(2);
  });
});
更多有关单元测试的内容,请参考 Unit Testing Best Practices in AngularJS。
发布应用
为了将应用发布为产品版本,还需要做很多工作:
- 校验我们的代码
- 运行我们的测试
- 合并和缩小脚本和样式来减少网络请求
- 优化任何使用到的图像
- 对所有输出进行编译处理,使程序瘦身
实现上述目标只需一句:
$ grunt
这个命令将会完成 Grunt 的任务以及根据 Gruntfile.js 文件进行配置,创建一个可以运行的应用版本。只需等上一分钟,你就能得到一个完整的编译版本,和一份编译过程耗时的报告。
编译完成后的文件,放在了 dist 目录下,是一个可以拿去服务器上的部署的真正的产品。
你也可以运行下面命令自动编译项目,并且启动 web 服务器
$ grunt serve:dist
总结
Anugular 生成器也支持创建新的视图、指令和控制器。例如:可以通过运行 yo angular:route routeName 搭建一个新的控制器,同时在 app.js 中的路由也会被更新。
了解更多有关于 Angular 生成器的 Yeoman 命令,请查看 generator readme。
当然,Yeoman 还可以做更多的事情,它还支持其他框架的脚手架。
除了 Yeoman 之外,还有几个框架可以生产 Angular 项目,请参考 5 Angular JS Seeds & Bootstrap Apps