参考:https://www.cnblogs.com/f-ck-need-u/p/7220009.html
1、rsync 的语法和三种工作模式
Local:  rsync [OPTION...] SRC... [DEST]

Access via remote shell:
  Pull: rsync [OPTION...] [USER@]HOST:SRC... [DEST]
  Push: rsync [OPTION...] SRC... [USER@]HOST:DEST

Access via rsync daemon:
  Pull: rsync [OPTION...] [USER@]HOST::SRC... [DEST]
        rsync [OPTION...] rsync://[USER@]HOST[:PORT]/SRC... [DEST]
  Push: rsync [OPTION...] SRC... [USER@]HOST::DEST
        rsync [OPTION...] SRC... rsync://[USER@]HOST[:PORT]/DEST
有上述语法可知,rsync有三种工作方式:
(1)“Local”即本地文件同步;
(2)“Access via remote shell”即本地主机通过远程shell与远程主机通信,实现本地与远程文件的同步;
(3)“Access via rsync daemon”即通过套接字的方式实现本地主机直接与远程主机的rsync daemon进程通信,实现本地与远程文件的同步。
(1)和(2)的本质是管道通信,(3)则是远程主机运行rsync daemon程序,通过监听873端口与本地主机通信(客户端)。
还有一种特殊的工作方式——通过远程shell启动远程主机的一个临时性的rsync daemon,仅用于临时读取daemon的配置文件,当此次rsync同步完成,远程shell启动的rsync daemon进程也会自动消逝。此通信方式的命令行语法格式同(3),但要求options部分必须明确指定"--rsh"选项或其短选项"-e"。
其中,第一个路径参数一定是源文件路径,即作为同步基准的一方,可以同时指定多个源文件路径。最后一个路径参数则是目标文件路径,也就是待同步方。路径的格式可以是本地路径,也可以是使用user@host:path或user@host::path的远程路径,如果主机和path路径之间使用单个冒号隔开,表示使用的是远程shell通信方式,而使用双冒号隔开的则表示的是连接rsync daemon。另外,连接rsync daemon时,还提供了URL格式的路径表述方式rsync://user@host/path。
如果仅有一个参数,则命令相当于"ls -l"的方式列出源文件列表,而不是复制文件。
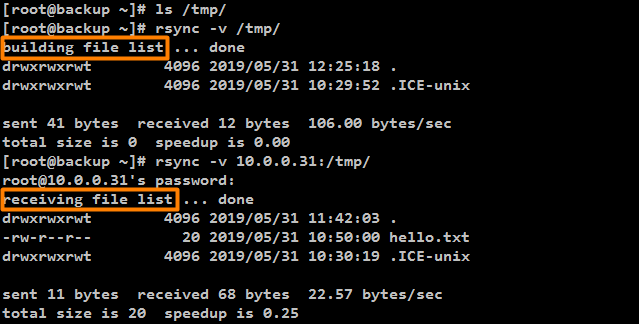
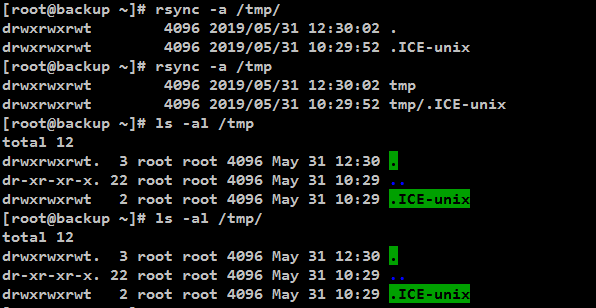
另外,使用rsync一定要注意的一点是,源路径如果是一个目录的话,带上尾随斜线和不带尾随斜线是不一样的,不带尾随斜线表示的是整个目录包括目录本身,带上尾随斜线表示的是目录中的文件,不包括目录本身。例如:
2、rsync的选项说明与示例
2.1 rsync选项说明
-v:显示rsync过程中详细信息。可以使用"-vvvv"获取更详细信息。
-z --compress:传输时进行压缩提高效率,--compress-level=NUM可按级别压缩。
-a --archive  :归档模式,表示递归传输并保持文件属性。等同于"-rtopgDl"。-r --recursive:递归到目录中去。
-t --times:保持mtime属性。强烈建议任何时候都加上"-t",否则目标文件mtime会设置为系统时间,导致下次更新检查出mtime不同从而导致增量传输无效。
-o --owner:保持owner属性(属主)。
-p --perms:保持perms属性(权限,不包括特殊权限)。
-g --group:保持group属性(属组)。
-D        :是"--device --specials"选项的组合,即也拷贝设备文件和特殊文件。
-l --links:如果文件是软链接文件,则拷贝软链接本身而非软链接所指向的对象。

-n --dry-run :仅测试传输,而不实际传输。常和"-vvvv"配合使用来查看rsync是如何工作的。
-P:显示文件传输的进度信息。(实际上"-P"="--partial --progress",其中的"--progress"才是显示进度信息的)。
-R --relative:使用相对路径。意味着将命令行中指定的全路径而非路径最尾部的文件名发送给服务端,包括它们的属性。用法见下文示例。
--size-only :默认算法是检查文件大小和mtime不同的文件,使用此选项将只检查文件大小。
-u --update :仅在源mtime比目标已存在文件的mtime新时才拷贝。注意,该选项是接收端判断的,不会影响删除行为。
-d --dirs   :以不递归的方式拷贝目录本身。默认递归时,如果源为"dir1/file1",则不会拷贝dir1目录,使用该选项将拷贝dir1但不拷贝file1。
--max-size  :限制rsync传输的最大文件大小。可以使用单位后缀,还可以是一个小数值(例如:"--max-size=1.5m")
--min-size  :限制rsync传输的最小文件大小。这可以用于禁止传输小文件或那些垃圾文件。
--exclude   :指定排除规则来排除不需要传输的文件。
--delete    :以SRC为主,对DEST进行同步。多则删之,少则补之。注意"--delete"是在接收端执行的,所以它是在exclude/include规则生效之后才执行的。
-b --backup :对目标上已存在的文件做一个备份,备份的文件名后默认使用"~"做后缀。
--backup-dir:指定备份文件的保存路径。不指定时默认和待备份文件保存在同一目录下。
-e          :指定所要使用的远程shell程序,默认为ssh。
--port      :连接daemon时使用的端口号,默认为873端口。
--password-file:daemon模式时的密码文件,可以从中读取密码实现非交互式。注意,这不是远程shell认证的密码,而是rsync模块认证的密码。
-W --whole-file:rsync将不再使用增量传输,而是全量传输。在网络带宽高于磁盘带宽时,该选项比增量传输更高效。
--existing  :要求只更新目标端已存在的文件,目标端还不存在的文件不传输。注意,使用相对路径时如果上层目录不存在也不会传输。
--ignore-existing:要求只更新目标端不存在的文件。和"--existing"结合使用有特殊功能,见下文示例。
--remove-source-files:要求删除源端已经成功传输的文件。
参考:http://www.cnblogs.com/f-ck-need-u/p/7221713.html
2.2 示例
2.2.1 基础示例
(1)将/etc/fstab拷贝到/tmp目录下
[root@backup ~]# rsync /etc/fstab /tmp
(2)将/etc/cron.d目录拷贝到/tmp下
[root@backup ~]# rsync -r /etc/cron.d /tmp
(3)将/etc/cron.d目录拷贝到/tmp下,但要求在/tmp下也生成etc子目录
[root@backup ~]# rsync -R -r /etc/cron.d /tmp
其中"-R"选项表示使用相对路径,此相对路径是以目标目录为根的。对于上面的示例,表示在目标上的/tmp下创建etc/cron.d目录,即/tmp/etc/cron.d,etc/cron.d的根"/"代表的就是目标/tmp。
如果要拷贝的源路径较长,但只想在目标主机上保留一部分目录结构,例如要拷贝/var/lib/yum/yumdb/*到/tmp下,但只想在/tmp下保留从yum开始的目录,如何操作?使用一个点代表相对路径的起始位置即可,也就是将长目录进行划分。
[root@backup ~]# rsync -R -r /var/lib/./yum/yumdb/ /tmp
这样,从点开始的目录都是相对路径,其相对根目录为目标路径。所以对于上面的示例,将在目标上创建"/tmp/yum/yumdb/"。
(4)对远程目录下已存在文件做一个备份
[root@backup ~]# rsync -R -r --backup /var/lib/./yum/yumdb/ /tmp
这样在目标目录下,已存在的文件就被做一个备份,备份文件默认使用"~"做后缀,可以使用"--suffix"指定备份后缀。
[root@backup ~]# ls -l /tmp/yum/yumdb/a/09e97db56b022f05de9d57fc7d1e8d2caaff5a93-authconfig-6.1.12-23.el6-x86_64
total 64
-rw-r--r-- 1 root root 64 May 31 17:17 checksum_data
-rw-r--r-- 1 root root 64 May 31 17:13 checksum_data~
-rw-r--r-- 1 root root  6 May 31 17:17 checksum_type
-rw-r--r-- 1 root root  6 May 31 17:13 checksum_type~
-rw-r--r-- 1 root root 35 May 31 17:17 from_repo
-rw-r--r-- 1 root root 35 May 31 17:13 from_repo~
-rw-r--r-- 1 root root 10 May 31 17:17 from_repo_revision
-rw-r--r-- 1 root root 10 May 31 17:13 from_repo_revision~
-rw-r--r-- 1 root root 10 May 31 17:17 from_repo_timestamp
-rw-r--r-- 1 root root 10 May 31 17:13 from_repo_timestamp~
-rw-r--r-- 1 root root 10 May 31 17:17 installed_by
-rw-r--r-- 1 root root 10 May 31 17:13 installed_by~
-rw-r--r-- 1 root root  4 May 31 17:17 reason
-rw-r--r-- 1 root root  4 May 31 17:13 reason~
-rw-r--r-- 1 root root  3 May 31 17:17 releasever
-rw-r--r-- 1 root root  3 May 31 17:13 releasever~
可以使用"--backup-dir"指定备份文件保存路径,但要求保存路径必须存在。
[root@backup ~]# mkdir /tmp/log_back
[root@backup ~]# rsync -R -r --backup --backup-dir=/tmp/log_back /var/lib/./yum/yumdb/ /tmp
[root@backup ~]# ls -l /tmp/log_back/yum/yumdb/a/09e97db56b022f05de9d57fc7d1e8d2caaff5a93-authconfig-6.1.12-23.el6-x86_64
total 32
-rw-r--r-- 1 root root 64 May 31 17:17 checksum_data
-rw-r--r-- 1 root root  6 May 31 17:17 checksum_type
-rw-r--r-- 1 root root 35 May 31 17:17 from_repo
-rw-r--r-- 1 root root 10 May 31 17:17 from_repo_revision
-rw-r--r-- 1 root root 10 May 31 17:17 from_repo_timestamp
-rw-r--r-- 1 root root 10 May 31 17:17 installed_by
-rw-r--r-- 1 root root  4 May 31 17:17 reason
-rw-r--r-- 1 root root  3 May 31 17:17 releasever
指定备份路径后,默认将不会加备份后缀,除非使用"--suffix"显式指定后缀,如"--suffix=~"。
(5)指定ssh连接参数,如端口、连接的用户、ssh选项等
[root@xuexi tmp]# >~/.ssh/known_hosts   # 先清空host key以便下面的测试

[root@xuexi tmp]# rsync -e "ssh -p 22 -o StrictHostKeyChecking=no" /etc/fstab 172.16.10.5:/tmp
Warning: Permanently added '172.16.10.5' (RSA) to the list of known hosts.
root@172.16.10.5's password:
(6)"--existing"之同步存在的和"--ignore-existing"之同步不存在的
目前/tmp/{a,b}目录中内容如下,bashrc在a目录中,crontab在b目录中,且a目录中多了一个c子目录。

使用"--existing"选项可实现只更新目标端已存在的文件的目标。
[root@backup ~]# rsync -r -v --existing /tmp/a/ /tmp/b
sending incremental file list
fstab
profile
rc.local

sent 3112 bytes  received 70 bytes  6364.00 bytes/sec
total size is 5561  speedup is 1.75
结果只有3个目标上已存在的文件被更新了,由于目标上没有c目录,所以c目录中的文件也没有进行传输。
而"--ignore-existing"是更新目标端不存在的文件。
[root@backup ~]# rsync -r -v --ignore-existing /tmp/a/ /tmp/b
sending incremental file list
bashrc
c/
c/find

sent 2905 bytes  received 54 bytes  5918.00 bytes/sec
total size is 5561  speedup is 1.88
"--existing"和"--ignore-existing"结合使用时,有个特殊功效,当它们结合"--delete"使用的时候,文件不会传输,但会删除receiver端额外多出的文件。
[root@backup ~]# cd /tmp
[root@backup tmp]# mkdir -p d/{a,b}
[root@backup tmp]# echo "hello,world." >d/b/a.log
[root@backup tmp]# awk 'BEGIN{for(i=1;i<=4;i++)print "echo hello,stranger. >d/a/"i".txt"}'|bash
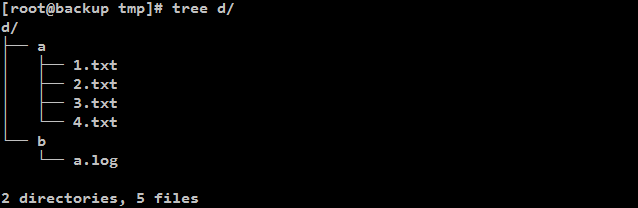
[root@backup tmp]# rsync -nrv --delete d/a/ d/b/
sending incremental file list
deleting a.log
1.txt
2.txt
3.txt
4.txt

sent 80 bytes  received 24 bytes  208.00 bytes/sec
total size is 64  speedup is 0.62 (DRY RUN)

[root@backup tmp]# rsync -nrv --existing --ignore-existing --delete d/a/ d/b/
sending incremental file list
deleting a.log

sent 68 bytes  received 12 bytes  160.00 bytes/sec
total size is 64  speedup is 0.80 (DRY RUN)
实际上,"--existing"和"--ingore-existing"是传输规则,只会影响receiver要求让sender传输的文件列表,在receiver决定哪些文件需要传输之前的过程,是这两个选项无法掌控的,所以各种规则、"--delete"等操作都不会被这两个选项影响。
(7)"--remove-source-files"删除源端文件
使用该选项后,源端已经更新成功的文件都会被删除,源端所有未传输或未传输成功的文件都不会被移除。未传输成功的原因有多种,如exclude排除了,"quick check"未选项该文件,传输中断等等。
总之,显示在"rsync -v"被传输列表中的文件都会被移除。如下:
[root@xuexi ~]# rsync -r -v --remove-source-files /tmp/a/anaconda /tmp/a/audit /tmp
sending incremental file list
anaconda/anaconda.log
anaconda/ifcfg.log
anaconda/journal.log
anaconda/ks-script-1uLekR.log
anaconda/ks-script-iGpl4q.log
anaconda/packaging.log
anaconda/program.log
anaconda/storage.log
anaconda/syslog
audit/audit.log

sent 4806915 bytes  received 204 bytes  9614238.00 bytes/sec
total size is 4805676  speedup is 1.00
上述显示出来的文件在源端全部被删除。
2.2.2 “--exclude”排除示例
使用"--exclude"选项指定排除规则,排除那些不需要传输的文件。
[root@backup tmp]# rsync -r -nv --exclude="anaconda/*.log" /var/log/anaconda /var/log/audit /tmp
sending incremental file list
anaconda/
anaconda/syslog
audit/
audit/audit.log

sent 3365629 bytes  received 58 bytes  6731374.00 bytes/sec
total size is 3365016  speedup is 1.00
上例中只排除了anaconda目录中的log文件,但是audit目录中的log文件是正常传输的。
注意,一个"--exclude"只能指定一条规则,要指定多条排除规则,需要使用多个"--exclude"选项,或者将排除规则写入到文件中,然后使用"--exclude-from"选项读取该规则文件。
另外,除了"--exclude"排除规则之外,"--include"包含规则——筛选出要进行传输的文件,所以include规则也称为传输规则。它的使用方法和"--exclude"一样。如果一个文件既能匹配排除规则,又能匹配包含规则,则先匹配到的立即生效,生效后就不再进行任何匹配。
最后,关于规则,最重要的一点是它的作用时间。当发送端敲出rsync命令后,rsync将立即扫描命令行中给定的文件和目录(扫描过程中还会按照目录进行排序,将同一个目录的文件放在相邻的位置),这称为拷贝树(copy tree),扫描完成后将待传输的文件或目录记录到文件列表中,然后将文件列表传输给接收端。而筛选规则的作用时刻是在扫描拷贝树时,所以会根据规则来匹配并决定文件是否记录到文件列表中(严格地说是会记录到文件列表中的,只不过排除的文件会被标记为hide隐藏起来),只有记录到了文件列表中的文件或目录才是真正需要传输的内容。换句话说,筛选规则的生效时间在rsync整个同步过程中是非常靠前的,它会影响很多选项的操作对象,最典型的如"--delete"。也许,你看完这一整篇文章都没感觉到这一点的重要性,但如果你阅读rsync的man文档或者学习rsync的原理,你一定会深有体会。
实际上,排除规则和包含规则都只是"--filter"筛选规则的两种特殊规则。详见。
2.2.3 “--delete”的解释
有以下两个目录,其文件见下图:

目录/root/anaconda和/tmp/anaconda的文件的mtime不相同,其中有四个相同文件。进行以下操作:
[root@backup ~]# rsync -vrn --delete /root/anaconda /tmp
sending incremental file list
deleting anaconda/fstab
deleting anaconda/anaconda.yum.bak
deleting anaconda/anaconda.storage.bak
deleting anaconda/anaconda.program.bak
anaconda/anaconda.ifcfg.log
anaconda/anaconda.log
anaconda/anaconda.program.log
anaconda/anaconda.storage.log
anaconda/anaconda.syslog
anaconda/anaconda.xlog
anaconda/anaconda.yum.log

sent 166 bytes  received 34 bytes  400.00 bytes/sec
total size is 406329  speedup is 2031.64 (DRY RUN)
由以上可知:rsync 有--delete选项后,会删除目标目录中存在而源目录中不存在的文件,并将源目录中的文件同步到目标目录(同步,包含了mtime不同的相同文件)。
这样的行为实现了远程删除的功能,对于作用于本地的rsync,也就实现了rm的本地删除功能。而且,如果使用空目录作为源目录,则它的作用是清空目录上的整个目录。
含有--delete选项的文件同步的原理:
在发送端将源文件列表发送给接收端后,接收端的generator进程会扫描目标目录形成目标文件列表,然后对两个列表中的信息条目都计算数据块校验码,最后将数据块校验码发给发送端,发送端通过校验码来匹配哪些数据块是需要传输的,这样就实现了增量传输的功能——只传输改变的部分,不会传输整个文件。而rsync中--delete选项生效的时间点是generator对两个列表进行对比,生成校验码之前进行的,先将目标上存在但源上不存在的多余文件删除,这样就无需为多余的文件生成校验码。
如果将"--delete"选项和"--exclude"选项一起使用,则被排除的文件不会被删除。例如:
[root@backup ~]# rsync -vrn --exclude="*.bak" --delete /root/anaconda /tmp
sending incremental file list
deleting anaconda/fstab
anaconda/anaconda.ifcfg.log
anaconda/anaconda.log
anaconda/anaconda.program.log
anaconda/anaconda.storage.log
anaconda/anaconda.syslog
anaconda/anaconda.xlog
anaconda/anaconda.yum.log

sent 166 bytes  received 34 bytes  400.00 bytes/sec
total size is 406329  speedup is 2031.64 (DRY RUN)
更多的关于--delete选项的说明,见。
3、rsync daemon模式
3.1 rsync daemon的介绍
既然rsync通过远程shell就能实现两端主机上的文件同步,还要使用rsync的服务干啥?试想下,你有的机器上有一堆文件需要时不时地同步到众多机器上去,比如目录a、b、c是专门传输到web服务器上的,d/e、f、g/h是专门传输到ftp服务器上的,还要对这些目录中的某些文件进行排除。通过远程shell只能通过运维逐条命令执行,不能实现批量、定时的任务管理,影响运维效率。rsync daemon就解决了这些问题,同时还可以向外提供服务,只要告诉了别人rsync的url路径,外人就能向ftp服务器一样获取文件列表并进行选择性地下载,所以,你所制定的列表,你的同事也可以获取到并使用。
rsync daemon进程执行“rsync --daemon”命令即可开启。rsync daemon进程的配置文件默认为/etc/rsyncd.conf(该文件需要人为创建),rsync daemon进程端口默认为873.
rsync daemon的通信方式和传输通道与远程shell不同:
远程shell是通过管道连接的方式进行数据传输的,无需事先开启rsync服务;
rsync通过socket套接字的方式进行,需要开启rsync daemon进程,通过873端口监听客户端的请求。
以下是rsync client连接rsync daemon时的命令语法:
Pull: rsync [OPTION...] [USER@]HOST::SRC... [DEST]
      rsync [OPTION...] rsync://[USER@]HOST[:PORT]/SRC... [DEST]
Push: rsync [OPTION...] SRC... [USER@]HOST::DEST
      rsync [OPTION...] SRC... rsync://[USER@]HOST[:PORT]/DEST
连接命令有两种类型,一种是rsync风格使用双冒号的"rsync user@host::src dest",一种是url风格的"rsync://user@host:port/src dest"。对于rsync风格的连接命令,如果想要指定端口号,则需要使用选项"--port"。
上述语法中,其中daemon端的路径,如user@host::src,它的src代表的是模块名,而不是真的文件系统中的路径(文件路径是配置文件模块src下的path)。
3.2 rsync 的 daemon模式下的配置文件/etc/rsyncd.conf
The rsyncd.conf file is the runtime configuration file for rsync when run as an rsync daemon. The rsyncd.conf file controls authentication, access, logging and available modules.
以上是man syncd,conf描述。rsyncd.conf是rsync daemon进程运行时的配置文件。文件rsyncd.conf的配置决定了访问权限、访问授权、日志功能和可访问的模块。
以下是一个syncd.conf的配置文件模板:
[root@backup ~]# cat /etc/rsyncd.conf
# /etc/rsyncd: configuration file for rsync daemon mode
# See rsyncd.conf man page for more options.
# configuration example:

# uid = nobody
# gid = nobody
# use chroot = yes
# max connections = 4
# pid file = /var/run/rsyncd.pid
# exclude = lost+found/
# transfer logging = yes
# timeout = 900
# ignore nonreadable = yes
# dont compress   = *.gz *.tgz *.zip *.z *.Z *.rpm *.deb *.bz2

# [ftp1]
#        path = /home/ftp
#        comment = ftp export area
在上述示例配置文件中,先定义了一些全局选项,然后定义了[ftp1],这个用中括号包围的"[ftp1]"就是rsync中所谓的模块,ftp1为模块ID,必须保证唯一,每个模块中必须定义一项"path",path定义的是该模块代表的路径,例如此示例文件中,如果想请求ftp1模块,则在客户端使用"rsync user@host::ftp1",这表示访问user@host上的/home/ftp目录,如果要访问/home/ftp目录下的子目录www,则"rsync user@host::ftp1/www"。
以下是常见的配置项,也算是一个配置示例:
# rsyn_conf ____________________start
# create by ant 190601
# /etc/rsyncd.conf start

port = 888                              # rsync的端口,默认为873
uid = rsync                             # rsync服务的运行用户,默认为nobody,文件传输完成后文件的属主就是这个uid
gid = rsync                             # rsync服务的运行组,默认为nobody,文件传输完成后文件的属组就是这个uid
use chroot = no                         # rsync daemon在传输前是否切换到指定的path目录下,并将其监禁在内
max connections = 200                   # 最大连接数,0表示没限制
timeout = 300                           # rsync服务器超时时间,0表示永不超时
pid file = /var/run/rsyncd.pid          # rsync daemon的pid文件
lock file = /var/run/rsync.lock         # 锁文件
log file = /var/log/rsyncd.log          # 指定rsync的日志文件,避免日志发送给syslog
ignore errors                           # 忽略某些IO错误
read only = false                       # 指定模块是否可读写,false表示可读写(是否可上传文件),true表示只读
write only = false                      # 指定模块是否支持下载,true表示客户端不能下载
list = false                            # 客户端是否可显示(列表)模块下的文件
hosts allow = 172.16.1.0/24             # 允许连接到指定模块的主机,多个不同ip用空格隔开或者设置区间
hosts deny = 0.0.0.0/32                 # 禁止连接指定模块的主机
auth users = rsync_backup               # 指定连接到该模块的用户列表,只有列表里的用户才能连接到模块,用户名和对应密码保存在secrts file中,这里使用的
                                        # 不是系统用户,而是虚拟用户.不设置时,默认所有用户都能连接,但使用的是匿名连接
secrets file = /etc/rsync.password      # 保存auth users用户列表的用户名和密码,每行包含一个username:passwd.由于"strict modes"默认为true,所以
                                        # 此文件要求非rsync daemon用户不可读写。只有启用了auth users该选项才有效。

[backup]                                # 模块backup
comment = "backup dir by ant"           # 说明
path = /backup                          # 模块对应的目录

[test]                                  # 模块test
comment = "nfsbackup dir by ant"
path = /test

# rsync_config______________end
注意事项:
(1)从客户端推到服务端的文件的属主和属组分别是配置文件中指定的uid和gid;客户端从服务端拉来的文件的属主和属组是客户端正在执行rsync程序的当前用户;
(2).auth users和secrets file这两个参数是非必须的,省略时默认使用匿名连接;这两个参数一旦配置,secrets file参数对应的文件权限必须是600,对应的客户端的密码文件也必须是600。
3.3 rsync daemon模式服务的搭建步骤
################## rsync服务端共8个步骤 ########################
1、查看rsync程序是否安装
[root@backup ~]# rpm -qa | grep rsync
rsync-3.0.6-12.el6.x86_64

[root@backup ~]# rsync --version
rsync  version 3.0.6  protocol version 30
Copyright (C) 1996-2009 by Andrew Tridgell, Wayne Davison, and others.
Web site: http://rsync.samba.org/
Capabilities:
    64-bit files, 64-bit inums, 64-bit timestamps, 64-bit long ints,
    socketpairs, hardlinks, symlinks, IPv6, batchfiles, inplace,
    append, ACLs, xattrs, iconv, symtimes

rsync comes with ABSOLUTELY NO WARRANTY.  This is free software, and you
are welcome to redistribute it under certain conditions.  See the GNU
General Public Licence for details.
2、添加rsync服务的用户,管理本地目录
[root@backup ~]# useradd -s /sbin/nologin -M rsync
[root@backup ~]# id rsync
uid=501(rsync) gid=501(rsync) groups=501(rsync)
3、生成rsync daemon的配置文件/etc/rsyncd.conf
见上述 ———— 3.2 rsync 的 daemon模式下的配置文件/etc/rsyncd.conf
4、根据auth user参数创建secret file参数对应的密码文件
[root@backup ~]# echo "rsync_backup:backup123" >/etc/rsync.password
[root@backup ~]# cat /etc/rsync.password
rsync_backup:root123
5、给密码文件设置权限
[root@backup ~]# chmod 600 /etc/rsync.password
[root@backup ~]# ls -l /etc/rsync.password
-rw------- 1 root root 21 Jun  2 09:26 /etc/rsync.password
6、创建文件共享目录并授权rsync服务管理
[root@backup ~]# mkdir -p /backup /test
[root@backup ~]# chown rsync.rsync /backup
[root@backup ~]# chown rsync.rsync /test
[root@backup ~]# ls -ld /backup /test
drwxr-xr-x 2 rsync rsync 4096 Jun 2 09:33 /backup
drwxr-xr-x 2 rsync rsync 4096 Jun 2 09:33 /backup
7、启动rsync daemon服务并检查端口是否开启
[root@backup ~]# ps -ef|grep rsync|grep -v grep
root       1792      1  0 09:35 ?        00:00:00 rsync --daemon
[root@backup ~]# lsof -i :873
COMMAND  PID USER   FD   TYPE DEVICE SIZE/OFF NODE NAME
rsync   1792 root    3u  IPv4  11946      0t0  TCP *:rsync (LISTEN)
rsync   1792 root    5u  IPv6  11947      0t0  TCP *:rsync (LISTEN)
[root@backup ~]# netstat -lntup|grep 873
tcp        0      0 0.0.0.0:873                 0.0.0.0:*                   LISTEN      1792/rsync
tcp        0      0 :::873                      :::*                        LISTEN      1792/rsync
8、将rsync daemon服务加入开机自启动
[root@backup ~]# echo "/usr/bin/rsync --daemon" >>/etc/rc.local
[root@backup ~]# tail -1 /etc/rc.local
/usr/bin/rsync --daemon
##################### rsync客户端步骤 #######################
1、把服务端密码文件的密码写入本地/etc/rsync.password
[root@nfs01 ~]# rpm -qa|grep rsync
rsync-3.0.6-12.el6.x86_64
[root@nfs01 ~]# echo "backup123" >/etc/rsync.password
[root@nfs01 ~]# cat /etc/rsync.password
backup123
2、配置密码文件的权限
[root@nfs01 ~]# chmod 600 /etc/rsync.password
[root@nfs01 ~]# ls -l /etc/rsync.password
-rw------- 1 root root 10 Jun  2 11:54 /etc/rsync.password
rsync daemon 配置步骤总结:
++++++++++++++++ 服务端 +++++++++++++++++
1、查看rsync程序是否安装
rpm -qa | grep rsync
rsync --version

2、添加rsync服务的用户,管理本地目录
id rsync
useradd -s /sbin/nologin -M rsync
id rsync

3、生成rsync daemon的配置文件/etc/rsyncd.conf

4、根据auth user参数创建secret file参数对应的密码文件
echo "rsync_backup:backup123" >/etc/rsync.password
cat /etc/rsync.password

5、给密码文件设置权限
chmod 600 /etc/rsync.password
ls -l /etc/rsync.password

6、创建文件共享目录并授权rsync服务管理
mkdir -p /backup
chown rsync.rsync /backup
ls -ld /backup

7、启动rsync daemon服务并检查端口是否开启
ps -ef|grep rsync|grep -v grep
lsof -i :873
netstat -lntup|grep 873

8、将rsync daemon服务加入开机自启动
echo "/usr/bin/rsync --daemon" >>/etc/rc.local
tail -1 /etc/rc.local
++++++++++++++++ 客户端 +++++++++++++++++
1、把服务端密码文件的密码写入本地/etc/rsync.password
echo "backup123" >/etc/rsync.password
cat /etc/rsync.password

2、配置密码文件的权限
chmod 600 /etc/rsync.password
3.4 rsync daemon模式文件同步实例
[root@nfs01 ~]# rsync -avz /etc/rc.local rsync_backup@172.16.1.41::backup --password-file=/etc/rsync.password
sending incremental file list
rc.local -> rc.d/rc.local

sent 46 bytes  received 11 bytes  38.00 bytes/sec
total size is 13  speedup is 0.23

[root@nfs01 ~]# rsync -avz /etc/yum.conf rsync://rsync_backup@172.16.1.41/test/ --password-file=/etc/rsync.password
sending incremental file list
yum.conf

sent 643 bytes  received 27 bytes  1340.00 bytes/sec
total size is 969  speedup is 1.45

#########################################

[root@backup ~]# ls -l /backup/ /test/
/backup/:
total 0
lrwxrwxrwx 1 rsync rsync 28 Feb 23 12:48 rc.local -> /rsyncd-munged/rc.d/rc.local

/test/:
total 4
-rw-r--r-- 1 rsync rsync 969 Jul 24  2015 yum.conf


3.5 rsync daemon文件同步异常举例
问题一:
[root@nfs tmp]# rsync -avz /etc/hosts rsync@172.16.1.41::backup
Password:
@ERROR: auth failed on module backup
rsync error: error starting client-server protocol (code 5) at main.c(1503) [sender=3.0.6]
问题原因:
①  认证的用户名或者密码输入的不正确
②  认证文件编写有问题(认证内容信息)
③ 认证文件的权限设置的不正确(权限为600,文件用户和用户组还是root不变)
④  rsync服务端配置文件中指定的认证文件路径与实际认证文件路径不符


问题二:
[root@nfs01~]#rsync -avz /etc/hosts rsync_backu@172.16.1.41::backup --password-file=/etc/rsync.password
rsync: failed to connect to 172.16.1.41: Connection refused (111)
rsync error: error in socket IO (code 10) at clientserver.c(124) [sender=3.0.6]
问题原因:
①  rsync服务没有启动


问题三:
rsync -avz /etc/sysconfig/network rsync_backup@172.16.1.41::nfsbackup --password-file=/etc/rsync.password
@ERROR: chdir failed
rsync error: error starting client-server protocol (code 5) at main.c(1503) [sender=3.0.6]
解决原因:
① rsync服务端没有模块指定的目录,需要进行创建和授权