PyMySQL安装
|
1
|
pip3 install pymysql |
创建链接的基本使用
|
1
2
3
4
5
6
7
8
9
10
11
12
13
14
15
16
17
18
19
20
21
22
23
24
25
26
27
28
29
30
31
32
|
# 导入pymysql模块import pymysql# 连接databaseconn = pymysql.connect( host=“你的数据库地址”, user=“用户名”,password=“密码”, database=“数据库名”, charset=“utf8”)# 得到一个可以执行SQL语句的光标对象cursor = conn.cursor() # 执行完毕返回的结果集默认以元组显示# 得到一个可以执行SQL语句并且将结果作为字典返回的游标#cursor = conn.cursor(cursor=pymysql.cursors.DictCursor)# 定义要执行的SQL语句sql = """CREATE TABLE USER1 (id INT auto_increment PRIMARY KEY ,name CHAR(10) NOT NULL UNIQUE,age TINYINT NOT NULL)ENGINE=innodb DEFAULT CHARSET=utf8; #注意:charset='utf8' 不能写成utf-8"""# 执行SQL语句cursor.execute(sql)# 关闭光标对象cursor.close()# 关闭数据库连接conn.close() |
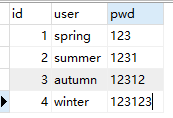
在建链接之前,我们需要做好一些前期工作:建库建表
下面例子中 我将使用我建好的库:db= 'xing'
建好的userinfo表
简单验证功能
|
1
2
3
4
5
6
7
8
9
10
11
12
13
14
15
16
17
18
19
20
21
22
23
24
25
26
27
28
29
30
31
32
33
34
|
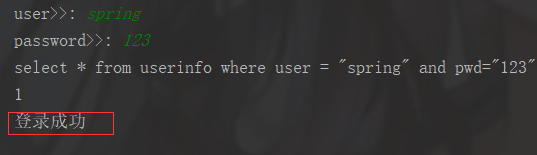
# pip3 install pymysqlimport pymysqluser=input('user>>: ').strip()pwd=input('password>>: ').strip()# 建立链接conn=pymysql.connect( host='192.168.0.103',#我的IP地址 port=3306, # 不是字符串不需要加引号。 user='root', password='123', db='xing', charset='utf8')# 拿到游标cursor=conn.cursor()# 执行sql语句sql='select * from userinfo where user = "%s" and pwd="%s"' % (user, pwd)print(sql)res=cursor.execute(sql)print(res)cursor.close()conn.close()# 进行判断if res: print('登录成功')else: print('登录失败') |
输出结果:
但是会有以下问题:输入的SQL 语句被注释了

或者是

这个时候之后 我们可以这样解决
|
1
2
3
4
5
6
7
8
9
|
execute帮我们做字符串拼接# 将以下代码sql="select * from userinfo where name='%s' and password='%s'" %(user,pwd)res=cursor.execute(sql)# 改为sql="select * from userinfo where name=%s and password=%s" #%s需要去掉引号,pymysql会自动加上res=cursor.execute(sql,[user,pwd]) |
输出结果:


二、增删改查操作
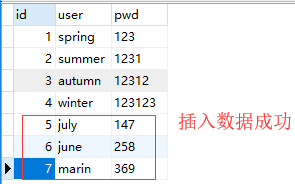
添加多条数据
|
1
2
3
4
5
6
7
8
9
10
11
12
13
14
15
16
17
18
19
20
21
22
23
24
25
26
27
28
29
|
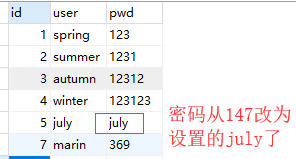
import pymysqlconn = pymysql.connect( host='192.168.0.103', port=3306, user='root', password='123', database='xing', charset='utf8')# 获取一个光标cursor = conn.cursor()# 定义要执行的sql语句sql = 'insert into userinfo(user,pwd) values(%s,%s);'data = [ ('july', '147'), ('june', '258'), ('marin', '369')]# 拼接并执行sql语句cursor.executemany(sql, data)# 涉及写操作要注意提交conn.commit()# 关闭连接cursor.close()conn.close() |
输出结果:
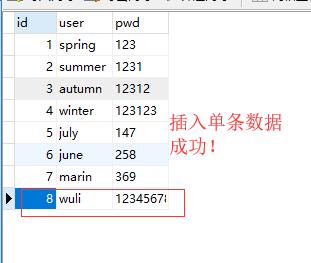
插入单条数据
|
1
2
3
4
5
6
7
8
9
10
11
12
13
14
15
16
17
18
|
import pymysqlconn =pymysql.connect( host ='192.168.0.103', port = 3306, user = 'root', password ='123', database ='xing', charset ='utf8')cursor =conn.cursor() #获取一个光标sql ='insert into userinfo (user,pwd) values (%s,%s);'name = 'wuli'pwd = '123456789'cursor.execute(sql, [name, pwd])conn.commit()cursor.close()conn.close() |
输出结果:
获取最新插入数据 (最后一条)
|
1
2
3
4
5
6
7
8
9
10
11
12
13
14
15
16
17
18
19
20
21
22
23
24
25
26
27
28
29
|
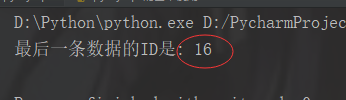
import pymysql# 建立连接conn = pymysql.connect( host="192.168.0.103", port=3306, user="root", password="123", database="xing", charset="utf8")# 获取一个光标cursor = conn.cursor()# 定义将要执行的SQL语句sql = "insert into userinfo (user, pwd) values (%s, %s);"name = "wuli"pwd = "123456789"# 并执行SQL语句cursor.execute(sql, [name, pwd])# 涉及写操作注意要提交conn.commit()# 关闭连接# 获取最新的那一条数据的IDlast_id = cursor.lastrowidprint("最后一条数据的ID是:", last_id)cursor.close()conn.close() |
输出结果为:(因为我之前插入多条记录时,多运行了两次,所有结果下面的这个)

删除操作
|
1
2
3
4
5
6
7
8
9
10
11
12
13
14
15
16
17
18
19
20
21
22
23
24
|
import pymysql# 建立连接conn = pymysql.connect( host="192.168.0.103", port=3306, user="root", password="123", database="xing", charset="utf8")# 获取一个光标cursor = conn.cursor()# 定义将要执行的SQL语句sql = "delete from userinfo where user=%s;"name = "june"# 拼接并执行SQL语句cursor.execute(sql, [name])# 涉及写操作注意要提交conn.commit()# 关闭连接cursor.close()conn.close() |
输出结果是:

更改数据
|
1
2
3
4
5
6
7
8
9
10
11
12
13
14
15
16
17
18
19
20
21
22
23
24
|
import pymysql# 建立连接conn = pymysql.connect( host="192.168.0.103", port=3306, user="root", password="123", database="xing", charset="utf8")# 获取一个光标cursor = conn.cursor()# 定义将要执行的SQL语句sql = "update userinfo set pwd=%s where user=%s;"# 拼接并执行SQL语句cursor.execute(sql, ["july", "july"])# 涉及写操作注意要提交conn.commit()# 关闭连接cursor.close ()conn.close () |
查询数据
fetch数据
|
1
2
3
4
5
6
|
# 可以获取指定数量的数据cursor.fetchmany(3)# 光标按绝对位置移动1cursor.scroll(1, mode="absolute")# 光标按照相对位置(当前位置)移动1cursor.scroll(1, mode="relative") |
