看这个文章之前,要保证你的Nginx已经安装成功!
如果没有,请移步到下面这个文章,看完后再回来看!
https://www.cnblogs.com/apollo1616/p/10214531.html
1.前车之鉴,我们先去准备好两个域名分别对应的网页。
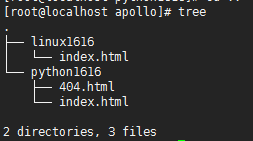
目录规划:本次实验静态文件总目录为apollo,下面设置两个文件夹,对应2个域名

www.python1616.com --- python1616
www.linux1616.com --- linux1616
2.启动Nginx服务
[root@localhost conf]# pkill nginx
[root@localhost conf]# /opt/nginx1616/sbin/nginx
[root@localhost conf]# /opt/nginx1616/sbin/nginx
nginx: [emerg] bind() to 0.0.0.0:80 failed (98: Address already in use)
nginx: [emerg] bind() to 0.0.0.0:80 failed (98: Address already in use)
nginx: [emerg] bind() to 0.0.0.0:80 failed (98: Address already in use)
nginx: [emerg] bind() to 0.0.0.0:80 failed (98: Address already in use)
nginx: [emerg] bind() to 0.0.0.0:80 failed (98: Address already in use)
nginx: [emerg] still could not bind()
3.Nginx配置文件设置
nginx.conf主配置文件学习
# nginx工作进程数,根据cpu的核数定义
worker_processes  4;
events {
    # 连接数
    worker_connections  1024;
}
# http区域块,定义nginx的核心web功能
http {
    include(关键字) mime.types(可修改的值);
    default_type application/octet-stream;

    # 定义日志格式
    log_format  main  '$remote_addr - $remote_user [$time_local] "$request" '
                      '$status $body_bytes_sent "$http_referer" '
                      '"$http_user_agent" "$http_x_forwarded_for"';

    # 开启访问日志功能的参数
    access_log logs/access.log main;
    sendfile on;

    # tcp_nopush on;
    # keepalive_timeout 0;
    # 保持长连接
    keepalive_timeout 65;

    # 支持图片 gif等等压缩,减少网络带宽
    gzip on;

    #这个server标签,控制着nginx的虚拟主机(web站点)
    server {
        # 定义nginx的入口端口是80端口
        listen 80;
        # 填写域名,没有域名就写IP地址
        server_name www.python1616.com;
        # 定义编码
        charset utf-8;
        # location定义网页的访问url
        # 就代表用户的请求是192.168.13.79/
        location / {
            # root参数定义网页根目录
            root /opt/apollo/python1616;;
            # 定义网页首页文件的名字的
            index index.html index.htm;
        }
        # 定义错误页面,客户端的错误,就会返回40x系列错误码
        error_page 404  403 401 400 /404.html;
        # 服务器错误,500系列错误代表后端代码出错
        error_page 500 502 503 504 /50x.html;
    }
    #在另一个server{}的外面,写入新的虚拟主机2
    server{
        listen 80;
        server_name www.linux1616.com;
        location /  {
            # 定义虚拟主机的网页根目录
            root /opt/apollo/linux1616;
            index index.html;
        }
    }
}
4.修改windows本地的测试域名 C:WindowsSystem32driversetchosts文件
写入如下内容
192.168.13.79 www.python1616.com
192.168.13.79 www.linux1616.com
因为我们没有www.python1616.com 也没有www.linux1616.com, 因此要在本地搞一个测试域名,
不想改dns的话,就去去买一个域名~~~~~~~~~~~~~~~~~~~~~~
5.然后在浏览器测试访问 两个不同的 web站点
www.python1616.com

www.linux1616.com

6.nginx的访问日志功能
6.1开启nginx.conf中的日志参数
log_format main '$remote_addr - $remote_user [$time_local] "$request" '
'$status $body_bytes_sent "$http_referer" '
'"$http_user_agent" "$http_x_forwarded_for"';
#开启访问日志功能的参数
access_log logs/access.log main;
6.2检查access.log的日志信息
tail -f access.log
7.nginx的拒绝访问功能
7.1在nginx.conf中,添加参数
在server{}虚拟主机标签中,找到location 然后添加参数
#当访问 192.168.13.79/ 的时候
location / {
#拒绝参数是 deny
#deny 写你想拒绝的IP地址
#deny还支持拒绝一整个网站
deny 192.168.13.33;
root /opt/apollo/python1616;
index index.html;
}
8.nginx的错误页面优化
error_page  404    /404.html;
# 写上这句话,然后去你项目根目录下面创建一个404.html就ok了

www.python1616.com输错的时候,成功跳转自己自定义的网页

为了见证结果再设置下www.linux1616.com出错时候的页面
