一。前期配置
vim,ssh,java,hadoop环境
二。MySQL安装
1.安装mysql
sudo apt-get autoremove --purge mysql-server-5.0
sudo apt-get remove mysql-server
sudo apt-get autoremove mysql-server
sudo apt-get remove mysql-common # (非常重要)
# 清理残留数据
dpkg -l |grep ^rc|awk '{print $2}' |sudo xargs dpkg -P
# 安装mysql
sudo apt-get install mysql-server
sudo apt-get install mysql-client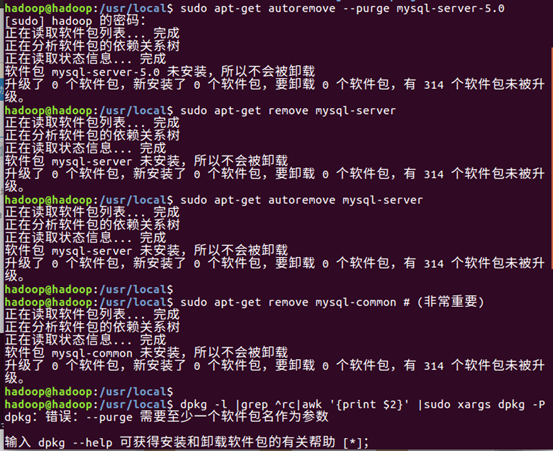
2. 安装时需要输入root账户密码

3. 使用命令登录到mysql新建账户
mysql -uroot -p123 #-u+用户名 -p+密码create database metastore;
grant all on metastore.* to hadoop@'%' identified by '123';
grant all on metastore.* to hadoop@'localhost' identified by '123';
flush privileges;
exit创建数据库
其中hadoop为用户名,123为密码。
hadoop@hadoop:/usr/local$  mysql -u root -p
 Enter password:
Welcome to the MySQL monitor.  Commands end with ; or g.
Your MySQL connection id is 4
Server version: 5.7.21-0ubuntu0.16.04.1 (Ubuntu)

Copyright (c) 2000, 2018, Oracle and/or its affiliates. All rights reserved.

Oracle is a registered trademark of Oracle Corporation and/or its
affiliates. Other names may be trademarks of their respective
owners.

Type 'help;' or 'h' for help. Type 'c' to clear the current input statement.

mysql> create database metastore;
Query OK, 1 row affected (0.00 sec)

mysql>  grant all on metastore.* to hadoop@'%' identified by '123';
Query OK, 0 rows affected, 1 warning (0.00 sec)

mysql>  grant all on metastore.* to hadoop@'localhost' identified by '123';
Query OK, 0 rows affected, 1 warning (0.00 sec)

mysql> flush privileges;
Query OK, 0 rows affected (0.00 sec)

mysql> exit;

Bye
三。 安装hive
1. 在/usr/local目录下解压并赋予权限
hadoop@haoop:/usr/local/$sudo tar -xzvf hive-2.3.2.tar.gz
hadoop@haoop:/usr/local/$sudo mv hive-2.3.2 hive   #重命名
hadoop@haoop:/usr/local/$sudo chown -R hadoop hive
2. 下载mysql-connector-java-5.1.44的jar包
https://dev.mysql.com/downloads/connector/j/
解压
sudo tar -xzvf mysql-connector-java-5.1.44.tar.gz3. 将mysql的jar包复制到/hive/lib目录下
sudo cp mysql-connector-java-5.1.44-bin.jar /usr/local/hive/lib4. 添加hive环境变量
sudo vim ~/.bashrc
export HIVE_HOME=/usr/local/hive
export PATH=$PATH:$HIVE_HOME/bin
export CLASSPATH=$CLASSPATH:/usr/local/hadoop/lib/*:.
export CLASSPATH=$CLASSPATH:/opt/usr/local/hive/lib/*:.
source ~/.bashrc
5. hive配置文件
hadoop@haoop:/usr/local/$cd ./hive/conf
hadoop@haoop:/usr/local/hive/conf$sudo cp hive-default.xml.template hive-default.xml
hadoop@haoop:/usr/local/hive/conf$sudo cp hive-default.xml.template hive-site.xml
hadoop@haoop:/usr/local/hive/conf$sudo cp hive-env.sh.template hive-env.sh
hadoop@haoop:/usr/local/hive/conf$sudo vim hive-env.sh
hadoop@haoop:/usr/local/hive/conf$sudo vim hive-site.xml
hive-env.sh
sudo vim hive-env.sh
export HADOOP_HEAPSIZE=1024
export HADOP_HOME=/usr/local/hadoop # 请指定你的hadoop安装目录, 这里我的是/usr/local下
export HIVE_CONF_DIR=/usr/local/hive/conf
export HIVE_AUX_JARS_PATH=/usr/local/hive/lib
新建hive-site.xml
此处username是我在mysql中创建的用户名,password是我设置的密码。
如果你使用的是原来的template文件,则最好将${system:java.io.tmpdir}/${system:user.name}替换为自己的目录 我使用的是 /usr/hive
sudo vim hive-site.xml
<?xml version="1.0" encoding="UTF-8" standalone="no"?>
<?xml-stylesheet type="text/xsl" href="configuration.xsl"?>
<configuration>
<property>
<name>javax.jdo.option.ConnectionURL</name>
<value>jdbc:mysql://localhost:3306/metastore?createDatabaseIfNotExist=true&characterEncoding=UTF-8&useSSL=false</value>
</property>
<property>
<name>javax.jdo.option.ConnectionDriverName</name>
<value>com.mysql.jdbc.Driver</value>
</property>
<property>
<name>javax.jdo.option.ConnectionUserName</name>
<value>hadoop</value>
</property>
<property>
<name>javax.jdo.option.ConnectionPassword</name>
<value>123</value>
</property>
</configuration>6.查看mysql是否运行
sudo netstat -tap | grep mysql
sudo /etc/init.d/mysql restart
7. 初始化hive,两种初始化方法
schematool -initSchema -dbType mysql #schematool -dbType mysql -initSchema hadoop 123
8. 运行hive
报错未创建目录
Logging initialized using configuration in jar:file:/usr/local/hive/lib/hive-common-2.3.2.jar!/hive-log4j2.properties Async: true
Exception in thread "main" java.lang.RuntimeException: Unable to create temp directory /user/hive/tmp
创建/user/hive/tmp目录
sudo mkdir -p /usr/hive/tmp报错权限不够
Logging initialized using configuration in jar:file:/usr/local/hive/lib/hive-common-2.3.2.jar!/hive-log4j2.properties Async: true
Exception in thread "main" java.lang.RuntimeException: java.io.IOException: 权限不够
添加权限
hadoop@hadoop:/user$ sudo chmod -R 777 /user/hive/tmp/

hadoop@hadoop:/user$ sudo chmod -R 777 /user/hive/hive_resources/
正确运行

四。运行hive的eclipse客户端代码
1.修改/usr/local/hadoop/etc/hadoop/core-site.xml
<!--将hadoop修改为自己的用户名-->
<property>
<name>hadoop.proxyuser.hadoop.hosts</name>
<value>*</value>
</property>
<property>
<name>hadoop.proxyuser.hadoop.groups</name>
<value>*</value>
</property>
<property>
<name>hadoop.proxyuser.lina.hosts</name>
<value>*</value>
</property>
<property>
<name>hadoop.proxyuser.lina.groups</name>
<value>*</value>
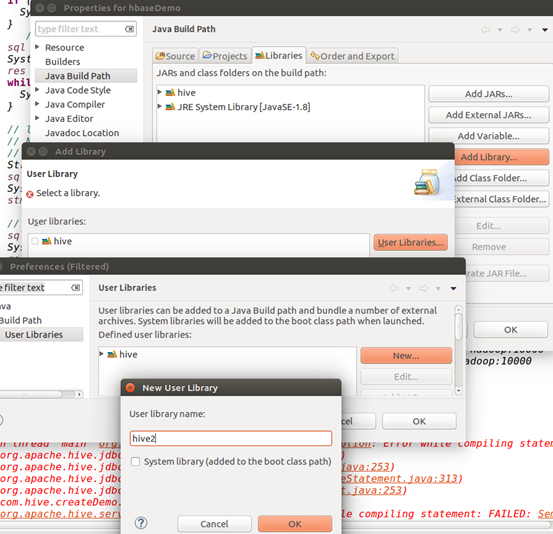
</property>2. 新建java工程项目
添加hive的jar库
项目>右键 build path > congifure build path >libraries >add library > user librarys > new新建hive的jar库 > ok > add external jars > 全选/hive/lib/目录下的所有的jar文件添加到hive用户库中

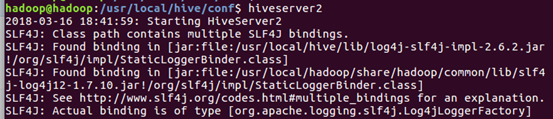
3. 打开hive监听端口hiveserver2
编写客户端代码
package com.hive.createDemo;

    import java.sql.SQLException;
    import java.sql.Connection;
    import java.sql.ResultSet;
    import java.sql.Statement;
    import java.sql.DriverManager;

public class Hivetest1 {
      private static String driverName = "org.apache.hive.jdbc.HiveDriver";

      /**
       * @param args
       * @throws SQLException
       */
      public static void main(String[] args) throws SQLException {
          try {
          Class.forName(driverName);
        } catch (ClassNotFoundException e) {
          // TODO Auto-generated catch block
          e.printStackTrace();
          System.exit(1);
        }
        //replace "hive" here with the name of the user the queries should run as
         //此处hadoop为主机名或者localhost,或者是IP地址+hive使用的用户名+密码
        Connection con = DriverManager.getConnection("jdbc:hive2://hadoop:10000/default", "hadoop", "123");
        Statement stmt = con.createStatement();
        String tableName = "testHiveDriverTable";
        stmt.execute("drop table if exists " + tableName);
        stmt.execute("create table " + tableName + " (key int, value string)");
        // show tables
        String sql = "show tables '" + tableName + "'";
        System.out.println("Running: " + sql);
        ResultSet res = stmt.executeQuery(sql);
        if (res.next()) {
          System.out.println(res.getString(1));
        }
           // describe table
        sql = "describe " + tableName;
        System.out.println("Running: " + sql);
        res = stmt.executeQuery(sql);
        while (res.next()) {
          System.out.println(res.getString(1) + "	" + res.getString(2));
        }

        // load data into table
        // NOTE: filepath has to be local to the hive server
        // NOTE: /tmp/a.txt is a ctrl-A separated file with two fields per line
        String filepath = "/tmp/a.txt";
        sql = "load data local inpath '" + filepath + "' into table " + tableName;
        System.out.println("Running: " + sql);
        stmt.execute(sql);

        // select * query
        sql = "select * from " + tableName;
        System.out.println("Running: " + sql);
        res = stmt.executeQuery(sql);
        while (res.next()) {
          System.out.println(String.valueOf(res.getInt(1)) + "	" + res.getString(2));
        }

        // regular hive query
        sql = "select count(1) from " + tableName;
        System.out.println("Running: " + sql);
        res = stmt.executeQuery(sql);
        while (res.next()) {
          System.out.println(res.getString(1));
        }
      }

    }
运行代码

