实现的操作包括:1、打开属性表;2、编辑属性表;3、增加属性列;4、数据排序;5、字段计算……
嗯,实现的功能目前就这些吧,后续还会继续跟进,还望大家多多关注……下面就分功能说说我的实现方式吧……
1、打开属性表
属性表的打开是在TOC的右键菜单中打开的,首先新建一个类OpenAttribute,继承BaseCommand,OpenAttribute类的源码如下:
using System;
using System.Collections.Generic;
using System.Linq;
using ESRI.ArcGIS.ADF.BaseClasses;
using ESRI.ArcGIS.Controls;

namespace MapDemo
{
    public sealed class OpenAttribute : BaseCommand
    {
        IMapControl3 m_mapControl;
        AxMapControl _MapControl;

        public OpenAttribute(AxMapControl pMapControl)
        {
            base.m_caption = "查看属性表";
            _MapControl = pMapControl;
        }

        public override void OnClick()
        {
            formTable formtable = new formTable(_MapControl, m_mapControl);
            formtable.Show();

        }

        public override void OnCreate(object hook)
        {
            m_mapControl = (IMapControl3)hook;
        }
    }
}
解释一下,AxMapControl参数是为了后面属性表操作时刷新视图的。接着在toc右键事件中添加代码:
m_menuLayer.AddItem(new OpenAttribute(mapMain), -1, 2, false, esriCommandStyles.esriCommandStyleIconAndText);
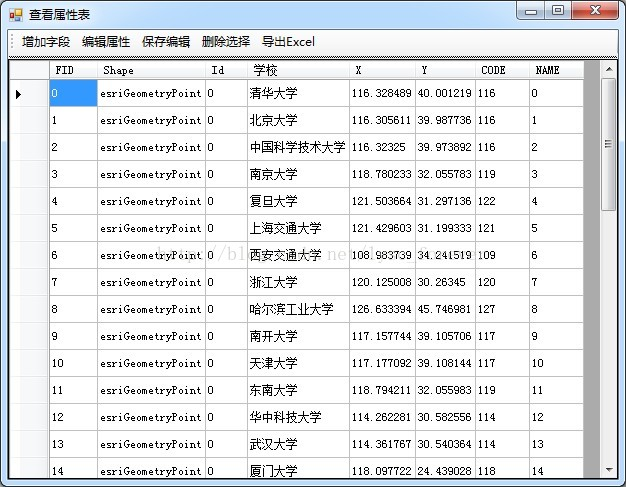
如此这般,这般如此,我们期待的属性表就出现了,效果呢比较丑陋,莫怪莫怪……
属性表打开之后呢,大家就看到了有关属性表操作的一些功能了,不过呢,属性表的大开的工作还尚未完成。接下来呢,添加如下引用:
完了之后,定义一下变量:
- AxMapControl _MapControl;
- IMapControl3 m_mapControl;
- public DataTable dt2;
- ITableSort pTs;//处理排序
- bool up = true;
- int row_index = 0;
- int col_index = 0;
- public string strAddField = "";
- RowAndCol[] pRowAndCol = new RowAndCol[10000];
- int count = 0;
这个窗口的参数为:
public formTable(AxMapControl pMapControl,IMapControl3 pMapCtrl)
{
    InitializeComponent();
    _MapControl = pMapControl;
    m_mapControl = pMapCtrl;
}
这样,下面就可以显示属性了,在form_load事件中写如下代码:
TableShow();
此处,调用了TableShow方法,TableShow的代码如下:


public void TableShow()
{
    ILayer pLayer = (ILayer)m_mapControl.CustomProperty;
    IFeatureLayer pFLayer = pLayer as IFeatureLayer;
    IFeatureClass pFeatureClass = pFLayer.FeatureClass;

    if (pFeatureClass == null) return;

    DataTable dt = new DataTable();
    DataColumn dc = null;

    for (int i = 0; i < pFeatureClass.Fields.FieldCount; i++)
    {

        dc = new DataColumn(pFeatureClass.Fields.get_Field(i).Name);

        dt.Columns.Add(dc);

    }

    IFeatureCursor pFeatureCuror = pFeatureClass.Search(null, false);
    IFeature pFeature = pFeatureCuror.NextFeature();

    DataRow dr = null;
    while (pFeature != null)
    {
        dr = dt.NewRow();
        for (int j = 0; j < pFeatureClass.Fields.FieldCount; j++)
        {
            if (pFeatureClass.FindField(pFeatureClass.ShapeFieldName) == j)
            {

                dr[j] = pFeatureClass.ShapeType.ToString();
            }
            else
            {
                dr[j] = pFeature.get_Value(j).ToString();

            }
        }

        dt.Rows.Add(dr);
        pFeature = pFeatureCuror.NextFeature();
    }
    gdvAttribute.DataSource = dt;
    dt2 = dt;
}
这样呢,属性表的显示就完成了。
2、新增字段
先看看那个“新增字段”按钮的事件吧……
ILayer pLayer = (ILayer)m_mapControl.CustomProperty;
IFeatureLayer pFLayer = pLayer as IFeatureLayer;
formAddField formaddfield = new formAddField(pFLayer, gdvAttribute);
formaddfield.Show();
此处,调用了窗体formAddField ,传递的参数是IFeatureLayer pFLayer 和DataGridView gdvAttribute,那么,下面看看formAddField的设计以及实现
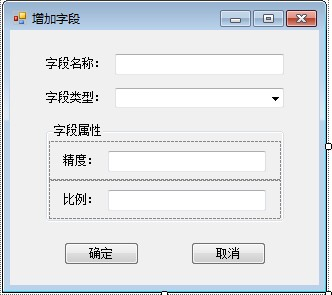
界面呢也是比较简单,看看formAddField 的代码:
using System;
using System.Collections.Generic;
using System.ComponentModel;
using System.Data;
using System.Drawing;
using System.Linq;
using System.Text;
using System.Windows.Forms;

using ESRI.ArcGIS.Carto;
using ESRI.ArcGIS.Geodatabase;
using ESRI.ArcGIS.Controls;

namespace MapDemo
{
    public partial class formAddField : Form
    {
        private IFeatureLayer _FeatureLayer = null;
        private DataGridView _dgv;
        public formAddField(IFeatureLayer pFeatureLayer, DataGridView dgv)
        {
            InitializeComponent();
            _FeatureLayer = pFeatureLayer;
            _dgv = dgv;
        }

        private void formAddField_Load(object sender, EventArgs e)
        {
            this.cmbFieldType.Items.Add("长整型");
            this.cmbFieldType.Items.Add("短整型");
            this.cmbFieldType.Items.Add("浮点型");
            this.cmbFieldType.Items.Add("双精度");
            this.cmbFieldType.Items.Add("文本型");
            this.cmbFieldType.Items.Add("日期型");
            this.cmbFieldType.SelectedIndex = 0;
        }

        /// <summary>
        /// 改变事件
        /// </summary>
        /// <param name="sender"></param>
        /// <param name="e"></param>
        private void cmbFieldType_SelectedIndexChanged(object sender, EventArgs e)
        {
            string strFieldType = cmbFieldType.Text;
            switch (strFieldType)
            {
                case "长整型":
                    {
                        panelPrecision.Visible = true;
                        panelScale.Visible = false;
                        break;
                    }
                case "短整型":
                    {
                        panelPrecision.Visible = true;
                        panelScale.Visible = false;
                        break;
                    }
                case "浮点型":
                    {
                        panelPrecision.Visible = true;
                        panelScale.Visible = true;
                        break;
                    }
                case "双精度":
                    {
                        panelPrecision.Visible = true;
                        panelScale.Visible = true;
                        break;
                    }
                case "文本型":
                    {
                        panelPrecision.Visible = true;
                        panelScale.Visible = false;
                        lblPrecision.Text = "长度";
                        break;
                    }
                default://日期型0
                    {
                        panelPrecision.Visible = false;
                        panelScale.Visible = false;
                        break;
                    }
            }
        }

        private void btnOK_Click(object sender, EventArgs e)
        {
            string strFieldName = txtFieldName.Text;
            string strFieldType = cmbFieldType.Text;
            try
            {
                IFeatureLayer editAttributeLayer = _FeatureLayer;

                //Field collection
                IFieldsEdit pFieldsEdit;
                //获取FeatureLayer
                IFeatureLayer pFeatureLayer = editAttributeLayer;

                //从FeatureLayer获取工作空间
                IDataset pDataSet = pFeatureLayer.FeatureClass as IDataset;
                IWorkspace pWorkSpace = pDataSet.Workspace;
                //设置字段属性
                IField pNewField = new FieldClass();
                IFieldEdit pFieldEdit = pNewField as IFieldEdit;
                pFieldEdit.AliasName_2 = strFieldName;
                pFieldEdit.Name_2 = strFieldName;
                switch (strFieldType)
                {
                    case "长整型":
                    {
                        pFieldEdit.Type_2 = esriFieldType.esriFieldTypeInteger;
                        pFieldEdit.Precision_2 = int.Parse(txtPrecision.Text);
                        break;
                    }
                    case "Class1.cs短整型":
                    {
                        pFieldEdit.Type_2 = esriFieldType.esriFieldTypeSmallInteger;
                        pFieldEdit.Precision_2 = int.Parse(txtPrecision.Text);
                        break;
                    }
                    case "浮点型":
                    {
                        pFieldEdit.Type_2 = esriFieldType.esriFieldTypeSingle;
                        pFieldEdit.Precision_2 = int.Parse(txtPrecision.Text);
                        pFieldEdit.Scale_2 = int.Parse(txtScale.Text);
                        break;
                    }
                    case "双精度":
                    {
                        pFieldEdit.Type_2 = esriFieldType.esriFieldTypeDouble;
                        pFieldEdit.Precision_2 = int.Parse(txtPrecision.Text);
                        pFieldEdit.Scale_2 = int.Parse(txtScale.Text);
                        break;
                    }
                    case "文本型":
                    {
                        pFieldEdit.Type_2 = esriFieldType.esriFieldTypeString;
                        pFieldEdit.Length_2 = int.Parse(txtPrecision.Text);
                        break;
                    }
                    default://日期型0
                    {
                        pFieldEdit.Type_2 = esriFieldType.esriFieldTypeDate;
                        break;
                    }
                }
                //添加字段
                try
                {
                    int theField = pFeatureLayer.FeatureClass.Fields.FindField(strFieldName);
                    if (theField == -1)
                    {
                        pFeatureLayer.FeatureClass.AddField(pFieldEdit);
                        MessageBox.Show("字段添加成功!");
                    }
                    else
                    {
                        MessageBox.Show("字段已经存在!");
                    }
                }
                catch (Exception ex)
                {
                    MessageBox.Show("Field " + pFieldEdit.Name + " was not added due to an error (" + ex.Message + " )");
                }

            }
            catch (System.Exception ex)
            {
                MessageBox.Show(ex.Message);
            }
            this.Close();
            RefreshTable refresh = new RefreshTable();
            refresh.Refresh(_dgv, _FeatureLayer);
        }

        private void btnCancle_Click(object sender, EventArgs e)
        {
            this.Close();
        }
    }
}
首先,在窗体加载的时候将数据类型添加进去,之后在类型选择改变时触发其属性控制控件的显示或者改变,接下来就是最重要的添加字段了,大家注意到了,在this.Close()之后,还调用了RefreshTable 的Refresh方法,传递的参数是datagridview _dgv和Ifeaturelayer _FeatureLayer,Refresh方法主要是实现添加自断后显示的刷新,由于后面还有涉及到,所以,这个后面一并说。
3、编辑属性并保存
还是先看看那两个按钮的时间吧:
private void toolEditor_Click(object sender, EventArgs e)
{
    gdvAttribute.ReadOnly = false;
    this.gdvAttribute.CurrentCell = this.gdvAttribute.Rows[this.gdvAttribute.Rows.Count - 2].Cells[0];
}

 /// <summary>
/// 保存编辑
/// </summary>
/// <param name="sender"></param>
/// <param name="e"></param>
private void toolSave_Click(object sender, EventArgs e)
{
    gdvAttribute.ReadOnly = true;
    ILayer pLayer = (ILayer)m_mapControl.CustomProperty;
    IFeatureLayer pFLayer = pLayer as IFeatureLayer;
    IFeatureClass pFeatureClass = pFLayer.FeatureClass;
    ITable pTable;
    //pTable = pFeatureClass.CreateFeature().Table;//很重要的一种获取shp表格的一种方式
    pTable = pFLayer as ITable;
    //将改变的记录值传给shp中的表
    int i = 0;
    while (pRowAndCol[i].Column != 0 || pRowAndCol[i].Row != 0)
    {
        IRow pRow;
        pRow = pTable.GetRow(pRowAndCol[i].Row);
        pRow.set_Value(pRowAndCol[i].Column, pRowAndCol[i].Value);
        pRow.Store();
        i++;
    }
    count = 0;
    for (int j = 0; j < i; j++)
    {
        pRowAndCol[j].Row = 0;
        pRowAndCol[j].Column = 0;
        pRowAndCol[j].Value = null;
    }
    MessageBox.Show("保存成功!", "提示", MessageBoxButtons.OK);
}
在保存属性表的时候,出现了pRowAndCol,对他的定义如下:
public struct RowAndCol
{
    //字段
    private int row;
    private int column;
    private string _value;

    //行属性
    public int Row
    {
        get
        {
            return row;
        }
        set
        {
            row = value;
        }
    }
    //列属性
    public int Column
    {
        get
        {
            return column;
        }
        set
        {
            column = value;
        }
    }
    //值属性
    public string Value
    {
        get
        {
            return _value;
        }
        set
        {
            _value = value;
        }
    }
}
4、删除选择
顾名思义,就是删除选择的行,这里的选择可以是多选,也可是单选,看看对应按钮的事件吧:
private void toolDelSelect_Click(object sender, EventArgs e)
{
    if (((MessageBox.Show("确定要删除吗", "警告", MessageBoxButtons.YesNo)) == DialogResult.Yes))
    {
        ILayer pLayer = (ILayer)m_mapControl.CustomProperty;
        IFeatureLayer pFLayer = pLayer as IFeatureLayer;
        ITable pTable = pFLayer as ITable;
        IRow pRow = pTable.GetRow(row_index);
        pRow.Delete();
        TableShow();
        MessageBox.Show("删除成功!", "提示", MessageBoxButtons.OK);
        _MapControl.ActiveView.Refresh();
    }
}
此处,看看下面这个事件:
private void gdvAttribute_CellValueChanged(object sender, DataGridViewCellEventArgs e)
{
    //记录值一旦改变触发此事件
    //在dataGridView中获取改变记录的行数,列数和记录值
    pRowAndCol[count].Row = gdvAttribute.CurrentCell.RowIndex;
    pRowAndCol[count].Column = gdvAttribute.CurrentCell.ColumnIndex;
    pRowAndCol[count].Value = gdvAttribute.Rows[gdvAttribute.CurrentCell.RowIndex].Cells[gdvAttribute.CurrentCell.ColumnIndex].Value.ToString();
    count++;
}
5、导出Excel
首先得添加程序对Microsoft.Office.Interop.Excel的引用,添加完成之后方可导出:
private void toolExpXLS_Click(object sender, EventArgs e)
{
    ILayer pLayer = (ILayer)m_mapControl.CustomProperty;
    IFeatureLayer pFLayer = pLayer as IFeatureLayer;
    IFeatureClass pFeatureClass = pFLayer.FeatureClass;
    IFields pFields = pFeatureClass.Fields;
    ExportExcel(gdvAttribute, pFields);
}

private void ExportExcel(DataGridView myDGV, IFields pFields)
{
    string saveFileName = "";
    SaveFileDialog saveDialog = new SaveFileDialog();
    saveDialog.DefaultExt = "xls";
    saveDialog.Filter = "Excel文件|*.xls";
    saveDialog.ShowDialog();
    saveFileName = saveDialog.FileName;
    if (saveFileName.IndexOf(":") < 0) return; //被点了取消

    Microsoft.Office.Interop.Excel.Application xlApp = new Microsoft.Office.Interop.Excel.Application();
    if (xlApp == null)
    {
        MessageBox.Show("无法创建Excel对象,可能您的机子未安装Excel");
        return;
    }

    Microsoft.Office.Interop.Excel.Workbooks workbooks = xlApp.Workbooks;
    Microsoft.Office.Interop.Excel.Workbook workbook = workbooks.Add(Microsoft.Office.Interop.Excel.XlWBATemplate.xlWBATWorksheet);
    Microsoft.Office.Interop.Excel.Worksheet worksheet = (Microsoft.Office.Interop.Excel.Worksheet)workbook.Worksheets[1];//取得sheet1

    //写入标题
    for (int i = 0; i < myDGV.ColumnCount; i++)
    {
        worksheet.Columns.Cells[1, i + 1] = myDGV.Columns[i].HeaderText;
    }
    //写入数值
    for (int r = 0; r < myDGV.Rows.Count; r++)
    {
        for (int i = 0; i < myDGV.ColumnCount; i++)
        {
            worksheet.Cells[r + 2, i + 1] = myDGV.Rows[r].Cells[i].Value;
        }
        System.Windows.Forms.Application.DoEvents();
    }

    worksheet.Columns.EntireColumn.AutoFit();//列宽自适应

    if (saveFileName != "")
    {
        try
        {
            workbook.Saved = true;
            workbook.SaveCopyAs(saveFileName);
        }
        catch (Exception ex)
        {
            MessageBox.Show("导出文件时出错,文件可能正被打开!
" + ex.Message);
        }
        xlApp.Quit();
        GC.Collect();//强行销毁
        MessageBox.Show("资料保存成功", "提示", MessageBoxButtons.OK);
    }
}

