一、背景
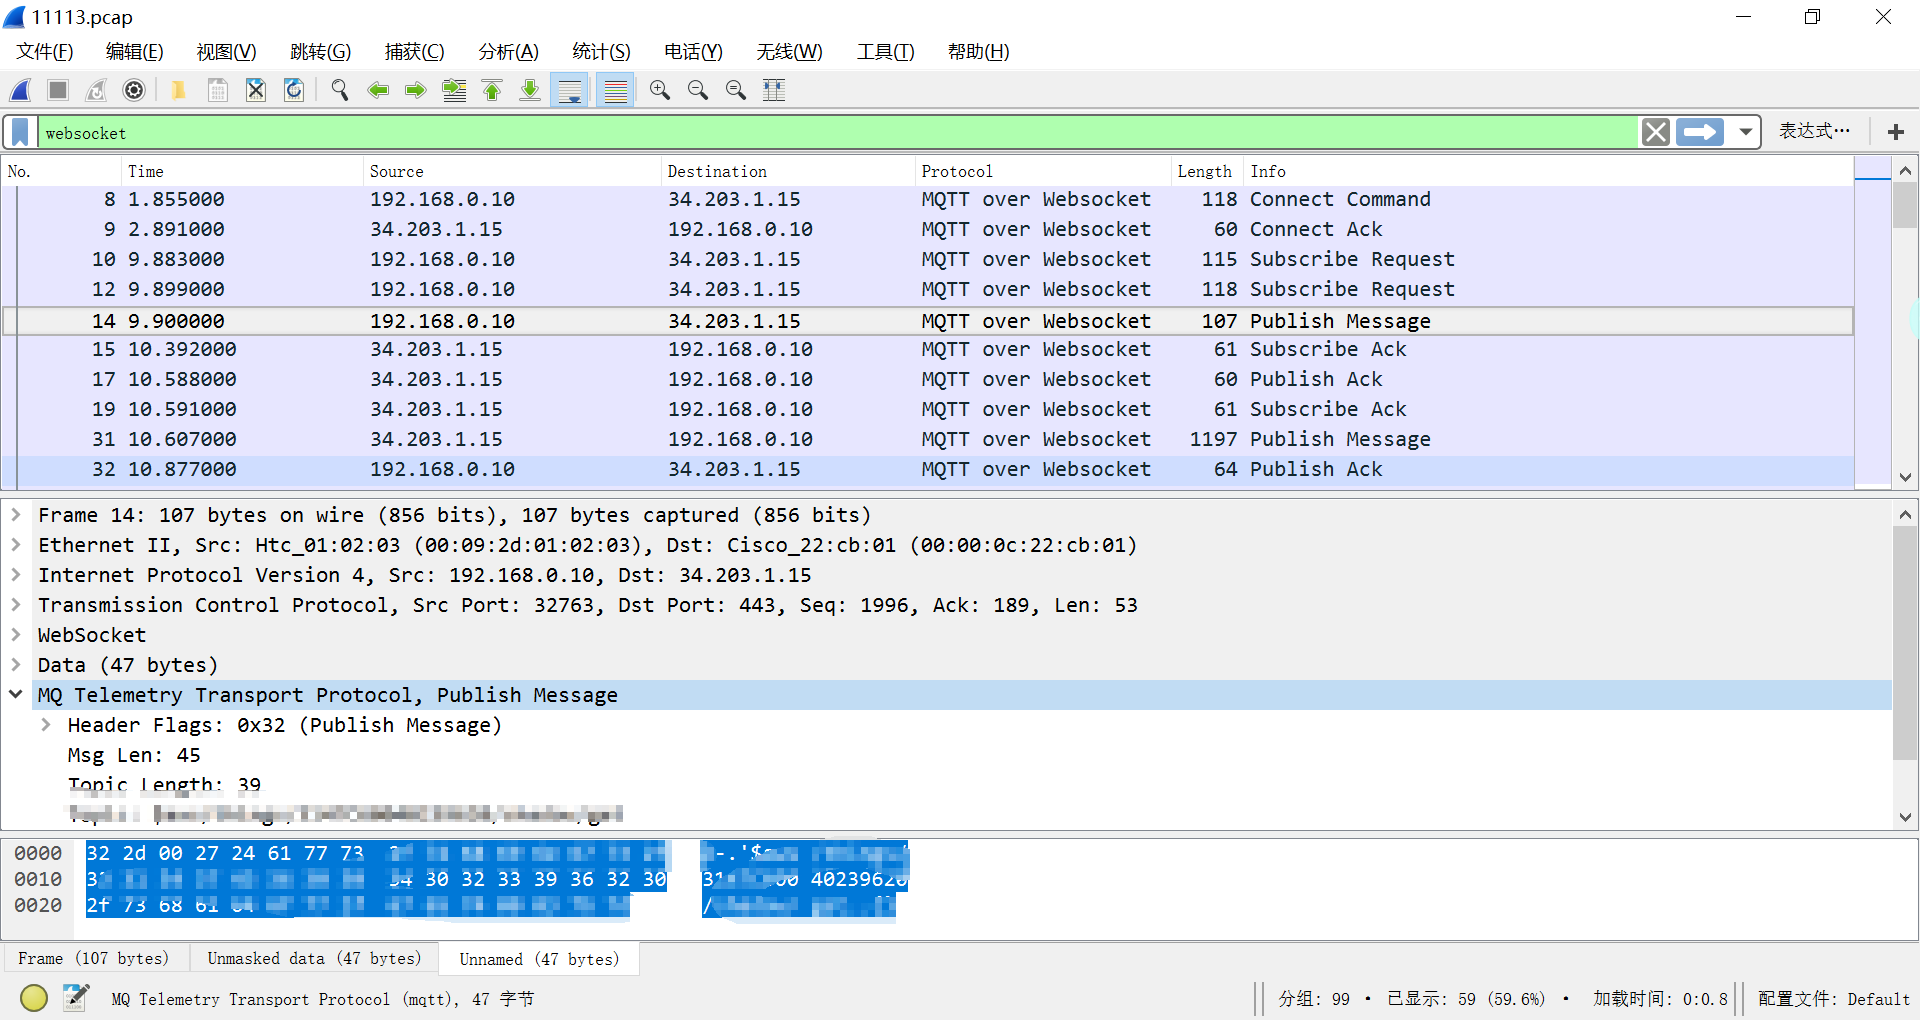
最近在做物联网流量分析时发现, App在使用MQTT协议时往往通过SSL+WebSocket+MQTT这种方式与服务器通信,在使用SSL中间人截获数据后,Wireshark不能自动解析出MQTT语义,只能解析到WebSocket层,如图所示。虽然在Data域中显示了去掉mask的WebSocket数据,但分析起来mqtt仍然很难受。所以打算写一个插件,利用wireshark自带的MQTT解析功能来分析Data部分的数据,而不是自己从头写一个完全新的解析器。注:很多教程是教如何添加一个新的协议,如设置协议的属性等,推荐参考【2】,本文主要梳理编写插件的条理。

二、Lua编写wireshark插件基础
有前辈介绍了用Lua写wireshark插件的基础教程,可以参考文末【1】【2】,这里再以自己的理解总结一下,因为实在没有一个文档让我有从入门到精通的感觉。
1. 首先需要知道解析器(Dissector)和post-dissectors的相关概念【3】
1)解析器(Dissector)是用来被wireshark调用解析数据包或部分数据包的,需要以Proto对象的形式注册后才能被wireshark调用。同时,我们还可以使用wireshark已经自带的解析器,注册一个解析器的例子代码如下所示。
-- trivial protocol example
-- declare our protocol
--trival是协议名字,后面是说明,均需要在wireshark中唯一。

trivial_proto = Proto("trivial","Trivial Protocol")
-- create a function to dissect it
function trivial_proto.dissector(buffer,pinfo,tree)
    pinfo.cols.protocol = "TRIVIAL"
    local subtree = tree:add(trivial_proto,buffer(),"Trivial Protocol Data")
    subtree:add(buffer(0,2),"The first two bytes: " .. buffer(0,2):uint())
    subtree = subtree:add(buffer(2,2),"The next two bytes")
    subtree:add(buffer(2,1),"The 3rd byte: " .. buffer(2,1):uint())
    subtree:add(buffer(3,1),"The 4th byte: " .. buffer(3,1):uint())
end
-- load the udp.port table
udp_table = DissectorTable.get("udp.port")
-- register our protocol to handle udp port 7777
udp_table:add(7777,trivial_proto)
2)解析器注册分为很多种,可以使用函数register_postdissector(trivial_proto)注册为postdissectors,即在所有解析器执行完后执行;也可以在DissectorTable上注册,这样就可以使用wireshark自带的上一层协议解析后的结果。比如,协议TCP的解析表”tcp.port”包括http,smtp,ftp等。例如,你写的解析器想解析tcp端口7777上的某个协议,就使用下面的代码,而不必从tcp或者ip层开始解析。
-- load the udp.port table
udp_table = DissectorTable.get("udp.port")
-- register our protocol to handle udp port 7777
udp_table:add(7777,trivial_proto)
这个功能非常强大。直观地,如果想解析WebSocket上的mqtt协议,可以这么写【6】(但是不知什么原因我这么写一直无法成功解析。):
local mqtt_dissector = Dissector.get("mqtt")
local ws_dissector_table = DissectorTable.get("ws.port")
ws_dissector_table:add(8083, mqtt_dissector)
通过上面这段代码我们学习到,直接获得wireshark中解析器的方法Dissector.get,更多的方法可以参考官方文档11章【7】,比如我们如何获得已经支持的所有协议呢?mqtt协议的解析器关键字是大写还是小写?可以这么写【8】:
local t = Dissector.list()

for _,name in ipairs(t) do
    print(name)
end

--查看所有支持的table
local dt = DissectorTable.list()

for _,name in ipairs(dt) do
    print(name)
end
3)被调用时,wireshark会传递给解析器三个参数:数据缓冲区(一个Tvb 对象【4】)、包的信息(Pinfo对象【5】)以及显示在图形化中的树形结构(TreeItem 对象 )。注意,理解这三个参数至关重要,同时注意它们不是Lua自身具有的数据类型,经常需要调用对象中的方法转换。通过这三个参数, 解析器就可以获得和修改包的相关信息。
Tvb就是包的数据内容,可以像这样来提取内容。通常,我们需要提取出来包的内容当做字符串处理,或者提供字符串转换成Tvb来让解析器处理,这时候需要进行一些转换,如下代码所示【10】,详细可参考【9】。
local b = ByteArray.new(decipheredFrame)
local bufFrame = ByteArray.tvb(b, "My Tvb")
Pinfo经常被解释为报文信息,个人理解简单的说就是给了按照图中这个条访问报文的接口,最常见的例子就是修改协议列名称或者info列显示的消息,如pinfo.cols.protocol = "MQTT over Websocket" ,更多的属性从参考文献【5】中可以获取。

TreeItem 对象表示报文解析树中的一个树节点,获得了这个就可以动态往图形化界面里添加节点。
2.调试与启用插件
启动
wireshark在启动时会加载init.lua脚本, windows平台在wireshark安装目录下,linux在etc/wireshark下。想要执行我们写的插件,只需在该脚本最后加上dofile(".\plugins\mqttoverwebsocket.lua")来执行即可。重新加载Lua脚本的快捷键是Ctrl+Shift+L。
调试
若脚本有语法错误,wireshark图形界面在加载时会弹出提示;若有运行时错误,会在图形化的协议树中显示;wireshark还有一个Lua终端来执行编写的插件脚本、打印错误信息,通过“工具——Lua——console”打开,动态执行脚本通过“工具——Lua——evaluate”。注意看到输出需要使用wireshark提供的内置函数如debug(text)来输出【14】。
三、实现解析Websocket上的MQTT协议
由于不明原因将mqtt协议解析器注册到ws.port或ws.protocol上仍然无法自动解析MQTT,所以我选择首先获得已经解析好去掉mask后的WebSocket的data字段,然后再将其转换成tvb到mqtt解析器中自动解析。获得包解析后内容的方法主要参考【11】和【12】中的解析树的例子,使用fieldinfo类与全局函数all_field_infos()来获得解析树的各个部分内容。
由于传入mqtt解析器的tree就是这个包的树根,所以也会自动添加一个节点。最后取得了不错的效果。另附github链接:https://github.com/a3135134/Wireshark-Plugin-MQTToverWebSocket.git

do
    -- calling tostring() on random FieldInfo's can cause an error, so this func handles it
    local function getstring(finfo)
        local ok, val = pcall(tostring, finfo)
        if not ok then val = "(unknown)" end
        return val
    end

    -- Create a new dissector
    MQTToverWebsocket = Proto("MQTToverWebsocket", "MQTT over Websocket")
    mqtt_dissector = Dissector.get("mqtt")
    -- The dissector function
    function MQTToverWebsocket.dissector(buffer, pinfo, tree)
        local fields = { all_field_infos() }
        local websocket_flag = false
        for i, finfo in ipairs(fields) do
            if (finfo.name == "websocket") then
                websocket_flag = true
            end
            if (websocket_flag == true and finfo.name == "data") then
                local str1 = getstring(finfo)
                local str2 = string.gsub(str1, ":", "")
                local bufFrame = ByteArray.tvb(ByteArray.new(str2))
                mqtt_dissector = Dissector.get("mqtt")
                --mqtt_dissector:call(finfo.source, pinfo, tree) #9 BUG
                mqtt_dissector:call(bufFrame, pinfo, tree)
                --mqtt_dissector:call(finfo.value, pinfo, tree)
                websocket_flag = false
                pinfo.cols.protocol = "MQTT over Websocket"
            end
    end

        --ws_dissector_table = DissectorTable.get("ws.port")
        --ws_dissector_table:add("443",mqtt_dissector)
    end
    -- Register the dissector
    --ws_dissector_table = DissectorTable.get("ws.port")
    --ws_dissector_table:remove(443, mqtt_dissector)
    --ws_dissector_table:add(443, MQTTPROTO)
    --ws_dissector_table:add_for_decode_as(mqtt_dissector)
    register_postdissector(MQTToverWebsocket)
end
四、TIPS与BUG
TIP1.如果遇到非知名端口上的多层解析怎么办?如遇到1885端口上的SSL+Websocket+MQTT如何处理?
首先选择要解析的包,右键点击“解码为...”,设置当前1885端口为SSL Port,然后将Current的None修改为HTTP。这样Wireshark才会将该包解析显示为Websocket,之后才能使用该插件解析。wireshark默认只解析知名端口如443,所以经常还是要凭借经验来自己配置。
TIP2.手机端使用HTML5编写控制页面(国内很多智能家居都是,如苏宁智能等),Hook后就打不开网页(似乎是由于使用了系统webview),怎么办?
想办法获得访问的页面URL,将该页面放到浏览器中去模拟访问再抓包。设置系统变量就可以将浏览器的SSL Session Key导出,再设置wireshark的“编辑——首选项——协议——SSL”就可以解析了。
BUG1.这个插件在wireshark升级或重新安装后会报错,提示已经注册了相同说明的协议,不知如何解决,但不影响使用。
参考文献1
【1】http://www.cnblogs.com/zzqcn/p/4827251.html
【2】https://mika-s.github.io/wireshark/lua/dissector/2017/11/04/creating-a-wireshark-dissector-in-lua-1.html
【3】https://wiki.wireshark.org/Lua/Dissectors#Dissectors
【4】https://wiki.wireshark.org/LuaAPI/Tvb#Tvb
【5】https://wiki.wireshark.org/LuaAPI/Pinfo#Pinfo
【6】https://ask.wireshark.org/question/1480/mqtt-over-websocket/
【7】https://www.wireshark.org/docs/wsdg_html_chunked/lua_module_Proto.html#lua_class_Dissector
【8】https://osqa-ask.wireshark.org/questions/32288/can-over-ethernet-lua-dissector
【9】https://www.wireshark.org/docs/wsdg_html_chunked/lua_module_Tvb.html
【10】https://osqa-ask.wireshark.org/questions/43013/conversion-of-string-into-userdata-type-like-wiresharks-buffer
【11】https://www.wireshark.org/docs/wsdg_html_chunked/lua_module_Field.html#lua_class_Field
【12】https://wiki.wireshark.org/Lua
【13】https://wiki.wireshark.org/Lua/Examples#View_Packet_Tree_of_Fields.2FFieldInfo
【14】https://wiki.wireshark.org/LuaAPI/Utils
By ascii0x03, 2018/4/10,转载请注明出处
我的博客即将搬运同步至腾讯云+社区,邀请大家一同入驻:https://cloud.tencent.com/developer/support-plan?invite_code=16ze50p7mjz0y