choices参数
choices参数主要用于模型表中某些字段中
比如:
我们存性别字段直接存中文,在数据量大的时候太消耗数据库资源,而且性别字段至多三个选择
男.女.其他 所以我们可以将其设置为数字进行存储,取出性别字段时,也给他配一个对应关系,例如:1就对应 男
写法:
class User(models.Model):
    name = models.CharField(max_length=32)
    password = models.CharField(max_length=32)
    gender_choices = (
        (1, '男'), (2, '女'), (3, '其他')
    )
    gender = models.IntegerField(choices=gender_choices)
注意:gender_choices中写法是元组套元组
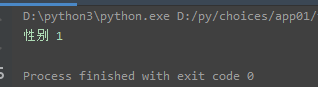
如果我们像平常一样取gender中的数据时,还是会直接显示数据
    obj = models.User.objects.filter(pk=1).first()
    print('性别', obj.gender)
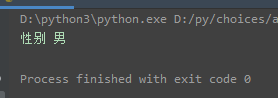
我们要使用固定语法取值
get_choices字段名_display()
obj = models.User.objects.filter(pk=1).first()
print('性别', obj.get_gender_display())
如果gender中存入的是,不在gender_choices对应关系中,get_gender_display()直接显示数字
MTV与MVC模型
MTV与MVC是纯概念知识点
MTV(Django自称自己为MTV模型,本质上也是MVC模型)
M: models 模型层
T: templates 模板层
V: views 视图函数
MVC
M: models
V: views
C: controller 控制器,其实就是urls 路由分发层
前端三种数据编码格式
1.urlencoded
2.formdata
3.json
form表单
默认是urlencoded编码格式
数据格式:xxx=xxx&yyy=yyy
Django后端针对urlencoded编码格式的数据会自动解析并放到request.POST中
我们可以将form表单默认的编码格式改为formdata 可以传输文件
Django后端会将符合urlencoded编码格式的数据放入request.POST中
而将文件数据放入request.FILES中
json
从后端往前端发送json数据,跟之前一样都需要json.dumps(数据)
我们可以用JasonResponse可以省去jaon.dumps和转码
	from django.http import JsonResponse
    return JsonResponse(res)
json在前端需要序列化和反序列化需要通过javascript, 模板语法暂时并不知道能否序列化,反序列化
Django自带的序列化组件
from django.core import serializers
def index(request):
    user_list = models.User.objects.all()
    # 我们要将用户对象以字典的形式发送给前端,前端而且能以自定义对象使用,这时候需要用到json

    # 使用for循环过于繁琐
    # l = []
    # for user_obj in user_list:
    #     l.append(json.dumps({
    #         'name': user_obj.name,
    #         'password': user_obj.password,
    #         'gender': user_obj.get_gender_display()
    #     }))

    res = serializers.serialize('json', user_list)  # serialize第一个参数数据格式,第二个参数queryset对象
    # 可以做到与上面for循环的效果,还能更好
    '''
    {"model": "app01.user", "pk": 1, "fields": {"name": "tank", "password": "123", "gender": 1}}
    能展示出出自哪个表, 展示主键, 然后将其他字段全部放入fields中,但是有choices参数的字段并不能对应到相应数据了,只会展示数据库中的数据
    '''
    return render(request, 'index.html', locals())
注意:
前后端交互数据时,编码格式要统一
比如:以urlencoded编码格式往后端发送文件数据,文件数据会直接被打包在request.POST中
但是request.POST.get('file')只能拿到文件名,并不能拿到文件对象
Ajax
异步提交 局部刷新
请求方式 get/post
a标签href属性 get请求
浏览器窗口输入url get请求
form表单 get/post请求
Ajax get/post请求
首先ajax这门技术 是js中的
但是原生的js操作ajax比较繁琐,我们这里为了提高效率
直接使用jQuery封装版本的ajax
Ajax 最大优点是在不重新加载整个页面的情况下,可以与服务器交换数据并更新部分网页内容
(这一特点给用户的感受是在不知不觉中完成请求和响应过程)
Ajax基本语法
    // ajax POST请求
    $('.del').click(function () {
        $.ajax({
            // url代表往哪个路由提交 不写默认当前地址发生
            url:'',
            // 选择ajax提交方式
            type: 'post',
            // 提交数据
            data: {'delete_id': $(this).attr('delete_id')},
            // 相当于异步提交之后的回调函数, 异步提交获得结果
            success: function (data) {
                alert(data)
            }
        })
    })
Ajax以字典的形式往后端发生数据

浏览器并不是以字典的形式发送,而是以xxx=xxx&yyy=yyy形式发送

ajax在提交数据时默认使用urlencoded编码格式
Ajax传输文件
// ajax 发送文件
    //
    $('#d2').click(function () {
        // ajax传送文件,需要先生成一个formdata对象,将所有数据都放入formdata中
        let form = new FormData();
        // 往FormData对象中添加普通数据
        form.append('name', 'jason');
        form.append('password', '123');
        // 往FormData对象中添加文件
        // 固定写法
        // 1.先获取文件标签所存储的文件对象
        // 2.将jQuery对象转成原生js对象
        // 3.利用原生js对象的方法 .files[0]获取到标签内部存储的文件对象
        form.append('myfile', $('#d1')[0].files[0]);
        $.ajax({
            url:'',
            type:'post',
            // 传输数据就是FormData对象
            data: form,
            // 不过传输FormData对象需要注意要修改两个参数
            processData: false,
            contentType: false,
            success: function (data) {
                alert(data)
            }
        })
    })
Ajax传输json数据
 // ajax传输json数据
    $('#d2').click(function () {
        $.ajax({
            url:'',
            type:'post',
            // 将数据进行序列化
            data: JSON.stringify({'name':'jason','age':18}),
            contentType: 'application/json',  // 告诉后端这是json数据
            success:function (data) {
                alert(data)
            }
        })
    })
前端发送过来的json数据并不会放在request.POST中,而是放在request.body中
b'{"name":"jason","age":18}'
而且是原封不动,并不会给你进行转码或者反序列化,需要后端进行手动解码反序列化
sweetalert搭建页面
sweetalert展示,我们用一个小例子,删除用户时,用一个弹窗,让他进行一次确认
教程网站 https://lipis.github.io/bootstrap-sweetalert/
前端代码
    $('.del').click(function () {
        // 先获取当前删除对象
        var $btnEle = $(this);
        swal({
          title: "确定删除吗?",
          text: "删除可就没了!",
          type: "warning",
          showCancelButton: true,
          confirmButtonClass: "btn-danger",
          confirmButtonText: "我要删除!",
          cancelButtonText: "我先不删了!",
          closeOnConfirm: false,
          closeOnCancel: false,
          showLoaderOnConfirm: true  // 可以显示正在等待后端发来数据
            },
        function () {
            $.ajax({
                url:'',
                type:'post',
                data:{'delete_id': $btnEle.attr('delete_id')},
                success:function (data) {  // 后端发来的data数据是json格式,但是前端会将json数据自动反序列化,转成js自定义对象
                    if (data.code==100){
                        swal("删除!", "你已经删除.", "success");
                        $btnEle.parent().parent().remove()
                    }else{
                        swal("Cancelled", "Your imaginary file is safe :)", "info");
                    }
                    // 删除完之后,将其整行数据从页面上删除

                }
            });

        });


            })
后端代码
def userlist(request):
    # 判断是否为ajax请求
    back_dic = {'code': 100, 'msg': ''}
    if request.is_ajax():
        delete_id = request.POST.get('delete_id')
        models.User.objects.filter(pk=delete_id).delete()
        back_dic['msg'] = '删除成功!'
        return JsonResponse(back_dic)
    user_list = models.User.objects.all()
    return render(request, 'userlist.html', locals())
批量插入数据
def booklist(request):
    # 这种方式插入数据时间过长
    # for i in range(1000):
    #     models.Book.objects.create(title='第%s本书' % i)
    l = []
    for i in range(1000000000):
        # 先生成一个Book对象,并不创建数据
        l .append(models.Book(title='第%s本书' % i))
    # 使用批量插入数据
    # bulk_create会将你传入的数据再次进行list化
    models.Book.objects.bulk_create(l)

分页器
手撸分页器
'''
算了算了 自己写不出来
'''
后端使用分页器
from app01.utils.mypage import Pagination
# 需要去app下建立一个utils文件夹,这里存放所有第三方组件
# 获取所有书籍对象
book_list = models.Book.objects.all()
# 获取前端get请求发来的page,默认为1
current_page = request.GET.get("page",1)
# 统计书籍对象个数
all_count = book_list.count()
# per_page_num展示书籍对象条数   pager_count分页条展示个数
page_obj=Pagination(current_page=current_page,all_count=all_count,per_page_num=10,pager_count=5)
page_queryset = book_list[page_obj.start:page_obj.end]
前端使用分页器
{% for book in page_queryset %}
<p>{{ book.title }}</p>
{% endfor %}
// 生成分页导航条
{{ page_obj.page_html|safe }}
Pagination
class Pagination(object):
    def __init__(self,current_page,all_count,per_page_num=2,pager_count=11):
        """
        封装分页相关数据
        :param current_page: 当前页
        :param all_count:    数据库中的数据总条数
        :param per_page_num: 每页显示的数据条数
        :param pager_count:  最多显示的页码个数

        用法:
        queryset = model.objects.all()
        page_obj = Pagination(current_page,all_count)
        page_data = queryset[page_obj.start:page_obj.end]
        获取数据用page_data而不再使用原始的queryset
        获取前端分页样式用page_obj.page_html
        """
        try:
            current_page = int(current_page)
        except Exception as e:
            current_page = 1

        if current_page <1:
            current_page = 1

        self.current_page = current_page

        self.all_count = all_count
        self.per_page_num = per_page_num


        # 总页码
        all_pager, tmp = divmod(all_count, per_page_num)
        if tmp:
            all_pager += 1
        self.all_pager = all_pager

        self.pager_count = pager_count
        self.pager_count_half = int((pager_count - 1) / 2)

    @property
    def start(self):
        return (self.current_page - 1) * self.per_page_num

    @property
    def end(self):
        return self.current_page * self.per_page_num

    def page_html(self):
        # 如果总页码 < 11个:
        if self.all_pager <= self.pager_count:
            pager_start = 1
            pager_end = self.all_pager + 1
        # 总页码  > 11
        else:
            # 当前页如果<=页面上最多显示11/2个页码
            if self.current_page <= self.pager_count_half:
                pager_start = 1
                pager_end = self.pager_count + 1

            # 当前页大于5
            else:
                # 页码翻到最后
                if (self.current_page + self.pager_count_half) > self.all_pager:
                    pager_end = self.all_pager + 1
                    pager_start = self.all_pager - self.pager_count + 1
                else:
                    pager_start = self.current_page - self.pager_count_half
                    pager_end = self.current_page + self.pager_count_half + 1

        page_html_list = []
        # 添加前面的nav和ul标签
        page_html_list.append('''
                    <nav aria-label='Page navigation>'
                    <ul class='pagination'>
                ''')
        first_page = '<li><a href="?page=%s">首页</a></li>' % (1)
        page_html_list.append(first_page)

        if self.current_page <= 1:
            prev_page = '<li class="disabled"><a href="#">上一页</a></li>'
        else:
            prev_page = '<li><a href="?page=%s">上一页</a></li>' % (self.current_page - 1,)

        page_html_list.append(prev_page)

        for i in range(pager_start, pager_end):
            if i == self.current_page:
                temp = '<li class="active"><a href="?page=%s">%s</a></li>' % (i, i,)
            else:
                temp = '<li><a href="?page=%s">%s</a></li>' % (i, i,)
            page_html_list.append(temp)

        if self.current_page >= self.all_pager:
            next_page = '<li class="disabled"><a href="#">下一页</a></li>'
        else:
            next_page = '<li><a href="?page=%s">下一页</a></li>' % (self.current_page + 1,)
        page_html_list.append(next_page)

        last_page = '<li><a href="?page=%s">尾页</a></li>' % (self.all_pager,)
        page_html_list.append(last_page)
        # 尾部添加标签
        page_html_list.append('''
                                           </nav>
                                           </ul>
                                       ''')
        return ''.join(page_html_list)