SpringBoot概述
Spring Boot的诞生简化了Spring应用开发,SpringBoot提供对Spring容器、第三方插件等很多服务的管理。对于大部分Spring应用,无论是简单的web系统还是构建复杂的系统,使用SpringBoot只需要少量的配置就可以完成。
与SSM、SSH等相比,SpringBoot具有以下优点:
- 实现约定大于配置,是一个低配置的应用系统,只需要极少甚至不需要配置,就能使用Spring的大量功能。
- 提供内置的Tomcat或者Jetty容器
- 通过依赖的jar包管理,自动装配技术,容易支持与其他技术体系、工具的集成。
- 支持热加载等。
Springboot工程搭建
Spring boot工程可以通过Intellij IDEA手动创建,也可以直接在spring官网(http://start.spring.io/)下载,以下为直接在spring官网生成工程并导入
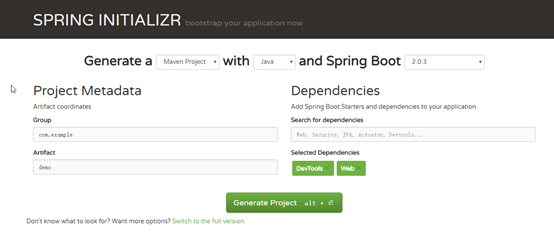
将下载后的SpringBoot工程解压导入到Intellij,项目结构如下:

一个最简单的SpringBoot Web工程结构相比于SpringMvc工程不管是目录结构还是配置文件确实少了很多,我们看一下包含的几个文件分别有什么作用
- SpringbootdemoApplication: 一个带有 main() 方法的普通Java类,带有@ SpringBootApplication注解,标识这是SpringBoot应用启动入口。
- application.properties:一个空的 properties 文件,可以根据需要添加配置属性
- SpringbootdemoApplicationTests:一个默认的Junit 测试脚手架,它加载了一个使用 Spring Boot 字典配置功能的 Spring 应用程序上下文属性
- pom.xml: maven依赖
Pom文件解析,完整的Pom.xml如下:
<?xml version="1.0" encoding="UTF-8"?>
<project xmlns="http://maven.apache.org/POM/4.0.0" xmlns:xsi="http://www.w3.org/2001/XMLSchema-instance"
   xsi:schemaLocation="http://maven.apache.org/POM/4.0.0 http://maven.apache.org/xsd/maven-4.0.0.xsd">
   <modelVersion>4.0.0</modelVersion>

   <groupId>com.sl</groupId>
   <artifactId>springbootdemo</artifactId>
   <version>0.0.1-SNAPSHOT</version>
   <packaging>jar</packaging>

   <name>springbootdemo</name>
   <description>Demo project for Spring Boot</description>

   <!--父级依赖:添加了这个配置,标识该工程是Spring Boot应用, -->
   <parent>
      <groupId>org.springframework.boot</groupId>
      <artifactId>spring-boot-starter-parent</artifactId>
      <version>2.0.3.RELEASE</version>
      <relativePath/> <!-- lookup parent from repository -->
   </parent>

   <properties>
      <project.build.sourceEncoding>UTF-8</project.build.sourceEncoding>
      <project.reporting.outputEncoding>UTF-8</project.reporting.outputEncoding>
      <java.version>1.8</java.version>
   </properties>

   <dependencies>
      <!--Spring Boot通过Starter来提供服务,默认已提供一系列的Starter,都是以spring-boot-starter-xx命名的-->
      <!--起步依赖,此处创建的是Web工程,必须添加spring-boot-starter-web依赖-->
      <dependency>
         <groupId>org.springframework.boot</groupId>
         <artifactId>spring-boot-starter-web</artifactId>
      </dependency>
      <dependency>
         <groupId>org.springframework.boot</groupId>
         <artifactId>spring-boot-starter-test</artifactId>
         <scope>test</scope>
      </dependency>

   </dependencies>

   <build>
      <plugins>
         <plugin>
            <groupId>org.springframework.boot</groupId>
            <artifactId>spring-boot-maven-plugin</artifactId>
                <configuration>
                    <fork>true</fork>
                </configuration>
         </plugin>
      </plugins>
   </build>


</project>
添加示例:
在com.sl.springbootdemo下创建类,并添加示例代码,具体如下:
package com.sl.springbootdemo;
import org.springframework.web.bind.annotation.RequestMapping;
import org.springframework.web.bind.annotation.RestController;

@RestController
public class HomeController {

    @RequestMapping("/hello")
    public String hello() {
        return "Spring Boot Demo";
    }

}
启动项目:
对于新手而言,启动方式有三种,参考:http://tengj.top/2017/02/26/springboot1/
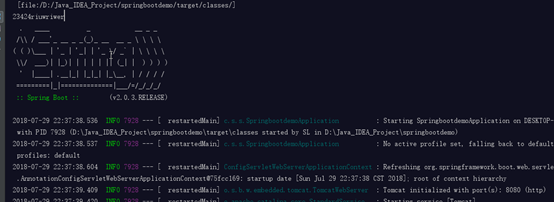
如上即成功运行,在浏览器输入:http://localhost:8080/demo, 即可正常访问,以上即一个简单的web项目搭建。
热部署
上面的示例,如果修改类则必须再次重新运行应用,对于开发者来说非常不方便,Spring Boot提供了Spring-boot-devtools,它能在修改类或者配置文件的时候自动重新加载Spring Boot应用,只需要在pom.xml文件中添加如下依赖即可:
<dependency>
   <groupId>org.springframework.boot</groupId>
   <artifactId>spring-boot-devtools</artifactId>
   <optional>true</optional>
</dependency>
重新启用SpringBoot,修改其他代码就可以发现控制台自动输log,说明工程自动重启了,以下为控制台输出log:
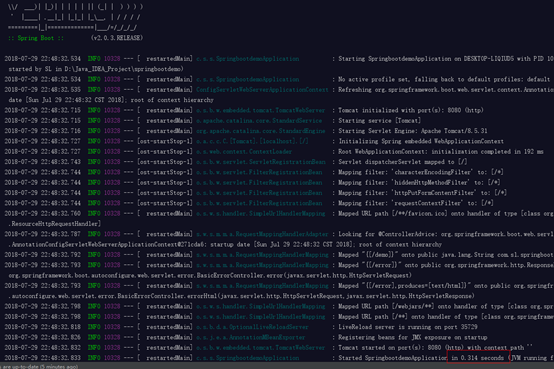
可以发现一个小细节,这次重启时间之后0.314s(之前手动启动时间约在1.7s),这是因为Spring Boot再次重启,避免了Tomcat重启,也避免重启已经加载的Spring相关类,只是重新加载变化的类,所以相对速度快一点。
如果添加了上面配置还是不行,则需要检查一下IntelliJ配置:
1. file -> setting –> compiler 将 Build project automatically 勾选上
2. ctrl + alt + shift + / 快捷键,弹框中 选第一个registry,弹出框后下拉找到 compiler.automake.allow.when.app.running 勾选上
以上内容来源于学习内容:
书本: 《Spring Boot2精髓》
博客: http://tengj.top/2017/02/26/springboot1/