一.环境配置(基于MySQL数据库)
2.下载安装 Navicat,破解方法去吾爱破解网站查询
第一次连接mysql时可能会出现错误,可能是因为二者对密码的编码方法不一致,可通过在帮助中升级更新Navicat来解决
3.下载JDBC jar包 mysql-connector-java-version.jar
注意这里要说明一下JDBC jar包存放的位置:
如果是Java项目:
Eclipse项目中导入该jar包,方法:右击项目→构建路径→配置构建路径→add external jar

如果是Web项目:
eclipse配置的tomcat默认发布项目不会部署到tomcat的安装目录去,所以JDBC jar包要手动复制到Web项目中的WebContent / WEB-INF / lib文件夹下

如果是Tomcat导包(表示服务器可能要用到数据库,例如数据源):
如果是MyEclipse集成Tomcat,显然是要用“右键项目 -> Properties -> Java Build Path -> 右侧选项卡选择Libraries -> Add JARs...”。
如果是非集成Tomcat,你必须把驱动程序包复制粘贴在Tomcat根目录“commonlib”文件夹下。
二.JDBC技术简介
JDBC(Java Data Base Connectivity)是Java程序与数据库系统通信的标准API,它定义在JDK的API中,通过JDBC技术,Java程序可方便地与各种数据库交互。
1.JDBC连接数据库的过程:
1.注册数据库驱动
连接数据库之前,需要将数据库厂商提供的数据库驱动类注册到JDBC的驱动管理器,通常情况是通过数据库驱动类加载到JVM来实现的。
Class.forName("com.mysql.jdbc.Driver"); //最新更改为com.mysql.cj.jdbc.Driver
2.构建数据库连接URL
这个URL由数据库厂商来定,但符合格式“JDBC协议+IP地址或域名+端口+数据库名称”,比如MySQL的URL是“jdbc:mysql://localhost:3306/test”。
3.获取Connection对象
在完成注册和构建URL后,就可以通过驱动管理器来获取数据库连接Connection,Connection对象是JDBC封装的数据库连接对象,只有创建此对象后,才能对数据进行相关操作。
DriverManager.getConnection(url, username, password);//URL, 数据库用户名, 密码
测试实例:
package Test;

import java.sql.Connection;
import java.sql.DriverManager;
import java.sql.SQLException;

public class testJDBC {

    public static void main(String[] args) {
        // TODO 自动生成的方法存根
        try {
            Class.forName("com.mysql.cj.jdbc.Driver");
            String url="jdbc:mysql://localhost:3306/test?useUnicode=true&characterEncoding=utf8&serverTimezone=GMT%2B8&useSSL=false";
          //由于二者的字符编码方式可能不一致,故统一编码
            String username = "root";
            String password = "123456";
            Connection connection = DriverManager.getConnection(url, username, password);
            if (connection != null) {
                System.out.println("数据库连接成功!");
                connection.close();
            }
            else {
                System.out.println("数据库连接失败!");
            }
        }catch (ClassNotFoundException e) {
            e.printStackTrace();
        }catch (SQLException e) {
            e.printStackTrace();
        }
    }
}
2.JDBC API
1.Connection接口
Connection接口位于java.sql包中,是与特定数据库的连接会话,只有获得特定数据库的连接对象,才能访问数据库,操作数据库中的数据表、视图和存储过程等,Connection接口的常用方法声明:
方法声明 |
说明 |
void close() throws SQLException |
立即释放Connection对象的数据库连接占用的JDBC资源,在操作完数据库后,应立即调用此方法 |
void commit() throws SQLException |
提交事务,并释放Connection对象当前持有的所有数据库锁。当事务被设置为手动提交模式时,需要调用该方法提交事务。 |
2.DriverManager类
DriverManager类主要作用于用户及驱动程序之间,它是JDBC中的管理层,通过DriverManager类可以管理数据库厂商提供的驱动程序,并建立应用程序与数据库之间的连接。
3.Statement接口
Statement接口提供了执行语句和获取查询结果的基本方法。
4.PreparedStatement接口
实际开发中,SQL语句往往需要将程序中的变量做查询条件参数等,而使用Statement接口进行操作会过于繁琐,而且存在安全方面的缺陷。PreparedStatement接口继承于Statement接口,而且对带有参数SQL语句的操作执行进行了扩展。应用于PreParedStatement接口中的SQL语句,可以使用占位符“?”来代替SQL语句中的参数,然后再对其赋值。最好使用该接口,不仅可以提高SQL执行效率,而且还可以避免SQL语句的注入式攻击。
5.ResultSet接口
执行SQL语句的查询结果会返回查询的结果集,而Result接口封装了该结果集。Result还提供了光标的功能,通过光标可以自由定位到某一行中的数据。
三.JDBC操作数据库
1.添加数据
通过JDBC向数据库添加数据,可以使用INSERT语句实现插入数据的SQL语句,对应SQL语句中的参数可以使用占位符“?”代替,然后通过PreparedStatement对其赋值并执行SQL。
实例:建立一个学生信息数据库,通过JDBC向其添加数据。
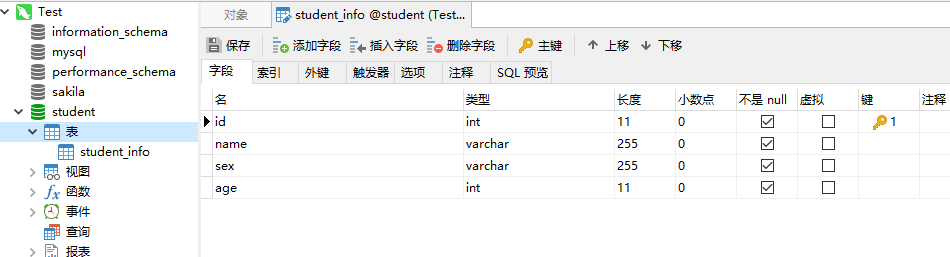
1.首先在Navicat中创建名为student的数据库,创建student_info表
2.创建名为Student的类,来封装学生对象信息


package com;

import java.io.Serializable;

public class Student implements Serializable{
    /**
     *
     */
    private static final long serialVersionUID = -7421230515641293748L;
    private int id;
    private String name;
    private String sex;
    private int age;
    public int getId() {
        return id;
    }
    public void setId(int id) {
        this.id=id;
    }
    public String getName() {
        return name;
    }
    public void setName(String name) {
        this.name=name;
    }
    public String getSex() {
        return sex;
    }
    public void setSex(String sex) {
        this.sex=sex;
    }
    public int getAge() {
        return age;
    }
    public void setAge(int age) {
        this.age=age;
    }
}
3.创建index.jsp页面,用于提交添加学生信息的表单。
<%@ page language="java" contentType="text/html; charset=UTF-8"
    pageEncoding="UTF-8"%>
<!DOCTYPE html>
<html>
    <head>
        <meta charset="UTF-8">
        <title>Insert title here</title>
    </head>
    <body>
        <form action="AddStudent.jsp" method="post" onsubmit="return check(this)">
            <table    align="center" width="450">
                <tr>
                    <td align="center" colspan="2">
                        <h2>添加学生信息</h2><hr>
                    </td>
                </tr>
                <tr>
                    <td align="center">学号:</td>
                    <td><input type="text" name="id"></td>
                </tr>
                <tr>
                    <td align="center">姓名</td>
                    <td><input type="text" name="name"></td>
                </tr>
                <tr>
                    <td align="center">性别</td>
                    <td><input type="text" name="sex"></td>
                </tr>
                <tr>
                    <td align="center">年龄</td>
                    <td><input type="text" name="age"></td>
                </tr>
                <tr>
                    <td align="center" colspan="2">
                        <input type="submit" value="添加">
                    </td>
                </tr>
            </table>
        </form>
    </body>
</html>
4.创建AddStudent.jsp页面,用于对添加学生信息的请求处理,通过JDBC提交到数据库。
<%@ page language="java" contentType="text/html; charset=UTF-8"
    pageEncoding="UTF-8"%>
<%@ page import="com.Student"%>
<%@ page import="java.sql.*" %>
<!DOCTYPE html>
<html>
    <head>
        <meta charset="UTF-8">
        <title>Insert title here</title>
    </head>
    <body>
        <%request.setCharacterEncoding("UTF-8"); %>
        <jsp:useBean id="students" class="com.Student">
            <jsp:setProperty property="*" name="students"/>
        </jsp:useBean>
        <%
            try{
                Class.forName("com.mysql.cj.jdbc.Driver");
                String url="jdbc:mysql://localhost:3306/student?useUnicode=true&characterEncoding=utf8&serverTimezone=GMT%2B8&useSSL=false";
                String username = "root";
                String password = "123456";
                Connection conn= DriverManager.getConnection(url, username, password);
                String sql="insert into student_info(id,name,sex,age) values(?,?,?,?)";
                PreparedStatement ps=conn.prepareStatement(sql);
                //使用PreparedStatement对象对SQL语句的占位符参数赋值,其参数的下标值不是0而是1,这与数组下标有区别
                ps.setInt(1, students.getId());
                ps.setString(2, students.getName());
                ps.setString(3, students.getSex());
                ps.setInt(4, students.getAge());
                //使用executeUpdate()方法执行更新操作,并返回int类型整数
                int row=ps.executeUpdate();
                if (row > 0){
                    out.print("成功添加了 "+row+" 条数据!");
                }
                //在执行数据操作之后,应该立即调用Result对象、PreparedStatement对象、Connection对象的close()方法,从而及时释放所占用的数据库资源
                ps.close();
                conn.close();

            }catch(Exception e){
                out.print("学生信息添加失败!");
                e.printStackTrace();
            }
        %>
        <br>
        <a href="index.jsp">返回</a>
    </body>
</html>
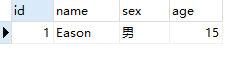
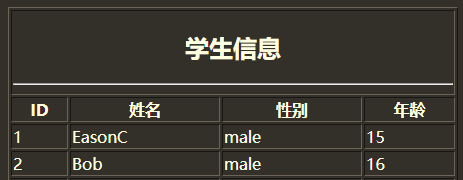
效果:


数据库中:
2.查询数据
执行查询数据操作后需要通过一个对象来装载查询结果集,这个对象就是Request对象。Request对象是JDBC API中封装的结果集对象,从数据表中查询到的数据都放置在这个集合中。其结构如下图所示:
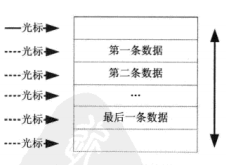
从图中可以看出,在Request集合中,通过移动光标来获取查询到的数据,Request对象中的光标可以进行上下移动,如获取Request集合中的一条数据,只需要把光标定位到当前数据光标即可。在第一条数据之前和最后一条数据之后都有一个位置,默认情况下,Request的光标位置在第一行数据之前,所有在第一次获取数据时就需要移动光标位置。
实例:在上面的项目中创建名为ShowServlet的对象,用于查询所有图书信息。
package com;

import java.io.IOException;
import java.sql.*;
import java.util.ArrayList;
import java.util.List;

import javax.servlet.ServletException;
import javax.servlet.annotation.WebServlet;
import javax.servlet.http.HttpServlet;
import javax.servlet.http.HttpServletRequest;
import javax.servlet.http.HttpServletResponse;

/**
 * Servlet implementation class ShowServlet
 */
@WebServlet("/ShowServlet")
public class ShowServlet extends HttpServlet {
    private static final long serialVersionUID = 1L;

    /**
     * @see HttpServlet#HttpServlet()
     */
    public ShowServlet() {
        super();
        // TODO Auto-generated constructor stub
    }

    /**
     * @see HttpServlet#doGet(HttpServletRequest request, HttpServletResponse response)
     */
    protected void doGet(HttpServletRequest request, HttpServletResponse response) throws ServletException, IOException {
        // TODO Auto-generated method stub
        try{
            Class.forName("com.mysql.cj.jdbc.Driver");
            String url="jdbc:mysql://localhost:3306/student";
            String username = "root";
            String password = "123456";
            Connection conn= DriverManager.getConnection(url, username, password);
            String sql="select * from student_info";
            Statement stmt=conn.createStatement();
            ResultSet rs = stmt.executeQuery(sql);
            //使用PreparedStatement对象对SQL语句的占位符参数赋值,其参数的下标值不是0而是1,这与数组下标有区别
            List<Student> list = new ArrayList<Student>();
            while(rs.next()) {
                Student student = new Student();
                student.setId(rs.getInt("id"));
                student.setName(rs.getString("name"));
                student.setSex(rs.getString("sex"));
                student.setAge(rs.getInt("age"));
                list.add(student);
            }
            request.setAttribute("list", list);
            rs.close();
            stmt.close();
            conn.close();

        }catch(ClassNotFoundException e) {
            e.printStackTrace();
        }catch(Exception e){
            e.printStackTrace();
        }
        request.getRequestDispatcher("student_list.jsp").forward(request, response);
        response.getWriter().append("Served at: ").append(request.getContextPath());
    }

    /**
     * @see HttpServlet#doPost(HttpServletRequest request, HttpServletResponse response)
     */
    protected void doPost(HttpServletRequest request, HttpServletResponse response) throws ServletException, IOException {
        // TODO Auto-generated method stub
        doGet(request, response);
    }

}
创建student_list.jsp页面显示所有学生信息
<%@ page language="java" contentType="text/html; charset=UTF-8"
    pageEncoding="UTF-8"%>
<%@ page import="java.util.List" %>
<%@ page import="java.util.ArrayList" %>
<%@ page import="com.Student" %>
<!DOCTYPE html>
<html>
    <head>
        <meta charset="UTF-8">
        <title>Insert title here</title>
    </head>
    <body>
        <table    align="center" width="450" border="1px">
            <tr>
                <td align="center" colspan="4">
                    <h2>学生信息</h2><hr>
                </td>
            </tr>
            <tr align="center">
                <td><b>ID</b></td>
                <td><b>姓名</b></td>
                <td><b>性别</b></td>
                <td><b>年龄</b></td>
            </tr>
            <%
                List<Student>list=(List<Student>)request.getAttribute("list");
                if(list == null || list.size() < 1){
                    out.print("没有数据!");
                }else{

                    for(Student student:list){
            %>
            <tr>
                <td><%=student.getId()%></td>
                <td><%=student.getName()%></td>
                <td><%=student.getSex()%></td>
                <td><%=student.getAge()%></td>
            </tr>
            <%
                    }
                }
            %>
        </table>
        <br>
        <a href="index.jsp">返回</a>

    </body>
</html>
同时在index.html中添加
<a href="ShowServlet">查看所有学生信息</a>
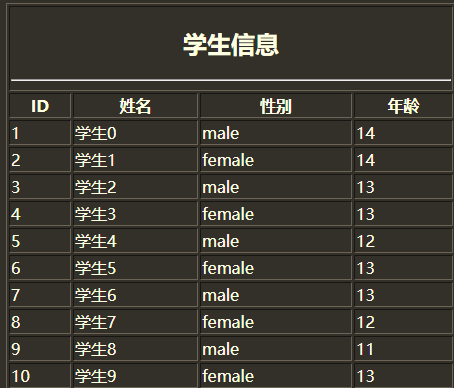
效果:
3.修改数据
update 表名 set 列名=?where id=?
String sql = "update student_info set name=? where id = ?";
PreparedStatement ps = conn.prepareStatement(sql);
ps.setString(1, s_name);
ps.setInt(2, s_id);
ps.executeUpdate();
4.删除数据
delete form student_info where id = 1
String sql = "delete student_info where id = ?";
PreparedStatement ps = conn.prepareStatement(sql);
ps.setInt(1, id);
ps.executeUpdate();
5.批处理
//Student类中
public Connection getConnection() {
        Connection conn=null;
        try{
            Class.forName("com.mysql.cj.jdbc.Driver");
            String url="jdbc:mysql://localhost:3306/student?useUnicode=true&characterEncoding=utf8&serverTimezone=GMT%2B8&useSSL=false";
            String username = "root";
            String password = "123456";
            conn= DriverManager.getConnection(url, username, password);
        }catch(ClassNotFoundException e) {
            e.printStackTrace();
        }catch(Exception e){
            e.printStackTrace();
        }
        return conn;
    }
    public int saveBatch() {
        int row=0;
        Connection conn = getConnection();
        try{
            String sql="insert into student_info(id,name,sex,age) values(?,?,?,?)";
            PreparedStatement ps=conn.prepareStatement(sql);
            Random random=new Random();
            for(int i=0; i< 10; i++) {
                ps.setInt(1, i+1);
                ps.setString(2, "学生"+i);
                ps.setString(3, i%2==0?"male":"female");
                ps.setInt(4, random.nextInt(5)+10);
                ps.addBatch();//添加批处理命令
            }
            int[] rows=ps.executeBatch();//执行批处理操作
            row = rows.length;
            //在执行数据操作之后,应该立即调用Result对象、PreparedStatement对象、Connection对象的close()方法,从而及时释放所占用的数据库资源
            ps.close();
            conn.close();
        }catch(Exception e){
            e.printStackTrace();
        }
        return row;
    }
index.jsp
<jsp:useBean id="batch" class="com.Student"></jsp:useBean>
<%
    int row=batch.saveBatch();
    out.print("批量插入了 " +row+" 条数据!" );
%>
效果:
6.调用存储过程
在JDBC API中提供了调用存储过程的方法,通过CallableStatement对象进行操作。CallableStatement对象位于java.sql包中,它继承了Statement对象,主要用来执行数据库中定义的存储过程,其调用方法如下:
{call <procedure-name>[(<arg1>,<arg2>,......)]}
//arg为存储过程的参数,可对其进行赋值操作。
存储过程是一个SQL语句和可选控制流语句的预编译集合。编译完成后存放在数据库中,这样就省去了执行SQL语句进行编译所花费的时间。在执行存储过程时只需要将参数传递到数据库中,而不需要将整条SQL语句都提交给数据库,从而减少了网络传输的流量,从另一方面提高了程序的运行速度。
实例:创建查询所有学生信息的存储过程,通过JDBC API对其调用获取所有图书信息,并将其输出到JSP页面。
(1)先在Navicat视窗下在数据库student中新建查询创建名为findAllStudent的存储过程。
CREATE PROCEDURE findAllStudent()
BEGIN
    SELECT * FROM student_info;
END
(2)在Student类中加入findAll()函数来执行存储过程
public List<Student> findAll(){
    List<Student> list= new ArrayList<Student>();
    Connection conn = getConnection();
    try {
        CallableStatement cs = conn.prepareCall("{call findAllStudent()}");
        ResultSet rs = cs.executeQuery();
        while(rs.next()) {
            Student student = new Student();
            student.setId(rs.getInt("id"));
            student.setName(rs.getString("name"));
            student.setSex(rs.getString("sex"));
            student.setAge(rs.getInt("age"));
            list.add(student);
        }
    }catch(Exception e){
        e.printStackTrace();
    }
    return list;
}
(3)在原student_list.jsp中修改,用JavaBean来实例化Student
<jsp:useBean id = "findStudent" class="com.Student"></jsp:useBean>

...
<table>
    ...
    List<Student>list=findStudent.findAll();
四.JDBC在Java Web中的应用
1.分页查询
在数据库量非常大的情况下,不适合将所有数据都显示到一个页面。通过JDBC实现分页查询的方式有很多种,而且不同的数据库机制也提供了不同的分页方式,两种非常经典的分页方法。
通过ResultSet的光标实现分页
光标通过上下移动定位查询结果集的行,从而获取数据。可以设置Result对象中记录的起始位置,来实现分页显示。
优点是在各种数据库上通用,缺点2是占用大量资源,不适合大数据。所以实际开发都是采用数据库提供的分页查询实现的。
SELECT * FROM *** WHERE *** ORDER BY *** LIMIT arg1, arg2
arg1:指定查询记录的起始位置
arg2:指定查询数据返回的记录数
通过数据库机制进行分页
如SQL Server中提供的top关键字,MySQL数据库提供的limit关键字,它们都可以设置数据返回的记录数。
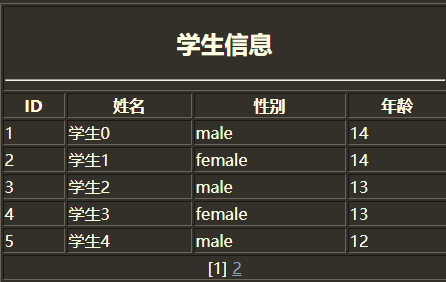
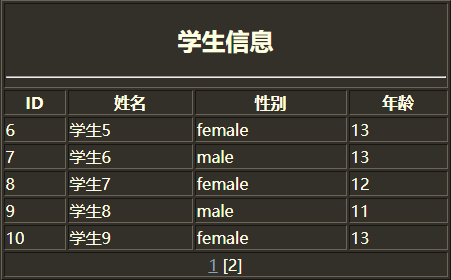
实例:将上面的学生信息分页显示
在Student类中加入
public static final int PAGE_SIZE = 5;
 //每页记录数,静态变量可直接引用,因为该值不会经常修改,所以定义为final类型。
//在java中,通常将final类型的变量大写
/**
      为了简单,所以我每次都把这些方法放到了Student类中,实际上应该分开
     * 分页查询所有信息
     * @param page 页数
     * @return List<Student>
    */
    public List<Student> find(int page){
        List<Student> list = new ArrayList<Student>();
        Connection conn = getConnection();
        String sql = "SELECT * FROM student_info LIMIT ?,?";
        try{
            PreparedStatement ps=conn.prepareStatement(sql);
            ps.setInt(1, (page-1)*Student.PAGE_SIZE);
            ps.setInt(2, Student.PAGE_SIZE);
            ResultSet rs = ps.executeQuery();
            while(rs.next()) {
                Student s = new Student();
                s.setId(rs.getInt("id"));
                s.setName(rs.getString("name"));
                s.setSex(rs.getString("sex"));
                s.setAge(rs.getInt("age"));
                list.add(s);
            }
            rs.close();
            ps.close();
            conn.close();
        }catch(Exception e){
            e.printStackTrace();
        }
        return list;
    }
    /**
     *查询总记录数
     *@return 总记录数
    */
    public int findCount() {
        int count = 0;
        Connection conn = getConnection();
        String sql = "select count(*) from student_info";
        try {
            Statement stmt = conn.createStatement();
            ResultSet rs = stmt.executeQuery(sql);
            if(rs.next())
                count = rs.getInt(1);
            rs.close();
            conn.close();
        }catch(SQLException e) {
            e.printStackTrace();
        }
        return count;
    }
在ShowServlet类中的doGet()做获取分页查询结果和构造分页条对象
        int currPage = 1;    //当前页码
        if(request.getParameter("page") != null) {
            currPage = Integer.parseInt(request.getParameter("page"));
        }
        Student s = new Student();
        List<Student>list = s.find(currPage);
        request.setAttribute("list", list);
        int totalPages;        //总页数
        int count = s.findCount();    //查询总页数
        if(count % Student.PAGE_SIZE == 0)
            totalPages = count / Student.PAGE_SIZE;
        else
            totalPages = count / Student.PAGE_SIZE+1;
        StringBuffer sb = new StringBuffer();
     /*如果一个字符串经常发生变化,应该使用StringBuffer对字符进行操作。因为在JVM中,
       每次创建一个新的字符串,都需要分配一个字符串空间,而StringBuffer则是字符串缓冲区,
     性能更高。*/
        for (int i = 1; i <= totalPages; i++) {  //构建分页条
            if(i == currPage)
                sb.append("[" + i + "]");
            else
                sb.append("<a href='ShowServlet?page="+i+"'>"+i+"</a>");
            sb.append(" ");
        }
        request.setAttribute("bar", sb.toString());
        request.getRequestDispatcher("student_list.jsp").forward(request, response);
在student_list.jsp中修改
List<Student>list=(List<Student>)request.getAttribute("list");

......
<tr>
    <td align="center" colspan="4">
        <%=request.getAttribute("bar") %>
    </td>
</tr>
效果: