关于REST是什么东西,在这里我就不再多说,大家可以去http://blog.csdn.net/pilou5400/archive/2010/12/24/6096861.aspx看看介绍,直接切入主题:

这是一个rest风格的访问,Spring从3.0开始将全面支持rest。不得不感叹Spring的强悍。
项目结构:
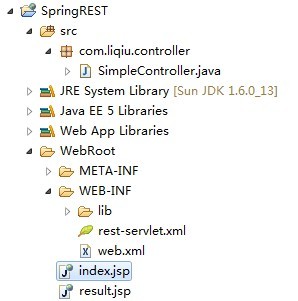
第一步永远是配置,使用框架永远都是先有配置,在web.xml中的配置:
- <?xml version="1.0" encoding="UTF-8"?>
- <web-app version="3.0"
- xmlns="http://java.sun.com/xml/ns/javaee"
- xmlns:xsi="http://www.w3.org/2001/XMLSchema-instance"
- xsi:schemaLocation="http://java.sun.com/xml/ns/javaee
- http://java.sun.com/xml/ns/javaee/web-app_3_0.xsd">
- <display-name></display-name>
- <context-param>
- <!--rest配置文件的路径,貌似不配置也是加载这个地址,这个地方有点疑问,大家指点指点-->
- <param-name>contextConfigLocation</param-name>
- <param-value>/WEB-INF/rest-servlet.xml</param-value>
- </context-param>
- <listener>
- <listener-class>org.springframework.web.context.ContextLoaderListener</listener-class>
- </listener>
- <servlet>
- <!-- 配置一个Servlet,有这个Servlet统一调度页面的请求 -->
- <servlet-name>rest</servlet-name>
- <servlet-class>org.springframework.web.servlet.DispatcherServlet</servlet-class>
- <load-on-startup>2</load-on-startup>
- </servlet>
- <servlet-mapping>
- <!-- 映射路径,不要写成了/*那样会拦截所有的访问,连JSP页面都访问不了 -->
- <servlet-name>rest</servlet-name>
- <url-pattern>/</url-pattern>
- </servlet-mapping>
- <welcome-file-list>
- <welcome-file>/index.jsp</welcome-file>
- </welcome-file-list>
- </web-app>
第二步:配置rest-servlet.xml这个文件
- <?xml version="1.0" encoding="UTF-8"?>
- <beans xmlns="http://www.springframework.org/schema/beans"
- xmlns:xsi="http://www.w3.org/2001/XMLSchema-instance" xmlns:jee="http://www.springframework.org/schema/jee"
- xmlns:tx="http://www.springframework.org/schema/tx" xmlns:context="http://www.springframework.org/schema/context"
- xmlns:aop="http://www.springframework.org/schema/aop"
- xsi:schemaLocation="http://www.springframework.org/schema/beans http://www.springframework.org/schema/beans/spring-beans-2.5.xsd http://www.springframework.org/schema/tx http://www.springframework.org/schema/tx/spring-tx-2.5.xsd http://www.springframework.org/schema/jee http://www.springframework.org/schema/jee/spring-jee-2.5.xsd http://www.springframework.org/schema/aop http://www.springframework.org/schema/aop/spring-aop-2.5.xsd http://www.springframework.org/schema/context http://www.springframework.org/schema/context/spring-context-2.5.xsd"
- default-lazy-init="true">
- <description>Spring公共配置</description>
- <!--检测注解-->
- <context:component-scan base-package="com.liqiu" />
- <bean class="org.springframework.web.servlet.mvc.annotation.DefaultAnnotationHandlerMapping" />
- <bean class="org.springframework.web.servlet.mvc.annotation.AnnotationMethodHandlerAdapter" />
- <!-- 注册视图解析器,说白了就是根据返回值指定到某个页面 -->
- <bean id="viewResolver" class="org.springframework.web.servlet.view.InternalResourceViewResolver">
- <property name="viewClass" value="org.springframework.web.servlet.view.JstlView" />
- <property name="prefix" value="/"></property> <!--页面文件的路径,在根目录下-->
- </bean>
- </beans>
第三步:具体实现类
- package com.liqiu.controller;
- import java.io.IOException;
- import javax.servlet.http.HttpServletRequest;
- import javax.servlet.http.HttpServletResponse;
- import org.springframework.stereotype.Controller;
- import org.springframework.web.bind.annotation.PathVariable;
- import org.springframework.web.bind.annotation.RequestMapping;
- import org.springframework.web.bind.annotation.RequestMethod;
- @Controller
- @RequestMapping("/simple")
- public class SimpleController {
- //映射路径/simple/index当访问这个路径时,执行这个方法
- @RequestMapping("/index")
- public String index(HttpServletRequest request ,HttpServletResponse response){
- //response,request会自动传进来
- request.setAttribute("message", "Hello,This is a example of Spring3 RESTful!");
- return "index.jsp";
- }
- //根据ID获取不同的内容,通过@PathVariable 获得属性
- @RequestMapping(value="/{id}",method=RequestMethod.GET)
- public String get(@PathVariable String id,HttpServletRequest request ,HttpServletResponse response) throws IOException{
- request.setAttribute("message", "Hello,This is a example of Spring3 RESTful!<br/>ID:"+id+"");
- //response.getWriter().write("You put id is : "+id);
- return "index.jsp";
- //return null;
- }
- }
index.jsp页面:
- <%@ page language="java" pageEncoding="UTF-8"%>
- <html>
- <head>
- <title>Spring3 RESTful</title>
- </head>
- <body>
- ${message}
- </body>
- </html>
在浏览器中输入:http://localhost:8080/SpringREST/simple/index/,就可以看到效果。
也可以在页面输入不同的参数,获得不同的内容,输入地址:http://localhost:8080/SpringREST/simple/88888,这次执行的就是get方法,通过注解获取ID值,效果:

关于Spring rest 对于Ajax的支持,其实响应Ajax就是通过response返回一个字符串到页面,既然能获得response对象,那问题就迎刃而解了,我们改造下get方法:
- @RequestMapping(value="/{id}",method=RequestMethod.GET)
- public String get(@PathVariable String id,HttpServletRequest request ,HttpServletResponse response) throws IOException{
- //request.setAttribute("message", "Hello,This is a example of Spring3 RESTful!<br/>ID:"+id+"");
- response.getWriter().write("You put id is : "+id);
- //return "index.jsp";
- return null;
- }
改造index.jsp页面:
- <%@ page language="java" pageEncoding="UTF-8"%>
- <html>
- <head>
- <title>Spring3 RESTful</title>
- <SCRIPT TYPE="text/javascript">
- function go(value){
- var url = "/SpringREST/simple/"+value+"/";
- var request = new XMLHttpRequest();
- request.open("GET", url, true);
- request.setRequestHeader("Content-Type","application/x-javascript;");
- request.onreadystatechange = function() {
- if (request.readyState == 4) {
- if (request.status == 200){
- if (request.responseText) {
- document.getElementById("text").innerHTML = request.responseText;
- }
- }
- }
- };
- request.send(null);
- }
- </SCRIPT>
- </head>
- <body>
- ${message}
- <br>
- Input the id of you will access object:<input id="id" type="text" size="7"><input type="button" value="Go" onclick="go(document.getElementById('id').value)">
- <div id="text"></div>
- </body>
- </html>
访问http://localhost:8080/SpringREST/simple/index/,在页面里的输入框中输入值,可以看到返回的数据:
