- JWT是跨不同语言的,JWT可以在 .NET, Python, Node.js, Java, PHP, Ruby, Go, JavaScript和Haskell中使用
- JWT是自我包涵的,它们包含了必要的所有信息,这就意味着JWT能够传递关于它自己的基本信息,比如用户信息和签名等。
- JWT传递是容易的,因为JWT是自我包涵,它们能被完美用在HTTP头部中,当需要授权API时,你只要通过URL一起传送它既可。
JWT易于辨识,是三段由小数点组成的字符串:
aaaaaaaaaa.bbbbbbbbbbb.cccccccccccc
这三部分含义分别是header,payload, signature
Header
头部包含了两个方面:类型和使用的哈希算法(如HMAC SHA256):
{
"typ": "JWT",
"alg": "HS256"
}
对这个JSON字符进行base64encode编码,我们就有了首个JWT:
eyJhbGciOiJIUzI1NiIsInR5cCI6IkpXVCJ9
Payload
JWT的第二部分是payload,也称为 JWT Claims,这里放置的是我们需要传输的信息,有多个项目如注册的claim名称,公共claim名称和私有claim名称。
注册claim名称有下面几个部分:
- iss: token的发行者
- sub: token的题目
- aud: token的客户
- exp: 经常使用的,以数字时间定义失效期,也就是当前时间以后的某个时间本token失效。
- nbf: 定义在此时间之前,JWT不会接受处理。开始生效时间
- iat: JWT发布时间,能用于决定JWT年龄
- jti: JWT唯一标识. 能用于防止 JWT重复使用,一次只用一个token;如果签发的时候这个claim的值是“1”,验证的时候如果这个claim的值不是“1”就属于验证失败
公共claim名称用于定义我们自己创造的信息,比如用户信息和其他重要信息。
私有claim名称用于发布者和消费者都同意以私有的方式使用claim名称。
下面是JWT的一个案例:
{
"iss": "scotch.io",
"exp": 1300819380,
"name": "Chris Sevilleja",
"admin": true
}
签名
JWT第三部分最后是签名,签名由以下组件组成:
- header
- payload
- 密钥
下面是我们如何得到JWT的第三部分:
var encodedString = base64UrlEncode(header) + "." + base64UrlEncode(payload); HMACSHA256(encodedString, 'secret');
这里的secret是被服务器签名,我们服务器能够验证存在的token并签名新的token。
TWT支持的算法有:
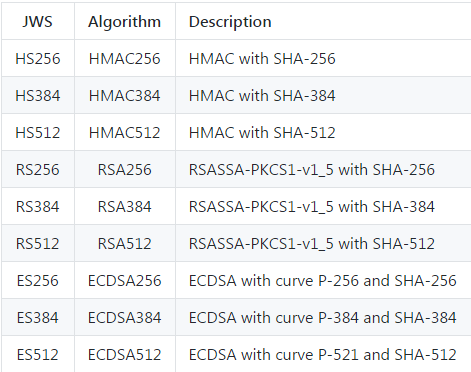
===========================================================================================================
以上是官网的理论部分,下面会有提供一些实例:
首先 导入 依赖:
<dependency>
    <groupId>com.auth0</groupId>
    <artifactId>java-jwt</artifactId>
    <version>3.2.0</version>
</dependency>
1, 指定加密算法:
//HMAC
Algorithm algorithmHS = Algorithm.HMAC256("secret");

-------------------------------------------------------------------------
//RSA

Map<String,Object> keys=RSAUtils.getKeys();
RSAPublicKey publicKey = (RSAPublicKey)keys.get("public"); //Get the key instance
RSAPrivateKey privateKey = (RSAPrivateKey)keys.get("private");//Get the key instance
Algorithm algorithmRS = Algorithm.RSA256(publicKey, privateKey);
2 , 生成token
用HS256生成token
try {
    Algorithm algorithm = Algorithm.HMAC256("secret");
    String token = JWT.create()
        .withIssuer("auth0")
        .sign(algorithm);
} catch (UnsupportedEncodingException exception){
    //UTF-8 encoding not supported
} catch (JWTCreationException exception){
    //Invalid Signing configuration / Couldn't convert Claims.
}
用RS256生成token
 Map<String,Object> keys=RSAUtils.getKeys();
        RSAPublicKey publicKey = (RSAPublicKey)keys.get("public"); //Get the key instance
        RSAPrivateKey privateKey = (RSAPrivateKey)keys.get("private");//Get the key instance
try {
    Algorithm algorithm = Algorithm.RSA256(publicKey, privateKey);
    String token = JWT.create()
        .withIssuer("auth0")
        .sign(algorithm);
} catch (JWTCreationException exception){
    //Invalid Signing configuration / Couldn't convert Claims.
}
3, 验证token
1)普通验证
用HS256验证token
String token = "eyJhbGciOiJIUzI1NiIsInR5cCI6IkpXUyJ9.eyJpc3MiOiJhdXRoMCJ9.AbIJTDMFc7yUa5MhvcP03nJPyCPzZtQcGEp-zWfOkEE";
try {
    Algorithm algorithm = Algorithm.HMAC256("secret");
    JWTVerifier verifier = JWT.require(algorithm)
        .withIssuer("auth0")
        .build(); //Reusable verifier instance
    DecodedJWT jwt = verifier.verify(token);
} catch (UnsupportedEncodingException exception){
    //UTF-8 encoding not supported
} catch (JWTVerificationException exception){
    //Invalid signature/claims
}
用RS256验证token
String token = "eyJhbGciOiJIUzI1NiIsInR5cCI6IkpXUyJ9.eyJpc3MiOiJhdXRoMCJ9.AbIJTDMFc7yUa5MhvcP03nJPyCPzZtQcGEp-zWfOkEE";
RSAPublicKey publicKey = //Get the key instance
RSAPrivateKey privateKey = //Get the key instance
try {
    Algorithm algorithm = Algorithm.RSA256(publicKey, privateKey);
    JWTVerifier verifier = JWT.require(algorithm)
        .withIssuer("auth0")
        .build(); //Reusable verifier instance
    DecodedJWT jwt = verifier.verify(token);
} catch (JWTVerificationException exception){
    //Invalid signature/claims
}
2)在payLoad 是可以自定义数据,用于验证,包括时间等。
在生成token的时候指定数据:
@Test
   public void gen1() throws IOException {
        String token ="";
        SimpleDateFormat sdf = new SimpleDateFormat("yyyy-MM-dd HH:mm:ss");
        //日期转字符串
            Calendar calendar = Calendar.getInstance();
            calendar.add(Calendar.SECOND,30 ); //特定时间的年后
            Date date = calendar.getTime();
        try {
           Algorithm algorithm = Algorithm.HMAC256("mysecrite");
            token = JWT.create()
                   .withIssuer("auth0")
                    .withSubject("xiaoming")
                    .withClaim("name", 123)
                    .withArrayClaim("array", new Integer[]{1, 2, 3})
                    .withExpiresAt(date)
                   .sign(algorithm);
           System.out.println("loglogagel:"+token);
       } catch (UnsupportedEncodingException exception){
           //UTF-8 encoding not supported
       } catch (JWTCreationException exception){
           //Invalid Signing configuration / Couldn't convert Claims.
       }


   }
验证token是否过期,是否有制定的
@Test
  public void gen3(){
      String token = "eyJ0eXAiOiJKV1QiLCJhbGciOiJIUzI1NiJ9.eyJpc3MiOiJhdXRoMCIsImV4cCI6MTQ5NzY4NTQwOX0.DHY-90JAA63_TvI-gRZ2oHCIItMajb45zB1tdCHQ_NQ";
      try {
          Algorithm algorithm = Algorithm.HMAC256("mysecrite");

          JWTVerifier.BaseVerification verification = (JWTVerifier.BaseVerification) JWT.require(algorithm)
                  .withIssuer("auth0")
                  .withSubject("xiaomong");
          Clock clock = new Clock() {
              @Override
              public Date getToday() {
                  return new Date();
              }
          };//Must implement Clock interface
          JWTVerifier verifier = verification.build(clock);
          DecodedJWT jwt = verifier.verify(token);
          System.out.println(jwt.getAlgorithm());
          System.out.println(jwt.getType());
          System.out.println(jwt.getIssuer());
          System.out.println(jwt.getExpiresAt());
      } catch (UnsupportedEncodingException exception){
          //UTF-8 encoding not supported
          exception.printStackTrace();
      } catch (JWTVerificationException exception){
          //Invalid signature/claims
          exception.printStackTrace();
      }
}
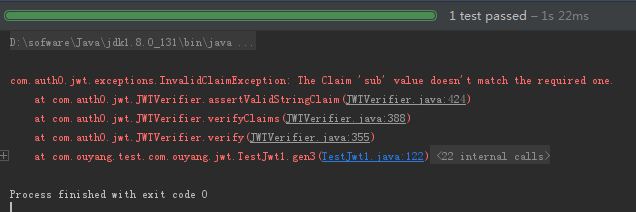
如果 subject验证的不一致,就会报如下错误:
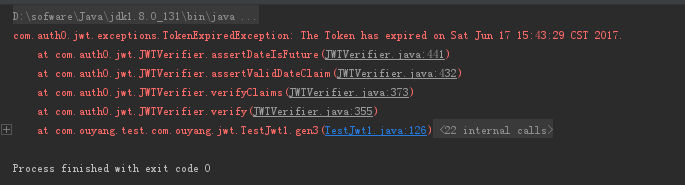
如果时间超过 30 秒,会报如下错误:
对验证的方法稍加修改:
 @Test
  public void gen3(){
      String token = "eyJ0eXAiOiJKV1QiLCJhbGciOiJIUzI1NiJ9.eyJzdWIiOiJ4aWFvbWluZyIsImFycmF5IjpbMSwyLDNdLCJpc3MiOiJhdXRoMCIsIm5hbWUiOiJJYW0gcmlnaHQgZnJvbSBjbGFpbSIsImV4cCI6MTQ5NzY4OTQ4NX0.6lsXISVAgi8B2wAvaZq4tj-h9Pgd6GGaOYZLz_gPFMU";
      try {
          Algorithm algorithm = Algorithm.HMAC256("mysecrite");

          JWTVerifier.BaseVerification verification = (JWTVerifier.BaseVerification) JWT.require(algorithm)
                  .withIssuer("auth0")
                  .withSubject("xiaoming");
          Clock clock = new Clock() {
              @Override
              public Date getToday() {
                  return new Date();
              }
          };//Must implement Clock interface
          JWTVerifier verifier = verification.build(clock);
          DecodedJWT jwt = verifier.verify(token);
          Map<String, Claim> claims = jwt.getClaims();    //Key is the Claim name
          Claim claim = claims.get("name");
          System.out.println(claim.asString());    //打印出claim的值
          System.out.println(jwt.getAlgorithm());
          System.out.println(jwt.getType());
          System.out.println(jwt.getIssuer());
          System.out.println(jwt.getExpiresAt());
      } catch (UnsupportedEncodingException exception){
          //UTF-8 encoding not supported
          exception.printStackTrace();
      } catch (JWTVerificationException exception){
          //Invalid signature/claims
          exception.printStackTrace();
      }
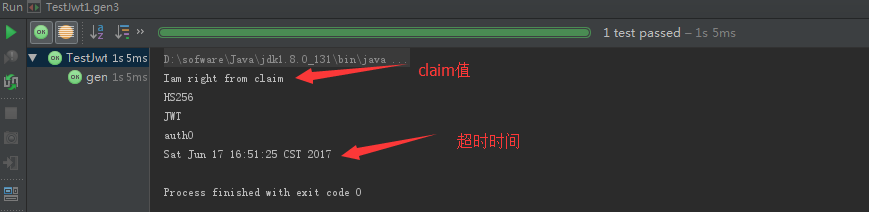
验证后的最后结果:
4,claim的添加,获取
1) 内置的payload主要有以下几个,如果没有就返回null
Issuer ("iss") :发布者
String issuer = jwt.getIssuer();
Subject ("sub")
String subject = jwt.getSubject();
Audience ("aud")
List<String> audience = jwt.getAudience();
Expiration Time ("exp")
Date expiresAt = jwt.getExpiresAt();
Not Before ("nbf")
Date notBefore = jwt.getNotBefore();
Issued At ("iat")
Date issuedAt = jwt.getIssuedAt();
JWT ID ("jti")
String id = jwt.getId();
2)定义私有的claim
添加:
String token = JWT.create()
        .withClaim("name", 123)
        .withArrayClaim("array", new Integer[]{1, 2, 3})
        .sign(algorithm);
获取:
JWTVerifier verifier = JWT.require(algorithm)
    .withClaim("name", 123)
    .withArrayClaim("array", 1, 2, 3)
    .build();
DecodedJWT jwt = verifier.verify("my.jwt.token");
目前,官方支持claim的类型的有:Boolean, Integer, Double, String, Date , String[] 和 Integer.
5, Header Claims
1)header claims 是定义header部分的内容,基本都是默认定义,不需要自己去设置的,内置的有:
Algorithm ("alg")
String algorithm = jwt.getAlgorithm();
Type ("typ")
String type = jwt.getType();
Content Type ("cty")
String contentType = jwt.getContentType();
Key Id ("kid")
String keyId = jwt.getKeyId();
2)添加:
Map<String, Object> headerClaims = new HashMap();
headerClaims.put("owner", "auth0");
String token = JWT.create()
        .withHeader(headerClaims)
        .sign(algorithm);
3)获取:
Claim claim = jwt.getHeaderClaim("owner");
总结: 看了其他人的一些博客,发现他们的api都是相对老一点的版本,生成token是一步一步来,新的确实简单方便很多。分享就这里,欢迎交流。
补充参考链接:
web 中使用jwt: https://github.com/jwtk/jjwt