Mybatis分页
原始方法,使用 limit,需要自己处理分页逻辑:
对于 mysql 数据库可以使用 limit ,如:
select * from table limit 5; --返回前5行

select * from table limit 0,5; --同上,返回前5行

select * from table limit 5,10; --返回6-15行
maven工程使用Pagehelper插件
(1)导入依赖
<!--pageHelper的依赖-->
        <dependency>
            <groupId>com.github.pagehelper</groupId>
            <artifactId>pagehelper</artifactId>
            <version>5.1.11</version>
        </dependency>
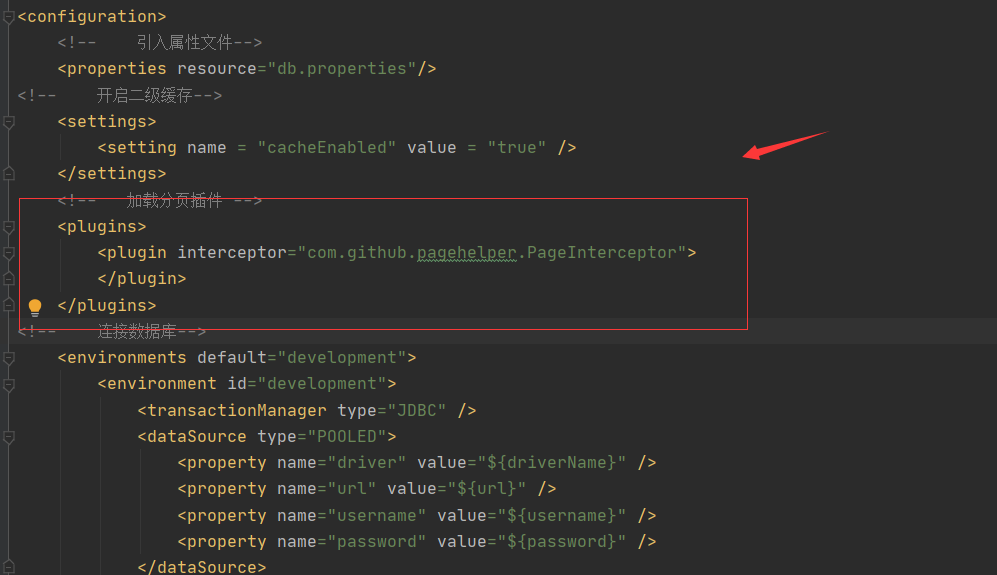
(2)使用分页插件在mybatis配置文件中加入如下代码
 <!--   加载分页插件 -->
    <plugins>
        <plugin interceptor="com.github.pagehelper.PageInterceptor">
        </plugin>
    </plugins>
分页插件在mybatis配置文件中加入时需要注意先后顺序,否则会报错
通过代码完成分页
    @Test
    public void test02()throws Exception{
        //加载映射文件
        Reader resource = Resources.getResourceAsReader("mybatis.xml");
        //创建工厂, 构建 sqlSession 的工厂
        SqlSessionFactory factory = new SqlSessionFactoryBuilder().build(resource);
        //创建能执行映射文件中 sql 的 session
        SqlSession session = factory.openSession(true);
        //通过反射获取dao查询方法
        ClassDao classDao = session.getMapper(ClassDao.class);
        PageHelper.startPage(2,2); //设置分页的条件
        List<Teacher> list =classDao.queryTeacherCount();
        System.out.println(list);
        PageInfo pageInfo=new PageInfo(list);
        System.out.println("总页码:"+pageInfo.getPages());
        System.out.println("总条数:"+pageInfo.getTotal());
        System.out.println("当前显示的页码:"+pageInfo.getPageNum());
        System.out.println("当前页码的数据:"+pageInfo.getList());
    }
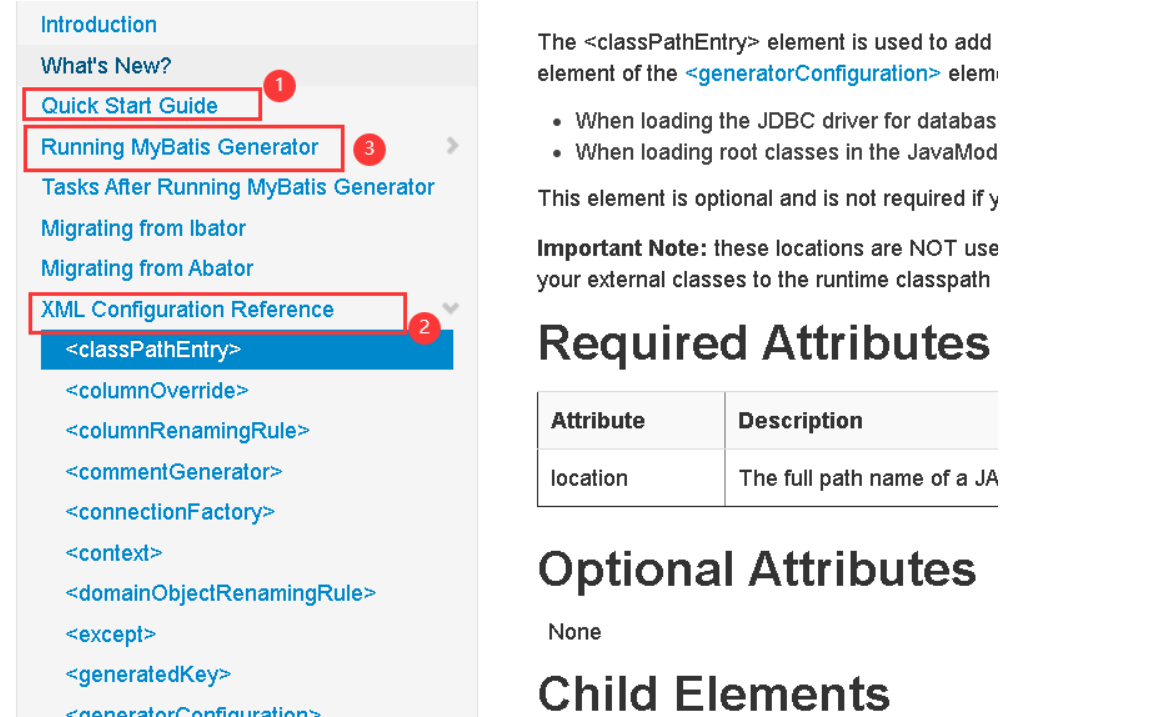
官网链接:http://mybatis.org/generator/configreference/classPathEntry.html
(1)引入依赖
        <dependency>
            <groupId>org.mybatis.generator</groupId>
            <artifactId>mybatis-generator-core</artifactId>
            <version>1.4.0</version>
        </dependency>
(2) 配置内容---放到工程下
<?xml version="1.0" encoding="UTF-8"?>
<!DOCTYPE generatorConfiguration
        PUBLIC "-//mybatis.org//DTD MyBatis Generator Configuration 1.0//EN"
        "http://mybatis.org/dtd/mybatis-generator-config_1_0.dtd">
<generatorConfiguration>
    <!--mysql驱动jar所在的绝对路径 必须低于8.0以下 -->
    <classPathEntry location="D:\JAVA\maven-repository\mysql\mysql-connector-java\5.1.26\mysql-connector-java-5.1.26.jar" />
    <context id="DB2Tables" targetRuntime="MyBatis3">
<!--        去除英文注释-->
        <commentGenerator>
            <property name="suppressAllComments" value="true" />
        </commentGenerator>
        <!--连接数据库的信息-->
        <jdbcConnection driverClass="com.mysql.jdbc.Driver"
                        connectionURL="jdbc:mysql:///school_db"
                        userId="root"
                        password="123@qwe">
        </jdbcConnection>
        <javaTypeResolver >
            <property name="forceBigDecimals" value="false" />
        </javaTypeResolver>

        <!--实体类生成的路径-->
        <javaModelGenerator targetPackage="com.fyx.entity" targetProject="./src/main/java">
            <property name="enableSubPackages" value="true" />
            <property name="trimStrings" value="true" />
        </javaModelGenerator>

        <!--映射文件生成的路径-->
        <sqlMapGenerator targetPackage="mapper"  targetProject="./src/main/resources">
            <property name="enableSubPackages" value="true" />
        </sqlMapGenerator>

        <!--dao生成的路径
        targetPackage:包的名称
        targetProject:路径
        -->
        <javaClientGenerator type="XMLMAPPER" targetPackage="com.fyx.dao"  targetProject="./src/main/java">
            <property name="enableSubPackages" value="true" />
        </javaClientGenerator>

        <!--数据库的表信息-->
        <table schema="school_db" tableName="t_class" domainObjectName="Tclass"
               enableUpdateByExample="false" enableSelectByExample="false" enableDeleteByExample="false"
               enableCountByExample="false">
        </table>
        <!--数据库的表信息-->
        <table schema="school_db" tableName="teacher" domainObjectName="Teacher"
               enableUpdateByExample="false" enableSelectByExample="false" enableDeleteByExample="false"
               enableCountByExample="false">
        </table>
    </context>
</generatorConfiguration>
(3)测试
 public static void main(String[] args) throws Exception{
        List<String> warnings = new ArrayList<String>();
        boolean overwrite = true;
        File configFile = new File("generator.xml");
        ConfigurationParser cp = new ConfigurationParser(warnings);
        Configuration config = cp.parseConfiguration(configFile);
        DefaultShellCallback callback = new DefaultShellCallback(overwrite);
        MyBatisGenerator myBatisGenerator = new MyBatisGenerator(config, callback, warnings);
        myBatisGenerator.generate(null);
    }
易出现异常:
这个表示在maper映射文件中生成多个重名的resultMap

三、缓存
mybatis也支持二级缓存----基于namespace 默认没有开启。
缓存机制减轻数据库压力,提高数据库性能
mybatis的缓存分为两级:一级缓存、二级缓存
一级缓存:
一级缓存为 sqlsesson 缓存,缓存的数据只在 SqlSession 内有效。在操作数据库的时候需要先创建 SqlSession 会话对象,在对象中有一个 HashMap 用于存储缓存数据,此 HashMap 是当前会话对象私有的,别的 SqlSession 会话对象无法访问。
具体流程:
第一次执行 select 完毕会将查到的数据写入 SqlSession 内的 HashMap 中缓存起来
第二次执行 select 会从缓存中查数据,如果 select 同传参数一样,那么就能从缓存中返回数据,不用去数据库了,从而提高了效率
注意:
1、如果 SqlSession 执行了 DML 操作(insert、update、delete),并 commit 了,那么 mybatis 就会清空当前 SqlSession 缓存中的所有缓存数据,这样可以保证缓存中的存的数据永远和数据库中一致,避免出现差异
2、当一个 SqlSession 结束后那么他里面的一级缓存也就不存在了, mybatis 默认是开启一级缓存,不需要配置
3、 mybatis 的缓存是基于 [namespace:sql语句:参数] 来进行缓存的,意思就是, SqlSession 的 HashMap 存储缓存数据时,是使用 [namespace:sql:参数] 作为 key ,查询返回的语句作为 value 保存的。
 @Test
    public void test01() throws IOException {
        //加载映射文件
        Reader resource = Resources.getResourceAsReader("mybatis.xml");
        //创建工厂, 构建 sqlSession 的工厂
        SqlSessionFactory factory = new SqlSessionFactoryBuilder().build(resource);
        //创建能执行映射文件中 sql 的 session
        SqlSession session = factory.openSession(true);
        //通过反射获取dao查询方法
        TeacherMapper teacherMapper = session.getMapper(TeacherMapper.class);
        Teacher teacher = teacherMapper.selectByPrimaryKey(1);
        System.out.println(teacher);
        System.out.println("=====================");
        //session.clearCache();
        Teacher teacher1 = teacherMapper.selectByPrimaryKey(1);
        System.out.println(teacher1);
    }
测试结果(第一次查询后,再次查询相同的,就直接从缓存中查询,不经过数据库)

二级缓存:
二级缓存是 mapper 级别的缓存,也就是同一个 namespace 的 mapper.xml ,当多个 SqlSession 使用同一个 Mapper 操作数据库的时候,得到的数据会缓存在同一个二级缓存区域
二级缓存默认是没有开启的。需要在 setting 全局参数中配置开启二级缓存。
(1)必须在配置文件中开启二级缓存
   <settings>
        <setting name = "cacheEnabled" value = "true" />
    </settings>

(2)在相应的映射文件中使用二级缓存

若想禁用当前select语句的二级缓存,添加 useCache="false"修改如下:
<select id="getCountByName" parameterType="java.util.Map" resultType="INTEGER" statementType="CALLABLE" useCache="false">
具体流程:
1.当一个 sqlseesion 执行了一次 select 后,在关闭此 session 的时候,会将查询结果缓存到二级缓存
2.当另一个 sqlsession 执行 select 时,首先会在他自己的一级缓存中找,如果没找到,就回去二级缓存中找,找到了就返回,就不用去数据库了,从而减少了数据库压力提高了性能
注意:
1、如果 SqlSession 执行了 DML 操作(insert、update、delete),并 commit 了,那么 mybatis 就会清空当前 mapper 缓存中的所有缓存数据,这样可以保证缓存中的存的数据永远和数据库中一致,避免出现差异
2、 mybatis 的缓存是基于 [namespace:sql语句:参数] 来进行缓存的,意思就是,SqlSession 的 HashMap 存储缓存数据时,是使用 [namespace:sql:参数] 作为 key ,查询返回的语句作为 value 保存的。