常见的图像变换操作
窗口视图变换
用户域:程序员用来定义草图的整个自然空间WD,它是一个实数域,理论上WD是连续无限的。
窗口区:用户指定的任一区域W,它是WD的子域,一般为矩形域。
屏幕域:设备输出图形的最大区域DC,它是有限的整数域, 如:如显示器有1600*1200个像素。
视图区:任何小于等于屏幕域的区域。一般为矩形。一个 屏幕上可定义多个视图。
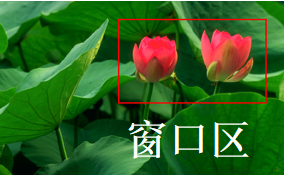

窗口和视图之间的坐标转换

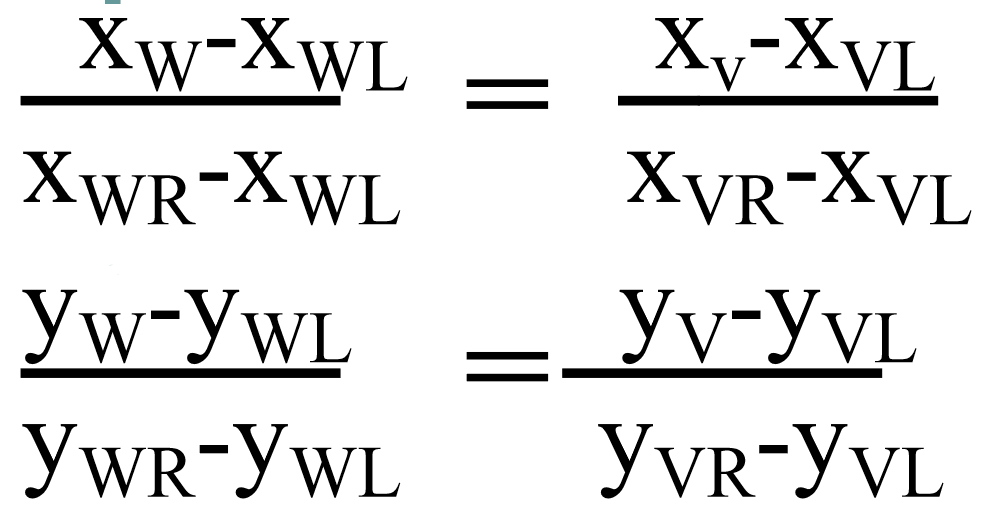
对于窗口和视图的坐标变换,我们可以根据变换的比例关系得到如下等式:
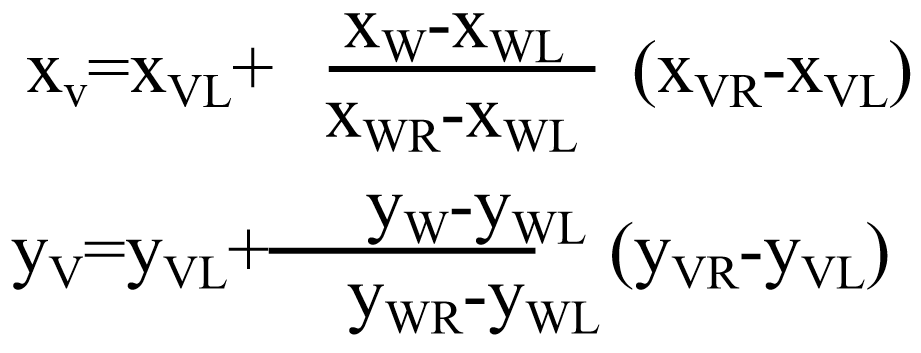
根据公式,可以推导出下面的变换公式:
图形的几何变换
对各种图形的几何变换,实际上是对点的变换,对原来图形中的一点坐标通过变换生成一个新的点坐标。二维图形的几何变换的表示采用3*3矩阵的形式,称为变换矩阵,点的坐标表示采用齐次坐标形式,故几何变换操作的过程是将变换矩阵M作用于齐次坐标点P生成新的坐标点P´,即P´=PM。其中齐次坐标齐次坐标表示就是用n+1维向量表示一个n维向量,齐次坐标不唯一,规范化齐次坐标表示就是h=1的齐次坐标。
平移变换
x´=x+Tx,y´=y+Ty

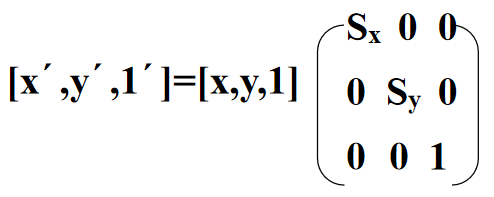
比例变换
x’=x . Sx, y’=y . Sy
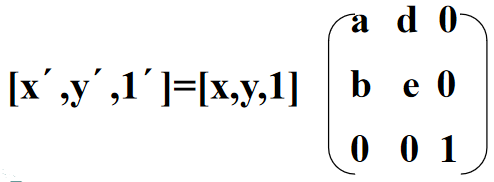
对称变换
x’=ax+by,y’=dx+ey

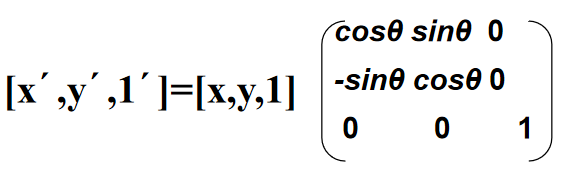
旋转变换
x´=xcosθ-ysinθ,y´=xsinθ+ycosθ

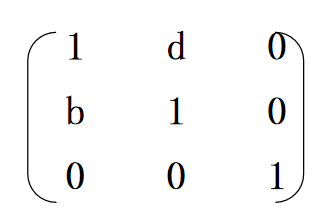
错切变换
x’=x+by, y’=dx+y
复合变换
一般的图形变换大多是复合变换,即由多个基本几何变换组合而成,复合变换矩阵实际上是一系列基本几何变换矩阵的乘积结果。
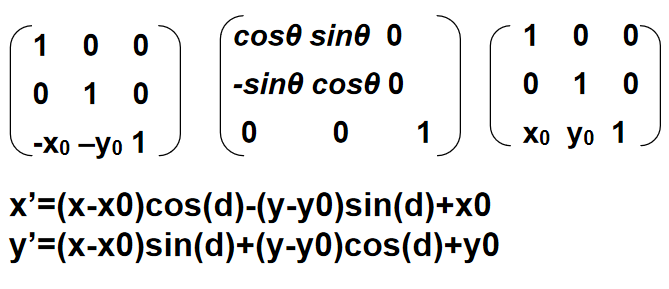
例如在图形绕平面上的一点(x0,y0)作旋转变换θ角度:
[x´,y´,1] = [x,y,1]T2(-x0,-y0)R2(θ)T2(x0,y0)
形体的透视变换
要把现实世界的三维物体在计算机的二维屏幕上 显示出来,必须经过投影变化,把物体从三维表示形式 转化为二维表示形式。

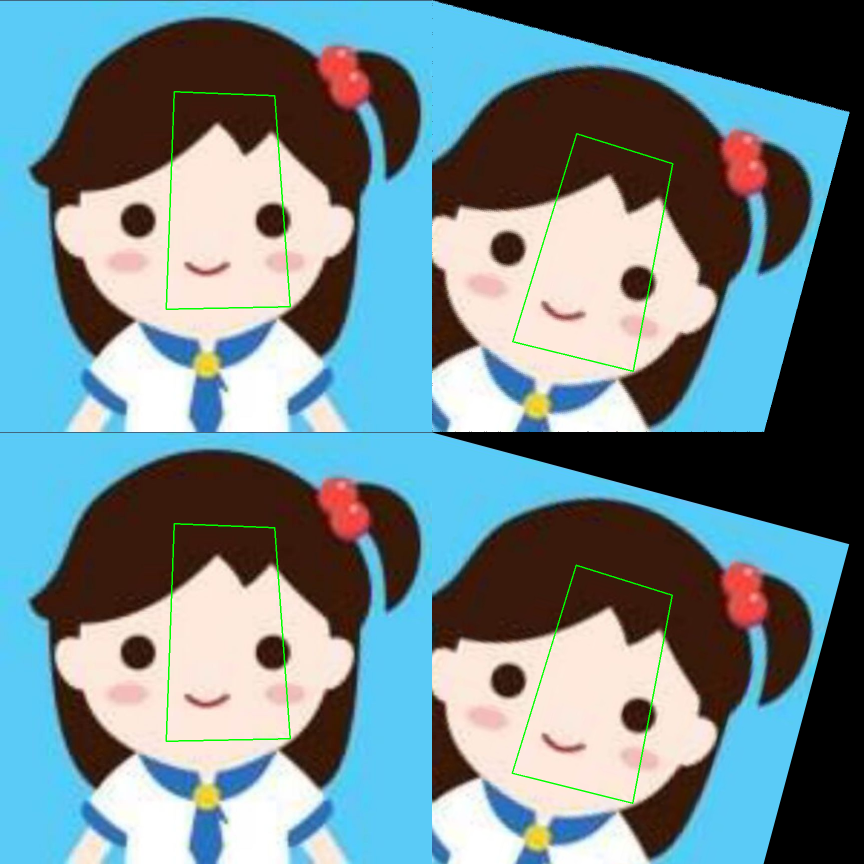
下面给出python实现的图像旋转:
import cv2
import numpy as np


path = 'img/a.png'


def show(image):
    image = cv2.resize(image, (0, 0), fx=0.5, fy=0.5)
    cv2.imshow('image', image)
    cv2.waitKey(0)
    cv2.destroyAllWindows()


def draw_line(image, point, color=(0, 255, 0), w=2):
    image = cv2.line(image, (point[0][0], point[0][1]), (point[1][0], point[1][1]), color, w)
    image = cv2.line(image, (point[1][0], point[1][1]), (point[2][0], point[2][1]), color, w)
    image = cv2.line(image, (point[2][0], point[2][1]), (point[3][0], point[3][1]), color, w)
    image = cv2.line(image, (point[3][0], point[3][1]), (point[0][0], point[0][1]), color, w)
    return image


def cal_rotate_point(center, point, degree):
    x, y = center
    point_ro = np.zeros_like(point)
    rad = np.deg2rad(degree)
    x1 = x - (x * np.cos(rad) - y * np.sin(rad))
    y1 = y - (x * np.sin(rad) + y * np.cos(rad))
    for i in range(point_ro.shape[0]):
        point_ro[i][0] = int(point[i][0] * np.cos(rad) - point[i][1] * np.sin(rad) + x1 + 0.5)
        point_ro[i][1] = int(point[i][0] * np.sin(rad) + point[i][1] * np.cos(rad) + y1 + 0.5)
    return point_ro


def rotate(image, center, degree):
    x, y = center[0], center[1]
    h, w = image.shape[:2]
    img = np.zeros_like(image)
    rad = np.deg2rad(degree)
    for i in range(w):
        for j in range(h):
            ir = (i-x) * np.cos(rad) - (j-y) * np.sin(rad) + x + 0.5
            jr = (i-x) * np.sin(rad) + (j-y) * np.cos(rad) + y + 0.5
            ir = int(ir)
            jr = int(jr)
            if 1 <= ir < w-1 and 1 <= jr < h-1:
                img[jr, ir, :] = image[j, i, :]
                img[jr-1, ir, :] = image[j, i, :]  # 对该像素的周围4个像素进行赋值
                img[jr+1, ir, :] = image[j, i, :]
                img[jr, ir-1, :] = image[j, i, :]
                img[jr, ir+1, :] = image[j, i, :]
    return img


def rotation(image, center, degree):
    center_h, center_w = center[:2]
    M = cv2.getRotationMatrix2D((center_h, center_w), -degree, 1)  # 参数依次为旋转中心, 旋转角度, 变换尺度, 返回变换矩阵
    img = cv2.warpAffine(image, M, (image.shape[1], image.shape[0]))
    return img


def cal_rotation_point(center, point, degree):
    center_w, center_h = center[:2]
    M = cv2.getRotationMatrix2D((center_w, center_h), -degree, 1)  # 参数依次为旋转中心, 旋转角度, 变换尺度, 返回变换矩阵
    point = np.array(point)
    point = np.insert(point, 2, values=np.ones(4), axis=1)
    M = np.mat(M).T
    new_point = np.dot(point, M)
    new_point = new_point.astype(int)
    new_point = [[new_point[i, 0], new_point[i, 1]] for i in range(new_point.shape[0])]
    return new_point


def my_rotate(image, point, degree, center):
    image_box = draw_line(image.copy(), point)
    img = rotate(image.copy(), (center[0], center[1]), degree)
    point_ro = cal_rotate_point((center[0], center[1]), point, degree)
    image_ro_box = draw_line(img, point_ro)
    images = np.hstack((image_box, image_ro_box))
    return images


def cv_rotate(image, point, degree, center):
    image_box = draw_line(image.copy(), point)
    img = rotation(image.copy(), (center[0], center[1]), degree)
    point_ro = cal_rotation_point((center[0], center[1]), point, degree)
    image_ro_box = draw_line(img, point_ro)
    print(point_ro)
    images = np.hstack((image_box, image_ro_box))
    return images


def main():
    image = cv2.imread(path)
    print(image.shape)
    center = (image.shape[1]//2, image.shape[0]//2)
    center = (0, 0)
    point = [[348, 183], [549, 191], [580, 613], [332, 618]]
    degree = 15
    images1 = my_rotate(image, point, degree, center)
    images2 = cv_rotate(image, point, degree, center)
    images = np.vstack((images1, images2))
    show(images)


if __name__ == '__main__':
    main()
