WEB服务-Nginx之4-常用模块和Location
Nginx模块介绍
Nginx高度模块化,但其模块早期不支持DSO机制;1.9.11版本后支持动态装载和卸载。
官网模块文档:http://nginx.org/en/docs/
模块分类:
-
核心模块:core module
-
标准模块:
- HTTP 模块:
ngx_http_*
HTTP Core modules 默认功能
HTTP Optional modules 需编译时指定 - Mail 模块:
ngx_mail_* - Stream 模块:
ngx_stream_* - 第三方模块
- HTTP 模块:
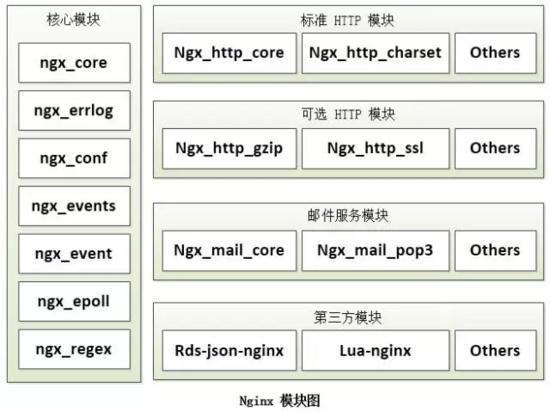
- 核心模块:是 Nginx 服务器正常运行必不可少的模块,提供错误日志记录 、 配置文件解析 、 事件驱动机制 、 进程管理等核心功能。
- 标准HTTP模块:提供 HTTP 协议解析相关的功能,比如: 端口配置 、 网页编码设置 、 HTTP响应头设置 等等。
- 可选HTTP模块:主要用于扩展标准的HTTP功能,让Nginx能处理一些特殊的服务,比如:Flash多媒体传输 、解析 GeoIP 请求、网络传输压缩、安全协议SSL支持等。
- 邮件服务模块:主要用于支持 Nginx 的 邮件服务 ,包括对 POP3 协议、 IMAP 协议和 SMTP协议的支持。
- 第三方模块:是为了扩展 Nginx 服务器应用,完成开发者自定义功能,比如: Json 支持、 Lua 支持等。
Nginx模块查看
- 查看自己添加的参数、编译时附带的可选模块或三方模块
[root@web01 ~]# nginx -V
nginx version: nginx/1.18.0
built by gcc 4.8.5 20150623 (Red Hat 4.8.5-39) (GCC)
built with OpenSSL 1.0.2k-fips  26 Jan 2017
TLS SNI support enabled
configure arguments: --prefix=/etc/nginx --sbin-path=/usr/sbin/nginx --modules-path=/usr/lib64/nginx/modules --conf-path=/etc/nginx/nginx.conf --error-log-path=/var/log/nginx/error.log --http-log-path=/var/log/nginx/access.log --pid-path=/var/run/nginx.pid --lock-path=/var/run/nginx.lock --http-client-body-temp-path=/var/cache/nginx/client_temp --http-proxy-temp-path=/var/cache/nginx/proxy_temp --http-fastcgi-temp-path=/var/cache/nginx/fastcgi_temp --http-uwsgi-temp-path=/var/cache/nginx/uwsgi_temp --http-scgi-temp-path=/var/cache/nginx/scgi_temp --user=nginx --group=nginx --with-compat --with-file-aio --with-threads --with-http_addition_module --with-http_auth_request_module --with-http_dav_module --with-http_flv_module --with-http_gunzip_module --with-http_gzip_static_module --with-http_mp4_module --with-http_random_index_module --with-http_realip_module --with-http_secure_link_module --with-http_slice_module --with-http_ssl_module --with-http_stub_status_module --with-http_sub_module --with-http_v2_module --with-mail --with-mail_ssl_module --with-stream --with-stream_realip_module --with-stream_ssl_module --with-stream_ssl_preread_module --with-cc-opt='-O2 -g -pipe -Wall -Wp,-D_FORTIFY_SOURCE=2 -fexceptions -fstack-protector-strong --param=ssp-buffer-size=4 -grecord-gcc-switches -m64 -mtune=generic -fPIC' --with-ld-opt='-Wl,-z,relro -Wl,-z,now -pie'
- 查看默认安装的模块
[root@web01 ~]# cat /opt/nginx-1.18.0/auto/options | | grep "^[^ ].*YES$"
HTTP=YES
HTTP_CACHE=YES
HTTP_CHARSET=YES
HTTP_GZIP=YES
HTTP_SSI=YES
HTTP_ACCESS=YES            # 基于IP的访问控制
HTTP_AUTH_BASIC=YES        # 基于用户登陆认证
HTTP_MIRROR=YES
HTTP_USERID=YES
HTTP_AUTOINDEX=YES         # 目录索引
HTTP_GEO=YES
HTTP_MAP=YES
HTTP_SPLIT_CLIENTS=YES
HTTP_REFERER=YES
HTTP_REWRITE=YES
HTTP_PROXY=YES
HTTP_FASTCGI=YES
HTTP_UWSGI=YES
HTTP_SCGI=YES
HTTP_GRPC=YES
HTTP_MEMCACHED=YES
HTTP_LIMIT_CONN=YES         # 连接频率限制
HTTP_LIMIT_REQ=YES          # 请求频率限制
HTTP_EMPTY_GIF=YES
HTTP_BROWSER=YES
HTTP_UPSTREAM_HASH=YES
HTTP_UPSTREAM_IP_HASH=YES
HTTP_UPSTREAM_LEAST_CONN=YES
HTTP_UPSTREAM_RANDOM=YES
HTTP_UPSTREAM_KEEPALIVE=YES
HTTP_UPSTREAM_ZONE=YES
MAIL_POP3=YES
MAIL_IMAP=YES
MAIL_SMTP=YES
STREAM_LIMIT_CONN=YES
STREAM_ACCESS=YES
STREAM_GEO=YES
STREAM_MAP=YES
STREAM_SPLIT_CLIENTS=YES
STREAM_RETURN=YES
STREAM_UPSTREAM_HASH=YES
STREAM_UPSTREAM_LEAST_CONN=YES
STREAM_UPSTREAM_RANDOM=YES
STREAM_UPSTREAM_ZONE=YES
- 查看默认不安装和不存在的模块
[root@web01 ~]# cat /opt/nginx-1.18.0/auto/options | grep "NO$|NONE$"
NGX_DEBUG=NO
CPU=NO
NGX_RPATH=NO
NGX_TEST_BUILD_DEVPOLL=NO
NGX_TEST_BUILD_EVENTPORT=NO
NGX_TEST_BUILD_EPOLL=NO
NGX_TEST_BUILD_SOLARIS_SENDFILEV=NO
EVENT_FOUND=NO
EVENT_SELECT=NO
EVENT_POLL=NO
USE_THREADS=NO
NGX_FILE_AIO=NO
HTTP_SSL=NO
HTTP_V2=NO
HTTP_REALIP=NO
HTTP_XSLT=NO
HTTP_IMAGE_FILTER=NO
HTTP_SUB=NO
HTTP_ADDITION=NO
HTTP_DAV=NO
HTTP_AUTH_REQUEST=NO
HTTP_SLICE=NO
HTTP_RANDOM_INDEX=NO
HTTP_STATUS=NO
HTTP_GEOIP=NO
HTTP_PERL=NO
HTTP_SECURE_LINK=NO
HTTP_DEGRADATION=NO
HTTP_FLV=NO
HTTP_MP4=NO
HTTP_GUNZIP=NO
HTTP_GZIP_STATIC=NO
HTTP_STUB_STATUS=NO
MAIL=NO
MAIL_SSL=NO
STREAM=NO
STREAM_SSL=NO
STREAM_REALIP=NO
STREAM_GEOIP=NO
STREAM_SSL_PREREAD=NO
NGX_COMPAT=NO
USE_PCRE=NO
PCRE=NONE
PCRE_JIT=NO
USE_OPENSSL=NO
OPENSSL=NONE
USE_ZLIB=NO
ZLIB=NONE
ZLIB_ASM=NO
USE_PERL=NO
USE_LIBXSLT=NO
USE_LIBGD=NO
USE_GEOIP=NO
NGX_GOOGLE_PERFTOOLS=NO
NGX_CPP_TEST=NO
NGX_LIBATOMIC=NO
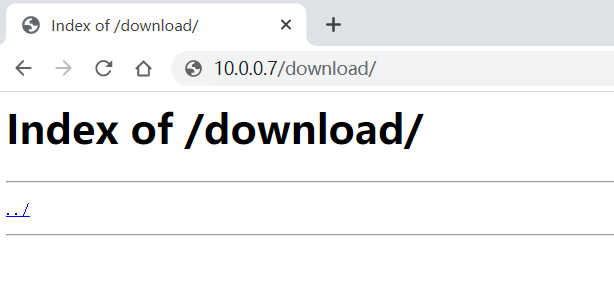
Nginx目录索引
ngx_http_autoindex_module模块处理以斜杠字符('/')结尾的请求,并生成目录列表。
- 当
ngx_http_index_module模块找不到索引文件时,通常会将请求传递给ngx_http_autoindex_module模块。 Nginx默认是不允许列出整个目录浏览下载。- 注意: 不要在目录里创建index.html 文件
配置:
Syntax:    autoindex on | off;
Default:   autoindex off;
Context:   http, server, location
autoindex常用参数:
autoindex_exact_size off;
默认为on, 显示出文件的确切大小,单位是bytes。
修改为off,显示出文件的大概大小,单位是kB或者MB或者GB。

autoindex_localtime on;
默认为off,显示的文件时间为GMT(格林威治)时间。
修改为on, 显示的文件时间为文件的服务器时间。

charset utf-8,gbk;
默认中文目录乱码,添加上解决乱码。

autoindex_format html | xml | json | jsonp;
显示索引的页面文件风格,默认html
示例:
server {
	listen 80;
	server_name module.oldboy.com;
	charset utf-8,gbk;

	location / {
		root /code;
		index index.html index.htm;
	}

	location /download {
		alias /module;
		autoindex on;
		autoindex_exact_size off;
		autoindex_localtime on;
	}
}
Nginx状态监控
ngx_http_stub_status_module模块提供对基本状态信息的访问。
- 官方源1.18.0默认安装此可选模块
- 未安装应使用
--with-http_stub_status_module配置参数启用它
配置:
Syntax: stub_status;
Default: —
Context: server, location
示例:
server {
    listen 80;
    server_name module.oldboy.com;
    access_log off;

    location /nginx_status {
        stub_status;
    }
}

server {
    listen 80;
    server_name module.oldboy.com;
    charset utf-8,gbk;

    location / {
        root /code;
        index index.html index.htm;
    }

    location /download {
        alias /module;
        autoindex on;
        autoindex_exact_size off;
        autoindex_localtime on;
    }

    location /nginx_status {
        stub_status;
    }
}
打开浏览器访问:http://module.oldboy.com/nginx_status
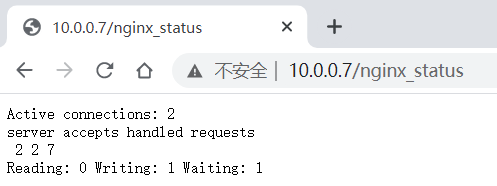
Active connections  # 当前状态,活动状态的连接数
accepts             # 统计总值,已经接受的客户端请求的总数
handled             # 统计总值,已处理完成的客户端请求总数,一般和accepts相同,除非拒绝处理
requests            # 统计总值,客户端发来的总的请求数

Reading             # 当前状态,正在读取客户端请求报文的连接数
Writing             # 当前状态,正在向客户端发送响应报文的连接数
Waiting             # 当前状态,正在等待客户端发出请求的空闲连接数,开启keepalive才有

# 注意, 一次TCP的连接,可以发起多次http的请求, 如下参数可配置进行验证
keepalive_timeout  0;   # 类似于关闭长连接
keepalive_timeout  65;  # 65s没有活动则断开连接
Nginx访问控制
http_access_module模块是基于IP的访问控制
http_auth_basic_module模块是基于用户登陆认证
基于IP的访问控制配置:自上而下检查,一旦匹配,立即生效,将条件严格的置前
# 允许配置语法
Syntax:     allow address | CIDR | unix: | all;
Default:    —
Context:    http, server, location, limit_except

# 拒绝配置语法
Syntax:     deny address | CIDR | unix: | all;
Default:    —
Context:    http, server, location, limit_except
- 访问控制配置示例:拒绝指定的IP,其他全部允许
server {
    listen 80;
    server_name module.oldboy.com;
    access_log off;

    location /nginx_status {
        stub_status;
        deny 10.0.0.1;
        allow all;
    }
}
- 访问控制配置示例:只允许谁能访问,其它全部拒绝
server {
    listen 80;
    server_name module.oldboy.com;
    access_log off;

    location /nginx_status {
        stub_status;
        allow   10.0.0.0/24;
        allow   127.0.0.1;
        deny    all;
    }
}
基于用户登陆认证配置:使用basic机制进行用户认证
# 指定访问提示字符串
Syntax:  auth_basic string| off;
Default: auth_basic off;
Context: http, server, location, limit_except

# 指定账户密码文件的绝对路径(相对路径从/etc/nginx/开始)
Syntax:  auth_basic_user_file file;
Default: -
Context: http, server, location, limit_except
基于用户登陆认证示例:
- 安装httpd-tools,需要使用该包中携带的
htpasswd命令
[root@web01 ~]# yum install httpd-tools
- 创建密码是密文的密码文件,
-c创建新文件,-b允许命令行输入密码
[root@web01 ~]# htpasswd -b -c /etc/nginx/auth_conf oldboy oldboy
[root@web01 ~]# cat /etc/nginx/auth_conf
oldboy:$apr1$s.Dd3Oio$A3GJHujb80clAU9wcCRUD.
- nginx配置:
server {
    listen 80;
    server_name module.oldboy.com;
    access_log off;

    location /nginx_status {
        stub_status;
        auth_basic "Auth access Blog Input your Passwd!";
        auth_basic_user_file auth_conf;
    }
}
Nginx访问限制
在企业中经常会遇到这种情况,服务器流量异常,负载过大等等。对于大流量恶意的攻击访问, 会带来带宽的浪费,服务器压力,影响业务,往往考虑对同一个ip的连接数,请求数、进行限制。
ngx_http_limit_conn_module模块可以根据定义的key来限制每个键值的连接数,连接频率限制
ngx_http_limit_req_module模块可以根据定义的key来限制每个键值的请求数,请求频率限制
连接限制配置:
# 模块名ngx_http_limit_conn_module
Syntax:  limit_conn_zone key zone=name:size;
Default: —
Context: http

Syntax:  limit_conn zone number;
Default: —
Context: http, server, location
示例:
http{   # 在http层,设置
    # 创建连接空间:大小1m
    limit_conn_zone $binary_remote_addr zone=conn_zone:1m;
server{ # 在server层,调用
    # 连接限制:限制同时最高1个连接,超过返回错误码503给客户端
    limit_conn conn_zone 1;
    }
}
重载使用ab工具进行压力测试:-n执行次数,-c并发次数
[root@web01 ~]# systemctl reload nginx
[root@web01 ~]# yum install -y httpd-tools
[root@web01 ~]# ab -n 20 -c 2 http://127.0.0.1/index.html
查看nginx错误日志
[root@web01 ~]# tailf /var/log/nginx/error.log
2018/10/24 18:04:49 [error] 28656#28656: 1148 limiting connections by zone "conn_zone", client: 123.66.146.123, server: www.oldboy.com, request: "GET / HTTP/1.0", host: "www.oldboy.com"
2018/10/24 18:04:49 [error] 28656#28656: 1155 limiting connections by zone "conn_zone", client: 123.66.146.123, server: www.oldboy.com, request: "GET / HTTP/1.0", host: "www.oldboy.com"
2018/10/24 18:04:49 [error] 28656#28656: 1156 limiting connections by zone "conn_zone", client: 123.66.146.123, server: www.oldboy.com, request: "GET / HTTP/1.0", host: "www.oldboy.com"
请求限制配置:
# 模块名ngx_http_limit_req_module
Syntax:  limit_req_zone key zone=name:size rate=rate;
Default: —
Context: http

Syntax:  limit_req zone number [burst=number] [nodelay];
Default: —
Context: http, server, location
参数:
- $binary_remote_addr:表示通过remote_addr这个标识来做限制,“binary_”的目的是缩写内存占用量,是限制同一客户端ip地址。
- zone=one:10m:表示生成一个大小为10M,名字为one的内存区域,用来存储访问的频次信息。
- rate=1r/s:表示允许相同标识的客户端的访问频次,每秒只处理一个请求。
- burst=3: 缓冲队列的长度,超过了访问频次限制的请求可以先放到这个缓冲区内等待,但是这个等待区里的位置只有5个,超过的请求会直接报503的错误然后返回。
- nodelay:不延迟
- 如果设置,会在瞬时提供处理(burst + rate)个请求的能力,永远不存在请求需要等待的情况,没有延时请求,超过(burst + rate)数量的请求直接返回503。
- 如果没有设置,则所有请求会依次等待排队,有burst个延时请求,超过(burst + 1)数量的请求直接返回503。
示例:
http {  # http层定义请求限制, rate限制速率,限制一秒钟最多一个IP请求
    limit_req_zone $binary_remote_addr zone=req_zone:10m rate=1r/s;
	server {
    	listen 80;
    	server_name module.oldboy.com;
    	# 1r/s只接收一个请求,多余的请求拒绝处理并返回错误码503给客户端
    	#limit_req zone=req_zone;

    	# 请求超过1r/s,剩下的将被延迟处理,请求数超过burst定义的数量, 多余的请求返回错误码503给客户端
    	limit_req zone=req_zone burst=3 nodelay;

    	location / {
    	    root /code;
    	    index index.html;
    	}
	}
}
重载使用ab工具进行压力测试
[root@web01 ~]# systemctl reload nginx
[root@web01 ~]# yum install -y httpd-tools
[root@web01 ~]# ab -n 20 -c 2  http://127.0.0.1/index.html
查看nginx错误日志
[root@web01 ~]# tailf /var/log/nginx/error.log
2020/09/10 17:23:48 [error] 2657#2657: *15 limiting requests, excess: 3.999 by zone "req_zone", client: 127.0.0.1, server: module.oldboy.com, request: "GET /index.html HTTP/1.0", host: "127.0.0.1"
2020/09/10 17:23:48 [error] 2657#2657: *16 limiting requests, excess: 3.998 by zone "req_zone", client: 127.0.0.1, server: module.oldboy.com, request: "GET /index.html HTTP/1.0", host: "127.0.0.1"
2020/09/10 17:23:48 [error] 2657#2657: *17 limiting requests, excess: 3.998 by zone "req_zone", client: 127.0.0.1, server: module.oldboy.com, request: "GET /index.html HTTP/1.0", host: "127.0.0.1"
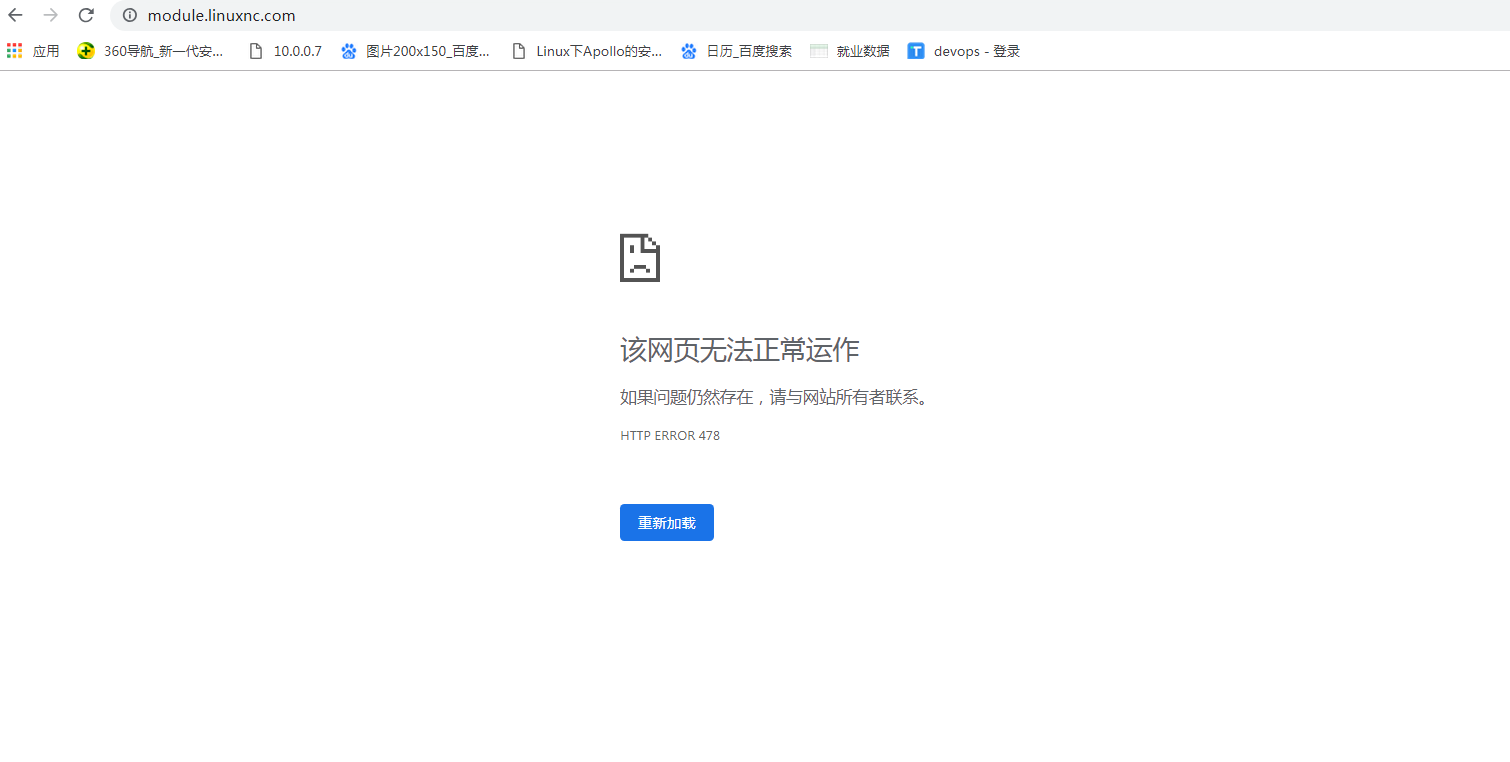
nginx请求限制重定向
在nginx请求限制的过程中,我们可以自定义一个返回值,也就是错误页面的状态码,默认是503。

1)修改默认返回状态码
server {
        listen 80;
        server_name module.oldboy.com;
        charset utf-8,gbk;

        location / {
                root /code;
                index index.html index.htm;
                limit_req zone=req_zone burst=3 nodelay;
                # 修改返回状态码为:478
                limit_req_status 478;
        }
}
2)错误页面太丑,重定向错误页面
server {
        listen 80;
        server_name module.oldboy.com;
        charset utf-8,gbk;

        location / {
                root /code;
                index index.html index.htm;
                limit_req zone=req_zone burst=3 nodelay;
                limit_req_status 478;
                # 重定向错误页面
                error_page 478 /err.html;
        }
}
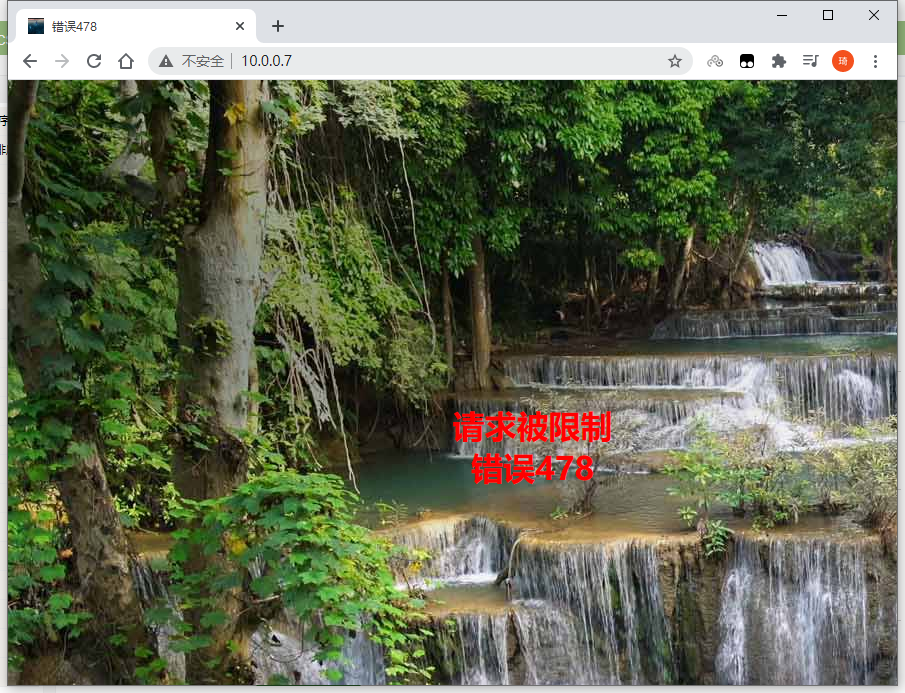
3)创建错误页面
cat >/code/err.html <<EOF
<!DOCTYPE html>
<html>
<head>
<meta charset="utf-8">
<title>错误478</title>
</head>
<body background="http://area.sinaapp.com/bingImg/" >
<h1 style="color:red;text-align:center;position:absolute;left:50%;top:50%;">
请求被限制<br>错误478
</h1>
</body>
</html>
EOF
3)使用浏览器访问验证
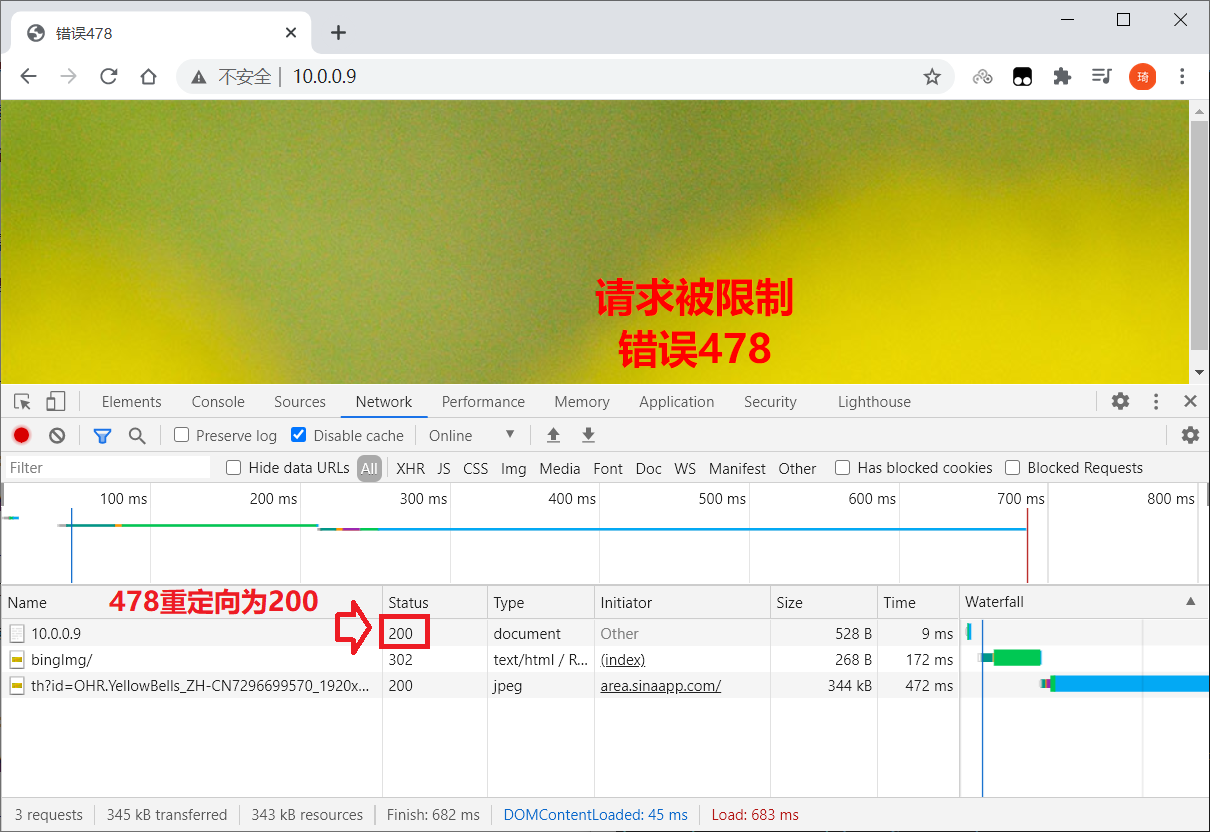
4)还可以
- 将478响应重定向为200响应,此时访问的网页就不会被拦截,返回200响应,仅提示报错。
- 指定错误页面文件路径。
server {
        listen 80;
        server_name module.oldboy.com;
        charset utf-8,gbk;

        location / {
                root /code;
                index index.html index.htm;
                limit_req zone=req_zone burst=3 nodelay;
                limit_req_status 478;
                # 重定向为200响应,错误页面
                error_page 478 =200 /err.html;
        }
        # 指定错误页面文件路径
		location = /err.html {
		    root /code/err;
		}
}
为什么Nginx连接限制没有请求限制有效?
我们先来回顾一下http协议的连接与请求:首先HTTP是建立在TCP基础之上,在完成HTTP请求需要先建立TCP三次握手(称为TCP连接),在连接的基础上在完成HTTP的请求。
所以多个HTTP请求可以建立在一次TCP连接之上。那么我们对请求的精度限制,当然比对一个连接的限制会更加的有效。因为同一时刻只允许一个TCP连接进入,但是同一时刻多个HTTP请求可以通过一个TCP连接进入。所以针对HTTP的请求限制才是较优的解决方案。
Nginx上传相关
ngx_http_core_module模块
client_max_body_size设置客户端请求正文的最大允许大小,在“ Content-Length”请求标头字段中指定。如果请求中的大小超过配置的值,则会向客户端返回413(请求实体太大)错误。请注意,浏览器无法正确显示此错误。设为0将禁用客户端请求主体大小的检查,不限制。
Syntax: 	client_max_body_size size;
Default:	client_max_body_size 1m;
Context:	http, server, location
client_body_buffer_size设置用于读取客户端请求正文的缓冲区大小。如果请求主体大于缓冲区,则将整个主体或仅将其一部分写入client_body_temp_path指定的临时文件中。默认情况下,缓冲区大小等于两个内存页。在x86,其他32位平台和x86-64上为8K。在其他64位平台上,通常为16K。
Syntax: 	client_body_buffer_size size;
Default:	client_body_buffer_size 8k|16k;
Context:	http, server, location
client_body_temp_path设定存储客户端请求正文的临时文件的目录路径及子目录结构和数量。在指定目录下最多可以使用三级子目录层次结构。
Syntax: 	client_body_temp_path path [level1 [level2 [level3]]];
Default:	client_body_temp_path client_body_temp;
Context:	http, server, location
目录名为16进制的数字;用hash之后的值从后往前截取第1、2、3级作为文件名;列如:
client_body_temp_path /tmp 1 2 2;
如果hash之后的值为7be8178adbafe254d60aa971db99f2e7
1级目录:7
2级目录:e2
3级目录:f9
- 1级目录占1位16进制,即2^4=16个目录 0-f
- 2级目录占2位16进制,即2^8=256个目录 00-ff
- 3级目录占2位16进制,即2^8=256个目录 00-ff
示例:
client_max_body_size 10m;
client_body_buffer_size 16k;
client_body_temp_path /apps/nginx/temp 1 2 2; #重载Nginx会自动创建temp目录
Nginx下载相关
ngx_http_core_module模块
limit_rate限制向客户端传输响应的速率。单位是bytes/second,默认值0表示无限制。该限制是根据请求设置的,因此,如果客户端同时打开两个连接,则总速率将是指定限制的两倍。
Syntax: 	limit_rate rate;
Default:	limit_rate 0;
Context:	http, server, location, if in location
示例:
- 创建配置文件
server {
    listen 80;
    limit_rate  10k;
    location / {
    	root /code;
    }
}
- 在
/code目录下创建一个1G大文件。
[root@web01 ~]# dd if=/dev/zero  of=/code/1G  bs=1M count=1024
1024+0 records in
1024+0 records out
1073741824 bytes (1.1 GB) copied, 10.9202 s, 98.3 MB/s
- 重载测试,下载此文件, 可以看到文件的下载速度。
[root@web01 ~]# systemctl reload nginx
[root@web01 ~]# wget 127.0.0.1/1G
--2020-09-15 11:35:19--  http://127.0.0.1/1G
Connecting to 127.0.0.1:80... connected.
HTTP request sent, awaiting response... 200 OK
Length: 1073741824 (1.0G) [application/octet-stream]
Saving to: ‘1G’

 0% [                                                 ] 49,152      11.9KB/s  eta 23h 30m
limit_except限制location内除了指定的请求方法之外的其它HTTP方法。
method参数可以是下列之一: GET, HEAD, POST, PUT, DELETE, MKCOL, COPY, MOVE, OPTIONS, PROPFIND, PROPPATCH, LOCK, UNLOCK,或 PATCH。
允许GET方法会使 HEAD方法也被允许。
可以使用ngx_http_access_module, ngx_http_auth_basic_module和 ngx_http_auth_jwt_module (1.13.10)模块指令来限制对其他方法的访问。
Syntax: 	limit_except method ... { ... }
Default:	-
Context:	location
示例:除了GET和HEAD之外的其它方法仅允许10.0.0.0/24网段主机使用
limit_except GET {
   allow 10.0.0.0/24;
   deny all;
}
示例:
- 创建配置文件
server {
    listen 80;
    limit_rate  10k;
    location / {
    	root /code;
    	limit_except GET {
 			allow 10.0.0.0/24;
			deny all;
		}
    }
}
- 重载测试
[root@web01 ~]# systemctl reload nginx
[root@web01 ~]# curl -XOPTIONS -I 127.0.0.1
HTTP/1.1 403 Forbidden  # 访问控制禁止
Server: nginx/1.18.0
Date: Tue, 15 Sep 2020 03:52:20 GMT
Content-Type: text/html
Content-Length: 153
Connection: keep-alive
[root@web01 ~]# tail -1 /var/log/nginx/error.log
2020/09/15 11:55:45 [error] 67393#67393: *48 access forbidden by rule, client: 127.0.0.1, server: , request: "OPTIONS / HTTP/1.1", host: "127.0.0.1"

[root@web01 ~]# curl -XOPTIONS -I 10.0.0.7
HTTP/1.1 405 Not Allowed  # 不允许此方式(OPTIONS)
Server: nginx/1.18.0
Date: Tue, 15 Sep 2020 04:00:01 GMT
Content-Type: text/html
Content-Length: 157
Connection: keep-alive
[root@web01 ~]# tail -1 /var/log/nginx/error.log
2020/09/15 11:59:51 [error] 67803#67803: *50 access forbidden by rule, client: 127.0.0.1, server: , request: "OPTIONS / HTTP/1.1", host: "127.0.0.1"
aio启用或禁用异步文件I / O(AIO)
Syntax: 	aio on | off | threads[=pool];
Default:	aio off;
Context:	http, server, location
directio指定文件写缓存的最大值,超出同步(直接)写磁盘
Syntax: 	directio size | off;
Default:	directio off;
Context:	http, server, location
示例:
情况一:在Linux上,可以从内核版本2.6.22开始使用AIO。另外,有必要启用 directio,否则将阻止读取:
location /video/ {
	aio	on;
	directio 512;
	output_buffers 1 128k;
}
directio仅可用于读取在512字节边界(对于XFS为4K)上对齐的块。在阻塞模式下读取文件未对齐的结尾。对于字节范围请求和FLV请求(并非从文件开头开始)也是如此:在文件的开头和结尾读取未对齐的数据将被阻止。
情况二:同时启用 AIO和sendfile
AIO用于大于或等于directio指令中指定的大小的文件sendfile用于较小的文件或禁用directio的文件。
location /video/ {
	sendfile on;
	aio on;
	directio 8m;
}
情况三:使用多线程(1.7.11)读取和发送文件,而不会阻塞工作进程:
默认情况下,禁用多线程,应使用--with-threads配置参数启用它 。多线程仅与epoll, kqueue和 eventport方法兼容 。仅在Linux上支持文件的多线程发送。
location /video/ {
	sendfile on;
	aio threads;
}
读取和发送文件操作被卸载到指定池的线程中 。如果省略池名称,则使用名称为“ default” 的池。池名称也可以使用变量设置:
aio thread = pool $ disk;
Nginx缓存功能
ngx_http_core_module模块
open_file_cache 可以存储以下内容的缓存:
-
文件元数据:文件的描述符、文件大小和最近一次的修改时间;
-
有关目录存在的信息;
-
文件查找错误,例如“找不到文件”,“没有读取权限”等。
错误缓存应该由open_file_cache_errors 指令单独启用 。
Syntax: 	open_file_cache off;
			open_file_cache max=N [inactive=time];
Default:	open_file_cache off;
Context:	http, server, location
该指令具有以下参数:
-
max设置缓存中元素的最大数量;在高速缓存溢出时,将删除最近最少使用(LRU算法实现)的元素;
-
inactive定义一个时间,如果某元素在这段时间内没有访问过或访问次数少于
open_file_cache_min_uses指令所指定的次数,则从缓存中删除该元素;默认为60秒; -
off禁用缓存。
open_file_cache_errors是否缓存文件查找时发生的错误信息
Syntax: 	open_file_cache_errors on | off;
Default:	open_file_cache_errors off;
Context:	http, server, location
open_file_cache_min_uses设置open_file_cache指令的inactive参数指定的时长内,至少被命中此处指定的次数,这是文件描述符在高速缓存中保持打开状态所必需的。
Syntax: 	open_file_cache_min_uses number;
Default:	open_file_cache_min_uses 1;
Context:	http, server, location
open_file_cache_valid缓存项有效性的检查频率
Syntax: 	open_file_cache_valid time;
Default:	open_file_cache_valid 60s;
Context:	http, server, location
示例:
open_file_cache max=10000 inactive=60s;
open_file_cache_valid 30s;
open_file_cache_min_uses 2;
open_file_cache_errors on;
Nginx检查文件
ngx_http_core_module模块
try_files按指定顺序检查文件是否存在,并使用找到的第一个文件或文件夹(以斜线结尾表示为文件夹)处理请求;该处理在当前上下文中执行。
文件的路径是file根据root和alias指令从参数构造的 。如果未找到任何文件,则内部重定向到uri最后一个参数中指定的文件 。
Syntax: 	try_files file ... uri;
            try_files file ... =code;
Default:	—
Context:	server, location
示例:
location /images/ {
	try_files $uri /images/default.jpg;
}
location / {
	try_files $uri $uri/index.html $uri.html =404;
}
- 创建配置文件
server {
	listen 80;
	location /images {
	       alias /code/images;
	       # 在指定的uri寻找文件,如果找不到,就会寻找默认文件,没有默认文件返回404
	       try_files  $uri /images/default.jpg;
	}
}
- 创建页面文件
[root@web01 ~]# mkdir /code/images
[root@web01 ~]# echo www.default.jgp> /code/images/default.jpg
[root@web01 ~]# echo www.a.jpg > /code/images/a.jpg
[root@web01 ~]# echo www.b.jpg > /code/images/b.jpg
- 重载测试,如果访问的页面不存在,就会返回指定的默认文件。
[root@web01 ~]# systemctl reload nginx
[root@web01 ~]# curl 127.0.0.1/images/a.jpg
www.a.jpg
[root@web01 ~]# curl 127.0.0.1/images/b.jpg
www.b.jpg
[root@web01 ~]# curl 127.0.0.1/images/xxx.jpg
www.default.jgp
- 自定义错误状态码
server {
	listen 80;
	location /images {
	   alias /code/images;
	   try_files  $uri $uri/default.jpg =598;
	}
}
- 重载测试
[root@web01 ~]# systemctl reload nginx
[root@web01 ~]# curl -I 127.0.0.1/images/xxx.jpg
HTTP/1.1 598
Server: nginx/1.18.0
Date: Tue, 15 Sep 2020 02:36:22 GMT
Content-Length: 0
Connection: keep-alive
Nginx监听功能
ngx_http_core_module模块
listen 指令监听端口|IP:端口|unix socket
Syntax:	    listen PORT|address[:port]|unix:/PATH/TO/SOCKET_FILE
            listen address[:port] [default_server] [ssl] [http2 | spdy] [proxy_protocol] [setfib=number] [fastopen=number] [backlog=number] [rcvbuf=size] [sndbuf=size] [accept_filter=filter] [deferred] [bind] [ipv6only=on|off] [reuseport] [so_keepalive=on|off|[keepidle]:[keepintvl]:[keepcnt]];
            listen port [default_server] [ssl] [http2 | spdy] [proxy_protocol] [setfib=number] [fastopen=number] [backlog=number] [rcvbuf=size] [sndbuf=size] [accept_filter=filter] [deferred] [bind] [ipv6only=on|off] [reuseport] [so_keepalive=on|off|[keepidle]:[keepintvl]:[keepcnt]];
            listen unix:path [default_server] [ssl] [http2 | spdy] [proxy_protocol] [backlog=number] [rcvbuf=size] [sndbuf=size] [accept_filter=filter] [deferred] [bind] [so_keepalive=on|off|[keepidle]:[keepintvl]:[keepcnt]];
Default:	listen *:80 | *:8000;
Context:	server
default_server  设定为默认虚拟主机,无法匹配虚拟主机时使用
ssl             限制仅能够通过ssl连接提供服务
backlog=number  超过并发连接数后,新请求进入后援队列的长度
rcvbuf=size     接收缓冲区大小
sndbuf=size     发送缓冲区大小
示例:
listen PORT;           # 监听本机所有的IPV4和IPV6的 PORT 端口,等于listen *:PORT
listen IP:PORT;        # 监听指定IP的 PORT 端口
listen Unix:/www/file  # 监听unix socket
Nginx保持连接
ngx_http_core_module模块
keepalive_disable禁用行为异常的浏览器的保持活动的连接。browser参数指定影响哪些浏览器。
msie6禁用与旧版本MSIE的保持活动的连接。safari禁用macOS和类似macOS的操作系统上的Safari和类似Safari的浏览器保持活动的连接。none启用与所有浏览器的保持活动的连接。
Syntax:	    keepalive_disable none | browser ...;
Default:	keepalive_disable msie6;
Context:	http, server, location
keepalive_requests设置一个保持活动的连接服务允许的最大请求数。发出最大数量的请求后,将关闭连接。
要释放每个连接的内存分配,必须定期关闭连接。因此,设置过多的最大请求数可能会导致使用过多的内存,不建议配置过大。
Syntax: 	keepalive_requests number;
Default:	keepalive_requests 100;
Context:	http, server, location
keepalive_timeout设置保持活动的连接的超时时间。
用户和服务器建立连接后,客户端分配到的keep-alive链接的超时时间,服务器将在这个超时时间过后关闭链接。
timeout是保持活动的连接的超时时间,在此期间,保持活动的客户端连接将在服务器端保持打开状态。设置为0,将禁用保持活动状态的客户端连接。浏览器收到的返回报文Connection:close。
header_timeout是显示在“ Keep-Alive:timeout = time”响应头字段中的值。两个参数可能不同。
Syntax: 	keepalive_timeout timeout [header_timeout];
Default:	keepalive_timeout 75s;
Context:	http, server, location
示例:
keepalive_timeout 60 60;
send_timeout设置将响应报文传输到客户端的超时时间。超时仅在两个连续的写操作之间设置,而不用于整个响应的传输。如果客户端在此时间内未收到任何信息,则连接将关闭。
Syntax: 	send_timeout time;
Default:	send_timeout 60s;
Context:	http, server, location
启用或禁用sendfile 选项,是否允许以sendfile方式传输文件。开启sendfile时,合并响应头和数据体在一个包中一起发送。
通常下载请求,是由后端程序负责把源文件打包加密生成目标文件,然后程序读取目标文件返回给浏览器。这种做法的缺陷就是占用大量后端程序资源,如果遇到一些访客下载速度巨慢,就会造成大量资源被长期占用得不到释放(如后端程序占用的CPU/内存/进程等),很快后端程序就会因为没有资源可用而无法正常提供服务,也就是nginx报502错误。sendfile方式配合location可以实现由nginx直接提供静态资源服务,以此提升服务器性能。
Syntax:	    sendfile on | off;
Default:    sendfile off;
Context:	http, server, location, if in location
sendfile_max_chunk设置Nginx工作进程每次调用sendfile()可以传输的数据量最大数据量。默认为0表示无限制,如果没有限制,一个快速连接可能会占用整个工作进程。
Syntax:	    sendfile_max_chunk size;
Default:	sendfile_max_chunk 0;
Context:	http, server, location
示例:
sendfile_max_chunk 512k;
启用或禁用TCP_NODELAY选项,也就是Nagle算法(Nagle algorithm)。当连接转换为保持活动状态时,将启用该选项。此外,它在SSL连接,无缓冲代理和WebSocket代理上启用。
- on,不进行延迟发送,多个包才确认一次。推荐使用。
- off,延迟发送,每发送一个包就需要确认ACK,才发送下一个包。
Syntax:	    tcp_nodelay on | off;
Default:    tcp_nodelay on;
Context:	http, server, location
启用或禁用TCP_NOPUSH,FreeBSD上的TCP_CORKsocket选项或Linux上的socket选项。仅在使用sendfile时启用。启用该选项可以
- 以一个包的形式发送响应头和文件的开头。
- 以完整的数据包发送文件。
Syntax:	    tcp_nopush on | off;
Default:    tcp_nopush off;
Context:	http, server, location
TCP_CORK和TCP_NODELAY是互相排斥的
选项
TCP_NODELAY启用是禁用Nagle算法,即数据包立即发送出去,可以降低网络里ACK的数量,从而提升网络性能。如果是交互性的业务,那应该让任意小包可以快速传输,关闭Nagle算法,提高包的传输效率。选项
TCP_CORK与此相反,可以认为它是Nagle算法的进一步增强,即阻塞数据包发送,可以降低网络里小包的数量,从而提升网络性能。如果需要提供网络的传输效率,应该减少小包的传输,使用TCP_CORK来做汇总传输,再利用sendfile来提高效率。
client_header_buffer_size设置用于读取客户端请求头的缓冲区大小。对于大多数请求,一个1K字节的缓冲区就足够了。但是,如果请求中包含长Cookie或来自WAP客户端,则该请求可能不适合1K。如果请求行或请求标头字段不适合此缓冲区,则将有由large_client_header_buffers指令配置的较大缓冲区 。
Syntax: 	client_header_buffer_size size;
Default:	client_header_buffer_size 1k;
Context:	http, server
client_header_timeout定义读取客户端请求标头的超时。如果客户端在此时间内未传输整个标头,则请求将以408(请求超时)错误终止。
Syntax: 	client_header_timeout time;
Default:	client_header_timeout 60s;
Context:	http, server
Nginx服务名称
ngx_http_core_module模块
Syntax: 	server_names_hash_bucket_size size;
Default:	server_names_hash_bucket_size 32|64|128;
Context:	http
设置服务器名称哈希表的存储桶大小。
Syntax: 	server_names_hash_max_size size;
Default:	server_names_hash_max_size 512;
Context:	http
设置服务器名称哈希表的最大值。
解决:配置 server 虚拟主机过多时,可能有报错
$ nginx -t
could not build the server_names_hash, you should increase server_names_hash_bucket_size: 32
2020/09/20 13:54:27 [emerg] 11372#0: the configuration file /opt/nginx/conf/nginx.conf test failed
Nginx路径匹配
try_file路径匹配,Nginx会按顺序检查文件及目录是否存在(根据 root 和 alias 指令设置的参数构造完整的文件路径),并用找到的第一个文件提供服务。在元素名后面添加斜杠 / 表示这个是目录。如果文件和目录都不存在,Nginx会执行内部重定向,跳转到命令的最后一个 uri 参数定义的 URI 中。
ngx_http_core_module模块
Syntax: 	try_files file ... uri;
            try_files file ... =code;
Default:	—
Context:	server, location
按指定顺序检查文件是否存在,并使用找到的第一个文件进行请求处理;该处理在当前上下文中执行。文件的路径是file根据root和alias参数构造的 。可在名称末尾指定斜杠来检查目录是否存在,例如“ $uri/”。如果未找到任何文件,则进行内部重定向到uri最后一个参数中指定的文件或一个命名的位置code。
例如:
location /images/ {
    try_files $uri /images/default.gif;
    # try_files $uri $uri/index.html $uri.html =404;
}

location = /images/default.gif {
    expires 30s;
}
- 代理Mongrel示例:
location / {
    try_files /system/maintenance.html
              $uri $uri/index.html $uri.html
              @mongrel;
}

location @mongrel {
    proxy_pass http://mongrel;
}
- Drupal / FastCGI示例:
location / {
    try_files $uri $uri/ @drupal;
}

location ~ .php$ {
    try_files $uri @drupal;

    fastcgi_pass ...;

    fastcgi_param SCRIPT_FILENAME /path/to$fastcgi_script_name;
    fastcgi_param SCRIPT_NAME     $fastcgi_script_name;
    fastcgi_param QUERY_STRING    $args;

    ... other fastcgi_param's
}

location @drupal {
    fastcgi_pass ...;

    fastcgi_param SCRIPT_FILENAME /path/to/index.php;
    fastcgi_param SCRIPT_NAME     /index.php;
    fastcgi_param QUERY_STRING    q=$uri&$args;

    ... other fastcgi_param's
}
try_files只使用两个参数时等效于error_page,如以下示例
location / {
    try_files $uri $uri/ @drupal;
}

location / {
    error_page 404 = @drupal;
    log_not_found off;
}

location ~ .php$ {
    try_files $uri @drupal;

    fastcgi_pass ...;
    fastcgi_param SCRIPT_FILENAME /path/to$fastcgi_script_name;
    ...
}
try_files在将请求传递给FastCGI服务器之前检查PHP文件的存在。
Wordpress和Joomla的示例:
location / {
    try_files $uri $uri/ @wordpress;
}

location ~ .php$ {
    try_files $uri @wordpress;

    fastcgi_pass ...;

    fastcgi_param SCRIPT_FILENAME /path/to$fastcgi_script_name;
    ... other fastcgi_param's
}

location @wordpress {
    fastcgi_pass ...;

    fastcgi_param SCRIPT_FILENAME /path/to/index.php;
    ... other fastcgi_param's
}
测试一:
web01配置
[root@web01 ~]# vim /etc/nginx/conf.d/try_file.conf
server {
    listen 80;
    server_name try.oldboy.com;

    location / {
        root /code/try;
        try_files $uri /404.html;
        #try_files $uri $uri/ /404.html;
    }
}
创建站点页面,添加host解析
[root@web01 ~]# mkdir /code/try
[root@web01 ~]# echo try_file_index.html > index.html
[root@web01 ~]# echo '404' > 404.html
[root@web01 ~]# echo 10.0.0.7 try.oldboy.com >> /etc/hosts
访问测试
- 访问 try.oldboy.com ,结果返回的是404.html
由于请求的是域名,后面没有URI,所以$uri匹配为空,匹配不到内容则返回404
[root@web01 ~]# curl try.oldboy.com
i am tomcat
- 访问 try.oldboy.com/index.html,返回的结果是index.html
请求的域名后面URI是/index.html ,所以$uri匹配到 /index.html,返回 try_file_index.html
[root@web01 ~]# curl try.oldboy.com/index.html
try_file_index.html
-
修改nginx配置,使用#try_files $uri $uri/ /404.html;,再测试
访问 try.oldboy.com,请求的是域名,后面没有URI,所以$uri匹配为空
然后 $uri/ 匹配到了 '空'/,相当于请求站点目录,默认返回站点目录下的index.html
如果仍然匹配不到内容则返回/404.html
[root@web01 ~]# curl try.oldboy.com/index.html
try_file_index.html
测试二:
前端nginx配置
[root@web01 ~]# vim /etc/nginx/conf.d/try_file.conf
server {
    listen 80;
    server_name try.oldboy.com;
    root /code;
    index index.html;

    location / {
        try_files $uri $uri/ @java;  # 当$uri和$uri/都匹配不到时,由后端的java来进行处理,名字可自定义,但一定要加@
    }

    location @java {
        proxy_pass http://172.16.1.8:8080; # 配置后端tomcat
	}
}
后端tomcat配置
[root@web02 ~]# echo 'i am tomcat' > /usr/share/tomcat/webapps/ROOT/index.html
[root@web02 ~]# systemctl start tomcat
挪走文件
[root@web01 ~]# mv /code/index.html /tmp/
测试访问
[root@web01 ~]# curl http://try.oldboy.com/index.html
i am tomcat
Nginx字符转换
ngx_http_charset_module模块将指定的字符集添加到“ Content-Type”响应头字段。此外,该模块可以将数据从一种字符集转换为另一种字符集,但有一些限制:
- 转换只有从服务器到客户端一种方式,
- 只能转换单字节字符集
- 或与UTF-8之间的单字节字符集。
charset是否将指定的字符集添加到“ Content-Type”响应头字段。如果此字符集与source_charset指令中指定的字符集不同,则会执行转换。
Syntax:	    charset charset | off;
Default:	charset off;
Context:	http, server, location, if in location
source_charset定义响应的源字符集。如果此字符集与charset指令中指定的字符集不同,则执行转换。
Syntax:	    source_charset charset;
Default:	-
Context:	http, server, location, if in location