前情提要:校花网爬取,并进行数据持久化
数据持久化操作
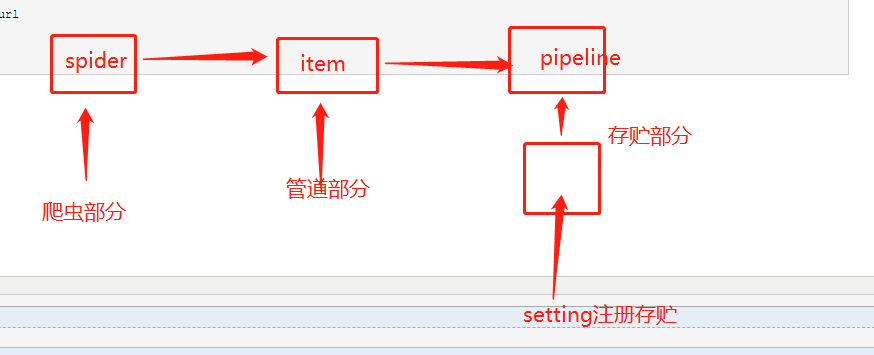
--编码流程:
1:数据解析
2:封装item 类
3: 将解析的数据存储到实例化好的item 对象中
4:提交item
5:管道接收item然后对item进行io操作
6:开启管道
-- 主意事项:
-将同一份数据存储到不同平台中:
-: 管道文件中一个管道类负责将item存储到某一个平台中
-: 配置文件中设定管道类的优先级
-:process_item方法中return item 的操作将item 传递给下一个即将被执行的管道类
全站数据爬取:
- 手动请求的发送
-: 设定一个通用的url模板
-: 手动请求的操作写在哪里: parse 方法:
-: yield scrapy.Request(url,callback)
POST请求
- strat_requests(self)
- post 请求手动的发送:yield scrapy.FormRequest(url,callback,formdata)
- cookies_Ennalle =False
日志等级和请求传参
- LOG_LEVEL ='ERROR'
- LOG_FILE ='path'
请求传参的应用场景:
-爬取且解析的数据没有在同一个页面上(如列表页,详情页)
-在请求方法中使用meta(字典)参数,该字典会传递给回调函数
-回调函数接收meta :response.meta['key']
步骤:
一: 创建项目
scrapy startproject xiaohua
二: 进入目录后创建爬虫
scrapy genspider xiaohuademo
三: 开始操作
1: 前提准备:
首先注释掉域名限制,防止不必要的错误:

2: 关闭setting里面的ROBOTSTXT_OBEY ,更改UA头

不遵守机器人协议
3: 书写spider 爬虫
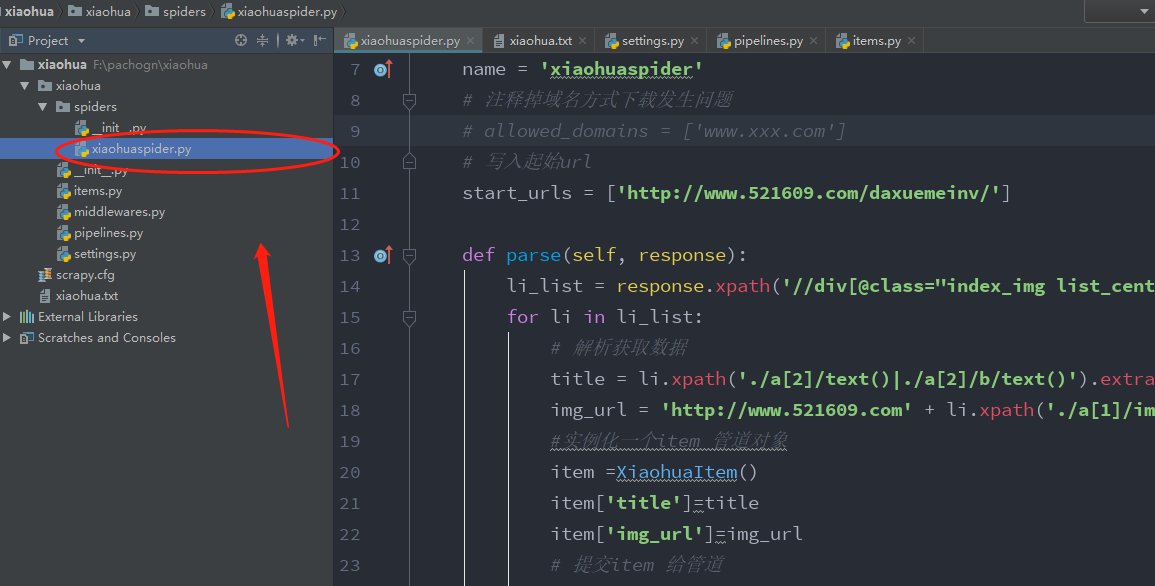
4:代码:
爬虫部分代码
# -*- coding: utf-8 -*-
import scrapy
from xiaohua.items import XiaohuaItem


class XiaohuaspiderSpider(scrapy.Spider):
    name = 'xiaohuaspider'
    # 注释掉域名方式下载发生问题
    # allowed_domains = ['www.xxx.com']
    # 写入起始url
    start_urls = ['http://www.521609.com/daxuemeinv/']

    def parse(self, response):
        li_list = response.xpath('//div[@class="index_img list_center"]/ul/li')
        for li in li_list:
            # 解析获取数据
            title = li.xpath('./a[2]/text()|./a[2]/b/text()').extract_first()
            img_url = 'http://www.521609.com' + li.xpath('./a[1]/img/@src').extract_first()
            #实例化一个item 管道对象
            item =XiaohuaItem()
            item['title']=title
            item['img_url']=img_url
            # 提交item 给管道
            yield item
item 部分代码 (该部分用来定义接收数据名)----->需要在spider 中实例对象
# -*- coding: utf-8 -*-

# Define here the models for your scraped items
#
# See documentation in:
# https://doc.scrapy.org/en/latest/topics/items.html

import scrapy


class XiaohuaItem(scrapy.Item):
    # define the fields for your item here like:
    title = scrapy.Field()
    img_url =scrapy.Field()
pipelines 代码
# -*- coding: utf-8 -*-

# Define your item pipelines here
#
# Don't forget to add your pipeline to the ITEM_PIPELINES setting
# See: https://doc.scrapy.org/en/latest/topics/item-pipeline.html

# 利用管道,将数据通过管道解析到某一平台(数据库)
# 从写方法进行封装到本地内存
import pymysql
class XiaohuaPipeline(object):
    fp = None

    # 从写open_spider 方法

    def open_spider(self, spider):
        print('开启爬虫')
        self.fp = open('./xiaohua.txt', 'w', encoding='utf-8')

    # 作用:实现持久化存储的操作
    # 从写open_spider可以降低 open的操作. 降低io 开启关闭减少内存
    # 该方法接收item 的数据
    # 只会被调用一次

    def process_item(self, item, spider):
        #获取解析内容
        title = item['title']
        img_url = item['img_url']
        # 将的内容写入文件
        self.fp.write(title+':'+img_url+'
')
        # 这里的return item 是方便其他管道内容调用
        return item
    def close_spider(self,spider):
        print('爬虫结束')
        self.fp.close()


class MySqlPipeline(object):
    conn =None #  创建连接数据库表示
    cursor =None #创建事务标识回滚标识
    def open_spider(self,spider):
        self.conn =pymysql.Connect(host='127.0.0.1',port=3306,user='root',password='',db='xiaohua')
        print(self.conn)
        print('开始存入数据库')
    def process_item(self,item,spider):
        self.cursor=self.conn.cursor()   #   创建回滚点
        try:
            self.cursor.execute('insert into demo1 value ("%s","%s")' %(item['title'],item['img_url']))
            self.conn.commit() # 提交事务
        except Exception as e:
            print(e)
            self.conn.rollback()   # 如果出现异常回滚事务
        return item
    def close_spider(self,spider):
        self.cursor.close()  #关闭事务
        self.conn.close() # 关闭连接
        print('数据库入完成')
setting 代码:
# -*- coding: utf-8 -*-

# Scrapy settings for xiaohua project
#
# For simplicity, this file contains only settings considered important or
# commonly used. You can find more settings consulting the documentation:
#
#     https://doc.scrapy.org/en/latest/topics/settings.html
#     https://doc.scrapy.org/en/latest/topics/downloader-middleware.html
#     https://doc.scrapy.org/en/latest/topics/spider-middleware.html

BOT_NAME = 'xiaohua'

SPIDER_MODULES = ['xiaohua.spiders']
NEWSPIDER_MODULE = 'xiaohua.spiders'


# Crawl responsibly by identifying yourself (and your website) on the user-agent
USER_AGENT = 'Mozilla/5.0 (Windows NT 10.0; WOW64) AppleWebKit/537.36 (KHTML, like Gecko) Chrome/69.0.3497.100 Safari/537.36'

# Obey robots.txt rules
ROBOTSTXT_OBEY = False

# Configure maximum concurrent requests performed by Scrapy (default: 16)
#CONCURRENT_REQUESTS = 32

# Configure a delay for requests for the same website (default: 0)
# See https://doc.scrapy.org/en/latest/topics/settings.html#download-delay
# See also autothrottle settings and docs
#DOWNLOAD_DELAY = 3
# The download delay setting will honor only one of:
#CONCURRENT_REQUESTS_PER_DOMAIN = 16
#CONCURRENT_REQUESTS_PER_IP = 16

# Disable cookies (enabled by default)
#COOKIES_ENABLED = False

# Disable Telnet Console (enabled by default)
#TELNETCONSOLE_ENABLED = False

# Override the default request headers:
#DEFAULT_REQUEST_HEADERS = {
#   'Accept': 'text/html,application/xhtml+xml,application/xml;q=0.9,*/*;q=0.8',
#   'Accept-Language': 'en',
#}

# Enable or disable spider middlewares
# See https://doc.scrapy.org/en/latest/topics/spider-middleware.html
#SPIDER_MIDDLEWARES = {
#    'xiaohua.middlewares.XiaohuaSpiderMiddleware': 543,
#}

# Enable or disable downloader middlewares
# See https://doc.scrapy.org/en/latest/topics/downloader-middleware.html
#DOWNLOADER_MIDDLEWARES = {
#    'xiaohua.middlewares.XiaohuaDownloaderMiddleware': 543,
#}

# Enable or disable extensions
# See https://doc.scrapy.org/en/latest/topics/extensions.html
#EXTENSIONS = {
#    'scrapy.extensions.telnet.TelnetConsole': None,
#}

# Configure item pipelines
# See https://doc.scrapy.org/en/latest/topics/item-pipeline.html
# 开启管道 ,开启管道才能进行数据存储
ITEM_PIPELINES = {
   'xiaohua.pipelines.XiaohuaPipeline': 300,
   'xiaohua.pipelines.MySqlPipeline': 301,
}

# Enable and configure the AutoThrottle extension (disabled by default)
# See https://doc.scrapy.org/en/latest/topics/autothrottle.html
#AUTOTHROTTLE_ENABLED = True
# The initial download delay
#AUTOTHROTTLE_START_DELAY = 5
# The maximum download delay to be set in case of high latencies
#AUTOTHROTTLE_MAX_DELAY = 60
# The average number of requests Scrapy should be sending in parallel to
# each remote server
#AUTOTHROTTLE_TARGET_CONCURRENCY = 1.0
# Enable showing throttling stats for every response received:
#AUTOTHROTTLE_DEBUG = False

# Enable and configure HTTP caching (disabled by default)
# See https://doc.scrapy.org/en/latest/topics/downloader-middleware.html#httpcache-middleware-settings
#HTTPCACHE_ENABLED = True
#HTTPCACHE_EXPIRATION_SECS = 0
#HTTPCACHE_DIR = 'httpcache'
#HTTPCACHE_IGNORE_HTTP_CODES = []
#HTTPCACHE_STORAGE = 'scrapy.extensions.httpcache.FilesystemCacheStorage'
5: 代码解析